Red stain. Choosing a shade for applying on a wooden coating: wood stain - colors and combinations
The tree will always be popular, because it is beautiful and environmentally friendly. clean material... However, like all natural decorative elements, boards are afraid of moisture and are a favorite habitat for insects, fungi, mold and other microorganisms. To increase the service life of things made from wood species, various protective agents and antiseptics are used. Today we will talk about such a wonderful substance as wood stain, with its help you can not only solve some problems associated with premature damage to wooden materials, but also give your products an unusual and noble appearance.
Wood is a strong and durable material that is subject to the influence of adverse environmental factors, therefore, in order to protect products from it from possible damage, it is necessary to process them. special means... On construction market You can find a huge number of different antiseptics, varnishes and other impregnations that change the color and some properties of wood, the most popular and inexpensive product is wood stain. Some people think that stains are used only to change the color of an object, but this wonderful preparation has other properties as well.

The properties of wood stains can vary depending on their composition. However, even if you do this with your own hands, it will still have some protective properties.
Properties of wood stains:
- If you want to change not only the color of the wood, but also to highlight its texture, then the stain is just what you need. It does not completely paint over the drawing, like paint, but gives the whole product a pleasant shade.
- Staining wood will protect furniture from insects and decay, while maintaining the texture and grain of the wood.
- Stain is protective agent, which increases the durability of wooden objects and costs several times cheaper than varnish and paint. In addition, due to its watery consistency, it penetrates deeper into the wood structure.
- With the help of a stain, you can make it so that even an inexpensive pine, painted with a colored stain, will look like a noble and strong oak and exotic mahogany.
- Stain tinting can lighten wood. This technique is especially often used before painting. wooden products.
- Impregnation with wood stain will strengthen the structure of the tree and give it a light moisture-proof property.
Not all stains have the above qualities. To understand what kind of stain you need, you need to read its composition, and see what the instructions for use say. By the way, you can handle not only whole wooden planks, but also chipboard, plywood or parquet items and other wooden crafts.
Water-based wood stain and alcohol stains
Water-based stains are the most sustainable stains. They do not have a sharp unpleasant odor and easy to use.
Such a product can be sold as dry, or already ready mix... Such dyes are most popular due to their low price and the possibility of their use, both for indoor and outdoor work.

Main characteristics of water stain:
- The colors of water-based stains are very varied. With their help, you can create a very interesting iridescent effect.
- You can use water stains without fear for your health. Even with the most high temperatures, such products do not emit harmful vapors.
- If you decide to experiment and ask the question: "What kind of stain to choose so that it can be washed off?" - then the water stain is what you need. Such a tinting agent can be easily washed off with water, therefore it is impossible to paint the floor with it.
- Tinting a wooden surface with such a tool makes its texture more visible. Unfortunately, this makes the product more sensitive to moisture, so it will need to be varnished.
It is highly undesirable to tint resinous tree species with such impregnation, as ugly stains can appear on them. For such products, it is better to use alcohol impregnation.
How long does alcohol impregnation dry? Almost a few seconds! This property is both an advantage and a disadvantage. Thanks to it, you can cover the stock of a sporting rifle with alcohol stain, and use it in a few minutes, however large area you can only stain with a spray gun, otherwise the surface of the product will be covered with unpleasant stains and stains, even varnish will not help fix the situation. Consists of alcohol impregnation of alcohol and dyes.
Treatment of wood with such an impregnation will make it more resistant to ultraviolet radiation and high humidity... However, due to the unpleasant smell of such a product, work with it is possible only in an open space.
Benefits of oil-based stains and wax and acrylic stains
Stain on oil based has a wide range of colors and shades. It costs more than water stains, but also useful properties she has more. Such a preparation can be used not only to change the color of the product, but also to emphasize its texture.
It is easy and convenient to treat wood with an oil-based stain, it is applied in a thin layer and does not raise the fibers of the product. Also, this tinting does not fade under the influence sun rays, makes the tree resistant to temperature extremes and protects it from moisture. You can remove oil stain stains with White Spirit thinner, or you can lighten painted wood a little with it. It differs from compositions with similar properties in that no varnish is needed to fix it. The disadvantages of oil staining include: long drying of the tinting and its toxicity.

It is very important to find the stain of a responsible and conscientious manufacturer. Judging by the reviews, the most popular firms are Vartan, Latek, Novbytkhim and Herlak.
Acrylic and wax stains are very easy to apply, they lay in a uniform layer and do not leave stains or streaks. However, due to the rapid drying of such stains, you need to work with them very quickly.
Wax stain is used to protect wood from moisture. It can be used to process parquet. This stain is not resistant to mechanical damage, therefore, to extend its service life, it is better to use varnish.
Acrylic, it is also rustic, the stain perfectly emphasizes the texture of the wood. With its help, you can get the most different shades which is why this drug is so popular. A tree painted with such a stain will still need to be opened with several layers of varnish.
Wood stain colors
Wood stains differ not only in composition, they come in different colors and shades. Most often, a dark mixture is used, it gives the products a more noble look. With the help of these wood stains, ordinary larch and maple can be turned into oak planks.
Modern stains can give wood the most unusual shade. However, to this day, the most popular is the range of natural wood flowers.

The most popular color range of wood stains:
- Pine;
- Birch;
- Bleached walnut;
- Plum; Red tree;
- Olive;
- Rosewood;
There are a lot of such examples. At the same time, it is noteworthy that the names of the same shade from different companies can be very different. When choosing a stain color, first of all, do not pay attention to color palette, which is printed on the packaging, and the samples are printed on birch boards.
It is also important to consider that the intensity of the stain color depends on the type of wood to which it is applied. Darkening a piece if the wood is light can be more difficult than darkening an oak piece. Not water stain can't paint well enough pine board, if it is not first demineralized, but water-based stains are generally unsuitable for resinous tree species.
White wood stain
You don't have to paint to make your furniture white. For such work will do and a lightening stain, which will not only lighten the product, but also accentuate its structure.
Wood stain is designed not only to give the product a lighter shade, but also to protect it from the adverse conditions of the surrounding world. It is very important to consider when considering different types of such a product, how and on what you will apply it. If there is a risk that moisture will spill onto the surface of the bleached object, then it is best to use wax, oil and acrylic preparations, but if your craft will be in a dry and ventilated place, then a water stain will do.

With the help of white stain, you can achieve very interesting effect and make an aged finish. It must first be painted with wood stain. white water-based, after it dries, the item must be brushed with a stiff brush. A dark colored wax or oil stain is rubbed into the pores formed on the wood.
When using water stain, do not forget about the protective layer. The dyed product must be treated with wax or oil.
Light stains do not always have a pronounced color. There is a colorless stain, which is applied exclusively to protect the tree from adverse natural factors.
How to make a stain with your own hands
It is not necessary to buy a ready-made stain. By mixing dyes such as coffee, a few drops of iodine or shavings of black bark, and some chemical elements, it can be done at home. Homemade stain is not only effective, it is also natural.
- Boil a glass of larch bark in a glass of water. The resulting product can be used to cover birch products, it will give them a beautiful reddish tint.
- Grind dried walnut shells into powder and boil for ten minutes. The resulting broth must be mixed with soda. Cover the light wood with the solution and it will take on a brown tint. If you want to change the color of the product, you can treat it with vinegar or potassium dichromate. In the first case, the shade will be gray, and in the second, red.
- With custard tea or coffee, you can give the wood different shades. The intensity of the colors depends on the strength of the brew.
- With a solution of potassium permanganate, you will paint the product in cherry color.
- A red hue can be achieved by soaking rusty nails in vinegar for several days. Black stain is obtained by adding a decoction of oak or walnut leaves to a vinegar solution.

Stains are made on their own quite often. They turn out to be environmentally friendly and harmless. Unfortunately, they all tend to fade, so to preserve the color of the product, a layer of varnish must be applied over the stain.
Wood staining with wood stain: step by step instructions
To make the product look neat and beautiful, you need to cover it with stain correctly. If the stain is applied poorly, it can fade in a few weeks, and if you do not follow the staining technology, you risk getting the surface covered with stains.
How to properly stain objects:
- First of all, it is necessary to remove the layer from the surface of the product. old paint... This can be done using sandpaper.
- Further, the surface is degreased with alcohol, White spirit or gasoline. If the product is made of resinous tree species, then it is de-resinous.
- The stain is heated and applied in a thin layer to the surface of the product. The top of the item is processed first. Layers are applied on top, one on top of the other, until the desired shade is achieved.
After the stain has dried, the product must be covered with several layers of varnish. Before applying a new layer, the dried varnish is treated with fine-grained sandpaper.
Wood stain (video)
Stain is great way to replace one wood color with another. Such funds are different types, they may have various compositions and colors. Use the stain correctly and you'll be rewarded with a beautiful piece.
Mahogany or oak parquet flooring is not affordable for everyone. But this is not a reason to deny yourself the contemplation of noble shades. It does not matter what your parquet is made of - tinting will help it "repaint" into the most expensive wood species. For this, there are special tinting compounds - stains, with which the wood can be given any color. As a rule, this is the color of the more expensive, elite breed. What tinting liquids are called stains? By what characteristics are they chosen and how are they applied to a wooden surface? Read about all this below.
What is wood stain and why is it needed?
Stain is a tinting liquid that is used to give wood an uncharacteristic shade. Penetrating into the structure of the wood, the stain stains it without forming a film on the surface. In other words, the texture of the wood remains visible, only its color changes. Thereby pine floor you can give a visual resemblance to a nut or oak parquet... Naturally, this similarity will only be superficial! The rest of the characteristics of the breed (resistance to decay, hardness, strength) will remain unchanged.
Types of wood stains: choosing the right composition
Modern stains-impregnations can be completely different in composition. Depending on the "content", they are divided into:
- aquatic;
- alcohol;
- oil;
- nitro-stains.
Let's take a closer look at each option.
1. Water stains - the most common ones, they allow you to paint wood in any color: from the lightest "pine" shade to dark mahogany. These stains are sold in two forms: liquid and dry. Liquid water stains are ready to use immediately, while dry powders require preliminary dilution warm water.
Water stains are practically odorless and this is a huge plus if you need to stain wood indoors. But they dry for a long time - about 12-14 hours. In addition, water-based stains have the ability to raise the pile of wood during the dyeing process, which leads to the need for subsequent sanding.
Among the water stains, acrylic stains made on the basis of acrylic resins stand out as a separate group. They are resistant to fading and do not wash out with water, they raise wood fibers less. Their disadvantage is the high price.
2. Alcohol stains are solutions of various aniline dyes in alcohol (denatured alcohol). After applying the stain, the coloring pigments quickly penetrate the wood texture, and the alcohol evaporates. The alcohol stain dries completely in 15-30 minutes. Therefore, it must be applied quickly to avoid stains and erosion. Uniform staining with alcohol stain is obtained by spraying it from a spray gun.
3. Nitro-stains - solvent-based stains. In their specificity, they are similar to alcohol stains. Requires quick application, preferably with a spray gun.
4. Oil stains - solutions of dyes in oil (most often - linseed). They are evenly applied and easy to apply, do not pick up fibers. The coloring pigments of oil stains have high lightfastness, therefore the surfaces painted by them long years do not change their brightness and retain their original appearance.
When applying oil stain, you can use a spray gun, a wide brush, or a rag. Drying of oil stains usually takes 2-4 hours.
Which color should you choose?
Each stain color is international classification has its own code. And the name corresponding to the type of wood, the color of which imitates the stain. For example, Mahogany, Oak or Plum stain. But it is unreasonable to choose impregnation only by name or picture on the label. You can get unpredictable results. There are reasons for this:
- The colors of the wood stains of the same cipher, but of different manufacturers, can differ significantly in shades. For example, water stain “Larch” produced by “Tsaritsyn paints” has a pinkish-brown color, and the same “Larch” from “Novbytkhim” differs in a pale yellow tint. Many stores display sample dies painted with different stains. Samples will more accurately convey real color stain than the picture on the label.
- The type of painted wood is significantly influenced by its characteristics - natural color, density, structure. For example, mahogany wood stain will appear darker than maple wood stain (assuming the same color stain is used). This is due to the fact that mahogany wood itself is a darker shade.
The same experiment with samples from maple and pine will show that pine wood is colored more intensely and faster. Pine is softer and more porous, while maple is denser and harder. Therefore, it is easier for coloring pigments to penetrate pine wood.
The degree of staining also depends on the texture of the wood. Oak with a pronounced texture quickly darkens from the stain due to the fact that the coloring pigments penetrate into the depressions of the veins. The main part of oak wood (outside the veins) is colored less quickly and intensely.

What is the best way to apply the stain?
To apply stains, you can use: a spray gun (with a nozzle size of no more than 1.5 mm), a wide brush (100 mm wide), a foam swab, a rag. If you have to process a large area, then you should definitely prefer a spray gun. It is also used when using nitromorilacs and alcohol stains. They dry too quickly and often stains on wood when applied with brushes or swabs.
Water and oil stains work well with brushes, swabs and rags. Natural bristle brushes are more suitable for oil stains, synthetic bristles are more suitable for water-soluble stains. The bristles should be strong, leaving no hairs behind.
Cloths and tampons used for stains, you can use cotton, foam. They should also not "scatter" with pile and threads, which can remain on the already painted surface and reduce the quality of the coating.

Preparatory stage: making a color sample
After buying the stain, but before starting the direct staining, it is advisable to make a color test (test color). It is necessary to understand whether a given stain is suitable for a specific surface, to identify the final color and to determine the number of layers of paint required.
For the manufacture of a color test, a plank is used, processed (polished, sanded) in the same way as the wooden surface to be painted. Naturally, the type of wood of the sample plate should also coincide with the main surface.
The board is covered with a single layer of stain. After drying, a second coat is applied to 2/3 of the sample. The third layer stains another 1/3. The dried wood stain is covered with two layers of varnish. Comparing the color intensity of each part of the sample, choose the number of layers that is most suitable for a particular surface.
To choose the most the best option often do several test colors. For this, several boards are covered with different stains. Then they make a choice.
Surface treatment before work
Before applying the stain, wood flooring need to prepare. They do it in stages:
1. Remove the old coating (if any). For this, the boards are scraped and sanded. In addition to removing the old coating, these procedures will even out the floor surface.
2. Clean the surface of grease and oil stains by wiping problem areas with a cloth soaked in white spirit or gasoline.
3. Conifers, before applying the stain, it is advisable to degum. That is, remove the resin from the wood structure, which can interfere with the absorption of the stain. Resin solutions are prepared according to the following "recipes":
- In 1 liter of water heated to 60˚C, 50 g of potassium carbonate and 60 g soda ash.
- In 1 L warm water(soft) dissolve 50 g of caustic soda. The resulting 5% soda solution is used to treat the surface.
- Mix 750 ml of distilled water with 250 g of acetone.
Any of these solutions are applied generously to the boards, preferably in several layers. After half an hour, wipe the surface with a cotton cloth and rinse with warm water.
Step-by-step staining technology
Despite multiple preparatory stages, the direct process of applying the stain is not complicated at all. Perform it according to the following scheme:
1. The stain is slightly warmed up to enhance the penetration rate into the wood.
2. A swab, rag or brush is moistened with stain. Strong moistening should not be allowed, otherwise the occurrence of streaks and uneven coloring is inevitable. When using a spray bottle, pour the stain into the reservoir.
3. Apply the stain along the wood grain. Try to work quickly, without interruption, to avoid stains. When streaks form, wipe the surface with a soft cloth, "pulling" excess liquid along the fibers. Leave the stain to dry completely.
4. Similarly, several more layers are applied to obtain the desired shade (usually 2-3 layers).
5. Finally, the stained surface is varnished in several layers with sanding of each intermediate layer with fine-grained sanding paper.

Video example of working with a solid board
To understand the technology of staining with stains, it is enough to see this process once. We suggest that you familiarize yourself with the video, where the staining method is presented. solid board by rubbing in the stain.
At the dacha and in a private house, wood is actively used: floors, windows, doors, furniture, gazebos and decor elements. And no matter how beautiful the tree is in its natural form, under the influence of time and external factors, it quickly loses its attractiveness and consumer qualities: under the influence of the sun it dims and turns gray; moisture can deform; when bacteria multiply - rot. Therefore, if you want to preserve the structure and dignified appearance of wooden products for a long time, then they should be treated with wood stain.
Stain (also called "stain") is a special liquid composition for giving the wood the desired color (toning). Usually these are colors that imitate noble wood species. But multicolored toning is also possible in accordance with the designer's idea.
The main difference between stains and paints and enamels is that the tinting impregnation elements penetrate deep into the wood and paint it from the inside, while retaining the visible texture and grain pattern. However, an opaque film does not form on the surface of the part, as is the case with paint treatment.
In addition to the aesthetic function of giving the tree a noble and attractive appearance, the stain also performs a number of practical tasks:
- protection of wood from moisture;
- protection against the destructive effects of ultraviolet radiation;
- prevention of the growth of bacteria that destroy the tree.
As a result of using wood stain, the service life of wooden parts can be extended several times.
Types of stains by composition

Manufacturers produce wood stains that differ in their base. Choose the composition suitable for your case, based on what result and in what time frame you need to get. Each lineup has its own pros and cons.
Water-based stain. In specialized stores, you can buy such a stain in the form of a ready-to-use liquid or powder, which you will need to dissolve in warm water before processing the wood. The final color intensity of the coating will depend on the ratio of the amount of powder and water. Before application, the water stain must be filtered so that undissolved particles of the dye do not get onto the wood.
A big plus of water-based impregnation is the absence of a pungent odor. This makes it suitable for indoor use. The water-based tinting liquid perfectly emphasizes the natural grain of the wood: it highlights some fibers and hides others. For complete drying, the composition will take 12-14 hours. But as for the disadvantages of water stain - it tends to lift wood fibers, because of this, the tree after drying turns out to be rough and less protected from moisture. To cope with the problem you need:
- or to sand the already treated surface after the composition has dried;
- or moisten the surface with plain water, let the water soak in, when the fibers rise, sand the wood, and only then cover it with stain.
Alcohol-based or solvent-based stain (nitromorilac). From the name it becomes clear that this type of impregnation is based on alcohol (denatured alcohol) or a special solvent. Just like the previous version of the stain (water-based), it is produced in the form of already finished composition or a powder to be dissolved. After distributing the stain, the coloring matter is quickly absorbed, and the alcohol / solvent evaporates, so the time for complete drying of alcohol impregnation is only 20-30 minutes. The technology of applying such a stain is also associated with fast drying: it must be applied quickly and evenly in order to avoid the appearance of spots and irregularities on finished product... It is most convenient to apply alcohol and nitro stain using a special sprayer rather than manually.
Oil-based stain. The dye in such an impregnation is dissolved in special oils (most often it is linseed oil). It is thanks to the basis that this type of product is the most environmentally friendly (i.e. it does not allocate any harmful substances), so it can undoubtedly be used for the processing of furniture parts, even such as parts kitchen furniture and furniture for the children's room. This is the most popular type of stain among furniture makers:
- it dries quite quickly - in 2-3 hours;
- deeply impregnates wood;
- does not lift wood fibers, so the material is reliably protected from moisture penetration;
- applied evenly without much effort;
- the color of the treated surface does not fade for many years.
Acrylic stains are produced on a water basis, which, thanks to a diverse palette, allow you to reproduce any desired shade of color. This is a new generation of impregnations, in which the disadvantages of the usual types of impregnation are eliminated. But today such impregnation is the most expensive.
- acrylic stain dries very quickly;
- has no smell;
- does not emit toxic fumes;
- the color is very stable (it lasts for many years);
- lays down evenly and does not form stains;
- reliably protects the tree from moisture.
Wax stain is latest technology in the field of wood processing. The substance is a soft waxy mass. Such impregnation does not penetrate into the depth of the wood, but creates on its surface protective layer. Wax stain not recommended for use as a base for two-component varnishes. The wax composition is rubbed into the surface of the product using soft tissue... When applied, the appearance of stains and the raising of wood fibers are excluded.
Wood stain: color

The stain not only protects the wood from rapid wear, but also gives it a beautiful noble color. Since the structure of the tree itself is heterogeneous, dense fibers are impregnated with stain to a lesser extent than others - that is why, after the impregnation dries, not only does the impregnation remain on the products, but also the natural pattern of the wood stands out better.
Modern impregnations can paint wood in any color, but the most popular is the “woody” range of shades. Each name corresponds to a specific type of wood: oak, teak, pine, walnut, mahogany, plum, mahogany, etc. If you could not find suitable color among the ready-made shades, you can mix several tones yourself.
When choosing a color in a specialty store, pay attention, first of all, not to its name or the photo on the package of the stain, but ask the consultant to provide you with samples of wood covered with stain of specific shades.
The fact is that for different manufacturers, compositions with the same name may have different shades. So that the result of processing parts was not unexpected, carefully examine the samples.
The intensity of the color depends a lot on the type of wood you intend to process: its natural color, density, porosity and texture. So conifers of trees do not absorb stains very well due to the abundance of resins, but deciduous ones, on the contrary, are saturated as much as possible. For example, if you treat maple and mahogany with a stain of the same color, then the color of the latter will be much darker (since the mahogany itself is initially darker). And if details, for example, from maple and pine, are covered with impregnation, then the final color of the maple part will be more intense.
White stain is used to create a trendy bleached wood effect, such as “ bleached oak"Or" arctic oak ". Also, with the help of white stain, you can create products with an antique effect. Then, as the first layer, a white water-based stain is applied, and after it dries, the pores in the wood structure are filled with a dark oil-based or wax-based impregnation.
It should be noted that not all types of wood stain have a pronounced color: there are transparent compounds that are applied exclusively to protect wood from destruction.
Wood stain: how to apply

You need to choose the method of applying the stain depending on what type of impregnation you purchased (water, alcohol or oil based), as well as the size of the part and, of course, your convenience.
The stain can be applied with a brush, swab, or paint spray. If you need to treat a large area, then with a brush it will be so convenient to do it: firstly, there will probably be stains from the brush villi, and secondly, it will take too long.
When the area of the part is large and the water- or alcohol-based stain dries quickly, it is easiest to use a paint sprayer. In this case, choose a stain slightly lighter than the desired color, because in the process of application, its layer will be thicker. When working with a sprayer, be sure to protect other surfaces with foil.
When applying oil stain excellent result obtained by working with a tampon (to make it, take a large piece of foam rubber or cotton wool wrapped in a soft cotton cloth).
If you prefer to work with a brush, then for water and alcohol compositions, choose a tool with synthetic bristles, for water, alcohol and nitro-stains, a brush made of natural bristles is suitable. Buy quality brushes that won't leave lint on the surface to be treated.
Wood stain: color proof

So you have chosen desired color and decided on a staining tool. Now, to figure out how many coats of impregnation you will need to apply to your wood pieces to get the desired color, make a test paint (do a color test).
- take a small plank of the same type of wood as the main parts for painting;
- sand the surface thoroughly, as you will do with the main details;
- apply the first layer of stain on the entire sample board and let it dry completely;
- then apply a second layer of impregnation, but already on 2/3 of the board;
- when the second layer dries, apply the third one to 1/3 of the sample;
- compare the intensity of the color in each of the cases (one, two and three layers of stain) and choose the optimal one for yourself.
Wood stain: preparing parts for staining

Uncoated wood is treated: or new board or wooden detail, from which the old coating has been completely removed.
- Absolutely dry wood needs to be leveled and sanded sandpaper(with a sandpaper). Try not to press on the parts and direct the movements only along the grain - this will avoid unnecessary grooves and scratches. The fact is that if the scratches seem insignificant on damp wood, then after processing it with a tinting composition, the defect will be very noticeable. Sanding should continue for about half an hour, during which time the surface will become smooth, and pores will open in the wood for deep penetration of the impregnation.
- When sanding is complete, use a vacuum cleaner to remove all dust and lint from the part.
- Degrease the surface with benzine or white spirit thinner.
- Moisten the wood slightly with water. Any type of stain will adhere better to a damp surface.
Wood stain: additional processing of conifers
Coniferous wood contains a large number of resins. After staining, the resinous areas of the part may appear as ugly stains. Therefore, before applying the impregnation, it is necessary to de-resin the tree. To do this, use one of the compositions:
- dissolve 60 g of soda ash and 50 g of potassium carbonate in 1 liter of warm water (60 degrees);
- mix 250 g of acetone with 750 ml of water.
After you prepare the mortar, apply it to the boards with a soft cloth or large brush, so that the wood is well drenched. It is preferable to treat the surface 2-3 times with a short break. Then leave the composition to act for half an hour. Clean the parts with warm soapy water. Only after the parts are completely dry from water, you can proceed to their further processing- toning with stain.
Wood stain: instructions for applying

- Shake the can of stain to mix evenly.
- Warm the composition to body temperature. This will help the impregnation substances penetrate deeper into the pores of the wood.
- Lightly soak the tool of your choice (brush, roller, swab) in the stain so that the substance does not flow. If using a spray bottle, pour the tinting compound into a special container.
- If you need to process a vertical surface, then it is better to do it from the bottom up. So, if small smudges are formed, they will be less noticeable and it will be easier to neutralize them.
- To stain a horizontal part, first brush along the grain, then across and again along. This will ensure an even coverage.
- Spread the impregnation carefully and make sure that it lies evenly and not glass.
- However, keep in mind that the wood must be soaked well, and the excess substance (which will not be absorbed) will subsequently be removed.
- Treat quickly and without interruption to avoid stains.
- Apply the required number of coats of stain to achieve the desired color. In this case, before applying the second layer, the first must dry completely.
Wood stain: cleaning

Washing is the final part of wood staining. It is carried out when the impregnating composition is completely dry. The cleaning process removes the excess tinting agent. Which did not absorb the wood. After washing, the part will look completely different: the texture and shine of the treated surface will appear.
For cleaning, you will need a large amount of acetone and a thick volume brush.
- Tilt the part at a slight angle.
- Position the part so that there is some absorbent material (such as paper towels) underneath.
- Soak your brush in acetone.
- “Sweep away” excess stain with a brush from top to bottom, so that it glides with acetone.
- Continue until the part looks uniform.
- When the stain stops coming off, washing is complete.
- Let the parts dry from acetone. And then you can apply the final coat - varnish.
Wood stain. Photo


Wood stain. Video
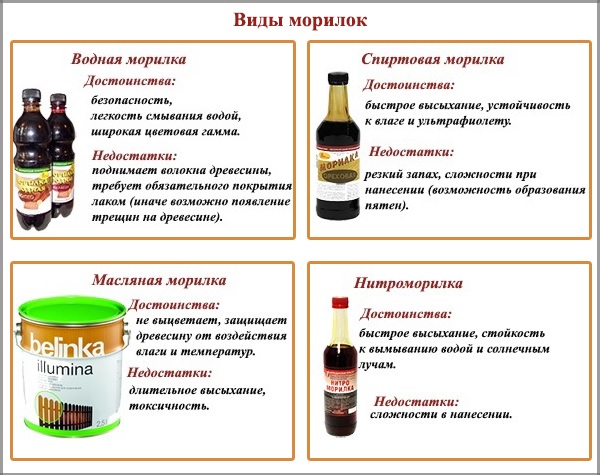
If you are working with wood and you need to give it a certain color, then you will definitely need a stain. Today there are several types of stains that differ in composition. In stores you can find the following types of wood stains:
- aquatic;
- alcohol;
- oil;
- nitro-stains.
Let's consider each of the types of stain in more detail.
1. Water stain- This is the most common type. It makes it possible to paint wood in any color: from the lightest "pine" color to dark mahogany. Available in liquid and dry form. Liquid water stain can be used immediately, but dry powder must be mixed with warm water first.
This type of stain is almost odorless, which is a great advantage if wood staining occurs indoors. But it dries for a rather long time - within 12-14 hours. In addition, water stain is capable of raising the pile of wood during staining, and this leads to the fact that the wood must be sanded after staining.
Of all water stains, acrylic stains, which are based on acrylic resin, are distinguished separately. They are highly resistant to fading, do not wash out with water and raise wood fibers much less. However, they have one drawback - a high price.
2. Alcohol stain is a solution of various aniline dyes in alcohol (denatured alcohol). After applying the stain, the coloring matter penetrates the wood texture, and the alcohol evaporates. This type of stain dries quickly enough - in 15-20 minutes. This is why it needs to be applied very quickly to prevent stains and washes. Uniform staining with alcohol stain is achieved by using a spray gun to spray it.
3. Nitromorilac- solvent-based stain. The principle of action is similar to alcohol stain. It is applied quickly and with a spray.
4. Oil stain- a mixture of dyes and oils (most often linseed). This type of stain can be applied easily and evenly. Oil stain does not pick up fibers. The coloring agents of the oil stain have high lightfastness, which allows the surface to retain its brightness and original appearance for many years. You can apply oil stain with a spray gun, a wide brush or a rag. Oil stain dries in 2-4 hours.
Choice of stain color.
Each color of the stain has its own code, which corresponds to the international classification, and the name coincides with the species of wood, the color of which is copied by the stain. For example, "Chestnut" stain, " Walnut"or" Cherry ". But it is very short-sighted to choose a stain only by name or picture on the label, as an unexpected result may be obtained. There are special reasons for this:
1. If the stains of the same color and code were made by different manufacturers, then they can have different shades. For example, the water stain "Larch" made by "Tsaritsyn paints" has a pinkish-brown tint, and "Larch" produced by "Novbytkhim" has a pale yellow color. In various stores there are samples that have been painted with different stains. Such samples will reproduce the color of the stain much more accurately than the picture on the label.
2. The natural color, structure and density of wood can also affect the result. staining... For example, a stain on mahogany will look much darker than on maple (if the stain used was the same tone). This is because mahogany wood has a darker shade than maple wood.
The same test with samples of pine and maple will demonstrate that pine wood is colored faster and more intensely. Pine has a softer and more porous wood, while maple is denser and harder. For this reason, it is easier for colorants to penetrate the pine wood.
The degree of staining is also influenced by the texture of the wood. Oak has a pronounced structure, so it quickly darkens from the stain, as the coloring substances penetrate into the grooves of the veins. But the bulk of the oak wood that is outside the veins stains more slowly and less brightly.

Methods for applying stain.
To paint wood with wood stain, you can use a spray gun (nozzle size 1.5 mm or less), a wide brush (100 mm wide), a foam rubber swab or rag. For processing large area it is better to use a spray gun. It is also used when working with nitrimorilacs and alcohol stains, as they dry very quickly, and stains appear on the surface of the wood when using brushes or tampons.
Brushes, tampons and rags are great for working with water and oil stains... Natural bristle brushes are suitable for oil stains, and synthetic bristles are suitable for water stains. The bristles of the brush should be strong and should not leave any hairs on the surface of the wood.
If fabrics or tampons are used to work with the stain, they should be cotton or foam rubber. They should not leave behind lint and threads that can remain on the painted surface and, thereby, reduce the quality of the coating.

Preparation for staining: making a color test.
After purchase of stain, but before the start of the staining itself, it will be useful to make a color test. Its need is that it will help you understand whether this stain is suitable for the surface. In addition, the test will allow you to find out what color will turn out in the end, and will help determine the number of application layers.
To make a color test, you need a plank that has been processed in the same way as the wood to be painted. Undoubtedly, the type of wood of the sample should coincide with the main surface.
The board is covered with one layer of stain. After drying, a second layer is applied to 2/3 of the sample. The third layer is applied to 1/3 of the board. After the stain dries, the board is varnished in two layers. Comparing the brightness of coloring of each part of the sample plate, the optimal number of layers for a certain surface is chosen.
To choose the best option, it is necessary to make several test stains. Several planks are painted with different stains and then the final choice is made.
Wood treatment before staining.
Before applying the stain, the wood must be prepared. There are several processing steps:
1. First you need to remove the old coating, if any. This is done by scraping and sanding the boards. This process will not only remove the old coating, but also level the wood surface.
2. Clean the surface from grease and oil stains. To do this, it is necessary to wipe problem areas with a rag that has been dipped in white spirit or gasoline.
3. Coniferous wood must be degummed before staining. It is necessary to remove resin from the wood structure, which may interfere with absorbency of stain... There are several types of demineralization solutions:
Dissolve 50 g of potassium carbonate and 60 g of soda ash in 1 liter of water heated to 60 degrees.
Dissolve 50 g of caustic soda in 1 liter of warm water. Treat the surface with the resulting soda solution.
Mix 750 ml of distilled water with 250 g of acetone.
Any of these solutions must be applied to the surface of the wood in several layers. After 30 minutes, wipe the wood with a cotton cloth and rinse with warm water.
Stages of staining a wooden surface with a stain.
If the wood surface is properly prepared for staining, the staining procedure will be fairly straightforward. It is performed in the following stages:
1. First, the stain needs to be slightly warmed up to enhance its penetration into the wood.
2. A brush, rag or swab is moistened with stain. Do not under any circumstances allow strong moisture, as streaks may appear and the staining will become uneven. If a spray bottle is used, the stain is poured into the reservoir.
3. The stain is applied along the wood grain. Apply the stain quickly and without interruption to avoid staining. If streaks appear, then wipe the surface with a cloth, collecting excess liquid along the fibers. Then the surface is left until the stain is completely dry.
4. Similarly, apply several more layers of stain in order to obtain the desired shade (usually 2-3 layers).
5. Then the surface stained, varnished in several layers. Each intermediate layer is sanded with fine-grained abrasive paper.
Wood has always been and will be in demand, because it is a natural, living material and no newfangled plastics can compete with it in creating an atmosphere of warmth, kindness and comfort in the room. But like any living material, wood products require care and protection. For this purpose, special varnishes and stains are widely used.
Varnishes and stains protect wood products from dirt and scratches, and also protect wood from moisture penetration.
Processing wood with these means not only allows you to protect it from excess moisture, exposure to light, dirt, scratches and other unfavorable factors, but also gives sophistication and nobility, fixing and emphasizing natural beauty pattern of treated wood.
Removing the old coating
Always apply varnish on a clean surface. If this is a new product, then no problem arises. But there are often cases when it is necessary to varnish already painted wood, for example, window frames, doors or wooden floors, the surface of which is damaged due to prolonged use. And if the integrity of the coating is violated, then its protection is also violated. Therefore, before proceeding with new processing, you need to completely clean the surface from the layer of old varnish.
There are three main cleaning methods wooden surfaces from the old coating: removal with special solvents, thermal or mechanical action. It is necessary to determine which method is best used in each case individually, based on the type of product and the materials used to cover it.

The surface of the product is moistened with a solvent, then removed with a spatula.
In the first method, the old varnish is removed using special liquid solutions, with which the entire surface of the product is abundantly wetted with a paint brush. Immediately after processing, the product must be covered or wrapped plastic wrap to create the effect of a thermos. After 24 hours, the film is removed and the old coating is carefully removed with a spatula. If the coating is removed poorly, the whole procedure is repeated anew, and so on until the wooden surface is completely cleaned.
When working with solvents, it is important to remember that they contain toxic substances. Therefore, they must be applied with glasses, rubber gloves and a respirator. At the end of the cleaning, the tree is wiped with warm water and allowed to dry for at least a day. After that, the surface is again sanded and primed. And only then can a new varnish be applied.
In the second method, to remove the old coating, the wood is heated. This softens the varnish and is easy to remove with a spatula. Heated construction hairdryer, you can use and blowtorch... But it is more difficult to work with it, because you need to constantly monitor so that the tree does not overheat and does not catch fire. To protect it, it is better to pre-moisten it with water and only then process it.
The latter method is more often used if you need to remove an old layer of varnish from a large area, for example, a floor or a wooden deck. Take it off with grinder, and the rest of the varnish is removed with sandpaper.
Surface preparation

All cracks on the wooden surface must be carefully filled and sanded.
The varnish can only be applied to sanded smooth surface... Regardless of whether new material you need to paint it with varnish or the old one, you need to carefully examine it. All found seams, cracks and knots must be treated and repaired.
The detected gaps between the seams and joints must be sealed with a special putty. After application, the putty is allowed to dry, and then, in order to remove possible irregularities, the putty areas are re-sanded with fine sandpaper.
It is also necessary to take into account the fact that it is pointless to putty a damp or even unfinished tree, and even more so to treat it with linseed oil, stain or varnish.
Drying, the wood deforms, and the applied layer will inevitably be damaged.
Features of the use of wood stain

The stain should be applied parallel to the grain of the wood, avoiding contact between the layers.
For better protection wooden products, they must be treated with a stain (impregnation). The stain, penetrating deeply into the pores of the wood, enters into a chemical reaction with the tannins in the growth rings and gives the wood a persistent water and light-protective color. It also protects the tree from mold fungi, grinder beetles and other pests and infections. Modern liquid stains are divided into three groups: alcohol, oil and water.
There are two types of water stains: in the form of ready-to-use solutions and in the form of a powder, from which such a solution must be prepared. This is the only type of stain that does not need white alcohol, drying oil and other solvents. Stains of this group have one significant drawback: penetrating inside the tree, they raise its fibers, which makes the tree unprotected against excess moisture. Although, on the other hand, such wood processing allows you to emphasize and highlight its structure. Therefore, today it is the most common type of stain.
Alcohol stain is produced in the same two varieties: ready-made and in powder. This stain cannot be applied by hand with a brush, but only from a spray gun, since it dries in almost seconds.
Oil stain is the most convenient to use. It is easy to apply in an even layer, it does not pick up wood fibers and dries quickly. In addition, by mixing dyes in oil, it can be used to give the tree almost any shade. Oil stains are diluted with white alcohol or drying oil.
To treat wooden surfaces with wood stain, the following are used:
- paint brush;
- foam roller;
- manual or automatic sprayer.
All these tools for staining wood are equivalent, and when choosing, you must be guided solely by common sense. For example, staining several dozen squares of a wooden floor with a paint brush for a very long time, and the bindings window frames, except for a brush, you will not process anything else.
The staining technique is no different from ordinary painting. The only condition: since most wood stains dry quickly, you need to work quickly, but carefully. It is important not to let the stain dry before the end of the work, otherwise there will be a seam noticeably different from the rest of the surface in this place. Therefore, you should not put a lot of solution on the brush.
The stain is always applied parallel to the direction of the grain of the tree. And you cannot move on to processing another figure or section without finishing the work with the first one. In places where two sections are connected, care must be taken to ensure that the applied layers of stain do not overlap.
Varnish for wood surfaces
Depending on the method of manufacture, varnishes are divided into several types: alkyd, nitro varnishes, polyurethane, oil, acrylic and alcohol varnishes.
Alkyd varnishes must be diluted with a solvent. The surface covered with them is protected from water and fire, does not fade in the sun. Acrylic varnishes create a film that is resistant to abrasion and retarding. Nitro lacquers have in common with acrylic base, but dry much faster. However, they are not able to withstand moisture and ultraviolet radiation for a long time.
Polyurethane varnishes are characterized by increased wear resistance. They form a strong film on the wood surface that dries quickly. Suffice it to say that the wooden parts of ships are treated with varnishes of this particular group.
Oil varnishes used to be very popular, but today they are mainly used for flooring. Their main advantage is their low price, in comparison with other types of varnishes. They require compulsory dilution with linseed oil and dry for a long time.
Acrylic varnishes have appeared relatively recently. Today it is the most versatile and easy-to-use varnish for wood. They can perform both internal and external work. It is diluted with water and does not have a pungent odor characteristic of other groups of varnishes. Its protective properties are similar to alkyd varnishes, but much more economical to use.
Alcohol varnishes are used exclusively for the restoration of antique furniture.
The technique of applying varnish is similar to the technique of wood staining. For work you will need a roller or paint brush. Sometimes, if you need to process hard-to-reach places, use a foam sponge. V recent times Spray varnish in spray cans is gaining popularity, for the application of which no tools are needed. But the consumption of such varnish is much higher compared to the traditional one.
Usually the varnish is applied in 2-3 layers. Regardless of the type of varnish and its texture, the layers must be thinned, otherwise smudges will be visible on the painted surface. The decision whether to use a roller or brush depends solely on the scope of work and your preference.
Work on processing wooden surfaces with wood stain and varnishing them does not require special qualifications from the performer, therefore, anyone can do it. The main thing is to have enough patience and perseverance. And then the tree in your house will delight the eye for a long time with a noble shine and chic appearance.