Flowerpot made from branches. Outdoor hanging flowerpots: design features and rules for caring for flowers in them
Do you like hanging flowers? This composition becomes a real decoration landscape plot. In addition, hanging flowers help to relieve space and significantly diversify the interior when it comes to the room. But in order for the flowers to look harmonious against the background of other plants, it is necessary to do DIY garden pots from scrap materials. How to create an original product from ordinary things? Let's figure it out.
 DIY garden pots made from scrap materials
 Do-it-yourself planters for the garden - there is no limit to your imagination
Flowerpots – best solution for those who do not have much space for growing lush, voluminous flower beds. Located in a suspended state, it will not interfere with walking and doing everyday activities in the summer cottage. Since it is quite rarely used exactly upper part terrace, why not use it for a small flower garden? Also, flowerpots can be hung in a gazebo, veranda, on a fence and even trees - wherever there is suitable conditions for plant life.

Today, the cost of a flowerpot is high, so not every summer resident can buy it. But don't despair! We invite you to make a flowerpot for your garden with your own hands! It is not only simple, but also very interesting. You will be able to make your any, even your wildest fantasies come true. After creating such a flowerpot, rest assured that you will hear many laudatory speeches and positive feedback. It has been noticed that people who decided to make flower pots for themselves soon made this activity their life’s work. Maybe this will happen to you too?

Where does the creation of a flowerpot begin? First, try to find suitable materials- containers that you no longer need on the farm. You may also need some tools, paints and rope. We suggest considering several options for making flowerpots:
Wood is the most beautiful, natural and aesthetic raw material. It fits perfectly into landscape design, does not require special care and will be an excellent material for creating flowerpots. What will the design be like? Of course, it all depends solely on your preferences and desires. Let's find out how to make the simplest, most uncomplicated flowerpot that looks like a box or bucket.
What will you need? Boards, branches, bars and other wooden products that were left after repair work or just lying around on a summer cottage. Also prepare some rope, glue, hammer, nails and scissors.
Before creating a flowerpot, you need to decide on the size of the product. What will it be like? Large or medium? The amount of material used depends on this. So, first you need to cut bars or branches of the same size. Now a standard knot is knitted on one branch, the next one is applied to it, on which another knot is knitted, etc. Knit until you are satisfied with the size of the design. The result should be an original, highly flexible canvas that will wrap around the flower pot. But how to make the bottom? To do this, you need to place several sticks on the cross ropes, which will become the basis.

- Pots made from plastic bottles
Plastic bottles are the easiest available material, which can be purchased at any store. To make a flowerpot from a bottle, you only need the bottle itself, a knife, rope and paints. For greater aesthetics, you can cut out flowerpots in the shape of animal heads, for example, a bear with two ears, a lion with a large mane, etc. Then the product is painted and acquires a different, original appearance. The only thing that needs to be taken into account is that such a pot will turn out small size, so it won’t be possible to plant large flowers there.

- Pots made from gramophone records
Finally, a use has been found for the old gramophone records that almost every summer resident has. Make them into flowerpots and other simple things. To do this, you will need a plate, a plate, mittens, twine and any object for shaping the product. First, make a hole in the plate and pass the string through it. Now, holding it in a glove, gradually heat it over the oven. After some time, you will notice how it begins to change its shape, soften and sag.


We looked at three options for pots, but in fact there are a lot of them. It is made from burlap, wire, ceramics, plaster, clay, etc. The main thing is not to be afraid to experiment and try something new. DIY garden pots from scrap materials Anyone can do it, even an inexperienced master.

Beauty and comfort in a home is not only about perfect cleanliness and an exquisite interior, consisting of expensive furniture and designer renovations. The harmonious design of the room consists of many details and decorative elements, which can often both attract attention and repel due to their lack of taste.
Indoor flowers are an invariable decoration of any home, giving the room a special aura. hearth and home and freshness. But sometimes, flower lovers do not have the opportunity to place in the room the number of plants that they would like. Or, due to a change in interior style, indoor plants V simple pots do not harmonize with the rest of the details.
But don't be upset! After all, you can diversify the interior and place more flowers with the help of flowerpots - decorative item, which will highlight all the advantages of the furnishings and indoor plants. You can buy a flower pot, or you can create it yourself, which will give the interior individuality and originality.

Common types of flowerpots
Before you start making flower pots with your own hands, it wouldn’t hurt to learn about its varieties. Indeed, today there is huge selection flower pots, which are conditionally divided depending on their purpose:
- desktop flower pots – usually placed on cabinets, tables, counters, taking into account the stylistic decision;
- floor planters – placed in spacious rooms and used for tall indoor plants;
- wall-mounted planters – suitable for small rooms where it is important to save space;
- hanging flowerpots - in addition to originality, this type the flowerpot allows you to place indoor plants quite compactly;
- flowerpots for the garden - will perfectly enliven the space of the site and give the site a complete look.


What materials are used to make flowerpots?! A decorative floral item can be made from anything, especially if it concerns self made. During the creative process, all available means are used - from natural materials to old things or various small decorations.
- Tree. This is the most common material for creating decorative containers, when choosing which it is important to take into account its resistance to moisture, as well as the processing of the material itself.
- Glass. Flower pots from of this material is a universal and practical item thanks to which you can monitor the moisture level of a plant.
- Plastic. Inexpensive and easy-to-clean containers have long been in demand among many housewives due to their availability and varied colors.
- Ceramics. A more expensive option for pots, but also more varied. Moreover, ceramics can easily be modified in some ways, for example, by applying a design or coating with glaze.
- Metal. Very unusual containers for flowers made of stainless steel or forged elements will give the interior special expressiveness and emphasize the sophistication of indoor flowers.


Pots for home decor with your own hands
Flower and hardware stores offer a huge selection of flower pots. Here you can choose by size, color, and also depending on the location of the container.
But it so happens that each person is individual, and therefore in own home he expects to see only exclusive items that will highlight the taste of the owner of the house. With some handicraft skills, any housewife can create a real masterpiece that will refresh the interior.
So let's begin.
Flower pots with lace
To diversify plain plastic pots, you can use pieces of bright fabric or lace. In addition, for work you will need:
- scissors;
- glue;
- pot;
- glue brush;
- material for gluing (lace, braid, ribbon).
Operating procedure:
- To begin with outside The pot should be wiped with alcohol to degrease the surface.
- Draw the necessary contours in place of which the decor will be located.
- Lubricate this area with glue, without going beyond the contours of the picture.
- Press well and leave until completely dry.

To secure decorative elements more firmly, you can use glue gun, which will give the decor strength. If desired, you can decorate the pots with braid, bright buttons, beads and other interesting little things.

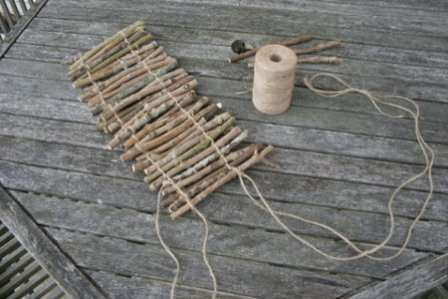
Flowerpot made from branches
No less interesting option creating a flower pot - a flower pot made of wooden circles, the manufacturing principle of which is similar to the previous one. Only for this you need to use tree branches whose diameter does not exceed 2 cm.
To prepare the material, you need garden shears, with which we cut wooden circles no more than 1 cm thick
Having previously degreased the surface, we attach the material to the pot one by one, carefully applying a small amount of transparent Moment glue.
Press it well and leave it out of the reach of children until it dries.
To ensure that the pot lasts for a long period, it is recommended to coat the product with wood varnish.
No less interesting options can be obtained by gluing river pebbles, shells, dry moss, cork, and tree bark.

Wooden plant pot with twine
An old wooden pot will sparkle with new colors if it is decorated with twine. To do this, you need to apply glue to the surface and slowly press the rope, wrapping it around the pot. It is very important to secure the rope at the end so that the product does not lose its original shape.
By pre-drilling holes for the rope, you can build a hanging planter with your own hands. To do this, you need to carefully thread the string through the holes and secure it well.

Planters made of branches or bamboo
Natural materials are the best way to decorate an interior, because they are different natural beauty and environmental friendliness. One option for creating a flowerpot is a flowerpot made from reed or bamboo branches.
To do this you need to prepare:
- chopped straight branches or bamboo;
- twine;
- scissors;
- glue "Moment" transparent;
- dense coarse fabric (burlap, linen);
- plastic pot.
Operating procedure:
- Before you start tying the sticks together, they should be aligned so that the product looks aesthetically pleasing.
- Then we tie the branches together with twine along the edges (2-3 cm to the edge), pulling them tightly so that the fabric does not fall apart.
- Apply a layer of glue to the outer walls of the pot and glue burlap or linen evenly.
- We tie a cloth of sticks around the pot, and tightly tie the top and bottom parts.
- The flower pots can be additionally decorated with flowers made from twine or burlap, which will give the product a special effect.

DIY hanging flower pots
Hanging flowerpots are often used by those who need to free up more space in their house or apartment. This decor allows you to move around the house without obstacles, so this type of flowerpot can be called the most popular.

In this way you can perfectly decorate your garden with your own hands. But before that, it’s worth remembering that materials for hanging flowerpots must be resistant to high temperature and the adverse effects of precipitation. For such purposes, a flower pot made from a plastic bottle would be suitable.

Pot made from a plastic bottle
There are many methods for making decorative containers from plastic bottles. One of them can be decorated using the decoupage technique.
Required materials:
- plastic bottle with a volume of 1-1.5 liters and a flat bottom;
- scissors;
- base for decoupage;
- napkins for decoration;
- tassels;
- varnish

Operating procedure:
- Prepare the bottle for use by thoroughly washing and wiping.
- Apply thin layer base, spreading it evenly with a brush.
- After the base has dried, this usually takes 20-30 minutes, apply surfactant glue, also smoothing it well.
- Separating top layer napkins, apply it to the container and smooth it with a brush or fingertips.
- In order for the surface to dry thoroughly, it is better to leave the product overnight at room temperature.
- Then we coat the pots with varnish and dry them.
- Using a hole punch, we make holes on both sides of the pot and thread a rope, with which the plant should be tied to the mount.

Features of vertical gardening
For lovers unusual decor When it comes to plants, you will certainly like “living walls” or vertical gardening. Today this is a favorite technique of designers all over the world, emphasizing the exclusivity of expensive interiors. Professional “living walls” are not cheap, especially if everything is done according to last word equipment, including automatic watering.
Vertical gardening has a number of advantages:
- saturation of air with oxygen;
- space saving;
- improves the appearance of the walls and complements the interior style;
- an abundance of plants on the wall are a source of additional air humidification;
- division of space into zones.

Despite the seeming difficulties in creating such walls, if you are well informed with the necessary information, you can create an extraordinary structure yourself. It is worth recalling that this type of landscaping can be built both in the house and in the garden.

Flowerpots for this type of landscaping can be wall-mounted or conventional, depending on the design and location of the plants. To create wall pots, containers made from plastic bottles that are easily attached to vertical design or a wall with a rope. To give the container a more aesthetic appearance, you can decorate it with braiding to match the interior. This decor is macrame or crocheted fabric.

An equally interesting option is pockets made of thick fabric in which you can plant climbing plants. This option is good for decorating a garden, in which you can build metal gratings or special stands.
On special stepped wooden frames you can place flowers in flowerpots, the surface of which is decorated with natural materials.
An excellent option is a flowerpot decorated with moss. All you need is dry moss and clear glue. The process of creating such a pot will not take much time, but the result will exceed all your expectations - an original and exclusive decorative item will become an unusual decoration for your garden or home.

A flowerpot decorated with river pebbles is an interesting option for vertical decoration. The process of creating such an item will take a little longer than in the case of moss, but it is worth the effort. This decor is distinguished by its non-standard approach and originality.

No less successful in creating a beautiful flowering wall in the garden are suitable plants. For this case, climbing and hanging flowers are ideal, which proper care, in addition to landscaping, they will create a whole riot of floral colors.
Decorating a home is labor-intensive and interesting activity, requiring creative inclinations and the desire to make interior decoration unique. To do this, they use all sorts of techniques and tricks, just to stand out with originality and non-standard solutions.
Making flowerpots with your own hands is one of the ways to not only refresh and diversify the interior, but also to prove yourself as a creator and artist who creates incredible masterpieces. After all, handicrafts have always been part of art, which in turn contributed to the manifestation of human creative abilities.
So, have fun creating!
Create a flower pot with your own hands – great idea for the weekend. The creative process will not take much time and effort. The raw materials are easy to find: in the hardware or hardware store closest to your home, or perhaps even in your own pantry or in a neighbor’s garage.
It all depends on what kind of art object you expect to see in the interior of your apartment: a brutal stone pot for or an openwork wicker pot for delicate violets. Choose the option that suits you.
DIY clay pot
Clay is the first material that comes to mind when it comes to flower pots. This is the same classic that does not require any special introduction. So let's get straight to the point.
Required materials

Step by step instructions
Before you start, make sure you have everything on hand necessary tools. To create without distractions, place a rolling pin on your work table, stationery knife, brushes and a container of water.
- The clay needs to be kneaded well. The modeling mass should become homogeneous and pliable.
- The main thing is a flat bottom. Roll out the clay into a layer. The thickness of the layer is equal to the desired thickness of the future pot. Cut the bottom into the shape of a plastic container.
- You need to cut a strip out of the remaining clay. Strip sizes are individual. The width of the strip is the height of the walls of the flower pot. And the length should be slightly greater than the circumference of the base.
- We connect the parts to form a pot.
- Now we need a little water to wet our fingers and smooth out the joints of the parts - “solder” the seams.
- Most important stage– drying. Follow the clay manufacturer's recommendations. On average, products need to dry for 24-48 hours.
- When the clay is completely dry and hardened, we begin painting. You can apply 1 or 2 layers of paint, depending on the intensity of the color you want to see in the finished product. At this stage, it is important to include all your imagination in your work.
- After the paint has dried, cover the pot finishing layer varnish
- Place a plastic container inside: it will protect the pots from moisture.
- We enjoy the result.
Plaster pot

Making pots from plaster is an art. The technology for making the base is simple. And there are many more options for decorating the finished product than in the case of clay.
Required materials
- Gypsum.
- Water.
- Two plastic container same shape, but different volumes.
- Cling film.
Step by step instructions
- Prepare a gypsum solution in a 2:1 ratio. Mix it thoroughly.
- Container larger size Cover the inside with cling film, wrap the small container with film on the outside.
- Pour about 2 cm of solution into the bottom of a large container. Give it a chance to set.
- Place a container of smaller diameter inside.
- Pour the remaining gypsum mortar into the void between the walls of the containers.
- Leave for 2 hours until the plaster hardens completely.
- Carefully remove the plastic molds.
- Let's start with the decor.
A plaster pot, like a clay pot, can be painted acrylic paints. Decorate using decoupage technique, cover with shells, cereals, beads, buttons or mosaics. Or even carve patterns directly onto the surface.
Cement pot
It's hard to imagine something more solid than concrete. Therefore, monolithic cement flower pots will organically fit into a serious interior with a claim to steadfastness.
Flower pots can be created from cement in at least two ways. The first one will exactly repeat the instructions for making a plaster pot described above. Only the ingredients will change. The second method is worthy of a more detailed description.
Required materials
- Cement.
- Sand.
- Water.
- Terry towel.
- Bucket.
- Cling film.
Step by step instructions

And if you want something more refined, you can make the surface of the flower pot glossy. To do this, knead cement mortar It is necessary not on water, but on silicate glue.
Wicker
Eco-style, rustic, country... If you are close simple shapes And natural materials, then the idea of weaving flower pots with your own hands will inspire you to create a real eco-masterpiece.
Required materials

Step by step instructions
- We cut the branches slightly larger than the height of the base pot.
- We tightly tie the twigs together to get a cloth that looks like a mat.
- Cover the base with burlap.
- We attach our “mat” to the burlap using glue.
- We secure the structure with jute cord.
- The pot is already good, you can leave it as is. Or you can continue to create - braid the flowerpots with thinner branches in the shape of a bird’s nest.
Mosaic
Mosaic – best way give a second life to dishes or tiles, which the hand will not raise to throw away.
Required materials

Step by step instructions
- We prepare the basis of the mosaic - fragments. They can be cut using a tile cutter. But it's easier to wrap it up old dishes into a piece of cloth and apply several blows with a hammer.
- We lay out the fragments, creating a test drawing.
- If we are satisfied with the result, we glue the mosaic to the base.
- Let the glue dry, following the manufacturer's recommendations.
- The final touch is grouting the joints.
This method is perhaps the simplest and most inexpensive. Even despite the low cost, a mosaic pot in the interior will look expensive, like a famous designer item.
Made of wood

Wooden flower pots are not so often found in apartment interiors. Perhaps because wood requires more careful care than plastic, for example. However, to be afraid wooden products not worth it. It is enough to treat them with special solutions against moisture and mold.
Required materials
- Small blocks of wood.
- Varnish for wood.
- Bio- and moisture protection for wooden products.
Step by step instructions
The manufacturing process is so simple that it can be done in three steps:
- We drill out and then hollow out the core of the block, leaving the bottom untouched.
- We impregnate the inside with protective solutions.
- We varnish the outside.
Other unusual options
If a person who feels like a real creator, artist, designer gets down to business, then he can create an exclusive thing with his own hands from any available items.
Vinyl records, shoes, hats and bags forgotten on the mezzanine, cans of tea or baby formula, old teapots, cups, plastic bottles, glass jars, unnecessary candlesticks or shades from chandeliers, cubes from a children's room...
The list of things that collect dust on the shelves can be continued endlessly. But any item on this list can be used as a flowerpot, using various artistic techniques: painting with paints and dot painting with contours, decoupage, embroidery, weaving newspaper tubes, knitting, applique, macrame...
Feel free to adopt our ideas, complement them with your own, and create. You will get a flower pot worthy of taking the most honorable place in the interior of the apartment. The main thing is not to be afraid of experiments!
For flowers with your own hands. Almost all families grow indoor plants or flowers in the garden. It looks very interesting if standard flower pots are placed in an unusual flowerpot. Of course, there are a lot of bright and original models of flowerpots on the market, but any person wants to bring individuality and some zest to their home or garden. There are a huge number of options on how to make a flowerpot with your own hands; all that remains is to choose the material that will look most appropriate in yours or home
Advice! It is worth remembering that a flowerpot, unlike a flower pot, does not have special holes in the bottom from which water could pour out after watering. Don’t forget to drain it from the pots so that the plant roots don’t rot. Free space between the flowerpots and flower pot or another container in which flowers grow, usually lined with moss or gravel so that the pot does not “dangle” inside.
DIY flower pots: building material
Surely, after renovation, any housewife is left with some unused materials that can be used to create flowerpots:
- If you have slats, bars or other boards, you can create wooden planter . First you have to cut out equal parts for the walls, and then connect them with nails or glue. The walls and bottom of the pots can be designed in the form of a lattice, or they can be solid. For oblong bowls with flowers will do planter box in the form of a small fence. This design is appropriate in an apartment or.
- Pretty easy to do DIY planters for the garden from leftover logs However, it is better to entrust this matter to a man. A log about 1-2 meters long can be rested on two small logs to form a kind of bench, or simply placed horizontally on the ground. Then in big log The inside is cut out, leaving only the walls and bottom. You can put small bowls inside petunias or others.
- From the leftovers ceramic tiles you can make a bright flowerpot . To do this, you will need only 5 parts, one of which will become the bottom, and the rest - the walls. The easiest way to connect the parts is with glue. Spectacular interior items are obtained from mirror tiles, they are easy to fit into modern minimalist interior or style.
- When from construction and gardening work burlap or other remains thick fabric, can be made flowerpot pockets for small plants . To do this, you need to cut out two identical square or semicircular parts and sew them on three sides. For a more complex pattern, you will have to select a base in the form of a wire, which will give the shape to the product. These pockets look great on a fence country house or on the balcony.
Pots made from natural materials
What could be easier than using the materials given to us to create vases and pots? nature? In the nearest forest or by the river you can find something that will subsequently significantly transform your interior:
- A beautiful flowerpot will be made from pebbles - small, streamlined stones. They are glued together, giving the future product an unusual shape. Similarly, you can use nut shells, tree cuts, small twigs, cones, etc.
- Can be done do-it-yourself garden pots made from a stump . A core is cut into it, into which a large plant, such as a fern, is placed. If you make several of these stumps at the same time, you will get a whole clearing in the garden.
- Eco-style pots can be woven from wicker. Weaving from wicker is quite difficult for a beginner, but the products are very impressive. You can hang or place such pots both in the house and in the garden.
Plants in pots look beautiful and unusual. They are easier to care for and create a variety of compositions. At the same time, it is not necessary to buy such a vessel in a store, because many ideas can be implemented independently.
An original flowerpot will decorate the area and attract the attention of neighbors. Now you can create it yourself beautiful products for the new season and plan future planting. Making flowerpots is an enjoyable process that will allow you to realize your creative potential. You can use the most various items: from old buckets and cups to faded T-shirts and unwanted building materials. Our selection contains the most current ideas, which will transform your site and allow you to realize any fantasies!
But first, let’s figure out what a flower pot is, what its features are, and what types of products can be made for different purposes.

A flower pot is a decorative container without a drainage hole. It serves as a shell for an ordinary pot. In a broader sense, a pot can be understood as any product in which or on which a potted plant can be placed. In this case, the flowerpot can be changed without replanting the flower. It is enough to move the pot with the plant into a new pot. This is very convenient if you like to update the design of your site or if the old pot has lost its decorative appearance.
Sometimes such a vessel is also used as a stand for draining water, although there are also flowerpots with a tray that have a hole in them. But such products, in principle, have more in common with ordinary pots. You can also plant plants entirely in pots, but in this case it is important to ensure good drainage to avoid moisture stagnation.
You can make the following types of flower pots:
floor planters – for placement near country house, in the center of a flower bed, along paths or a fence, etc.; hanging pots (hanging) - for gazebos, balconies, porches, external and internal parts of windows.
According to their intended purpose, pots are distinguished for outdoors (garden) and indoors (indoor). The latter are more compact. Flowerpots are very varied in shape and volume, and they must be selected taking into account the size of the plants that will be placed in them, as well as the future location. Large flowerpots are best placed in a recreation area or at the entrance to the house. Medium ones are along the paths, and small flowerpots are on the fence or in the gazebo.
Plants in pots can be an alternative to a flower bed if you don't have time to create one.
Among ready-made models, which can be found in summer cottages, plant pots on a leg and luminous flower pots stand out. The former look very elegant, and the latter provide additional lighting in the dark. Also popular is a three-dimensional pot-ball, in which you can grow both flowers and ornamental shrubs.

But if you are not attracted to designer flowerpots or don’t want to spend money on them, you can easily make beautiful and practical products yourself.
Outdoor flower pots made from scrap and building materials
Unusual containers for plants can be made from almost anything you have on hand. If you have crushed stone, use it to create a large planter. Any capacious container is suitable as a form for a flower pot. You can combine several of these containers to create, for example, an elegant vase. Place the crushed stone on cement mixture: Dilute 1 part cement and 3 parts sand with water to the consistency of sour cream, coat the pots with the resulting mixture and cover tightly with stones.


If you want something more unusual, try making a flowerpot from cement and fabric (burlap, etc.). Wrap a bucket or basin in a dry cloth and dip it into the cement mortar. Then cover with a wet cloth and leave for at least 12 hours, preferably a day. When the cement hardens, remove the base - the flowerpot is ready! All that remains is to paint it and place the plant inside.


A similar principle can be used to create flower pots from concrete. For the base, you can take an old pan or bucket, but the easiest way is to remove finished goods from plastic containers. Bring to life one of the ideas you like!


By analogy, you can make a beautiful clay pot or plaster pot.
A wooden flower pot will look attractive at your dacha. This environmentally friendly and easy-to-work material allows you to create durable and no less sophisticated products than those made from concrete or clay. Wooden planters made from leftover boards will look better as a composition. If desired, they can be painted in any color. And to ensure that the products can withstand bad weather, cover them with a protective varnish. It's easiest to make a rectangular or square planter, but you can experiment with the shape.


From tin cans It's easy to make metal planters. It is enough to cover them with paint or decorate them using the technique decoupage, pasting on the surface beautiful napkin or a picture.


Or you can make a large flowerpot from ordinary branches!


Unusual street planters made from unnecessary things
Stylish flowerpots that will amaze you with their appearance, can be made from old or out-of-fashion items. Giving objects a second life is now fashionable. Here are a few garden planters that are definitely worth your attention.
It’s as easy as pie to make a flowerpot for a summer house from an old chandelier; just place pots of flowers on it. But it is important to take into account their size so that the composition does not lose balance.


A flowerpot-bicycle will look original on the site. Staining in solid color will give it a decorative effect. And you can place pots with plants not only on the trunk or frame, but also near the wheels.


Hanging planter made of old t-shirt very practical and elegant. It is unlikely that anyone will guess what it is made of. Just don’t take clothes that are too old to prevent the fabric from tearing. You can cut a T-shirt into ribbons in different ways. Some can be found on the Internet, and your imagination will probably tell you some!


Do you feel bad about throwing away an old leaky bucket? Turn it into a Provence style flower pot! To do this, you can apply a thematic design to the bucket, tie it with ribbons, burlap, or place lavender inside.


Do not throw away mugs with chipped or chipped handles. It’s better to make a pot-cup, decorating it with any available materials.
A flower pot woven from newspaper tubes will look impressive. Just don't put it under open air, otherwise the design will quickly lose its attractive appearance.


Decorative flowerpots for balconies
Pots for the balcony can be different sizes, depending on the type of plants you are growing. Small flowerpots mounted on the railings or hanging flowerpots with hanging flowers will look nice. But it’s better to avoid bulky flowerpots; they will “eat up” most of the space.
An excellent option is neat concrete pots in which succulents are planted. Making such a product is quite simple; choose a plastic container as a base to make it easier to remove later. If you wish, you can also make simple figured flower pots from clay or plaster.

Rope pots are often made using the macrame technique - weaving with knots.
A more exotic option is a coconut pot. To create it, you first need to make a frame of the desired shape from metal rods and then line it with coconut fiber. If you want to make such a flowerpot, read our master class!
Plants in garden pots require special care. The fact is that water in containers evaporates faster than in open ground, so watering should be regular and abundant enough so that the entire lump of earth is saturated with water. If you wish, you can purchase a flowerpot with automatic watering, but if this is not possible, mulch the soil and do not place the plants in the sun.
Feeding will also have to be increased, because... in a limited amount of soil, plants quickly absorb the nutrients they need. nutrients. If indoor plants are placed in pots, it is important to regularly inspect them for pests and spray them with Epin, Zircon or other drugs that enhance immunity.
How to keep plants in pots in winter
For the winter, it is better to transfer heat-loving plants that do not have a dormant period (ficus, ivies, dracaenas, palm trees) to warm room together with the pot, and leave the flowerpot outside. If the plant is planted in a pot and there is no way to move it, it is important to provide the roots with protection from freezing. To do this, you can transplant the plant into open ground, but only on condition that it is frost-resistant. If this is difficult to do, then after the first frost, cover the perennial with spunbond or spruce branches, place the flowerpot in a large container and fill the gaps with soil. It is better to wrap tall flower pots with foil insulation.
Now you know how to make and decorate flowerpots to give... summer cottage individuality. If you don’t want to buy a standard store product, make it yourself - and you will not only get a unique thing, but also lift your spirits!