We make a beautiful and strong country table with our own hands. DIY table for the dacha
How to make a table for the dacha. DIY garden table and benches. We will talk about installing a new table with benches in the garden at the dacha. To unite the family, it was decided to install a new table through collective efforts. Old wooden table According to the quickly erected scheme, it was no longer suitable; it had to be updated every 5-7 years. In the construction of the table and benches, new and traditional building materials- metal and wood. The table turned out to be reliable and, compared to previous versions, it will last a long time. Provides detailed step by step instructions with photos and videos.
How to make a table with benches with your own hands

The design of the table was developed through collective efforts, taking into account material capabilities, skills and the availability of tools. The table is done and the choice of design option is probably no longer worth discussing. Old table was built from wood. Buried in the ground under open air raw posts and bench boards and table tops were attached to them. The lifespan of the pillars is 5-7 years depending on the thickness; the boards last up to 10-12 years. The table and benches were actively used from April to early October. Table and benches all year round exposed to precipitation in the form of snow and rain. New table made on metal frame, and the flooring of the table and benches is made of boards. The boards are dismantled in October and put away in a protected place, and in the spring they are fixed back to the frame. In this way, the life of the flooring and the entire table is extended. For critics, I want to say that there is a resting place under a canopy in the garden ( ).

 Pile "Yuventa"
Materials for the construction of tables and benches:
- Six Yuventa screw piles for installing a fence, 2400 mm long, head section 50x50 mm;
- 10 — 12 edged boards 2000 mm long with a cross-section of 150×50 mm, to speed up the work it is better to purchase planed ones, pay attention to the thickness of the boards - it should be the same;
- square metal pipe 60×60 mm, 4 m long;
- metal corner with shelf 40-5o mm, length 3.5 m;
- metal paint 1 liter;
- yacht varnish 1-4 liters;
- paint brush;
- solvent for paint and varnish 0.5-1 l;
- self-tapping screws for fastening boards 50 pieces;
- cement, sand
Tool for building table structure:
- Welding inverter;
- circular saw;
- laser level, tape measure, bubble level;
- electric plane;
- grinding machine with cutting and cleaning discs;
- screwdriver with a set of drills and bits.
Instructions for making a table with benches with your own hands


A drawing was prepared to install the table. See photo. The table width was chosen to be 1100 mm (6 boards 150 mm wide and one 200 mm wide). When changing the width of the table, pay attention to the distance between the bench and table posts.
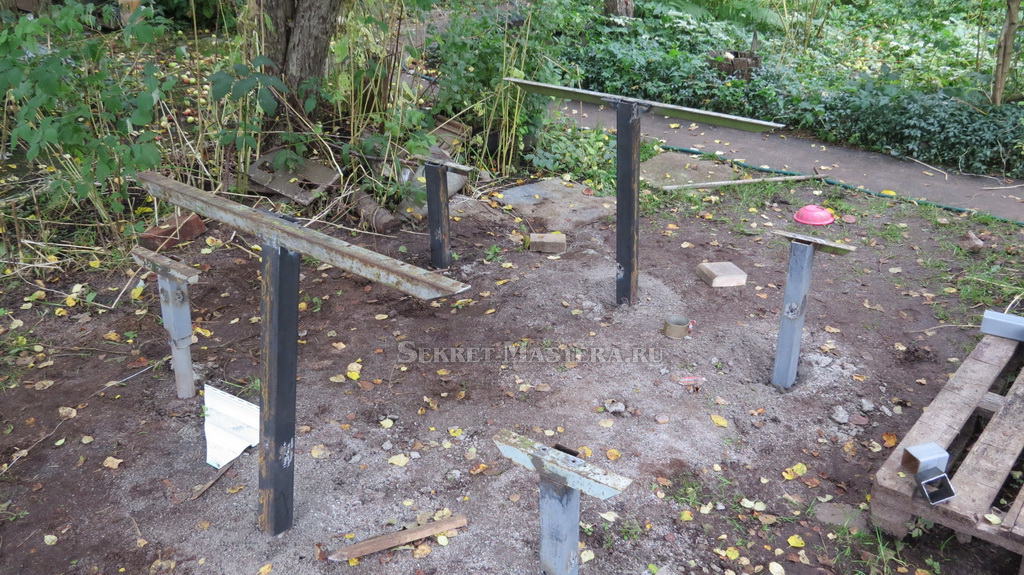
- The place for installing the table was chosen a long time ago, under the crowns of apple trees and next to artificial pond with fish. On site, pegs mark the places where the piles will be installed.
- We install Yuventa piles. To do this, a device for wrapping was made from a piece of 60x60 mm pipe. See photos and videos. In view of the features of my area, which are described in detail during construction on sandy soil, we had to make recesses for each pile. Without this recess, the pile would collapse before it was fully tightened. The recess is made petrol hole drill
. The recesses for the bench piles are dug at right angles. And for two table piles at a certain angle towards each other. This was done deliberately to make the table more stable.

 Digging a hole with a motor drill
 "Iuventa" piles for the table
 - The Yuventa piles were driven according to the standard scheme. Watch the video. Be sure to control your efforts so as not to destroy the pile before it is fully tightened. In my case it was a team effort. When tightening, you must try to comply with the intended locations of the pile and their inclination. Small errors in accuracy can be compensated for during subsequent assembly. See the details of the work at video example
.


 The Yuventa pile is twisted
 - After tightening the pit piles covered with sand in layers with humidification and compaction.
- For long service life of piles interior space piles are necessary, small mechanization was used. After concreting, we close the heads from exposure to precipitation and allow the concrete to harden. The piles must be cleaned of contamination immediately.

 Concreting piles
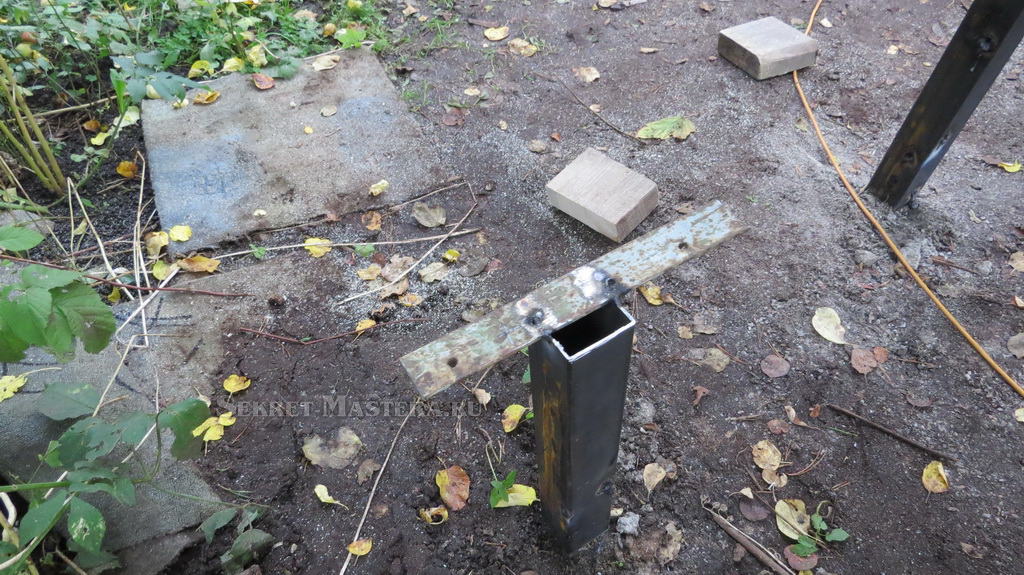
 - Slice square pipes 60x60 mm into 4 pieces of 550 mm and 2 pieces of 900 mm.
- We insert the pipes into the pile heads at a distance of 10-20 mm from the ground.
- We weld 60x60 mm pipes onto the heads, using the installation gap to eliminate inaccuracies in installing the piles. Try to install the bench posts strictly vertically, and the table posts coaxial to each other. Welding was carried out at 6-8 points at the points of contact between the head and the stand. Immediately clean the welding areas from scale.

 The posts are welded to the piles
 - mark the pipe cutting lines. Do it exactly. The cutting level from the ground surface for bench posts is 500 mm, table posts are 760 mm.
- Bulgarian with cutting disc cut the posts according to the markings. You need to cut carefully and precisely. The surface of each cut must be horizontal. Corners will be installed and welded to the ends of the racks.


- We cut the corners. The size of the corners for attaching the bench boards is 250-300 mm, you only need 4 pieces. The table will require two corners of 1000-1100 mm each (determined by the selected table width). The edges of the corners in the vertical plane are cut into a cone, and all edges are rounded. The surface must be smooth and free of burrs.
- We weld the corners to our racks, controlling the horizontal plane of the shelf along two axes using bubble level. Just in case, gussets were welded to reinforce the welding site to the rack. When welding the corners of the benches, you can slightly shift the center of the welding of the corner to compensate for errors in installing the pile (the distance of the table stand from the bench stand).

 Welding corners
 Corners are welded to the posts
 - I used boards for the table and benches from construction scraps frame house. The boards were not planed. Therefore, half a day was devoted to partial planing and sanding of the boards.
- We try on the boards and place them on the corners. The boards of the benches should be parallel to the boards of the table. The boards are marked for subsequent assembly. The position of the boards at the corners is also marked.

 Trying on boards
 - We mark holes in the corners for the screws for fastening the boards. A total of 14 holes for the corner of the table and 4 holes for the corner of the bench. We drill holes.

 Drilling holes in the corner
 Holes on the corner of the bench
 Holes on the corner of the table
 - The boards are impregnated with an antiseptic and, after drying, covered with paint or varnish. I coated the boards with yacht varnish.


- At the same time as varnishing the boards, the posts and corners are painted with protective paint. To prevent water from getting inside the racks, plugs are made ( polyurethane foam) at the ends of the pipes.
After a hard week at work or on vacation, there is nothing better to spend time in the countryside. Sit comfortably by the fire, drink tea brewed with herbs, and gather around the garden table, which you assembled with your own hands.
The modern market offers a large assortment of affordable plastic furniture. But, unfortunately, plastic tables for dachas are not reliable. Therefore, many garden owners dream of making it themselves from natural materials.
The process is not at all complicated, as it might seem at first glance, you just need to properly prepare for the work.
Country furniture set: what material to choose?
Outdoor tables and benches, being constantly in the open air, are exposed to natural precipitation, so they should be made only from durable materials: natural wood, stone, metal raw materials.

Natural wood
Please note that not every type of wood is suitable for the job. Breeds coniferous trees They have a loose, light structure, and they are also prone to ignition; constantly released drops of resin can ruin the tablecloth and dishes. Therefore, it is recommended to impregnate them with special moisture-resistant compounds.

For a wooden table at the dacha it is better to take hardwoods wood, and each board must be at least 50 millimeters. The design of the legs can be made in both straight and X-shaped versions.

Make sure that all surfaces of the component products are carefully processed to avoid getting a splinter in further use. And do not forget to apply a special impregnation to the finished product.
To extend the durability and strength of a wooden table for the dacha, experienced experts recommend coating it with at least three layers of varnish.

Stone
Stone furniture will undoubtedly amaze everyone with its grandeur and beauty. You can buy ready-made furniture, but its price is too high. You can reduce costs by self-execution bases for tables and benches. What can it be used for? available materials: slabs, bricks, building blocks, ordinary natural stone.

This base will fit perfectly into general style garden plot and other buildings. It is wise to use artificial stone for the table top and backs of the bench.

Metal
Tables and chairs for a summer cottage made of metal are not at all difficult to make yourself, but for the work process you will need a welding machine. Such furniture looks very attractive, and decoration with openwork inserts will add aesthetics. But metal furniture is also subject to gradual destruction, so it also needs special treatment against corrosion.

If funds allow, you can order forged products from a specialist in a professional workshop. Forging is perfect as a base, which can be supplemented with glass, stone and wood.

Therefore, there is an option to buy only the base for the furniture and then assemble it yourself.

Options for making country furniture
To create truly unique masterpieces of furniture, you can use unnecessary things at hand by rummaging around in a barn or garage, where you can undoubtedly find suitable consumables:
- metal barrels;
- used plastic parts;
- glass surfaces;
- other.
An old barrel lid can be cleaned of rust and treated, then covered with paint - you will get an interesting tabletop. Or you can use the iron part of a flower stand for the base (leg) of the table. It needs to be primed and coated. acrylic paints. Next, you need to glue the window seal to the support, and the glass - the table top to it, to improve fastening.

A non-wasteful owner, of course, keeps pallets from sets of bricks, which can also be used as a countertop. At such a table there is no shame in inviting friends for tea or a dinner party.

Pallet table designs
Self-construction from old pallets will not require any special costs. It can be done several times in simple ways, for which a simple set of tools will be useful:

- construction screwdriver;
- sandpaper;
- brush;
- colored stain;
- wheels;
- self-tapping screws and self-tapping screws.

First you need to properly sand the pallet, this is first done with a large sandpaper. At the completion stage, finer sandpaper is already taken. The work will go much faster if you have access to grinding wheel for processing parts.

Next, you should turn over the finished processed pallet and screw the small swivel wheels from below using a screwdriver. In order to fix the product to the tree more efficiently and reliably, it is recommended to use washers for lining the wheels.

The finished base must be thoroughly treated with an antiseptic. The transparent composition will preserve the interesting, unique structure of the wood, and the stain will give the item a colorful look.

A small neat table for a summer house, as shown in the photo, can be placed on a terrace, veranda, or directly in the room.

The summer recreation area will look most comfortable and cozy if you make a large set of furniture from pallets. This furniture set can be made in portable version, that is, with the possible transfer of it to different parts of the area.


The scope of fantasy: table option
A heavy cable reel is a relatively heavy structure that can be lightened and converted into outdoor table ik to the dacha. You will have to put a little effort into decorating, otherwise the design itself is almost ready.

The easiest way is to wrap the barrel of the product with screw twine, and thoroughly sand the top and coat it with clear varnish. Or you can take only the center itself from the coil, adding a tabletop to it, or vice versa - the base is made of metal, and the surface is made of the upper disk.

Old tires will make an excellent designer garden set: a table and ottomans with a backrest. They can be painted in your favorite color by fastening them together silicone sealant, or similar adhesive composition. It is wise to make the tabletop from durable plastic or strong wood. You can cut out foam rubber on the pouf seat for comfort, covering it with fabric.

A powerful, brutal set will be made from ordinary thick logs, which must first be carefully processed and impregnated with high-quality stain. Then, for stability, you should level bottom part logs

A slightly smaller pouf is made in the same way. But an interesting table will come from a long log, leveled on top for the tabletop.


Creation of a furniture set on personal plot Quite an exciting activity, and absolutely not expensive. Any old things prepared for disposal will be useful for work. Make every effort and the results will undoubtedly surprise both you and your guests!

Photos of tables for the garden


In order to ensure comfortable conditions habitat on suburban area, you need many different household things. Some of them can be moved here from a city apartment, but some are easier to make on site. Anyone whose hands do not grow from the hip girdle can make a table for their dacha with their own hands. And a table in a country house is an essential item; it is difficult to do without it. In addition, this work can be turned into pleasure.
So, we build a table for the garden with our own hands
For work we need dry lumber coniferous species. It is cheaper and easier to process by hand. The lumber must undergo initial processing with a jointer and surface planer. To construct a table at home, all boards must be cut to size in thickness. When building a garden table with your own hands, you should have an idea of what should happen in the end. You should first read various designs wooden garden furniture. They are presented in abundance both in specialized literature and simply around us (among our neighbors in the village).

Other people's experience can be very valuable, because it will help you avoid common mistakes. Typically, garden tables are divided into two types - those that stand in one place, and those that allow you to move them as needed. A stationary table can be made on supports dug into the ground - metal or made of hard rocks wood (like larch). And according to their design, tables also come in two types - on a cross-shaped support and on four legs with drawer joints.

The most rational design should be chosen based on your aesthetic and practical priorities. And it would be nice to sketch out the future product in the form of a sketch before building a table for the garden with your own hands. It is not necessary to work out the drawings in detail; it is enough to delve only into the general dimensions and principles of connecting parts. This will make it a lot easier future job. V assembled form usually ranges from 70 to 75 centimeters. And the dimensions of the tabletop should be chosen based on the number of people who will sit at the future table. For a person to feel comfortable at the table, it must be at least 60 centimeters wide. The cross-shaped design of the table support allows you to accommodate more people at it.

After completion of work
After we have made a table for the garden with our own hands, it would be nice to think about what to cover it with. This is especially true if it is intended to stand not under the canopy of the veranda, but in the open air. Oil-based varnish will best protect our product from exposure. Acrylic-based varnish behaves well. Nitrovarnish is not suitable due to its fragility. Before varnishing, the wood can be treated with stain or antiseptic.
In addition to the table, we also gained valuable experience. It should be developed by constructing various furniture for the garden, detailed drawings of which can be easily found on a variety of different resources.
It is quite possible to make a wooden outdoor table for a summer house with your own hands. For this, ready-made or independently developed drawings are used. To do it yourself beautiful table made of wood for outdoor use, must be purchased quality material, and follow the manufacturing rules.
Buying an outdoor table made of wood for a summer residence: types and selection criteria
Beautiful and comfortable country table– an indispensable attribute of a summer holiday. When choosing a finished product, you need to decide on the dimensions, as well as with the following parameters:
- using a piece of furniture outdoors or indoors;
- maximum quantity people who can sit at the table;
- budget allocated for acquisition.
The tabletop and body of an outdoor piece of furniture can be made of different types material:
- plastic models are ideal option for use in the country. The advantages are affordable cost, relative compactness and lightness. As a rule, they are produced in round or oval shape, and can accommodate approximately six to eight people. Despite the stylish appearance, they are not very characterized for a long time operation. Disadvantages include the tendency to destruction as a result negative impact direct sun rays. Also, the lightweight design can overturn in strong gusts of wind, the need to use the most flat surface possible for installation and susceptibility to damage, which is accompanied by a rapid loss of the original aesthetic appearance;

- wood models look very organic even in modern dacha landscape. Such pieces of furniture perfectly complement garden plantings. Such models belong to the category of quite expensive. The disadvantages of natural wood include the ability to collapse and warp under the influence of water and temperature changes, and the legs pressed into the soil can rot, which is why it is necessary to regularly treat with antiseptics;
- graceful metal models are distinguished by high quality and incredible durability. Such furniture looks especially beautiful against the background of forged fences and decorative elements. Such tables are distinguished by considerable weight and also very high cost. Very often modern models are very a good combination metal with wood or glass countertops.
If you plan to use the table in a summer cottage all year round, then the best option there will be a metal structure that is very resistant to any adverse external factors. Legs metal structure They can even be concreted, which will provide additional stability to the piece of furniture.

How to make a wooden table for your garden with your own hands
Tables from wooden planks very often made independently. Of course, this option will require sufficient care throughout the entire period of operation, but it will give local area the dacha has a bright style and originality. Among other things, build the most simple models you can do it yourself with little time and money, even in the absence of professional skills and special tools.
Making a drawing of a table with dimensions
Scheme self-assembly may already be ready, but in order to get an original table with the most suitable dimensions and shape of the tabletop, you need to complete the drawing yourself. When drawing up a drawing, it is recommended to focus on the standard dimensions of such an item: 178x95x77.5 cm.

Required tools and materials
To make beautiful and practical table made of wood for a summer residence, need to prepare:
- roulette;
- pencil;
- saw;
- drill or screwdriver;
- building level.
Work must be carried out using standard safety glasses and gloves. During production you need to use building materials presented:
- a pair of boards with dimensions 85x10x2.5 cm;
- a pair of boards with dimensions 153x10x2.5 cm
- four boards with dimensions 168x10x2.5 cm;
- four boards with dimensions 75x10x5 cm;
- board 95x10x2.5 cm - 17 pcs;
- fastening tools in the form of nails, screws and bolts;
- glue for woodworking.
It is also necessary to purchase antiseptic compounds for wood processing, wood varnish or special paint and brushes in advance.
How to make a table with your own hands (video)
Let's get started: making parts for a wooden outdoor table
All elements in the form of wooden boards must be smooth, natural humidity, made from quality hardwood. If necessary, before assembly, the boards must be leveled and, if necessary, sanded. To obtain a durable structure, the wood should be thoroughly treated with antiseptics.
It is not recommended to impregnate wood oil compositions , which have proven themselves very well when used in conditions high humidity, but increase the level of flammability and give the structure an unpleasant and fairly persistent odor that persists long time. After applying water-soluble impregnations, it is recommended to always apply a layer of a special glazing antiseptic, which allows you to give high decorative properties product and contributing additional protection.

Assembly and fastening of main elements
At the first stage of self-production of a wooden outdoor country table, the frame base of the piece of furniture is assembled. It is to the frame base that the boards will subsequently be fixed to create a tabletop and table legs. The frame base traditionally consists of four planed and smooth longitudinal boards measuring 168x10x2.5 cm and a pair end boards dimensions 85x10x2.5 cm.
Assembly must be carried out on the most flat surface possible, securing the end elements to the longitudinal boards using galvanized screws and adhesive. Very important prevent warping of the base during assembly and fastening. After checking the diagonal, additional boards 153x10x2.5 cm must be fixed, which will give the assembled structure additional rigidity, and will also hide the areas where the legs are attached.
The tabletop is assembled from boards measuring 95x10x2.5 cm. The boards can be fixed using either galvanized nails or self-tapping screws. Be sure to leave a gap of 0.5 cm between the tabletop elements. The legs are attached using self-tapping screws or bolted connections. The second option is more preferable and allows you to get a removable model, convenient for transportation and storage.

Installing amplifiers is a guarantee of table durability
If there is a need to obtain the most massive and durable structure, then amplifiers are used. To install such parts, you need to turn the product upside down. The transverse reinforcements in the middle of the tabletop are nailed, and the corners of the amplifiers are sawed off to save space. A pair of reinforcements with a shaped cutout that follows the shape of the tabletop crossbars is nailed to the sidewalls.

How to protect your table from external factors
Adverse weather conditions, represented by sun, rain and temperature changes, are aggressive environment For wooden structure, used in outdoor conditions. To protect wooden products and to extend their service life, special film coatings and various impregnating compositions are used. Most often used protective films based on polyurethane. The disadvantage of such a film coating is the loss of appearance, decreased efficiency and wear after a certain time. Wood protection impregnations are presented as a mixture based on oils and repellent solutions. Both options for protection from external adverse factors have proven themselves well, but require periodic updating.
Wooden outdoor table: drawing (video)
We make a wooden country table from what is at hand
A variety of available materials are often used as materials for creating a wooden country table. Incredibly stylish and very reliable tables made from slabs are an option that you can make yourself if you have some woodworking skills. In this case, you need to be prepared for the fact that the technology for manufacturing tabletops based on saw cuts is characterized by its own specifics and is quite labor-intensive, but the resulting finished product will be unique and inimitable.
Very original in garden design designs look like:
- from wooden beam for true fans of natural materials;
- from several stumps or bobbins;
- from old window frames with glass table top;
- from boxes supplemented with various decorative elements;
- from an old wooden chest with forged elements.

Tables made from pallets have also become quite widespread. The fashion for such products came from Asia, where such furniture items are often made for lack of available funds. When creating such an option, you can show all your imagination, but it is highly advisable to replace nails from pallets with self-tapping screws, and all fastenings of the frame and boards must be reinforced with special furniture corners. If desired, you can supplement the design with ordinary furniture wheels, allowing you to make the table mobile and easy to use.
How to make a metal table with a wooden top
One of the interesting and durable options garden furniture. For self-production you will need:
- metal profile pipe or high-quality rolled metal of sufficient cross-section;
- primer for working with metal surfaces;
- paint by metal surface and brushes;
- chalk or light marker;
- flat surface for stencil;
- wooden table top;
- bars and adhesive to secure the tabletop.

The tool can be presented welding machine, grinder, metal saw, hammer, screwdriver, screws and bolts. The metal is first cleaned of rust and dirt using a steel brush, after which a frame is created in accordance with the stencil.
Welding must be done carefully to prevent the formation of welding build-up. The entire structure is cleaned with a wire brush, after which it is primed and painted. After the paint has completely dried, the tabletop is fixed, which also needs to be treated with special antiseptics, and then varnished or painted.
DIY log table (video)
Self-production country furniture made of wood is a very interesting and creative process, accessible even to beginners. Such natural material goes well with metal, glass, and plastic, which allows you to create original, unusual and very decorative solutions with your own hands.
A table is furniture that you can’t do without either in the city or in the country. The table can be placed on the veranda, in the gazebo, or simply in a shady place. You can dine at it, have a feast or play board games on fresh air. You can only buy a small plastic table inexpensively; a large wooden table for a summer house is cheaper to make with your own hands. The article will present three options for tables and drawings for their manufacture.
Table dimensions and construction features
The optimal size of a tabletop for a garden table is 80x120 cm. A smaller table will be significantly inferior in functionality, table large sizes It will be too bulky and difficult to put away for the winter. The table size of 80x120 cm will allow you to hold formal feasts with the number of participants 8 - 10 people.
The easiest way to make a table for a summer house is from boards. In addition, it is the most accessible and inexpensive material. The advantage of making a table from wood is that the boards can be sawed to the desired size at any construction base, and can be transported to the dacha without any problems, thereby saving on transportation. It should be noted that with table dimensions of 75x80x120 cm, the longest board will be a tabletop board 120 cm long. A board of this length will fit into almost any car.
There are quite a few types of table designs, but by and large the difference is only in the form of the legs on which the tabletop rests. Therefore, the legs of the table are the most complex element the entire structure.
Table top
The tabletop at the table in the country is made of boards. The thickness of the boards can be from 30 to 50 mm. However, the best option is a board with a thickness of 40 mm.
An important point is cutting the boards. With a tabletop length of 120 cm, 5.3 boards with a width of 150 mm, 6.6 boards with a width of 120 mm and 8 boards with a width of 100 mm are required. Considering that boards are sold in lengths of just over 6 m, it is advisable to choose a board with a width of 100 mm for the tabletop.
By choosing a board with a width of 100 mm, you will not have to adjust or change the dimensions of the tabletop, which will greatly simplify the work of arranging the table. In addition, there will be 2 more boards 120 mm long, which can be used for other parts.
If you can’t purchase the right board, you can make the tabletop not continuous, but with intervals. Such a tabletop will look no less interesting. In this case, water that can accumulate on a table with a solid tabletop will flow through the gaps between the boards.
Table with straight legs
Table with straight legs simple design table for the garden. It's sustainable comfortable table, which will serve well both indoors and outdoors.

Fig.1.
The legs for the table consist of 4 elements: 2 vertical posts and 2 horizontal ones. The upper horizontal rack is attached to the tabletop, the lower one is a support.

Fig.2.
The design of the legs may vary. For example, instead of being supported on the bottom board, you can make it supported by vertical posts, and the bottom board can be made as an additional one for strength.
Please note that in this design, the boards are connected without additional grooves. This greatly simplifies the assembly of the table. To ensure that all elements are well secured, all joints must be glued with wood glue. In this case, the boards can be connected with self-tapping screws.

Fig.3.
- Assemble the legs. To do this, you need to cut the board according to the drawing. Treat the joints with glue and tighten with self-tapping screws or confirmant.
- Lay out the boards for the tabletop on a level surface, mark the position of the legs and secure the tabletop boards through the top strip of the legs.
- Install a horizontal tie between the legs.
- Wait 2 - 3 hours until the glue dries and remove burrs and sharp edges from the table.
- Next, the table can be varnished. Or simply treat with an antiseptic.
Table with X-shaped legs
A table with X-shaped legs is essentially not much different from a table with straight legs, it just has a different shape of the legs. However, it is impossible to manufacture without creating additional grooves on the legs. This makes the work somewhat more difficult.

Fig.4.
The table legs consist of 3 elements. Two crossing supports and a vertical top bar. The top bar, as in the previous case, is necessary for attaching the tabletop.

Fig.5.
To connect the legs in the inclined supports, you need to make a slot in the floor of the board.

Fig.6.
The table assembly procedure is as follows:
- Cut the boards to the required length.
- A groove is made in the legs into the floor of the board. The groove can be made with a jigsaw or a router.
- Assemble the legs. The connections are glued. The parts are fastened with self-tapping screws.
- Lay out the tabletop boards and attach the assembled legs to them.
- Install the bottom screed board.
- The table is treated to remove burrs and varnished.
Table with benches
A table with benches is quite often installed on verandas or in the open air. Unlike the designs described above, it does not require additional benches or chairs; the benches are included in the design of the table.

Fig.7.
The disadvantage of this version of the table for the dacha is that the design is quite bulky, and putting it away for the winter becomes very problematic.

Fig.8.
A special feature of the table design is that the benches are attached directly to the table legs. The crossbars on which the benches are attached simultaneously act as a tie for the legs, and the benches play the role of a longitudinal tie.

Fig.9.
The procedure for assembling a table with benches is as follows:
- Cut the boards to the required length.
- Assemble the legs and support for the bench flooring. The joints are glued and tightened with self-tapping screws.
- Mark the boards for the tabletop and mount them to the legs.
- Benches are secured.
- Treat with impregnation or antiseptic.
Examples of garden tables

Fig. 10.

Fig. 11.

Fig. 12.

Fig. 13.

Fig. 14.

Fig. 15.

Fig. 16.

Fig. 17.