Assembling the frame of the house what nails. Hardware for a frame house
The main and most common connections in a frame house easier and more reliable to do with special fasteners. Each of them has its own fasteners, which ensure the strength and stability of the entire structure. It is easy to use and allows you to abandon such laborious connections as a half-tree tie-in or various "locks".
Connecting fasteners for assembling frame wooden building structures has been used for a long time: tightening brackets, bolts and clamps. Very often used in construction frame houses. Today it has become more diverse and perfect. Fasteners not only simplify and speed up the assembly of building structures, but also make them stronger and more stable. Fasteners are most effectively used in the construction of prefabricated frame houses. Connecting fasteners for building construction wooden structures too diverse to be described in one article. Therefore, in the example frame house consider only a part of the fasteners, but the most used and mass-produced.
Connecting fastener made of cold-rolled steel sheet with a thickness of 2.0 - 4.0 mm, in the form of perforated (with holes) plates, corners, holders, supports for beams, connectors (plates with needle spikes - connectors), as well as shoes for bearing racks and columns mounted directly on the foundation. Depending on the purpose (dimensions of the connected parts and the loads transferred to them), each type of such fasteners is presented in several versions: in size, perforation configuration (holes) and even with additional elements(ribs) of increased rigidity.
Fastener perforation regulates the thickness of nails and tie bolts, as well as their number: on the one hand, they are enough to securely fix the connection, on the other hand, wood cracking does not occur. Such fasteners can have various coatings that protect them from corrosion: zinc, primer or polymer powder paint. Part of the connecting fastener is also used for repair work(for example, a corner when arranging the frame of internal partitions). Therefore, choosing such fasteners (dimensions, metal thickness, design option, perforation, stiffeners and protective covering), you should imagine what loads it will experience during operation.
Connecting fasteners have a number of undeniable advantages over classical connections in the construction of low-rise wooden houses and, first of all, prefabricated-frame, in which you have to make a lot of different nodal connections.
Firstly, there is no need to perform time-consuming and skill-intensive classic connections such as half-timber tie-ins or long locks. There is no splitting of wooden structures from excessive a large number and sizes of nails and bolts: normalized perforation of fasteners (holes) does not allow the use of nails that are too thick and drive them close to the edge of the bar.
Secondly, the classic tie-in leads to a decrease in the strength of the timber due to a decrease in its cross section at the joints (wood sampling). Steel connecting fasteners, on the contrary, create additional reinforcement of the structure of the nodes.
: used in butt joints where tensile loads are applied, such as when splicing a beam for tightening or making roof trusses.

Mounting plates are used in connections that experience tensile loads. They are applied to the connection on both sides and pulled together: with bolts - 2 holes with a diameter of 11 mm and with nails - the remaining holes with a diameter of 7.5, 5 and 4.5 mm. The dimensions of the holes determine the diameter of the bolts and nails used: their task is to ensure the necessary strength of the connection, preventing splitting of the wood.
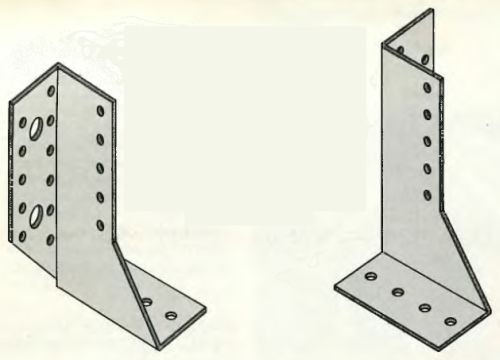
: used in various corner connections(walls, supporting frame studs, tie beams, roof rafters, etc.). An angle with a stiffener has a higher resistance to bending loads.

Mounting angles are used for angular connection between walls or the upper tie bar with a roof truss. They are presented in various sizes and several designs, including those reinforced with a stiffener. The corners are applied to the connection from two sides and tightened: with bolts - 2 holes with a diameter of 11 mm and with nails - the remaining holes with a diameter of 7.5, 5 and 4.5 mm. Bolts for fixing are used only in particularly strong connections.

Installation of beams attic floor or roof rafters using mounting brackets. Fastener perforation ensures the optimal number, thickness and location of nails in terms of loads occurring in the joint and eliminates splitting of wood. Corners with a stiffener are more resistant to bending loads.
Beam holders and supports
Beam holders and supports: indispensable for the installation of ceilings (floor and attic) in frame houses. Withstand high tensile loads in various corner joints. The holder is designed to fix the floor beam on the wall, column or other beam during construction. The support (or shoe) allows you to install the beam on the walls or columns of an already erected building (during reconstruction).
The support can be universal (consists of separate left-hand and right-hand elements) - suitable for beams of any section and specialized - for beams of a specific section. In addition, the support can be designed for surface mounting or for finishing. Shoes for posts and columns: the shoe is bolted or poured with concrete into the foundation or foundation. Its design allows, even after installation, to adjust its height (± 25 mm).
The beam holder is used in the device wooden floors when it lies with its ends on walls or other beams. Each connection is fixed on both sides. Therefore, the holder is left-handed and right-handed. He is nailed down. The number and size of nails is regulated by holes with a diameter of 5 mm.
Consists of two separate parts- left-handed and right-handed and suitable for beams of various sections. The connection is fixed on both sides with bolts and nails. Mostly such supports are produced in the same size and from sheet steel with a thickness of at least 2.5 cm.

It is already designed for a specific beam section and is represented by several standard sizes and two design options: 1 and 3 - for subsequent finishing in order to hide their vertical “wings” curved outward for fasteners; 2 - without subsequent finishing ("wings" are hidden).

The beam support is used in the construction of wooden floors, when it cannot be supported on the walls or columns themselves (for example, a floor installation in an existing building). Each connection is fixed on both sides with bolts and nails. In our example, two short beams are connected by poles through a B-pillar, a practical solution to a common problem.
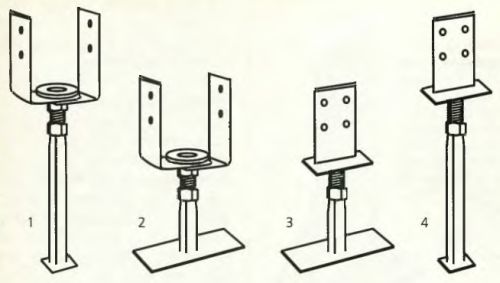
Shoes for bearing racks and columns are installed (anchored) in the concrete foundation during its pouring (and bolted to the finished one). Exist various designs shoes: 1 and 4 - for pouring in concrete; 2 and 3 - bolted; 1 and 2 - the rack is installed in the shoe; 3 and 4 - the shoe is cut into the rack; all structures, being mounted, can be rotated around their own axis and adjusted in height.

The rack or column is installed on the mounted shoe and fixed necessary quantity bolts: 1 - the rack is installed in the shoe; 2 - the shoe is cut into the rack. In this state, the rack can be turned to the desired angle around the axis and adjusted in height in the range of ± 25 mm.
Connectors
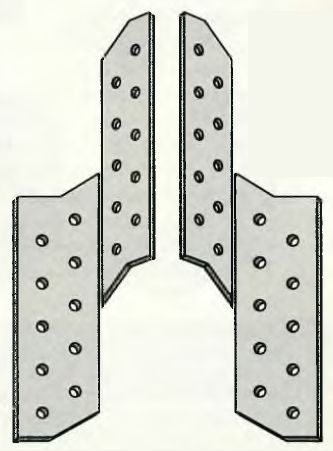
Connectors: designed for complex nodal connections in roof trusses covering spans of 7.5 meters or more. The connector is a flat plate, in the body of which, by stamping, needle nails (or spikes) of a certain configuration are cut out. They are made both in the form of plates with specific dimensions, and a tape (width 25 - 152 mm), cut to the required length. The connectors are pressed into the wood with spikes (across the fibers) on both sides of the joint. The principle of working with connectors is well understood by the example of mounting a roof truss, where two connectors (on 2 sides) allow you to assemble a unit from 3 parts at once.

Connectors - special connecting fasteners
Connectors - special connecting fasteners. It allows you to assemble and strengthen complex nodal connections of 3 or more parts, for example, in roof trusses with spans of more than 7.5 m. The connector is a flat plate, in the body of which needle spikes are cut. They are made in the form of finished plates with specific dimensions or tape (width 25 - 152 mm). They are pressed into the wood with spikes on both sides of the joint.
The nodes of a frame house are important places that must be built in a certain way so that they fulfill the role that technology has in them.
Several dogmas of frame housing construction.
1. The frame house must be assembled on nails. Any statements that it can be assembled on self-tapping screws or corners are unnecessary myths for frame housing construction. Builders around the world are building frame houses on nails(except for the Japanese, who build them on huge wooden pins and from a huge beam, but not on self-tapping screws). Builders - hacks will try to convince you otherwise, but you do not believe them. Trust me and building codes.
2. In a frame house, almost not used iron corners. They are not needed there. An exception is the work with farms, where they are used for the convenience of their installation. This rule does not apply to steel “shoes”, which are used to hang the log of a house or terrace on beams “from the side”. Although this connection can often be replaced with a connection “to the support board”.
3. For frame houses are used nails 90 mm(frame) and 60-70 mm (floor and sheathing). Nails large sizes not required even when working with a 50 mm thick board, and even more so if you have a frame house made of a 40 mm thick board. Reinsurance using large nails is not needed and only increases the value of the house.
So, let's move on to specific knots and nail fights in them.
Frame house floor
How to nail the second floor joist strapping to the double wall strapping (valid for the first floor as well):
Fastening the lag of the second floor (valid for the first floor):

The fight of nails in the logs of the floor through the strapping of the log (it is also true for the first floor, where instead of strapping there is a bed or):

Nail connection overlap lag on the central bearing wall carcass:

How many nails need to be hammered into the lag over the central support:

Subfloor markings

The subfloor and its fastening to the floor logs (this is also true for wall cladding with slab material):

Frame house walls
We drive nails into the bottom trim of the wall: 
Upper trim of the wall of the house to the wall posts:

We bring down the frame racks of the wall to the lower trim and the black floor:

We attach the frame racks in the middle of the house to the lower trim and floor joists in the middle of the house:

The second upper harness of the house is attached to the lower harness and racks frame wall:

Double pillar opening under the header:

Nails in the header of the window (opening) of the house:

A jib in the wall of the house:

Additional board for mounting GKL on the ceiling:

When creating a modern frame structure, they use self-tapping screws, nails or screws. This is enough convenient option fasteners. And in ancient times, such wooden structures were created without single nail or screw. The craftsmen knew how to create a hidden tenon-groove. This mount was very strong. Created several centuries ago, Western European half-timbered houses live today, because the tenon-groove that the carpenters of that time used is a skill without which it was impossible to build a frame house. Most likely, there were already nails and various staples, but they were not used at that time, due to their extremely high cost. The tenon-groove fastening justifies itself in many ways, because with it the tree is connected to the tree, and this is considered more appropriate than fastening wood to tree with screws or nails. And yet today, self-tapping screws and nails are a popular type of hardware, and today there are almost no craftsmen who master the skill of making an accurate and reliable type of “oblique tooth”, “dovetail”. Although such alternative compounds are quite acceptable and even preferred in our time.
The strength of the frame structure and its rigidity depend not only on the quality of the connections and the quality of the material itself, but also on the method of attachment, and correctly distributed loads at the design stage. If the connections are made incorrect or overloaded, then soon they will manifest themselves as singing sounds and squeaks. To prevent the structure from loosening, it is necessary to strictly observe the assembly technology and monitor the assembly quality of the frame elements. To prevent corrosion, self-tapping screws must be galvanized or otherwise treated against corrosion. You can additionally dip them in drying oil, primer or some other protective compound during screwing or work well after, although this will be less effective.
In fact, nails are successfully replaced with self-tapping screws. various types. Because they have a wide range of benefits. The main advantage is that they securely fix all the elements. Unlike a nail, a self-tapping screw has a thread. This allows it to be screwed into any material: be it wood, plastic, drywall, plywood or metal. For metal use special self-tapping screws, with a stronger structure and smaller threads. In addition, self-tapping screws, with the same length as a nail, have improved qualities in terms of holding strength for pulling out or stretching. Even a small self-tapping screw will hold any material firmly, and most likely will not loosen over time, as a nail can when assembling furniture. This allows you to successfully use self-tapping screws where nails can ruin appearance. And more importantly, self-tapping screws can be easily removed if necessary, as they have a thread and a slot for unscrewing.
A few tips and tricks when using self-tapping screws and nails in construction
The number of nails used does not yet guarantee the strength of the structure.
You need to arrange nails “wisely”. It is advisable not to hit them on the edge of the board, so as not to split. It is better to hammer nails “at an angle” - this way they hold more securely.
If you need to hammer a nail in a certain place, but there is a risk of splitting the board, first blunt the point, the nail will not push the fibers apart and split the board, but will crush them.
It is desirable to select the length of the nail in such a way that it does not slightly go out of the material to which we nail. Too thin a nail will not hold well. Long - to score for a long time, but it will not be stronger if it comes out or even splits the board.
Where the design "works to tear", instead of nails, it is better to use self-tapping screws of the required diameter. It's more reliable.
Self-tapping screws are also preferable where any vibrations are transmitted to the structure, for example: doors, windows; and also where we carry out wood paneling with any other material: fiberboard, chipboard, plywood, plastic, etc., as well as when attaching to wooden structures, for example: metal wire hangers, flagpoles, etc. In such places, the nails “crawl out” over time, and they have to be finished off, which does not add strength. It is better to immediately replace such a “live” nail with a self-tapping screw or screw.
Self-tapping screws are also used in places that will probably have to be disassembled later, this will facilitate disassembly and will not damage the material being disassembled.
To prevent the self-tapping screw from splitting the wood when screwing, you can pre-drill a hole of the same or smaller diameter.
It is much easier to tighten a self-tapping screw if it is lubricated with soap or dipped in oil.
A drill will help you quickly wrap a lot of self-tapping screws, in the chuck of which a bit or a screwdriver is installed. If possible, use a special screwdriver. Of course, it will be more convenient for them to work. In this case, the assembly speed on self-tapping screws will be the same as on nails.
In chapter, Download documents, instructions, programs there is a document: Connections on nails, screws and screws. Selection of fasteners for wooden housing construction, requirements and test methods.
The standard was prepared by the Association wooden housing construction within the framework of the adopted program "General program of work on regulatory and technical support for the production and use of wooden structures." A very detailed document with explanations: what and where to use fasteners, their type and size.
And now another fact: what happened to the self-tapping screws in just a few rainy days.
In 2013, in the summer, the porch of my house was painted. Before painting in the middle of summer, all the boards were removed (fortunately, everything was held on galvanized self-tapping screws). The boards were lightly sanded with a manual electric planer so that burrs did not stick out and the paint lay more evenly. Since the boards had completely dried up in a couple of years and were trimmed, they had to be screwed to new places close to each other, but without much fanaticism. Everything was done quickly without gaps and painted with a covering antiseptic "Vinha", which is used to paint the whole house. What was my surprise when, having arrived at the dacha in the fall (the autumn turned out to be extremely rainy), I found that where the boards below were screwed onto one whole beam of the porch frame, the boards were torn off and went beyond the porch by almost 5 cm! Taking into account the fact that only boards are no more than 1.8 m wide, and they were not subjected to direct precipitation (maximum rare slanting rains on a well-painted surface).
Since it was already quite cold, he did not do anything, leaving next year. The first photo below shows what happened to the 4x40 mm galvanized screws: the screws in the six outer boards (out of a total of twenty) were broken into 3 parts. The first part - the head and body 0.8-1 cm was in the board outside, part of the body about 1-1.5 cm stuck out of the board inside, and about 2 cm remained in the beam of the porch frame, of which only a few pieces turned out, and most failed to catch. Therefore, I had to fasten the boards with self-tapping screws at a slight angle so as not to get into the debris remaining in the timber, Fig. 2.
It seems to me that the love of our frame house builders for self-tapping screws stems from a misunderstanding of the elementary laws of physics and mechanics. It seems to them that if you tighten it tighter, it will be strong and reliable! Well, they screw self-tapping screws wherever they go - they fasten the frames of walls and ceilings with them, mount the slab sheathing and sincerely believe that if you use not hardened, but galvanized screws on the outside, then the house will stand on them for centuries. Oh well...
"Nails! Everyone needs nails!" shouted Krosh in a famous cartoon and was largely right. The North American "CODE" regulates the use of only nails, our SP 31-105-2002 also insists on nails, the Finns and the Swedes out, for some reason they build frame houses using nailers ... Maybe they all don't know that there is such a thing in the world a miracle, like a black Chinese self-tapping screw? =)
However, everything is much more prosaic - the material from which the nail is made implies the possibility of its deformation. That is, in the event of any non-design loads, the nail will bend or stretch without deforming the knocked down parts and without breaking itself.
In the case of a hardened self-tapping screw (and they are all hardened, even galvanized), it turns out that either the parts will be damaged, or the self-tapping screw will simply break. Yes, and the same black self-tapping screws rot only on the way, because they are intended for fixing GKL / GLV where heavy loads are not expected and there is no aggressive effect of moisture on the fastening material.
So, the use of self-tapping screws (screws - one hell of a thing) in the frame of the walls is:
- loss of time for the process (nailing with a nailer is an order of magnitude faster!);
- loss of finances (nails are cheaper than self-tapping screws and bits gradually grind off);
- destruction of fasteners in the future due to corrosion;
- high risk of breakage or destruction of the frame in the event of a strong shear load (strong wind, for example).
The only place where self-tapping screws can be used is the installation of materials to the floor frame, because. in this case, the self-tapping screw is not affected by shear loads, daily operation does not involve the presence of moisture, and you can save on glue and screw nails.
Building a frame house is like assembling a constructor. The wooden frame house is assembled in accordance with the scheme. At the same time, the strength and reliability of the future structure depends on the quality of the assembly units. What are the features of the implementation of the main components and connections of the frame house? And how to properly fix the lower and upper harnesses, racks, jibs, crossbars?
Knots for connecting the lower trim
The lower one is a frame made of a wooden beam or several boards knocked together, which is laid on top. On the concrete foundation under the lower strapping, the so-called beds - boards are placed. They perform the main function - they level the foundation and hide those flaws that could be made during its pouring.
The beds are attached to the concrete foundation with anchors. Mounting points are located at a distance of no more than 0.5 mm. At the same time, at least the ends of the beams are fixed with anchors.
Connecting the bed to the concrete foundation.
To install anchors, holes of a certain depth are drilled. They pass through the board and go deep into the thickness concrete foundation. The depth of drilling and driving in the anchor is determined by the height of the wall of the house and the design of the foundation. For traditional 2.5-3m stud wall on concrete base the depth of the anchor in the concrete is 15-20 cm.
The second option for mounting anchors is to concrete the anchor studs in the process of pouring the foundation. When casting concrete slab or tapes in predetermined places, hollow cones with internal threads are inserted into the thickness of the uncured concrete. After the concrete has hardened, the anchors are screwed into these elongated cone-shaped studs.
Features of the anchor connection
- Holes in the beam are drilled 2-3 mm more than the diameter of the anchor stud.
- Wide washers can be placed under the anchor bolt heads to increase their contact area with wooden surface, and increase the strength of the fastening connection.
 Anchoring bottom harness.
 Before fixing, mandatory waterproofing is carried out - a roofing material is placed on the concrete or its surface is covered with a special waterproof composition, mastic. After installation, check the horizon. Deviations from horizontal level are allowed in sizes not exceeding 0.5 ° per 3 m.
Lower strapping knot on a columnar foundation
The fastening of the structural units of the frame house described above is used on tape and slab foundations. For columnar bases, a different scheme is used:
- For ease of attachment top part column supports should have a flat horizontal head with holes.
- Put on top of the headband wooden beams, which perform the function of grillage.
- In the beams, recesses of the required depth are drilled. They are drilled under the holes in the headband.
- Fix the beam with bolts or screws.
 Strapping from a built-in board on pile foundation.
 On a note
It is necessary to fasten the beam to the foundation. Shallow belts and slabs are subject to significant movement during freezing. Reliable connection bedding and lower strapping ensures the reliability and durability of the entire structure.
The design of the nodes of the frame house
Vertical frame racks are installed on top of the bottom trim and fastened with nails. Fastening with metal corners used for T-shaped connection of beams without cutting. It's easier to do it. Fixation of beams with metal nails is used at the junction with partial cutting of the lower beam. This is a more difficult do-it-yourself connection.
A joint without cutting is used for corner frame supports. Butt joint with fixation with plates or corners is used in the main nodes of a frame house, if the construction is done by hand, without the involvement of professionals. If they work experienced builders, they use a partial stab connection. It prevents strong movements of the timber and frame boards during drying.
On a note
The size of the cutting for the vertical frame rack is 30-50% of the thickness of the lower trim beam.
The corner joint without cutting is fixed with metal plates using wood screws. In this case, reinforced steel corners with several perforations are used. As well as durable self-tapping screws in light golden and silver colors.
Strengthening the corners for fixing the corners of the house is carried out due to technological processing - metal plates hardened during the manufacturing process. Or due to the use of metal with a large section thickness, up to 2-3 mm.
 Ways of fastening racks.
 A punched connection is often used to attach posts in the middle of a wall. The supports are inserted into the prepared recesses and additionally fixed with nails. After that, their fixation in a vertical position is supplemented with jibs - diagonally inclined strips that rest on one side against a vertical rack, on the other - against a horizontal harness. For the convenience of the stop, the ends of the jibs are beveled - they cut off part of the end.
Temporary jibs
In the process of assembling the frame, temporary braces are also installed, which fix several vertical posts. Temporary jibs are placed between the upper and lower trim at an angle. They connect several vertical racks and are fixed with nails.
Temporary jibs are located on the outside of the frame. For their fastening, it is not necessary to cut down, but they need to be fixed in such a way that, upon completion of construction, temporary auxiliary beams can be easily dismantled. Therefore, nails are used to fix them.
 Temporary jibs for racks.
 Temporary braces hold the posts upright until permanent braces are installed at the bottom and top of each stanchion. Once the permanent braces are in place, the temporary fixing beams can be removed.
On a note
The construction project contains a description of the nodes of the frame wooden house in the drawings. He often does not describe in detail the method of attaching temporary jibs, since they do not bear the main load and support the frame temporarily.
Upper binding knots
The upper trim of the frame house is laid on the vertical frame supports after the installation of the corner posts. If the perimeter of the house is large enough (more than 6 m), then in addition to the corner posts, intermediate ones are also placed - in the middle of the wall. And only after - put the top harness.
After laying the top row, temporary braces are attached - through the entire wall. Next - attach the remaining vertical racks and struts to them. After that, the temporary braces between the upper and lower trim are removed.
It is most convenient to assemble the walls of a frame house in a prone position, knocking together the lower trim, vertical posts, crossbar, jibs and upper trim. And only after that, raise the walls to a vertical position, where it remains only to fasten all the walls of the house together. For a strong connection of the walls of the frame house, the second upper trim is used, which overlaps the first upper trim.
 Double top knots.
 When using double top strapping, you can do without the use of steel corners. In this case, there is no need to partially cut off the ends of the boards, performing the connection "in the paw". Because such connections with cutting out part of the butt end violate the integrity of the board and, accordingly, weaken it.
Beams are placed on top of the second upper trim interfloor overlap. The beams are laid on the end, the distance between the beams is set depending on the size of the spans and fastened with nails.
wall corner
The corner of the frame house is the place of maximum heat loss. As a rule, it is in the corners that condensation accumulates and it is they that need to be insulated in the first place. Therefore, even at the frame assembly stage, care must be taken to ensure that the corners of the future frame house are warm. How to do it?
Smooth fixing plates are placed on the outside of the vertical beam. They connect adjacent single-level surfaces of a vertical post and horizontal beams. Fixing corners are located on the side. They connect mutually perpendicular surfaces. What else is important to know about angles?
During construction in regions with a cold climate, non-solid wood is used as vertical racks. wooden beam, but assemble the corner post from separate boards. The resulting design resembles a well. In it inner space install insulation that retains heat, limits possible heat loss.
 Installation of corners in the frame of the house.
 It should also be warm, for this, single racks are used, but the load from window and doorways removed with a bolt. The crossbar is fixed along the entire length of the frame wall with the help of a gash into all vertical posts. At the same time, it is important to take into account that under each window opening there should be at least 1-2 vertical support boards.
Rafter system nodes
To the knots truss system include all connections between its elements, namely:
- Fastening the floor beams to the top trim.
- Fastening the rafter to the upper harness.
- Fastening racks on the gables to the upper trim and to the extreme rafters.
- Fastening of internal racks to the rafter bed and to the ridge.
- Fastening struts - inclined beams that support the rafters and rest on the bed.
- Fastening the crossbar to inclined rafters.
- Lathing fastening.
 The nodes of the truss system.
 The fastenings listed above can be done using corners or using nails if the elements of the truss system are connected with overlapping each other.
Fasteners
The following elements are used as fasteners for the nodes of a frame wooden house:
- Mounting plates (corners or even plates with or without holes). Plates and corners are attached to beams or supports using wood screws.
- Staples (straight and angled) - wire fasteners of a certain diameter. Their edges are bent and inserted into the ends or side surfaces beams.
- Bolts - used to tighten adjacent beams and rafters, inserted into through holes and fixed in them with nuts.
- Nails.
All connecting fixing and fasteners for frame buildings are made from metal. For fastening load-bearing elements use reinforced corners made of hardened steel or increased thickness, 3-4 mm. For fastening the supporting elements, corners made of ordinary steel with a thickness of 2-3 mm are used.
 Variety of fasteners.
 In order to protect against corrosion for the manufacture of corners, plates, galvanized steel is used. Rust protection is especially important in outdoor construction, when metal fasteners in the walls can become the center of moisture condensation, wetting a section of the wall. Therefore, galvanized fasteners are in high demand in various nodes of the frame house.
Node connection errors
The drawing of knots assumes the presence of sketches and descriptions. However, despite this, novice builders often make offensive mistakes. Let's list the main and most frequently repeated erroneous actions that beginner individual builders make when assembling a frame:
Not all jibs are installed. This is not true. The braces ensure the stability of the wall against wind loads. In addition to the jibs, to withstand the wind, it is necessary to use rigid plates in the outer skin.
- Use a solid beam or boards tightly placed next to each other as corner posts. Such a corner will be cold. Moisture will condense in it and mold will grow.
- Use "black" self-tapping screws for fasteners. They are not strong enough, especially if insufficiently dry wood is purchased for construction. When drying and warping, “black” self-tapping screws can be corny “torn off”. A more durable option is golden and silver-colored self-tapping screws, coated with galvanization or a layer of chromating, phosphating.
- An insufficiently dry tree is used, which shrinks heavily and “tears” the existing knots and connections.
- And another mistake is not to use nails. These proven fasteners are often stronger than any self-tapping screws.
Frame construction - new technology, in which, with seeming simplicity, there are many nuances and features.