DIY suspended ceiling. How to make suspended ceilings in your apartment? Types of designs How to make suspended ceilings
IN modern interior suspended ceilings take pride of place. They come in a wide variety of shapes and are mounted from different finishing materials. Their undoubted advantage is simple installation with a minimum execution time.
Peculiarities
When plastering, builders require a certain amount of experience. This process cannot be carried out without preparation. But almost anyone can install the frame on the ceiling with a minimum of tools. The main thing to have in your arsenal is: a drill, a jigsaw, a screwdriver and a level. It should be noted that there is a type of ceiling that requires the attention of professionals. This is a suspended ceiling system. Installation is carried out using special equipment, a heat gun. Home handyman can independently install a suspended ceiling system made of plasterboard, plastic, lining. And also master the Armstrong ceiling structure.


To choose the right type of ceiling covering, you need to consider the following factors:
- functionality;
- aesthetics;
- technical and operational aspects.

When determining the functional characteristics of suspended structures, you should use the instructions and technical sheets from the manufacturer. They describe in detail how to install, what type of premises they are suitable for. different types ceiling. IN technical descriptions examples of calculations are given design features, as well as tables with all the data. Therefore, experts have developed approved documents that indicate for which premises this or that type of ceiling covering is more suitable.


It is necessary to choose not only the material for installation, but also to develop the configuration of the ceiling. The supporting frame must clearly perform its functions.
The choice of ceiling type is significantly influenced by:
- the need to install a ventilation system;
- laying communications for connecting electricity;
- conditioning;
- the need for specific material properties (sound absorption, fire safety, impact resistance);
- service life and the ability to replace individual elements.

Each consumer has a list of his own requirements, especially aesthetic and design ones. But there are also generally accepted ones, from manufacturers of suspended ceiling systems. These include functionality, moisture resistance, thermal insulation, and service life. You need to focus on them.
Acoustics is the way sound travels. For office premises this is a very important criterion. Low noise levels have a beneficial effect on the work process and increase productivity. There are special acoustic plates from German manufacturers that absorb sound well. Their use is justified in rooms with increased level noise.

Suspended ceilings can provide free access to communications, pipes, ventilation, heating systems, fire alarm. To fix the problem, it is enough to remove the decorative ceiling tiles, which will provide access to the ceiling. With the help of a suspended ceiling you can easily hide defects and cracks in the base. The work of installation, dismantling and maintenance is less labor-intensive when compared with other types of finishing. The pendant system makes it possible to place more lamps and absorbs noise.

Development of exclusive designer ceilings of different, sometimes bizarre shapes, can be very expensive for the owner. But she will be one of a kind. Modern materials allow you to make the cellular structure of the suspended ceiling almost invisible. You can order different designs of slabs, and then assemble them into an intricate individual design on the ceiling.

Positive aspects ceiling structures are as follows:
- hide defects and imperfections in the base. This is relevant when carrying out repair work in old buildings, where the ceilings, as a rule, were plastered. Over time, the finishing layer began to crack and could even fall off in some places. This type of coating must be completely beaten off and the solution applied again;
- Manufacturers of building materials offer many solutions for the construction, shape and design of ceilings. The cost depends on the customer’s estimate: from inexpensive to exclusive solutions;
- Very large selection coatings are glass ceiling tiles, plastic, metal, plasterboard, wood. There are brilliant and matte ceilings, as well as with a 3D effect;


- no need to dismantle the entire ceiling to replace part of the covering;
- easy to care for. A damp wipe is sufficient; in addition, the coatings have dust-repellent properties;
- communications, wiring, pipes, ventilation can be laid in the interceiling space;
- suspended ceilings require the use of a variety of lighting devices, such as raster lamps, spotlights, LED systems, chandeliers;
- long service life. Frame elements are guaranteed for 15 years of use. With proper care, the elements of the suspension system last longer;
- have thermal insulation properties, absorb sound, are fireproof, and do not depend on sudden changes in temperature.


The negative aspects of ceiling structures are the following:
- reducing the distance from floor to ceiling. Suspended structure, as a rule, is held on knitting needles, the length of which is 25 cm. In small-sized apartments, the decrease in the height of the room will be very noticeable;
- high price level relative to other materials. It costs less to whitewash the ceiling, taking into account development construction industry, it is better to choose a more expensive one durable material. Each customer strives for individuality, and this can be achieved using modern solutions;
- fear of high humidity. In case of flooding, replacement will be required. decorative covering and load-bearing elements.


Materials
Suspended ceiling consists of metal frame, which occupies the entire base area, and ceiling slabs attached to supporting structures.

Plates can have different types of connection:
- Cells. The entire ceiling is divided into squares or rectangles, which are covered with slabs at the back.
- Tiles. Mainly used in office premises.
- Panels. As decorative element a panel in the form of a rectangle more than 30 cm wide is taken.
- Cassettes. The squares of the frame structure are covered with panels of the same size.


- Reiki. Decorative strips are used for installation different lengths and width.
- Solid ceiling. Most often it is assembled from sheets of plasterboard.
- Stretch ceiling. PVC film is used.


Decorative finishing consists of different materials:
- Drywall sheets. They make it possible to create a perfectly smooth coating that can be puttied, wallpapered, painted, applied decorative plaster. With the help of plasterboard sheets, ceilings appear in the interior different levels and geometric shapes. Drywall is environmentally friendly and complies sanitary standards. His disadvantages include the fact that he is afraid of conditions high humidity and needs a finishing coat.
- Plastic panels. They are made from polycarbonate. Mirror surface plastic ceilings- This is an excellent replacement for glass panels. This ceiling is easy to install, moisture-resistant, resistant to mechanical stress, and easy to clean.


- Metal. These are aluminum or steel slats, cassettes, panels. They can be matte or glossy, with a mirror finish.
- Tree. Any product made from natural wood, is the key to quality and durability. Wood products will never go out of fashion, but their big disadvantage is their high cost. Manufacturers suggest using more in finishing cheap way. Using chipboard and MDF boards, the surface of which is covered with patterns imitating natural wood. You can find slabs covered with veneer.


Frame
Before proceeding with installation, you should calculate the amount of materials, purchase tools, process the base and apply markings.
The sheathing is made of galvanized steel profiles. It is not afraid of moisture, since the profiles are protected by zinc. To install a ceiling made of plasterboard or plastic, you will need ceiling strips (60x27 mm) and guides (27x28 mm), as well as suspensions that will hold the structure: butterflies, connecting couplings, anchor suspensions, connecting elements. To secure it, you need to purchase metal screws and polypropylene dowels.

Tools
Basic tools for self-installation frame structures are as follows:
- angle grinder;
- perforator;
- laser level;
- tape measure, pencil, ruler;
- construction knife and files for metal or wood;
- rule;
- plumb line;

- metal scissors;
- safety glasses;
- hammer with nail puller;
- pliers, crimping pliers;
- metal hacksaw with fine teeth;
- screwdrivers, awl.

A level is needed to apply markings for installing the guide element. The rule is used when cutting drywall sheets. After installing the drywall, further finishing will be required. Tools and materials you may need:
- tape for reinforcing seams;
- sealing tape;
- priming solution;
- putty;
- paint roller and brush;
- spatula;
- abrasive sheet No. 240.

How to calculate consumption?
Armstrong ceiling consumption rates
Knowing the consumption rates, you can:
- independently calculate the amount of required materials;
- count approximate cost procurement;
- make an estimate;
- allocate a budget for work.

Using a square ceiling as an example total area 100 m², let’s do the calculations. The length of the guide strip is 3.6 m. It is installed in increments of 1.2 m. To find out the required quantity, divide the ceiling width of 10 m by the installation increment (1.2 m). This results in 8.33 rows of carriers. Multiply the length of the room 10 m by the number of rows. Almost 84 linear. m, and this is 28 pieces of supporting profiles. A 1.2 m crossbar is placed in 60 cm increments. We repeat a similar calculation: find out the number of rows (10 m length divided by 0.6 m installation step). We have almost 17 of them. linear meters this turns out to be 167. And in pieces it turns out to be almost 140 (167 linear meters must be divided by 1.2 m - the length of the bar).

Guides of 0.6 m are installed in increments of 1.2 m. We calculate in the same way and it turns out that 84 linear meters will be required. m slats. Their number will be 140 pieces. Suspensions are placed on 3.6 m strips with a step of 1.2 m. For 1 m² of ceiling you will need 0.7 pieces of suspension. The corner profile is calculated along the perimeter of the room, its length is 3 m. For 1 m² you need 0.4 linear meters. m.

Using these calculations, you can calculate the consumption of slatted ceilings, acoustic. Do not forget that this is an average calculation. It is better to include 7–10 additional percent in any estimate so that there is no later unpleasant situations. The following factors need to be taken into account:
- shape of the room;
- possibility of placing slats diagonally;
- cutting slabs;
- percentage of defects.


Cost standards for ceilings made of plasterboard sheets
Let's take as an example a ceiling 10 m long and 10 m wide. The size of the ceiling plasterboard is 2500x1200x9.5 mm. As a result of calculations, the following materials will be required for work:
- plasterboard – 100 m²;
- CD profile – 87 pieces;
- UD profile – 14 pieces;
- suspension 60/27 – 160 pieces;
- longitudinal connector – 70 pieces;
- cross-shaped coupling – 160 pieces;
- ceiling dowel - 1600 pieces;
- self-tapping screw “flea” – 900 pieces;
- dowel 6x40 – 200 pieces;
- putty – 40 kg;
- fiberglass tape – 130 running lines. m.


Installation
Installation of a suspended ceiling made of plasterboard
The first thing to do is find an assistant. It is very difficult to attach sheets of drywall yourself; you need safety net. It is better to start with a simple single-level ceiling, preferably a small area.

- Preparation for installation. You need to carefully inspect the walls and ceilings, remove anything that might interfere. Lay communications, repair cracks in the ceiling base.
- Mark the ceiling. At this step you need to decide on the lighting fixtures and their connections. When using spotlights, the ceiling drops 3–4 cm below them total length, and when using raster ones - by 5–10 cm. Look at the degree of curvature of the old ceiling, and avoid making such mistakes with the new one. Using a level, find the lowest angle from which the markings will begin. Having marked the corners, we usually measure an even horizontal line on the walls. This is the bottom line of the UD profile.

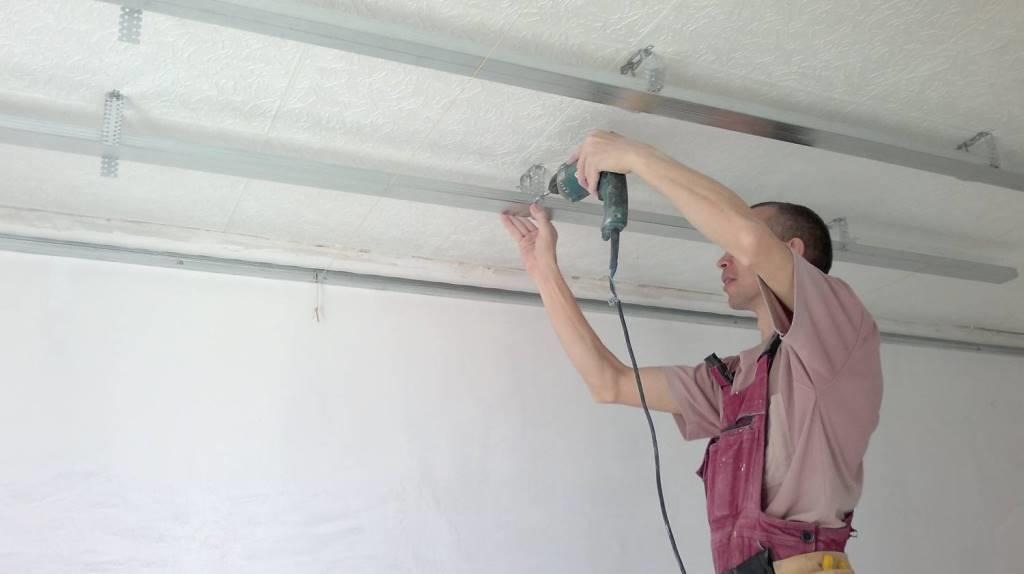
- Installation of frame elements. We fasten the guide profile around the perimeter. To do this, we make holes for the dowels at a distance of 30 cm with a puncher. We screw wood screws into them. The length of the dowel plug must be at least 40 mm. CD profiles are installed in increments of 60 cm. They come in 3 and 4 meters. To give the frame rigidity, you need to use hangers for rack profiles with a fastening pitch of 40 cm.
- Laying communications and choosing a location for the lamp. To install spotlight, you need to use a crown to make a hole in the drywall. Profile entry is not allowed. In the case of a chandelier, it is attached to the base or guide profile. The profile must be additionally reinforced with hangers. The wires are placed in a special corrugated pipe. Communications for the surface-mounted lamp are routed through a hole in the drywall.

- Thermal insulation. The frame structure can and should be insulated with sheets mineral wool. It not only serves as thermal insulation, but also absorbs sound.
- Fastening drywall sheets. Knowing the width between the walls, you need to calculate how many whole sheets and how many pieces are needed. Cut sheets using construction knife or drywall saws. Secure plasterboard sheets with metal self-tapping screws in increments of 25 cm. Heads fastening elements recessed into drywall so that they do not rust over time. Subsequently, they will be covered with putty. Glue at the junction of two sheets special tape and putty with gypsum mixture. After complete drying, the seams must be sanded. The entire surface must be primed so that finishing held up better.


Installation of Armstrong-type suspended structure
- Marking and drawing up a diagram. As in the previous case, you first need to draw up a layout diagram of the structures. Then start marking. Profiles in such a system are not attached to the base, but along the marking lines the master will quickly navigate where the supporting profiles and other jumpers will be located.
- To install a suspended ceiling, you need it lower by at least 15 cm. This is the minimum constructive gap for laying communications and installing lamps. You can also install insulation in this space. Most convenient way Marking a wall means using a laser level. You can use regular bubble levels instead.


- Laying communications. Before you start installing the frame, you need to carry out all the work related to the electrical wiring. For example, if it is known that the lighting device will be large, then its mounting location must be additionally reinforced with suspensions.
- Installation of the frame. After completing all work, you can proceed to installing profiles. Corner profiles are attached to concrete foundations using dowels. Their diameter is 6 mm, they are placed in increments of 30 cm around the entire perimeter. IN wooden base The corner is secured with wood screws. Their length is 30 cm.


If you plan to cover the walls of the room with gypsum plasterboard sheets, then an additional horizontal profile is installed in the metal wall sheathing. This is done for structural rigidity. On this additional profile a wall corner is attached. According to the marked lines, you need to secure a set of fasteners (suspension, butterfly, knitting needle). One set of hangers is required per 1m². In those places where lamps are planned, additional fasteners can be installed.
The supporting profiles (3600) are placed on the wall corners and secured with hangers. The distance between them is 1.2 or 0.6 m. It depends on the drawn diagram. All work must be controlled using a level. Fixed carriers must be positioned strictly horizontally. The hooks of the suspensions are slightly pressed with pliers so that the carriers hold well. The 1200 bearings are placed in 60 cm increments. They fit into the slots located on the 3600 profiles and snap into place. Some craftsmen bend them, but this is not necessary. The frame will already be rigid.

- Installation of ceiling slabs. After all work on the installation of the frame structure is completed, lamps and decorative slabs are installed. Electrical wires are brought in advance to the desired square where the lighting fixture will be located. And the lamp is connected using terminal blocks. First, whole slabs are installed. They are not fastened with anything, they are simply placed on the prepared frame. As a rule, the outer cells may not coincide with the size of the slabs, so trimming will be required. The slabs are easily sawed with a hacksaw and then placed in the holes.

After their installation, the installation of the ceiling can be considered complete. No additional finishing is required. This is the most simple circuit laying slabs, but there are more complex options when slabs are laid diagonally or with a shift. Load-bearing elements allow you to create a frame of different configurations. By choosing such a ceiling, the master has the opportunity to independently engage in design. After all, these coatings can be painted in different colors and combined with each other.


It is worth noting this type of panels as LED lamps. These are panels that look like a screen, covered with a matte film. They are designed for ceiling suspended systems and have standard size 600x600 mm. These panels have very powerful LEDs built into them that emit bright but soft light. It is enough to have one such lamp to create daylight diffused light in a room.
If suspended ceilings can only be installed with the help of specialists, then a slatted or plasterboard ceiling can be installed independently, significantly saving your budget.
Suspended ceilings are the most common method of finishing ceiling surfaces these days. It’s affordable, easy to do with your own hands, and the ceilings last a long time nice view, they can be installed in different rooms and rooms, the main thing is to choose the optimal suspended ceiling covering for the room. Suspended ceilings are similar to each other in that they have a suspended structure that is attached over the entire area of the ceiling in order to hold the facing materials.

But facing materials differ from each other in the material of manufacture, installation method and appearance.
Types of suspended ceilings
- Rack and pinion;
- Tiled;
- Panel;
- Cassette and lattice;
- Tensioners;
- Plasterboard.
A plasterboard ceiling is also considered suspended, because the installation of facing materials is carried out on a frame structure. But unlike other types, plasterboard ceilings require decorative finishing with putty and paint after installation.

The main feature in installing suspended ceilings is that they are all attached to a frame, which is mounted to the sub-ceiling; only the design of the frame itself differs.
For slats, tiles, panels, cassettes, gratings and plasterboard ceiling, the suspended ceiling frame is installed along its entire perimeter on supporting profiles, after which the frame profiles are distributed evenly over the entire surface of the ceiling. The suspended structure for a stretch ceiling is slightly different; it is mounted only along the perimeter of the ceiling surface and the edges of the tension fabric are attached to it.
Making a suspended ceiling with your own hands
You can design and install a suspended ceiling with your own hands if you know the rules and principles of installing the frame and facing materials. The suspended ceiling is metal structure, which is attached to the ceiling and walls, and serves as the basis for the facing material, holding it.
Before you start self-finishing ceiling, you need to carry out some preparatory measures.
Preparatory stage
- Decide on the type of facing materials and their required quantity;
- Calculate the area of the ceiling surface and the amount of materials needed for the frame;
- Prepare the rough ceiling by first clearing it of plaster, paint, wallpaper and other finishing materials that may become loose over time;
- Provide yourself with all the tools and materials necessary for work.

When the area of the ceiling surface is measured, it is necessary to calculate the amount of materials for the frame and finishing. It is better to calculate the material with a small margin than to later lack the necessary material. Ceiling surfaces are often uneven, so the length must be measured along the longest edge; after fixing the frame, the excess length of the profile can be cut off.
Next, you need to prepare the ceiling surface for installation of the frame. The ceiling must be cleaned by removing the old coating. This will make it easier to install the frame structure and prevent the old coating from collapsing.
After the preparatory work, armed with all necessary tools and materials, you can begin finishing the ceiling.
Metal profiles for suspended ceiling frames must be handled very carefully. They must be transported carefully to avoid bending, bulging or other damage. Damaged profiles must be replaced intact, otherwise the structure will be uneven, installation of facing materials will be difficult, and such a ceiling will not withstand the weight of finishing materials.
How to make a suspended ceiling from plasterboard (video)
Instructions on how to make a suspended ceiling
Step-by-step instructions for installing a suspended ceiling will help you make a suspended ceiling with your own hands, without the help of specialists. The first step in creating a suspended ceiling is to mark the level of the suspended ceiling according to the level of the old ceiling, the walls and the height of the room. Marking the ceiling level is carried out using building level, chalk or pencil and tape measure. Using a level, draw a chalk line in a horizontal direction along the highest point of the walls. Then, using a tape measure and chalk, you need to mark the lowest point, and on the walls mark the level of the new ceiling with a horizontal line, this will be a guide for installing the frame.
After marking, you can begin installing the frame; for this you will need:
- Self-tapping screws, dowels or anchors;
- Screwdriver;
- Drill.
Along the perimeter of the upper horizontal line, which is marked on the walls, guides are attached using dowels, dowels or self-tapping screws. After this, markings are made for installing supporting profiles. From the edge of the guide profile, using a tape measure and chalk, mark the future position of the supporting guides at an equal distance, and then fasten them to the surface with dowels. The height of the frame is adjusted by suspensions that are attached to the base ceiling.

When installing the frame, you should take into account the area for lighting; you can remove the wires and install a lamp socket. After installing the frame, you need to check its height according to the marks and the level of the walls using a building level. If unevenness and protrusions are observed, the distance is reduced with the help of suspensions, adjusting them.
After installing the profiles, the strength of its fastening to the ceiling surface, as well as the coupling of the profiles to each other, is checked. If the structure is installed correctly, no irregularities are detected and the frame has been tested for strength, you can begin finishing facing materials. Slabs, panels, slats, plasterboards and others are attached to the frame finishing materials, do decorative finishing.
How to decorate the ceiling
You can do both the installation of the frame and the decorative external finishing of the ceiling yourself. On panel and tiled ceilings, joints are visible; to successfully hide them, use finishing tape or lath. The tape is applied and secured to the joints, in the vertical and horizontal directions, forming stylish finish ceiling surface. Additional costs and the finishing of the plasterboard ceiling requires work.
Required materials:
- Primer;
- Putty;
- Water-based paint.

When puttingtying the joints of plasterboard sheets, it is necessary to fill the holes with the head of the screws so that the surface is perfectly flat.
The plasterboard surface is hidden with a primer, and the joints are leveled with putty, comparing them with the rest of the surface. The surface prepared for painting can be painted.
How to make a suspended ceiling with your own hands (video)
Plasterboard sheets look great on the ceiling in any color, you can safely experiment and repaint. Suspended ceilings have a long service life and are easy to install; by installing a suspended ceiling at home or in the office, you can forget about repair work for ten years.
Before answering the question of how to make a suspended ceiling, and what’s more, with your own hands, let’s define what it is and how suspended ceilings differ from other types of wall coverings.
A slatted ceiling is a structure based on aluminum ceiling panels(slats). The panels are connected to each other using intermediate profiles and corners.
If we are talking about installation in a room with high ceilings, for example, in an office, then you will not be able to install it yourself. In this case, the craftsmen who will be entrusted with this work will have to worry about how to make a suspended ceiling.
A suspended ceiling is more expensive than its plasterboard counterpart, but significantly cheaper than a suspended ceiling.
Advantages of suspended ceilings
Noting the advantages of suspended ceilings, we will focus on the modular version of its design.
Drawing of a slatted suspended ceiling: blue outline - the perimeter of the room; red crosses – places where the stringer is attached to the ceiling; green dotted line – stringer.
This design, depending on the configuration of the module, is divided into cellular, tiled, cassette, panel, lattice and slatted ceilings.
Before installing such a coating, it is necessary to analyze its positive and negative properties. We recommend not to make hasty final conclusions, because many of the positive properties indicated here are also possessed by other types of ceiling coverings, which can also be made with your own hands. Since manufacturers are constantly improving the quality of their products, eliminating certain shortcomings, then, based on the latest data, we note the following advantages of suspended ceilings that can be divided into certain groups.
Return to contents
Possibility of creating a variety of designs
They can be installed quite quickly without the use of “wet” technologies at any time of the year.
They allow you to hide defects in the ceilings of a building, such as cracks, stains, exposed electrical wiring (this is rare, but still occurs). Thanks to this, it is possible to eliminate existing but unnecessary differences in the heights of panel floors or create a relief ceiling on a flat floor.
With their help, it is easy to hide the utility networks of office premises, for example, ventilation and thermal, electrical and computer networks. At the same time, these elements, if necessary, remain easy to access.
A set of slatted suspended ceilings usually includes four elements: the slats themselves, a supporting profile (stringer), a suspension and a wall corner.
Possibility of creating a variety of room designs. For a bathroom or bedroom, you can choose the option of a mirror ceiling. In a room with high walls, you can install a version of a multi-level suspended ceiling. To create domes, vaults and arches, inexpensive plasterboard slabs and mineral fiberglass slabs, as well as various structural elements made of metal.
The ability to install lamps of almost any shape and size, well-reflecting aluminum ceilings improve the overall illumination of the room.
Return to contents
Operating Parameters
Resistance to vibration and dynamic loads. For example, in a gym you can install a “sports ceiling” option, an anti-shock coating that will withstand significant impact loads.
Ecological cleanliness. Only natural ingredients are used.
Ensure that the premises comply with sound insulation requirements. These coatings usually improve acoustic properties. To reduce the noise level in the room, acoustic liners are installed in suspended ceilings in certain places. This achieves noise reduction of up to 40 dB (about 100 times).
In most cases, slatted ceilings are equipped with tires that are slightly larger than required. Therefore, before installing the slatted ceiling, the tire must be cut.
The modular design of the ceiling makes them moisture resistant. So, even at a temperature of 30°C and relative humidity 90% maximum deflection will be no more than 2 mm.
The modular design increases fire resistance, and fire resistance is ensured by the ability to install special temperature sensors in them, which turn on the fire extinguishing system at the right time.
The ability to quickly disassemble and reassemble individual sections of the ceiling if there is a need to repair elements utility networks premises or, if necessary, reach the lighting network. This property turns out to be very useful in everyday life.
They provide good ventilation of the room, which is very important for office spaces where heat is continuously generated, for example, from working computers.
Return to contents
Disadvantages of suspended ceilings
The mounted busbar is connected directly to the end profile.
Minimum distance from concrete floor building to the bottom of the suspended structure is 150 mm. A significant reduction in the height of previously not very high ceilings can have a negative impact on the well-being of those living in the apartment.
Quite a high cost compared to conventional whitewashing, but there is no need to seal cracks and remove defects in floor slabs.
You will have to hire a specialist for installation, which means additional costs.
In the case of a suspended ceiling using plasterboard sheets, it is quite difficult to adjust the sheets so that the joints are not visible.
For those who, despite this warning, decided to mount a suspended ceiling with their own hands, we will give, if possible, detailed description This process for the rack version is perhaps the easiest for installing a suspended ceiling with your own hands.
Return to contents
Types of slatted ceilings
The panels are inserted into the grooves of the end profile and fixed to the rail using a latch.
Slatted ceilings are made from thin aluminum strip. To improve acoustics with inside slats secure a mineral or fiberglass coating. WITH outside they can have a matte or glossy finish. The rail can be plated with chrome or gold, any currently existing veneer, and even mahogany veneer. The profile of the slats can be embossed.
The slats are attached to the ceiling through a supporting profile called a stringer. There are various types stringers. On some, you can attach slats of different widths (for example, P and V profiles), or mount slats, placing them vertically or even vertically diverging (S-profiles).
One edge of the last panel is inserted behind the wall corner until it stops. The panel itself bends down, and its edge wraps around the corner on the opposite wall.
The slats are attached to the stringers by simply snapping them into place. To the wall along which the rail runs, either metal corners, or U-shaped profile. There are ceilings with independent and built-in jointing. They are called closed. Coverings with independent jointing consist of a main strip 80-120 mm wide and a jointing 15-20 mm wide. Slats with built-in jointing can be compared to the well-known “lining”. The length of the slats is 3 or 4 m. For ventilation, holes must be made in the slats of such ceilings.
Structures with no jointing between the slats are called ceilings open type. To ensure that the gaps between the slats are unnoticeable, this design is used in rooms with walls whose height is 5 meters or more.


Want to liven up your space but don't know where to start? A do-it-yourself suspended ceiling (or suspended) is great way transform a room with minimal costs, and step-by-step instructions and recommendations will help you complete the installation efficiently and quickly. By doing the renovation yourself, you get much more satisfaction, both from the process and from the final result.
The decisive factor in the interior is simplicity and beauty, as well as affordable price. IN current conditions, when building materials hit the wallet, repairs turn into real money laundering. A suspended ceiling requires little cost, and it is also easy to do it yourself, without resorting to calling craftsmen for an additional fee.

What materials are suitable:
- Drywall;
- PVC or MDF panels;
- Ceiling tiles;
- Armstrong panels;
- Metal modules;
- Rack plates.
The last three options are the most expensive, so there is no point in talking about them in detail. But it is worth noting the cladding made of plasterboard, PVC panels (or MDF) and ceiling tiles.
Suspended ceilings made from these materials can most often be found in Russian apartments. The design for all materials is the same and does not differ significantly.
Step-by-step instructions for installing suspended ceilings with your own hands
Repairs should begin with an assessment of your capabilities: both physical and material.
Do-it-yourself installation of suspended ceilings can be roughly divided into 4 stages:
- Design;
- Marking;
- Installation of the box (frame);
- Finishing.

Do-it-yourself installation of suspended ceilings does not require specific knowledge in construction industry, but you will still need to spend several days to do everything correctly and efficiently.
It’s not difficult to do the installation yourself, the main thing is to follow step by step instructions and know some of the nuances.
Design of suspended ceilings
Points 1 and 2 are needed for a rough understanding of the sequence in which the installation will take place and what it will look like in the end. At the first stage, the height of the structure is assessed. This is necessary in order to calculate the required space for placing lamps and communications. If you can't visualize what you want, use design programs. There are a great many of them on the Internet.
Modeling programs are available on the Internet and are available for download for free.
Markings for suspended ceilings
Having a “diamond eye” is good, but it’s better not to trust your ego and do everything in accordance with technology. Preliminary markings on the walls are needed to determine the level of the future ceiling.

The following recommendations will help you make the marks correctly:
- Draw a line at an arbitrary height using a laser level;
- Find the lowest point on the surface by measuring the distance from the drawn line to the ceiling;
- Lay down the length by which you want the ceiling to be lowered and make a mark;
- Draw a new horizontal line starting from the previous mark.
Everything in a renovation must be clearly planned. Mistakes can cost money in restoration or rework. It’s better to use the saying “measure 7 times, cut once” than to regret the money and time spent later.
Carry out markings efficiently and accurately, following all recommendations. If you draw the lines incorrectly, the design will become crooked and will have to be redone.
Frame installation
The process of manufacturing a structure for further cladding is not complicated. You need to purchase the necessary materials and begin installation. IN in this case We will talk about a metal frame. This type It is considered stronger and more durable than wooden slats.
The metal frame is reliable and simple. In case of installation wooden slats additional processing of the material is required. This option is not suitable for city apartments.
Step-by-step instructions for installing a metal frame for suspended ceilings:
- The profile guides are attached to a horizontal line on the wall (delayed height) using dowels, screws or anchors;
- The metal frame is installed along the entire perimeter of the ceiling;
- The profiles are strengthened using special hangers so that in the future the structure does not sag and lose its appearance;
- The metal frame is connected to suspensions and is adjustable in one plane horizontally;
- Before the final cladding, you should make sure that all technology has been followed correctly and the structure is securely fixed to the ceiling.
Making the frame is the most difficult part of the entire installation. This is followed by cladding with the material of your choice (MDF or PVC panels, plasterboard, Armstrong or polystyrene foam boards) and final processing (painting, installation of lighting equipment).
Detailed video installation instructions are available on the Internet for a better understanding of what you have to deal with. Review them in advance so that questions and controversial situations do not arise during the process.
Final work on installation of suspended ceilings
If you choose Armstrong panels, they are simply installed in pre-made areas in the structure. If you prefer plasterboard, then using self-tapping screws the sheets are attached to metal profiles and finished with putty, followed by painting. MDF and PVC panels require fastening to the frame using hardware. After completing the final work, all that remains is to admire your own creation and accept the well-deserved praise.
Advantages of suspended ceilings
When deciding to make repairs and choosing this or that type of material, you should weigh all the pros and cons and make right choice. The name “suspended ceiling” speaks for itself. Its structure is attached to the main surface using hangers at a certain distance.

Many arguments can be made in favor of suspended ceilings. The most significant advantages are:
- Installation is easy to do with your own hands;
- The design hides ceiling imperfections (unevenness, cracks), as well as ugly communications and wires;
- The surface is perfectly flat;
- The coating does not accumulate condensation;
- No specific surface care is required (most materials are dust-repellent, which means they simply do not become dirty);
- The color range of coatings allows you to choose an option for any room with a wide variety of designs;
- Possibility to install lighting fixtures in any order.
While describing the advantages, one cannot fail to mention the most main drawback such structures are a significant height fence. Installation requires a significant sacrifice of space. Of course, this is not such a big minus, but you will have to forget about the luxurious chandeliers. This problem is especially acute in small-sized apartments with an old layout.
How to make a suspended ceiling with your own hands (video)
Suspended ceilings are inexpensive, but beautiful way transform your home. Considering the number of advantages and minor disadvantages, choosing this option is definitely worth making. Huge popularity this method can be explained by the fact that the installation of the structure is easy to do independently and without huge material costs.
A suspended ceiling is an excellent solution for people who want to carry out repairs and level the surface themselves. In this case, there is no need to carry out plastering work or use canvases that are needed for a stretch ceiling; it is enough to make a frame from a profile and install the required material on it. You can learn in detail how to make a suspended ceiling yourself from the article.
Types of ceilings
The main difference between a suspended ceiling is the material used for cladding, because you can use tiles, panels and other materials. Among the types used, the following should be highlighted:
- Tiled ceiling. Typically used in shops, offices and other places where many people gather. By analogy, you can use other, more accessible MDF materials, drywall.
- Panel ceiling. Plastic is often used. Easy to install yourself; sometimes plastic is replaced with wood. Connects through grooves, leaving no gaps.
- Slatted ceiling. This includes metal panels, which are easy to install yourself, without special hardware.
 Slat ceilings
 - Cellular and slatted ceiling. The main covering of this type is a panel made of aluminum or steel.
The most difficult thing to install is plasterboard on the ceiling, since it will require not only a frame, but also finishing work. Therefore, below we will describe how to create a plasterboard ceiling yourself.
When is drywall used?
Such material for the ceiling is selected in several cases:
- When renovation work needs to be carried out in a short time with minimal effort, then plasterboard sheets will be easiest to install for a novice builder when compared with plastering the surface. In addition, there is no need to wait for the putty or other mixture to dry.
- The material is used when there is a need to hide wires and other communications.
- The material is excellent for mounting ceiling spotlights.
- Suitable for additional insulation, since there is a gap behind the sheet of drywall where it will be convenient to lay insulating materials.
- If you don’t have the skills to work with plaster, but the surface needs to be leveled, then the material will be ideal for use.
There is also a list of disadvantages of this material, so before installing a suspended ceiling, you need to know the following:
- Such a suspended ceiling will steal the height of the room.
- To carry out the work efficiently, you will need to use a hammer drill, a screwdriver, and also have the skills to master a level.
- After some time, cracks may form at the joints of the sheets on the surface.
- The work of leveling the surface cannot be done independently.
- The work can be carried out in the bathroom, but in this case it will be necessary to use sheets of moisture-resistant plasterboard, which will be somewhat more expensive than usual.
Knowing the main features of the material, as well as what suspended ceilings are made of, you can begin work, and the first thing you need to do is prepare necessary materials and tools.
Advice! The ceiling can be made of gypsum fiber material, which will have increased strength and is not subject to combustion, however, in this case it is necessary to create a stronger and stronger frame, since the sheets are heavier than ordinary plasterboard.
Materials and tools
At the very beginning, you will need to prepare and buy the following:
- Directly the required number of plasterboard sheets, the thickness of which will be about 9 mm. If the work is carried out in the bathroom or kitchen, then moisture-resistant sheets are used.
- Ceiling profiles (CD) 60x27, as well as guides (UD) 28x27 are purchased.
- You need to purchase dowels, screws and anchors for installation.
- Buy pendants.
- The fasteners that can be used to connect the profiles are called “crabs”.
- Prepare a self-adhesive sealing tape so that the frame fits tightly to the base.
The next step is to prepare the necessary tool for the job. For installation, you will need to prepare a tape measure, a level and several pencils or markers; for drilling, you will need a hammer drill; to fasten the sheets, you will need a screwdriver. Additionally, you need to prepare a knife, metal scissors, a hammer, and a string for precise marking. After the work, you will also need to plaster the sheets, and for this you will need several spatulas of different sizes, a sanding mesh and a grater for it, a serpyanka that will be used at the joints, primer and putty.
Preparatory work
Before installing such a ceiling, preparatory work is carried out, which consists of the following:
- Initially, you need to finish leveling the walls in the room, and the installation locations of the frame must be ideal.
- Draw a sketch on the sheet to count required quantity material. Additionally, the ceiling is drawn, or rather, a diagram of the frame is made in order to calculate all the points of contact of the sheets on the profiles. This step will allow you to avoid mistakes when fastening the sheets, since it is not always possible to secure the edge of the drywall into the profile.
 Sketch of a suspended ceiling made of plasterboard
 - Next, all defects that are on the ceiling are removed, even despite the fact that it will be closed. This will not allow the old to crumble finishing coating onto sheets. It is also recommended to seal all possible cracks and then open the surface with a primer.
Advice! Final finishing should be carried out when the drywall sheets have already been installed and securely fixed.
Marking
The next step is to mark the entire surface. This will be required to make a perfectly flat horizontal line that will be perpendicular to the floor and will run throughout the room. In addition, the marking is a guideline for starting installation when the starting profile is attached.
 Wall marking
 To carry out marking you need:
- Select the appropriate height. If a ceiling spotlight is used, the suspended ceiling should be lowered by at least 8 cm. If such lighting is not used, then you can limit yourself to 5 cm.
- Next is the lowest point. Measurements are taken in the corners and in the center of the room, the lowest height is marked on the wall with a pencil and the ceiling is lowered from it.
- The resulting height must be transferred to all walls, after which the currents are connected horizontally with a cord.
Advice! The outer profile is attached at a distance of no more than 25 cm from the wall; inside the step is 40-60 cm; if the work is carried out in the bathroom, then it is better to take a step of 40 cm.
Frame installation
Installation begins by fixing the guide profile:
- The guides need to be attached to the lines with the bottom edge, and marks must be made through the hole in the profile so that dowels can be used.
- Next, holes are made in the wall using a hammer drill.
- A sealant is glued to the profile, and then fastened to the wall through dowels. The ceiling is fixed through hangers, which should also be covered with a sealant, but secured with anchors.
On the hangers you will need to fix supporting profiles, the ends of which will be inserted into the guides. After the profile is securely fastened, it is necessary to bend the free ends of the hangers on both sides.
 Beginning of frame installation
 If the suspended ceiling is in the bathroom or hallway, then it will be very easy to make the frame yourself. As for the hall, kitchen or other rooms, which are much larger in area, you will need to attach additional transverse profiles, and sheets of drywall with short pieces will be mounted to them. Next, the profiles are joined using a “crab”. The end result should be a frame that looks like a large lattice.
 Ready frame
 Frame covering
Before sewing up the frame and installing the sheets, all necessary communications must be carried out. It is recommended to lay the wiring in a special corrugation, and then remove the necessary parts of the wires for lighting. By the way, in the bathroom this condition must be observed and it is better to use spotlights for the bathroom.
Before fastening begins, you need to cut out the sheets of drywall. This work is carried out on the floor using a regular kitchen or stationery knife. Additionally, holes are made for lamps.
The cut sheets are applied to the frame so that the edge of the sheet is in the middle of the profile, this will allow subsequent sheets to be properly secured. Fixation is carried out with self-tapping screws, with the following parameters:
- There should be 1-1.5 cm from the edge of the drywall to the place of fixation.
- The gap between the screws is no more than 15 cm.
- You need to screw the self-tapping screw 5 mm inwards.
 Sewing the frame
 There are a few more important features during installation:
- The gaps between the joints of materials should be up to 2 cm, no more. If necessary, a chamfer is made.
- It is recommended to sew up the ceiling initially in whole pieces, and then in cut pieces. This will allow you to accurately understand the dimensions of the parts that are still needed for the ceiling.
- You will need to make a small gap between the drywall and the wall, up to 1 cm.
 Finished drywall work
 At this step, the work is completed, but to bring it to its final form, it will need to be plastered; in the bathroom you can use special mixtures that are not afraid of water.
Finishing work
When the suspended ceiling is installed, all that remains is its finishing. Initially, you need to putty, according to the usual scheme, for any type of drywall:
- Reinforcing tape is applied to the joints to prevent cracks from appearing on the already finished ceiling in the future.
- Next, the ceiling seams are puttied, and the recesses of the self-tapping screws are also puttied.
 Plastering the ceiling
 - When the mixture on the ceiling dries, you need to wipe everything with a mesh.
- The next step is priming the ceiling and then applying finishing putty.
- The surface of the ceiling is sanded, after which everything is covered with a primer again and the final finishing is carried out - wallpapering or painting the ceiling.
 Suspended plasterboard ceiling
 Using these simple recommendations and rules, you can make a false ceiling yourself, in the bathroom or other rooms. If you follow the instructions, there will be no difficulties in making the ceiling, and the surface will be perfectly flat.