DIY chair - simple step-by-step instructions from design to decoration (115 photos). How to make a simple chair from boards How to make an extendable chair with your own hands
It’s true what they say: the Internet is a treasure trove useful information. People share valuable knowledge here and original ideas, opening up more and more new perspectives for each other.
A person without experience and skills receives unique opportunity organize for yourself furniture production at home. There are many detailed master classes with ready-made diagrams that will help you make any furniture, whether you have the necessary tools for this and a penchant for the craft.
Of course, you should start with simple projects, like the one presented in this master class. Anna White, a well-known craftswoman in narrow circles, has prepared for everyone detailed instructions, which talks about how to make a simple chair from boards for your home or terrace with your own hands.
When finished, it comes complete with stylish pillows. You can also make them yourself. Anna will briefly tell us about this too.
In this project you can use the simplest lumber that does not require processing. milling machine and production of complex groove joints.
Gather your materials and prepare everything you need before you begin. You will need:
Materials:
1. pine board 50 mm thick:
- 4 pcs x 50 x 100 x 550 mm - leg parts;
- 2 pcs x 50 x 100 x 810 mm - armrest parts;
- 6 pcs x 50 x 150 x 710 mm - side panel trim parts;
- 2 pcs x 30 x 30 x 710 mm - slats for seat parts;
- 4 pcs x 50 x 150 x 620 mm - back parts and lower part of the front panel;
- 2 pcs x 50 x 100 x 620 mm - upper part of the back and upper part of the front panel;
- 5 pcs x 50 x 100 x 620 mm - seat parts.
2. glue for woodworking;
3. furniture screws;
4. stain or protective and decorative oil for wood processing and tinting;
5. furniture varnish with transparent coating or varnish toner.
Tools:
- circular saw or a miter saw for cutting boards;
- sander;
- electric drill;
- screwdriver;
- paint brushes;
- soft, lint-free cloth for oil;
- construction tape and square;
- pencil.
Step one: detailing and marking parts
When deciding on the final dimensions of the chair, the author proceeded from the dimensions of the seat and pillows for it. The seat is an even square with sides of 620 mm. If you want to change the dimensions of the chair, all the dimensions indicated in the master class will have to be recalculated.
Otherwise, take advantage of these great detailed diagrams and write down on paper all the details that you will need for the job. Please indicate the exact size of each part. You can find a list of them in the list of materials for this master class.
Before you start, make sure that all your boards are planed to the same thickness, otherwise the finished chair will look like a typical sample handicraft. This processing of boards is carried out using a surface planer. As a last resort, you can order it from a workshop, but it is better to initially select properly processed lumber.
Mark the parts of the chair using a pencil and a square. Square - especially useful tool, if you plan to cut the boards by hand using a hacksaw.


Step two: making parts from boards
You will need thick boards 50mm thick, but different widths: 100 and 150 mm. In addition, prepare a rail no narrower than 30 mm for making parts of the base for the seat.
Cut the board into pieces of the required length using miter saw or manual circular saw. Both of these tools allow you to make perfectly straight cuts, which is very important when making furniture.
If you use a hand saw for wood, expect to have to adjust the cuts by hand to get neat, tight joints.
Sand all the parts in any way convenient for you. For example, an electric sander. For sanding pine, a piece of a block with a sandpaper. True, such work will take much more time.

Step three: assembling the wooden chair
Attach the trim pieces to the legs at intervals of approximately 20 mm. Pre-drill holes in the places where the screws will be screwed in to prevent the boards from splitting.
If you want the chair to serve you for a long time, use glue. In this case, apply a little wood glue to the joint, press the parts together and tighten the screw or self-tapping screw.
Fix the armrest on each of the side panels and connect the side panels to each other with the upper part of the backrest. Please note that along the inside of the chair all the upholstery parts are located flush with the frame, and along the outer contour they are somewhat recessed inward.
Insert your working strip into the gap between the side panels, place the upper part of the backrest in its proper place and secure it with screws. Screw the remaining back elements.
On the front panel, secure at the bottom wide board, and at the top - narrow by 100 mm. Sew up the seat and to complete the assembly, secure the top back piece, placing it flat.
Try to screw in the screws in the same vertical line to make the job look neater.
After some time has passed, when the chairs have already been tested in everyday life, the author advises fastening the seat parts in such a way that the seat itself is positioned at a slight angle. This will make sitting much more comfortable. The same can be said about the back of the chair.


Step four: wood processing
It is convenient because it allows you to easily apply the composition and repeat this procedure at any time in order to refresh the product. In this case, all preparation of the surface for re-painting comes down to light sanding by hand with sandpaper.
You can also use alcohol stain in combination with several layers of furniture varnish or, say, natural drying oil.
Apply the stain with a brush along the grain and try not to touch already painted areas again, otherwise the tone will be uneven.
A good alternative is also a decorative toner oil, which not only imitates valuable species wood, but also protects the tree from rot, the formation of mold and fungi, as well as from exposure to moisture.
You can varnish the chair with matte furniture varnish in order to extend its service life. Do not use varnishes on water based, since they do not have a sufficient level of strength and wear out quickly.
Apply the varnish in several layers, sanding each previous layer as soon as it hardens. Use fine-grained sandpaper for this, and do the sanding itself carefully, without much pressure. Finishing layer There is no need to sand the varnish.


Step five: finishing touch
Such simple furniture like this wooden chair, it needs beautiful textiles. The author used ready-made furniture pillows with floral patterns.
However, you can make pillows with your own hands. To do this, you will need foam rubber (preferably furniture grade, high-strength), batting or thin foam rubber to give the pillows shape and additional volume, as well as strong threads, suitable fabric and a sewing machine.
Cut the thick foam into pieces of the size you need. IN in this case into squares with sides 600 mm. Wrap them in one or two layers of thin foam or batting. Attach the fabric and determine on the spot how much you will need to sew the covers.
You can also make the covers in advance according to the pattern and, based on their size and shape, prepare the filler.
If you plan to wash the covers and always keep the pillows clean, sew the covers from simple thick fabric and make a removable set with zippers that you can always remove and wash in the machine.
The idea to make a baby easy chair DIY has a number of advantages. The main one is the opportunity to save money. Homemade furniture It costs several times less than purchased products. When making interior items yourself, you can choose optimal design, size and color of the final product. 
Related articles:
Children's room
The room for the child should be spacious enough for games, cabinets, tables and chairs, toys and other accessories. And most importantly - a comfortable and functional place to relax. Installing a bed is not always justified, especially in small rooms. Frame products also do not always meet safety aspects. In such cases, parents think about how to make a children's bed that can be transformed into a chair. This is a feasible task that can be solved without the involvement of specialists.
Thanks to creative approach you can make safe upholstered furniture that the child can independently move, disassemble and assemble.
Frameless chair that can change shape
Such products consist of several pillows fastened together. These interior elements have many advantages.
They are as follows:
- Light weight. To make transformable furniture, timber, plywood and heavy pressed boards are not used. The chair can be easily moved to a new place when the need arises.
- Safety. The accessory does not have hard surfaces and sharp corners that children can hit. When unfolded, the height of the soft part above the floor does not exceed 20 cm - a child falling in his sleep will not cause him any discomfort.
- Presentability. Properly made and tastefully decorated furniture looks beautiful and representative, fitting organically into the interior.
A folding chair without a frame is easy to maintain and repair. It can be easily disassembled into component parts that can be quickly replaced or updated.
What you need
Before starting work, it will be necessary to conduct a survey of the premises and draw up diagrams. You need to measure the size of the free niches and the area that can be occupied by furniture. If you make several identical items, you can use them to assemble a sofa or corner for spending time together with your child’s family or friends.
To make a child seat with your own hands, you will need to accurately calculate the need for materials. It is advisable not to skimp on fabric and make all pillows the same color on both sides. This way the furniture will look much better when unfolded.
Calculate the pattern frameless chair you can use paper copies of each pillow and ottoman to scale. The cut rectangles are laid on the fabric roll strip layout so that there is less waste. Separately, it is advisable to add a supply of material to the calculations for replacement in case of damage to the product.
To make a chair with your own hands you need the following materials:
- foam rubber slabs 10 cm thick;
- upholstery fabric;
- inexpensive chintz;
- braid 2 cm and 5 cm wide;
- threads;
- detachable zippers;
- decorative elements;
- synthetic glue.
Tools needed to make a chair:
- sewing machine;
- tailor's meter;
- roulette;
- scissors;
- stationery knife;
- marker or pencil.
Since the foam will have to be cut sharp knife, That flooring It is recommended to protect it during operation. For this, plywood or a piece of old linoleum is used.
Sewing order
To make upholstered folding furniture, you must have a sufficient supply of needles and threads.
Sewing covers is carried out in the following sequence:
- A strip of material is spread on the floor. If there is such a possibility, it is better to fix it tightly in the corners in a taut state.
- The patterns are transferred to the fabric. It is advisable to place the templates on the same line in order to obtain several blanks with one cut. The details of the pattern are made clearly visible. The part marking is applied on the reverse side.
- The marking is checked for correctness. After this, the material is cut with scissors. The excess is removed, and the blanks are stacked.
- The edges of the workpieces are finished using an overlocker. The covers are sewn together, zippers and wide braid are attached to them.
To strengthen the edges of pillows and give correct form, sew a narrow braid along the corners of the covers.
You can sew a bean bag chair with your own hands in the same way. Since it has a rounded shape, the seams do not need to be reinforced with braid.
Filling the filler
For a pear-shaped product, an inner cover is made of thick fabric. It is necessary to retain small fragments and dust. Foam balls, polyethylene or polyvinyl chloride can be used as filler. All these materials are environmentally friendly and are sold on construction markets.
To fill the cover, 0.3-0.5 m³ of material is required. To accurately calculate the need, you need to multiply half the length of the rounded part by the width and depth of the base. It is recommended to purchase balls with a reserve of 20-30% in order to add them to the case as the filler shrinks. Backfilling is carried out using a scoop; the completeness is determined experimentally. The receiver of the work is the child. After filling the inner reservoir, it is zipped up and the outer cover is pulled over the top.
Children's chair made from scrap materials
Making armchairs and chairs from foam rubber, polyurethane foam and mattresses is an excellent and profitable way to recycle old things. Old beds, wardrobes and sofas are used as starting materials. Their components are used as blanks for frames, sides, armrests and niches for things.
Tools and materials
To make folding upholstered furniture, you will need:
- roulette;
- hacksaw;
- square;
- electric drill;
- screwdrivers;
- wrenches;
- sandpaper;
- PVA glue;
- sewing machine;
- ruler;
- marker.
If a sofa is being disassembled, then the work uses a folding mechanism, corners, bolts and nuts.
What do you do with old furniture?
At home, you want to relax in a comfortable environment, feeling coziness around you. Required attribute to create it is upholstered furniture. The sofas and armchairs presented in stores are not always satisfactory in design or quality, not to mention the current prices. Alternatively, you can make a chair with your own hands, which is guaranteed to meet all individual preferences. Sizes, upholstery tone and level of softness - everything can be chosen to your liking, resulting in a designer piece of furniture.
Before starting work on assembling a chair at home, you need to decide on the basic parameters of the future product. You should start with the appearance. In accordance with the style of the room where the upholstered furniture will be installed, a suitable model is selected.
It is advisable to explore the range finished products in exhibition halls or look at photos in catalogs. In the first case, you can clearly see and touch the planned model, but the search will take some time. In the second case, the time spent will be minimal, but the final appearance may differ significantly from the desired one.
Having studied the range of chairs and decided on the model, you can begin preparatory work. First, you should measure the place where you plan to put the furniture and calculate the dimensions. To avoid mistakes in fitting parts and not to forget anything, competent drawings and diagrams are drawn up.
The generally accepted ergonomic seat height is approximately 45 cm, its width and depth vary from 40 to 45 cm. The height of the backrest from the floor should be about 1 meter. For comfortable sitting, a slope of 3 cm is made from the edge to the back.
To make a drawing of a chair on a sheet of graph paper or checkered paper, first draw a complete finished model, after which the following are displayed separately:
- back;
- side detail;
- seat;
- armrests.
When schematically modeling, it is necessary to take into account the thickness of the material from which the chair will be made. Synthetic and natural fabrics have different parameters, which can affect the final collection of parts. After completing the drawing, it is advisable to draw part templates on cardboard and cut them out. This will allow you to try on sizes in life size and project the necessary elements on the material.
Before purchasing, a full calculation of the quantity of required materials must be carried out. This is done in order to avoid going to the store again and purchasing unnecessary parts.
For components you can go to construction market or to a specialty store. You can also order materials for delivery, but in this case it will not be possible to visually evaluate their appearance and quality.


Materials and tools
The frame is an important part for any furniture. To make a chair correctly, you should decide on the material in advance. Most often used:
- tree;
- Chipboard, laminated chipboard;
- plywood;
- metal.
Wooden frames are the most environmentally friendly and do not cause allergies. A chair made from boards will last a long time if the wood good quality and chosen correctly. You should not take lumber with bark, cracks, or unclear geometry - all this will lead to cracking and deformation finished product.
A homemade chair with a frame made of chipboard is durable if the material is of sufficient density, thickness, dry and does not crumble. Unlike a tree synthetic material You cannot paint or give the surface the desired texture and tone.
Plywood is also used to make frames home chair. Due to the unattractive texture of the material, it is closed soft upholstery. With proper fastening, plywood thickness 15 mm and above, the part can be used for a long time.
On the market building materials laminated plywood appeared, which has an attractive appearance. It can be used for open parts of the chair without losing the visual effect.
A do-it-yourself chair frame made of metal will be the most durable, but its weight will significantly exceed other options. The disadvantage is that it can only be done with specialized welding tools. You can fasten the metal parts with nuts and bolts, but over time such a frame will begin to loosen and rattle.
Regardless of what material the frame for the chair will be made from with your own hands, this part is the main one and must be assembled with high quality and durability.

Solid wood


Thick furniture fabric is prepared for upholstery. The most common options:
- chenille;
- tapestry;
- jacquard;
- velours;
- flock;
- synthetic or genuine leather.
The choice of material is made taking into account future operating conditions. So, if you have pets or children who, due to their age, can damage or stain the fabric, it is better to give preference to easy-to-care, wear-resistant materials. Parts must be cut out with seam allowances, so material should be purchased with a small margin.
Soft elements are filled with furniture foam rubber with a density of 30 and higher. You can make upholstery from scrap materials, for example, use old blankets or pillows instead of foam rubber.


To make a chair with your own hands you will need:
- screwdriver or welding machine;
- a jigsaw with the necessary attachments or a grinder saw;
- furniture stapler;
- sewing machine;
- scissors;
- chalk or a piece of dry soap;
- grinding machine;
- hardware for fastening parts.
All tools, as well as components, must be prepared before the installation process begins, so as not to waste time searching for the necessary elements.

Tools
Manufacturing stages based on the model
The process of making a chair with your own hands directly depends on the chosen model. Homemade products may not even be inferior in comfort and appearance to their factory counterparts.
Traditional
Traditional chair is great design solution to create a comfortable environment in the home. Unlike sofas, armchairs take up much less space, and making them with your own hands from wood, chipboard or metal is faster and easier.
After preparing the tools, a location for assembly is selected. It is advisable that no one moves the laid out materials. It is important to provide side effects from the manufacturing process and their consequences for others. When cutting wood with a jigsaw, sawdust should not get on furniture and interior items, and when using inverter welding, you must adhere to the requirements fire safety. When all preparations are completed, you can begin installation.
Stages of work:
- using cardboard templates, transfer the layout of the parts onto the frame materials;
- use a jigsaw or grinder to cut elements along the lines of the drawing;
- if necessary, process open parts made of beams with a grinding machine;
- screwdriver or using welding machine fasten the frame parts;
- draw on furniture fabric upholstery pattern, cut with seam allowances of 1 cm, sew parts;
- cut and cut furniture foam, fill upholstery;
- the armrests are wrapped in foam rubber and secured with a special stapler. Decorative wooden armrests, if necessary, are secured on top with a screwdriver and self-tapping screws.
If a wooden chair will be placed in a room with high humidity, after assembling the frame, it should be treated with bioprotective agents.
After completing the installation work, you can decorate the chair to your liking. Small buttons are covered with furniture fabric, which are sewn onto the product in checkerboard pattern. By applying paints of different colors and sanding wooden elements decorated in an antique style with your own hands.


Folding
A folding chair is a great way to organize a place to relax. Such a piece of furniture made for use on garden plots, indispensable in summer period. A garden chair made by yourself will fulfill its functional purpose to the fullest and will not be inferior to factory-made analogues. The possibilities of using a folding piece of furniture allow it to be used in the most unexpected situations: overnight guests, moving, relaxing on the veranda. The wooden chair is made in the most different styles. Having chosen a design and completed a drawing, you can begin assembly work:
- cut the prepared materials with a jigsaw or grinder to the required sizes;
- treat the surface with a grinding machine to make it smooth, otherwise sharp traumatic particles may separate;
- treat with bioprotective agents and dry well;
- paint all the parts in the desired color;
- assemble the chair frame using a screwdriver, self-tapping screws and the necessary fasteners.
Wooden chairs can be decorated to suit almost any style. Varnishes, paints and patinated enamels are used for processing.
The finished chair should definitely be checked for strength. At correct execution all points folding chair made of timber will last a long time.


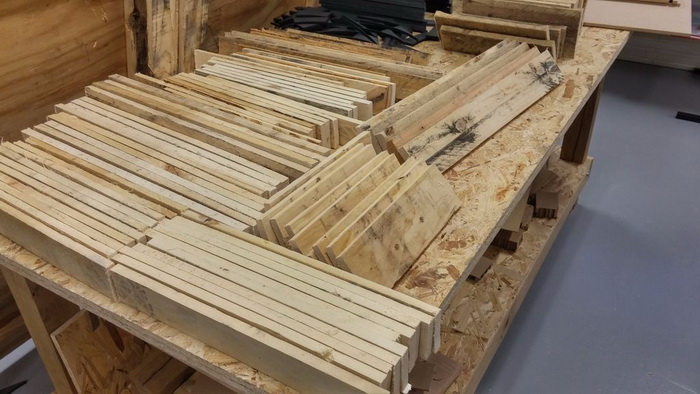
From pallets
Construction pallets are assembled from flat boards that have dried and will no longer change their geometry. However, their use as a material for self-made chairs are widespread. Pallets make original loft-style models that are almost no different from design options. Manufacturing includes several stages:
- After selecting the model and carrying out the preparation using grinder the boards are sanded. Without this process, the wood may delaminate.
- Using a jigsaw or grinder, the pallets are cut in half, the edges are sanded and painted over.
- From the elements you need to assemble a frame chair from boards of the desired shape, and then secure the elements with self-tapping screws and a screwdriver.
This DIY garden chair looks no worse than store-bought counterparts. For comfortable use of pallet seats, it is necessary to sew cushions on them. The fabric is selected based on the operating conditions of the furniture. As a filler you can use foam rubber, holofiber, synthetic padding polystyrene, polystyrene foam balls.


Soft cozy armchairs for home for relaxation and communication
You can’t do without an armchair, just like without a sofa. We love to relax after a hard day at work, sitting in it with a cup of coffee or watching our favorite show, movie, series. Besides ordinary furniture There is also a frameless one. It went on sale not long ago, but is already becoming widespread; this type of furniture is especially popular among children. The price for this innovation is increased.

Frameless bright beanbag chair “Shapito”
If you want to please your children and give them such a thing, you don’t have to run to the store. If you know how to sew, show your skill and imagination, try to make an upholstered chair yourself. On the Internet you can now find many patterns with step by step description work.

Handmade polka dot bean bag chair

Handmade frameless furniture
Making an upholstered chair has many advantages.
- This thing is light in weight, can be easily moved, and is completely harmless, since it is intended for children who will not only sit there, but also use it in play.
- To create it you don’t need any specific knowledge; you just need to have sewing skills. A bean bag chair is simply a cover filled with a synthetic filler - polystyrene foam, so it is comfortable to sit on.
- It will take a little time to make the chair, and the children will be happy to help make it.
- You will create an exceptional thing, turning dreams and ideas into reality.
- By creating a chair with your own hands, you will significantly save your family budget.
- Inexperienced needlewomen can easily handle the work.
- Part necessary materials you can find it at home, choose according to your taste color scheme and decide on a design.

Unusual frameless chair-bed
We decide on the design and construction (what types of products are there, what to choose, what is easier and what is more difficult to make)

Rocking chair with soft seat and back, made by hand
Armchair - comfortable furniture with backrest and armrests. But not all chairs have them; the upholstery can be leather or fabric. The shape of the back and armrests can be straight or round. They also differ in type, it all depends on what the chair is intended for, for what room - in a nursery, in a living room or bedroom, in an office.

Soft and fluffy chair for a child, made by yourself
The choice of chairs intended for children must be approached with particular care. It is important that the design is equipped with a system that allows you to change the height of the back and seat, which affects the child’s posture. If this is not taken into account, the child may develop scoliosis. Living room furniture is placed not only in the bedroom, but also in other rooms. We usually relax on it. Office chair suitable for work, it is comfortable, but does not allow you to relax.

Soft ottomans in bright colors in the interior of a modern living room
The chairs also differ in structure. An ordinary chair with a back and armrests, you can simply sit in it, sit comfortably in front of the TV or read. For small rooms it is convenient to use chair-beds. Transformable chairs are popular; they do not convert into a bed, but by reclining the back, you can fully relax. Bean bag chairs are more common in children's rooms. Children simply love to sit on them and play with them. This chair is easy to make at home. Rocking chairs are rare.
![]()
Unusual soft transformable chairs for relaxing in the room or on the balcony

A cute plush chair for a nursery - your baby will definitely like it
Once you have decided and decided which chair you would like, it is important to consider some points. When making furniture with a frame, you need to pay attention to its property - it must be strong. Suitable materials are metal, natural wood, MDF, chipboard, you can use bamboo or rattan.

Wooden frame for a chair-bed, perfect for small spaces
The materials for the bean bag chair - the cover and the filling - must be wear-resistant and natural. Nowadays there are a lot of armchairs, before choosing or making one, you need to know what model you want, its purpose and whether it fits the overall interior of the room.

Leather bean bag chair in the living room by the fireplace
Required materials

Inner and outer parts for making a bean bag chair with your own hands
To make a bean bag chair, you will need materials: approximately 3 meters of satin or calico for the inner cover, 3.5 meters of furniture fabric for the outer cover, a zipper - a meter, polystyrene foam (about 300 liters - one and a half kilograms), reinforced threads, graph paper make patterns.

Expanded polystyrene - special granules for the internal filling of the chair
Required Tools

Sewing supplies and necessary tools
Tools you will need:
- pencil,
- scissors,
- ruler,
- pins,
- needles,
- sewing machine,
- overlock for finishing edges.

Workplace for sewing products - sewing machine and overlocker
Manufacturing process: step-by-step instructions

Drawings for making an adult and children's bean bag chair
Before you start making an upholstered chair with your own hands, you need to make a drawing, look for the pattern on the Internet and copy it from there. Choose any model for the product, at your discretion - just a bag, a pear, a drop, a square, get creative and make a funny animal. Now we select the fabric.

DIY budget armchair made from old jeans
For the inner case, just select thick fabric so that after time the balls do not come out - fabric for bedsteads, satin or calico. For the outer cover, choose a fabric for upholstery, denim or leatherette will do, the main thing is that you like it and fit in with the overall decor.

A special filler, polystyrene foam, is used as padding. Order online or buy from a store that sells furniture repair and restoration products. It must be remembered that the material is voluminous and practically weightless. When purchasing it, you need to look at the size of the package, and not the weight. For a bean bag chair you need 250-300 liters.

The chair bag consists of a removable outer cover, a durable inner cover and a filling
If you don't want to bother with polystyrene foam, replace it with ceiling tiles– grind it and use it as a filler. You can use plant components as filling, but it is better to change them every six months, since this is a moisture-absorbing material and mold may appear.
Before making a soft fabric chair, we make patterns, lay them out on the fabric, do not forget about the seam allowances - 2-3 cm, then you need to outline them with chalk. The model consists of a bottom and “petals”. First we start sewing the inner cover: all the wedges are sewn to the bottom, then they are sewn on the sides. Don't forget about the hole for the filler. Now let's move on to the outer case. It is made in the same way; we sew a zipper on the side.

Patterns for a bean bag chair on fabric
When the covers are ready, you need to stuff the inner bag.
Attention! If you are crafting with children, make sure that the granules do not get into the respiratory tract, since they are volatile and can easily get into the nose and mouth. Fill 2/3 of the volume, sew up the hole. Then we put on the top cover and fasten it with a zipper.

Newsprint jacquard bean bag chair
The final stage is decoration

Cozy handmade knitted chairs
You can leave the finished chair in its original form, or you can make it an exceptional element of the interior by decorating it. For needlewomen there are endless possibilities.

Pear chair in the corner of a children's room for a girl
In general, there are many options. Be guided by taste and imagination.

Fluffy fur chair for a cozy living room
Video: Making a bean bag chair – Everything will be fine – Issue 507 – 12/03/2014 – Everything will be fine
Every day, on the way to work, we dream of long-awaited holidays, weekends to go to your favorite summer cottage, enjoy spending time with family and friends, and merge with nature.
A wooden chair in a country house is an excellent element of the interior, allowing you to relax comfortably and drink tea on the terrace.
Today, a cozy, well-equipped dacha should not be an unattainable luxury that requires exorbitant expenses. Schemes, drawings, technologies, Internet resources offer hundreds of ideas for creating garden furniture.

We invite you to create a chair with your own hands for your home or cottage.
Throughout our lives we are surrounded by furniture. Furniture production technology is evolving and improving. Garden furniture, designer, author's- it's everywhere, we're surrounded by furniture! It’s natural to want to purchase a high-quality, practical, stylish item for your garden at an affordable price.

Assemble a chair with your own hands for summer cottage or a private house can be owned by any owner.
Innovative furniture showrooms, designer garden furniture stores provide a range of services, sell stylish wooden chairs, for children and adults, with and without armrests, but not every average family can afford this kind of pleasure.

Your favorite area will be significantly transformed if it is decorated with a luxurious, reliable, hand-made chair.
It is not necessary to resort to enormous expenses to purchase a fashionable piece of country furniture. A product created with your own hands will provide comfort and will harmoniously “fit” into the design of your favorite garden. Flight of fancy, list necessary tools– everything you need to make your dreams come true in everyday life!

Wooden furniture has been and remains a classic that accompanies us everywhere.
In order for hand-made furniture to serve you for a long time, the design must meet certain parameters.

This chair is ideal for relaxing in the country and looks great in the garden.
| Transportability | As a rule, wooden chairs are used for relaxing on fresh air, under open air. In case of a sudden change in weather conditions, it is convenient to move the chair under a canopy if it is transportable. |
| Selection of quality raw materials | One of important conditions in making a chair yourself, wood plays a role hard rocks. Despite the high pricing policy, the result of the design thanks to quality material, will be excellent. These species include: aspen, oak, pine, cedar. |
| Maximum weather protection | Keeping the chair straight for a long time sun rays, heavy rain, leads to deterioration external state. Preparation for protecting the finished chair begins at the earliest stages of design. High-quality, dry lumber is the key to success. If you initially purchased low-quality raw materials, dry the boards while working. Sand, saturate antiseptic workpieces, apply hot drying oil. At the final stage, after the finished product has completely dried, it must be opened with varnish. The material to get started is ready. |

Making a garden chair is not difficult; there are no complex connections or parts.
A set of standard questions for a self-taught furniture maker
How to make a chair out of wood with your own hands? Is it possible to build a garden chair with armrests yourself? How to make a child seat and where to find correctly drawn up drawings and diagrams? A number of similar questions will certainly flash through the mind of a beginner. home handyman. There are various models of wooden chairs for summer cottages: folding and standard metal structures, wooden rocking chairs, comfortable chairs for two, children's and adults with durable armrests and comfortable seating.

Such furniture can be used without worrying about scratches and annual painting.
Not always, each of the above structures contributes good rest. Let's consider the process of making a simple model- wooden garden chair.
Preparing for work
The main components in preparatory stage is the presence of a list of tools and materials that should be in the master’s arsenal.
Required materials:
Required tools:
- Saw (disc);
- R ubank;
- Hand router;
- N wood saw;
- screwdriver;
- D rel;
- From the tube;
- L frost, tape measure, pencil.

Tools for work.
A preliminary calculation of measurements for the components of a cedar wooden chair is as follows. Dimensions are indicated in millimeters.
- Legs 4 pcs. (rear 2 pcs., front 2 pcs.)
- Two front legs – 20x254x787;
- Two hind legs - 20x76x533.
- The back of the chair is 20x279x914.
- Chair armrest:
- ABOUT it's time - 2 pcs., (20x127x406);
- Z rear support – 1 pc., (20x76x610).
- Jumper – 1 pc., (20x51x589).
- Insert strips – 2 pcs., (12x20x254).

The parts that make up a garden chair.
The process of making a chair with your own hands: step-by-step instructions
Creating Basic Parts
As a rule, work begins with a preliminary stage- preparation of basic elements. Having a drawing with detailed tips will facilitate the further process of making a wooden chair with your own hands.

Scheme for creating a garden chair with your own hands.
The most complex and time-consuming process is the manufacture of the side supports of the seat. You need to make a full-size template of the side support on cardboard.

Drawing of the side support of a garden chair.
1) Draw the first side of the part, lifting the segment on the left, then the next two at the appropriate angle.
2) Mark a perpendicular segment, heading towards point A.
3) Mark point C, draw a cutout under the transverse tie.
4) Extend the bottom side with a line, marking an angle of 75 degrees, with the vertex C.
5) Draw an arc, measuring the angle at point D. The radius of the arc is 116 mm. Connect the points with a segment.
6) Using a square grid, we draw roundings between points A and B.
7) Place the resulting template on a wooden board. We outline the parts and prepare for cutting.
To cut straight sections, you need to use a saw; for cutting out shaped sections, a jigsaw is perfect.

Drawings of garden chair parts.
IMPORTANT! In order for the cedar board to chip less, the cutting blade of the tool must be carried out in the direction of the grain!
After transfer finished drawing onto the board, mark a similar one according to the first diagram, using the already cut out part.
If you don’t have a ready-made armrest pattern, no problem! The circumference is not important.
1) It is necessary to make wedge-shaped supports for the armrests using a saw, bevelling the top edges by 6 degrees.

To make it easier to connect parts, use a clamp.
2)
Carefully screw the supports to the front legs. For fastening we use glue and screws.
3) We cut out the armrests and rear support.
4) Use sandpaper to clean the ends of the finished part.
5) Cut off the ends of the support.
6) We press the rear support part to the back.
7)
We mill the edges of the surfaces.

Attaching the armrests to the wedge-shaped support.
IMPORTANT! Glue plays an important role in making your own garden chair. Heat-resistant wood glue, unlike the common and frequently used PVA glue, will not lose its properties when exposed to high temperatures, moisture, does not dry out and will not crumble. For this reason, to create a wooden product, we recommend using heat-resistant glue.
Assembly of parts
Before assembly, it is necessary to carefully coat each of the parts with a triple layer of antiseptic to preserve internal surfaces. After processing the material, you can proceed to the next steps.
- We align the finished parts, having previously marked the drilling points.

We cut out the parts exactly along the marked contour.
- We make holes for the bolts andcarefully fasten the parts together.

Please note that the strength of the seat will depend on the placement of the boards.
- We install the rear leg perpendicular to the bevel of the support (similar to the first one, we assemble the second side of the frame), withWe connect the side parts of the wooden chair with the lower back cross member and the first seat bar.

The ends of the planks and the opposite ends of the legs should coincide, which will mean the correct position of the backrest.
- We install supports. We fix the supports with clamps.

The joint will be tight, which is what we need.
- We secure the upper backrest guide with screws, trying to align it with the lower cross member. We draw a line on all the cross boards, as well as on the bar of the back of the chair, then drill a pilot hole, holding the bar.

Afterwards, we secure the top with slats and evenly fix all the slats in turn.
- We draw the radius of curvature, cutting the strips according to the markings.

By selecting correct width final rail, put it in place of the seat.
- We carefully sand the edges, upper surfaces of the backrest and seats. We close the screws with wooden plugs and sand them. Using hot drying oil or oil impregnation, we process the finished wooden chair.

Drying and varnishing the product is the final stage of production.
Making wooden garden furniture with your own hands
Decor is one of the important components. With the help of unnecessary things, pillows, bright rags, vine branches and painstaking work, you can achieve phenomenal results.

As you can see, making a garden wooden chair with armrests with your own hands is not at all difficult.
Fantasy, imagination, positive charge, basic knowledge, diagrams and drawings - this is the entire list of necessary components for creating a wooden chair with your own hands. Desire and a little work are the key to success!

A wooden chair made by yourself will last for many years.
While maintaining its original appearance, such a chair will perfectly “fit” into the natural atmosphere and allow you to enjoy a comfortable rest.