Artificial pond in the country: how to create and design. How to make a pond at your dacha with your own hands with photos and step-by-step instructions Make a decorative pond with your own hands
A small pond can decorate and diversify any suburban area. And it will be even more pleasant if you build such a pond with your own hands. This may seem difficult, but with good instructions there shouldn't be any problems.
Floating school of decorative fish - best decoration pondTraditionally, work begins with preparatory activities.
Stage 1. Decide on the location and size
First, we decide on the place where the decorative pond will be located. To do this, we take into account the following points:
- there should be no trees nearby, as their roots can damage the bottom of the structure, and their leaves can clog the water;
- the place should be open and illuminated by the sun for at least 6 hours a day (this will increase the intensity of algae reproduction without infringing on terrestrial plants);
- if possible, it is advisable to leave space for future expansion of the pond;
- The area of the reservoir should not exceed 3% of the entire site.
In a word, than smaller area, the easier it is to carry out construction work. In terms of depth, we divide the reservoir into three levels:
- for plants near the shore;
- shallow water for winter-hardy water lily;
- a recess in which fish will winter (if we breed them).
Pay attention! It is undesirable to make the reservoir too deep - it is enough to make a depth of 1.6-1.8 meters (that is, below the soil freezing level). The burial area should not exceed a fifth of the entire pond.
Stage 2. Deciding on the material
There are quite a lot of materials that can serve as the basis for a decorative pond, but the most popular of them are the options below.
Due to the fact that the construction of a decorative pond from a mold is unlikely to cause any difficulties, we will consider in more detail the second construction option.
Prices for ready-made ponds and bowls for ponds and fountains
Ready-made ponds and bowls for ponds and fountains
Stage 3. Prepare consumables
The work will require:
- PVC film;
- roofing felt;
- round stones;
- rope;
- stone slabs;
- shovel;
- sand;
- bricks;
- fine gravel.
Having prepared everything you need, we proceed to the next stage.
Stage 4. Digging a pit
Step 1. First, we create a scale sketch of the future reservoir, indicating the size and width of the curtains (shelves for plants, that is, the upper stage of the structure). This will help avoid possible difficulties not only during construction, but also when planting.
We also think about the accent of the composition - a large original stone, for example, a sculpture or just a tree.
Step 2. Using a rope or sand, we outline the expected contour of the reservoir. We make sure to check that all the banks are at the same level, and then use a shovel to cut the turf along the perimeter of the pond.
Step 3. Now let's start the excavation work. First, we dig a pit to the depth of the first level (about 30-40 cm) and mark a line from which we will dig down to the second level (90 cm). Next, we create the deepest level (up to 1.8 meters, if we plan to breed fish), and extract the last portion of soil.
Pay attention! It is recommended to regularly check the level of the banks while digging a pit. If there is no water level of the appropriate length, you can take a simple long board and attach a 50-centimeter device to it.
Step 4. To dig a reservoir, it is advisable to use the services of specialists in this kind of work, accompanied by a small excavator, because this work is quite difficult. But if you decided to do this stage of the work yourself, then you should be prepared for the fact that moisture will accumulate in the pit and you will have to dig in dirty slurry. To remove water, you can use a pump (but only one specifically designed for pumping liquid with solid particles). You can dig another hole nearby to dump water into.
Step 5. Carefully inspect the bottom of the finished pit for branches, sharp stones and anything that could damage the film. We check the horizontality of the banks and, if necessary, level them.
Step 6. We dig a ditch 20 cm deep along the perimeter of the pond to fix the film. Then, using a rope, we measure the dimensions to determine the required size of the film, add 0.5 m on each side.
When conducting earthworks You may be faced with the problem of where to put the soil from the hole. An excellent solution to this problem is to raise the level of the site by evenly distributing the soil over the entire area of the garden. Another option is possible - to use the land to build an alpine slide.
Stage 5. Lay the film
Step 1. Cover the bottom of the pit with a 15-centimeter sand “cushion” and compact it thoroughly.
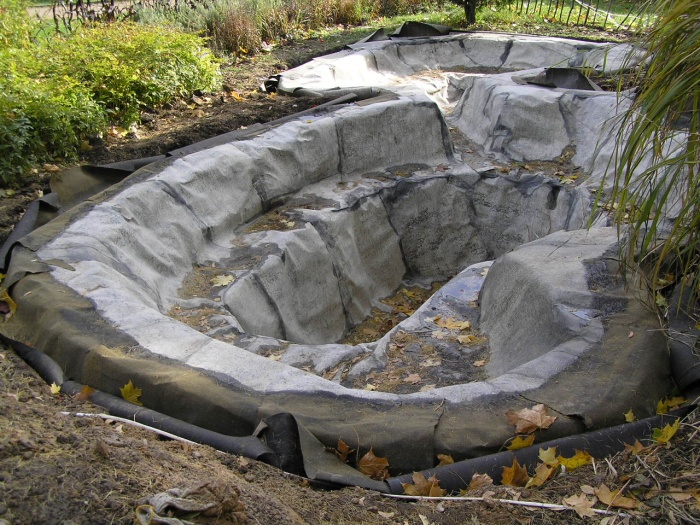
Step 2. To protect the PVC film from damage, lay a layer of roofing felt (laying is done with an overlap).
Step 3. Cover the bowl of the reservoir with film. We do this freely, with a small margin along the banks. We press the ends of the film with bricks.
Pay attention! To increase the elasticity of the film, it is advisable to lay it on a sunny day - under the influence of temperature, the film will stretch better and easily bend around all the protrusions of the pit.
Step 4. Fill the pond with water, but do not rush to cut off the excess film. It is necessary to wait approximately 24 hours for the PVC coating to take on its final volume. Then we cut the film, place its edges in a previously made trench, tuck it in and fill it with crushed stone.
Pay attention! Often the width of the film is not enough for the whole pond. In such cases, several pieces are connected to each other by soldering.
Prices for different types of pond films
Pond film
Stage 6. Setting up a decorative pond
Step 1. In order to prevent the earth from falling into the bowl of the reservoir, we strengthen the edge. This can be done using:
- stone blocks;
- plastic pipes nailed to pegs.
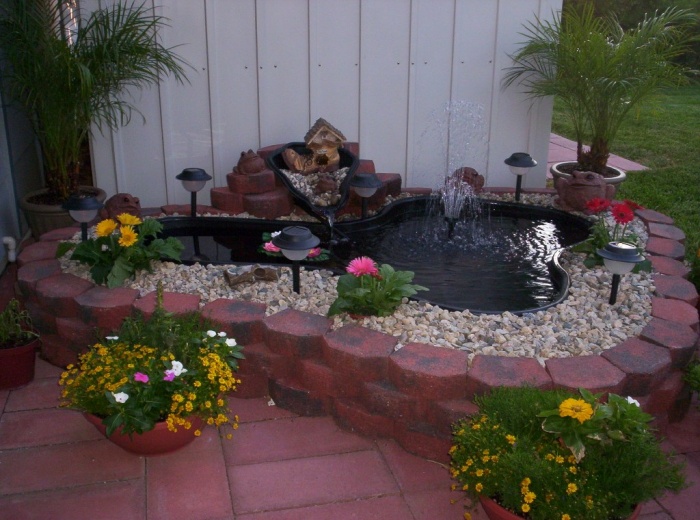
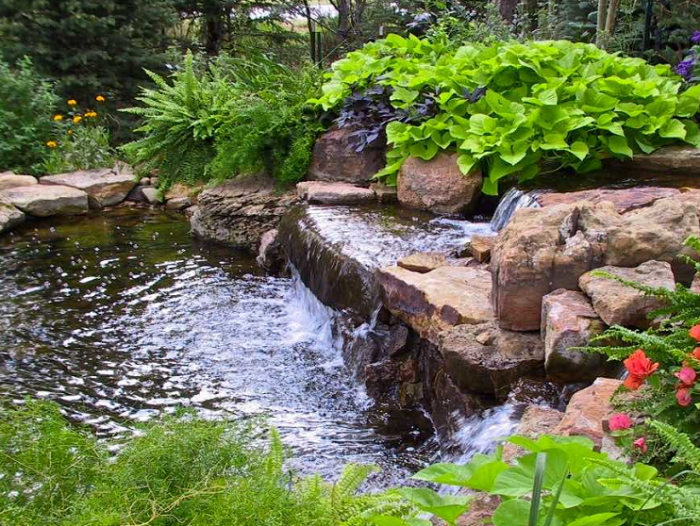
Lay out the edge natural stone(although you can use brick, tile, and other materials), we decorate it with a group of boulders or one large block.
Step 2. We lay out the bottom of the reservoir with crushed stones or stones. Then we place the pre-prepared plants in plastic containers and arrange them in curtains. It is advisable to use plants that saturate with oxygen (such as hornwort, water lily, swamp grass, etc.). After this, the pond can be completely filled with water.
Pay attention! For correct selection hydrochemical preparations and a pump, it is necessary to measure the volume of the reservoir. To do this, when replacing water, take water meter readings before/after the filling procedure.
Step 3. We can make a small stream for permanent circulation of water - this will prevent the latter from stagnation. To do this, we raise the source slightly above the level of the reservoir and install it to supply water from a bowl. We are planning to decorate the mouth of the stream, for which we can use:
- stones;
- containers made of glass or clay;
- planting.
Step 4. We install at the bottom of the reservoir, stretch the pipes to the source and connect them to the cleaning filter. The latter must be pressure, that is, with reverse cleaning provided, since it is much more efficient than usual.
All, ready! All that remains is to regularly clean it from dirt and use special means, revitalizing the water and preventing the excessive spread of algae, as well as removing plants for the winter.
When building a pond, it is difficult to avoid some mistakes, especially in the compositional plan. For this reason, you need to be aware of common mistakes that gardeners make.
| Plant growing zones | Plants |
|---|---|
| Coastal zone | Conifers, elderberries, ferns, meadowsweet, lilies of the valley, bergenia, etc. |
| Coastline | Lipstick, fluffy, marigold, speedwell, snake knotweed, forget-me-not, etc. |
| Plants for decorating shallow waters (up to a depth of 5-20 cm) | Calamus, reed, parasol, cattail, arrowhead, etc. |
| Deep aquatic plants 30-150 cm | Water lily, water lily |
| Plants to decorate the surface of the water (floating on the surface of the water) | Duckweed, water paint, telores |
Finally, when planning to build a pond yourself, first practice - make, for example, a miniature pond, and only then move on to larger compositions. This will significantly increase the chances of success.
Good luck with your work!
Video - Creating a pond at the dacha
In the summer we all want to have a good rest by the water, but not everyone has the opportunity to go to the sea. Some people spend their summer holidays at their own dacha, but even at small area you can create a zone for yourself comfortable rest using an artificial reservoir made by yourself.
Pond for a summer residence - where to start
So that the issue of constructing a reservoir does not seem so complicated, it is necessary to break the entire process into several stages and carry them out sequentially.

First, decide on a place for the future artificial pond and its size on a summer cottage.
How to choose the most suitable site for a pond in your country house:
Important! It is easier to build a pond of a small area. If you are confused by the amount of work or the financial side of the issue, start with a small lake.

Perhaps, later, having experience and skills, you will create a fairly large version of the reservoir at your dacha with your own hands; good experience in carrying out the preparation is shown in the video
Determining the size and shape of the future reservoir at the dacha
The depth of the reservoir, according to experts, should not be too great; for an artificial lake, a depth of up to two meters will be sufficient. The deepest part is usually made in 1/5 of the area of the entire reservoir.
When planning a pond, take into account the landscape of your dacha site. Designers advise doing it on a flat surface area, and if the topography of the dacha area is hilly, with slopes, in this case it is better to opt for a flowing stream or cascade.
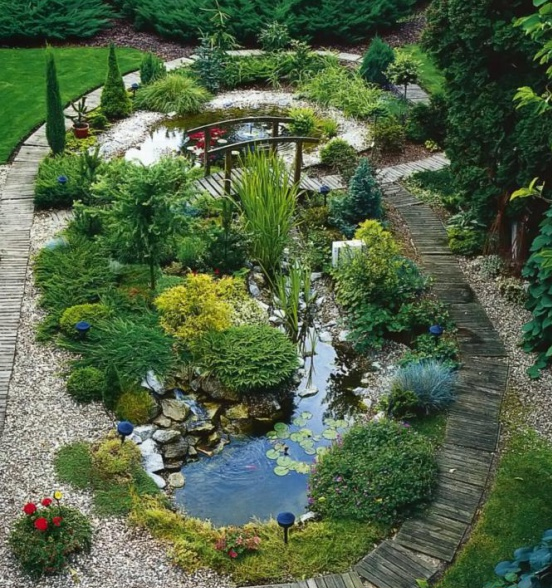
You need to choose which version of the pond will fit most advantageously and interestingly into the landscape of your dacha site. Designers of landscape objects offer a lot of options for designing decorative ponds; you just need to delve into the subtleties and nuances of various projects and choose the best one, optimally suited specifically for your dacha.
Varieties of shapes of water bodies
A reservoir can have clear geometric shore lines, especially if it is located on the territory near a mansion built in a strict aristocratic style, with alleys, paths, and flower beds of regular geometric shapes. In this option, a pond or lake will organically fit into the overall interior of the site.
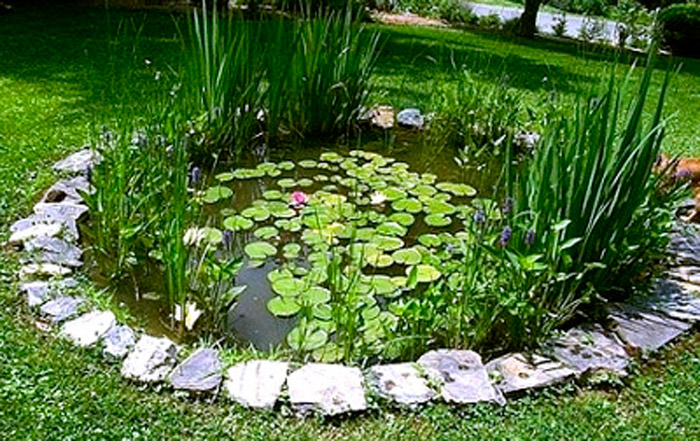
A small pond can be made round or oval shape, use moisture-loving plants to decorate it.
If you want to get closer to the natural landscape, the coastline is made in a winding or free-form shape so that it resembles as much as possible a natural body of water in a country house.

It is necessary to think in advance about the design style of the artificial lake so that it matches the style of the rest of the dacha, complementing it.
Before you begin work at your dacha, you also need to consider how you plan to use your future artificial pond. If you want to get a place for swimming, then it will not be possible to breed fish in it. The decorative pond cannot be used for swimming sanitary standards and hygiene requirements.
When choosing the size of a future reservoir, keep in mind that an artificial pond is the same biological system as a natural pond or lake, with an optimal ratio of animal and flora, with a water purification system, self-regulation of microorganisms.
It is easier to monitor and maintain the eco-balance in large artificial reservoirs; in small, as well as in small aquariums, it is much more difficult to maintain the necessary balance. But making it yourself, both financially and in terms of labor costs, is much easier to make a small pond.

Shape of a pit for a pond at the dacha
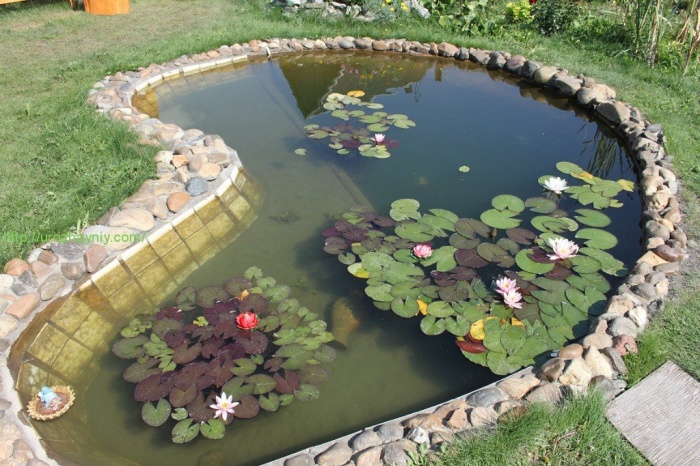
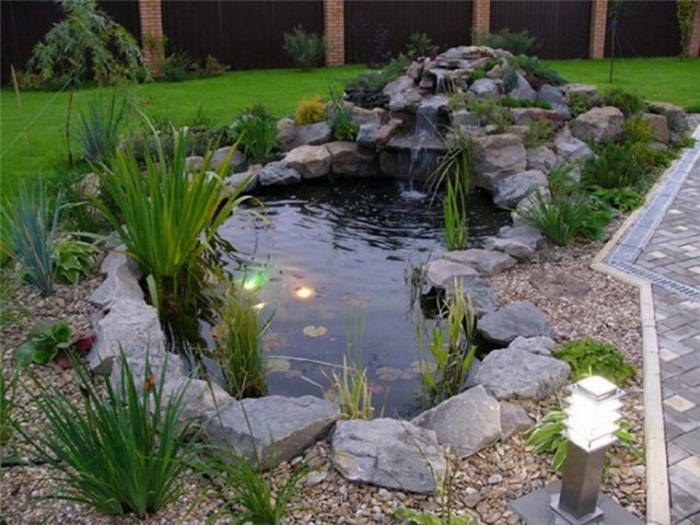
It is clear that in order to make an artificial pond in the country, first of all, you need to dig a pit of appropriate shapes and sizes. The foundation pit for a pond has its own characteristics. In shape, it resembles a deep plate with wide edges, as can be seen in the photo.

Along the edges of the pit there should be a shallow coastal zone, then there should be a protrusion that prevents the overflow of water from the coastal zone into the swimming area, and vice versa. A recess is made in the center to the required size.

To maintain ecological balance, the water in the pond must circulate, otherwise it will quickly become clogged, silt up and lose its decorative and attractive appearance.

IN small pond At the dacha, to maintain cleanliness, a skimmer is installed, which allows you to clean the surface layer of water from contaminants, and a UV sterilizer. To do this, they are installed at the bottom of the reservoir drainage pipes, through which water is pumped into the filter and back to the bathing area, as in the photo.

Materials for waterproofing the bottom of a reservoir
There can be several options for making a waterproof bottom of a reservoir:
- Using a ready-made plastic mold. This choice of bottom greatly simplifies the procedure for making a reservoir for a summer residence, but it limits the possibilities for choosing the size, shape of the banks and the volume of the water space by the shape and dimensions of the selected container. Typically, such a container has a small volume of up to 4 m 3;
- The bottom of a reservoir at the dacha can be made of concrete, but this will be a rather labor-intensive procedure, and it will also require additional protection from frost to avoid cracking concrete base. In addition, if there is a need to remodel or dismantle the pond at the dacha, this will be quite problematic;
- One of the most budget options for the dacha there will be a pond bottom made of clay, but the process is quite labor-intensive. You will need to apply two layers of clay dough to the bottom of the reservoir bowl, and then strengthen the bottom with fine gravel, pressing it into the clay layer;
- The most optimal and most used method is to use a special film laid on the bottom of the pit.
Important! If the width of the film roll does not allow covering the entire bottom of the pit in one solid piece, it is necessary to weld the seams so that water cannot leak out of the reservoir.
When choosing film, keep in mind that cheaper options have a significantly shorter service life and are destroyed more quickly when exposed to frost and sunlight, video
Excavation work
Digging a pit under a body of water 20-30m2 or more with your own hands is not an easy task. It may be easier to use equipment in the form of a small excavator. If the amount of excavation work is small, you may be able to do it yourself or hire several workers armed with shovels, video
The main thing is to correctly indicate the size and shape of the required pit.
We mark the boundaries of the future reservoir using a rope or hose; you can sprinkle the contours with sand so that they can be easily distinguished. Then, along the contour of the coastline, we dig a trench to approximately the depth of a bayonet, thus obtaining the first level of depth - the line of the swamp zone, up to 40 cm deep and 30-50 cm wide. Then we dig the next level inside with a gradual deepening towards the center of the pit, so that as a result It turned out to be a bowl, as in the photo.

The second level is made to a depth of 1 meter, the deepest third level is in the center of the pit.
Important! While digging a pit, check the level of the banks; they should be the same height.
Along the perimeter of the dug pit, another ditch is dug, up to 30 cm deep, so that the edges of the film can be laid and secured in it.
Film laying
Before laying the film, the bottom of the pit must be leveled, compacted, stones, tree roots, and debris must be removed. Then pour a layer of sand, 15-20 cm, carefully level and compact. After this, a layer of roofing felt or geotextile is laid, old linoleum can be used, and then the bottom is lined with film.
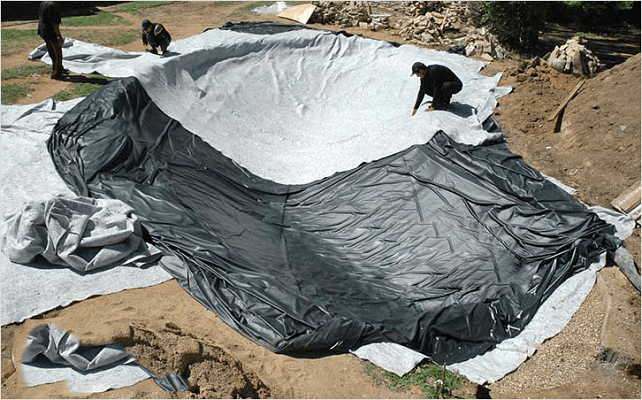
The edges of the film are secured with bricks or stones, and after that the reservoir is filled with water. Water is poured in several portions, if there are air bubbles under the film, they need to be removed during the process of filling the reservoir with water, take into account the experience of others in the video https://www.youtube.com/watch?v=JlxWYFNrkig. After this, the ends of the film are laid in the prepared ditch and secured with crushed stone or large stones.

Arrangement of a reservoir at the dacha with your own hands step by step
When you fill the pond at your dacha with water, measure how much water is required. This will be the capacity of your pond. In accordance with these data it will be possible to select required power pump, filters and other equipment for water purification in a pond at the dacha. Usually you can purchase it as a kit and install it yourself according to the instructions.
Then you need to strengthen the edge so that the earth does not crumble into the reservoir, and design the shoreline in accordance with your project.
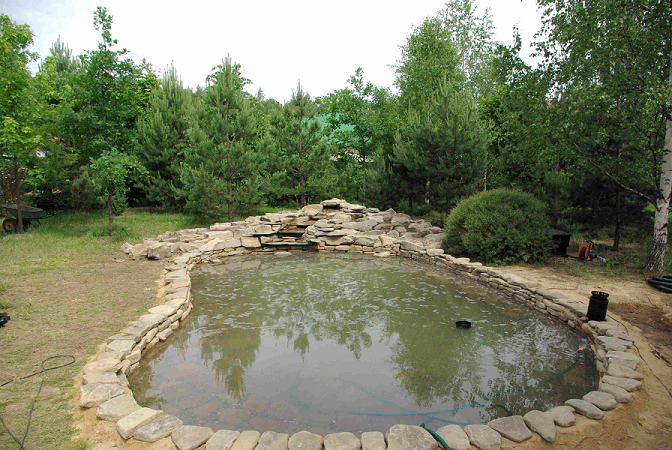
You can place a large stone on the bottom; it must be round in shape so as not to damage the film and injure swimmers. You can also decorate the banks of a pond at your dacha with stones; it is better if large boulders alternate with smaller stones. In addition to stones, you can use driftwood in the design of a pond at your dacha, wooden structures, animal figurines and other options.
To decorate the banks of a reservoir in a dacha, moisture-loving plants with large leaves, for example, bergenia, as well as ferns, lilies of the valley, coniferous shrubs. In shallow water you can plant plants such as calamus, reeds, cattails, or water lily like in the video
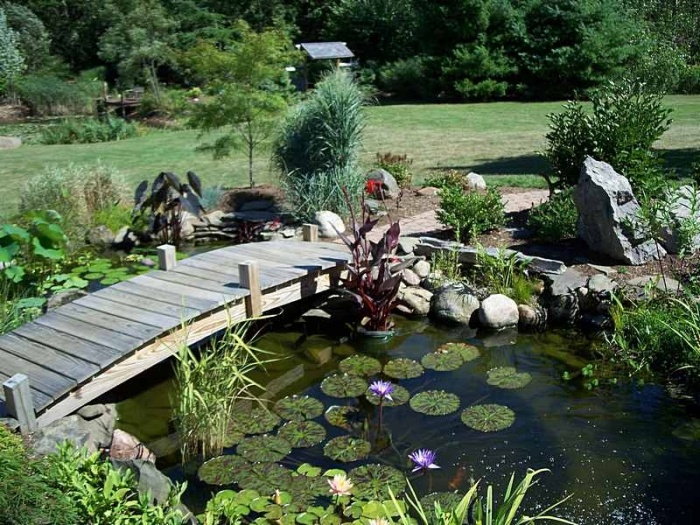
In the center of the garden pond there are water lilies and lotus. Interesting design solution there will be a creation floating in the center of the reservoir flower arrangement, as in the photo.
Usually, plants in special containers or pots are used to decorate decorative ponds; they are conveniently removed while cleaning the bottom and changing the water.
Conclusion
Anyone can create a reservoir in their dacha; the main thing is to carefully follow the recommendations of experts. Of course, you will have to spend time and money, but as a result you will get a wonderful place to relax and will enjoy spending time at your dacha.
And a pond. Even a small body of water attracts those around you like a magnet. Water is fascinating even in small quantities... Moreover, you can build a pond with your own hands in a few hours. But this is a small artificial reservoir. Building a large one will require both money and time.
Where to dig
Small artificial reservoirs are best viewed from above. Therefore, if there is a corresponding depression on the site, it is best to do it here. There is, however, in this negative side: You will have to raise the edges of the bowl higher to rainwater didn't get inside. The second option is to come up with a water drainage system (make a drainage system above the reservoir).
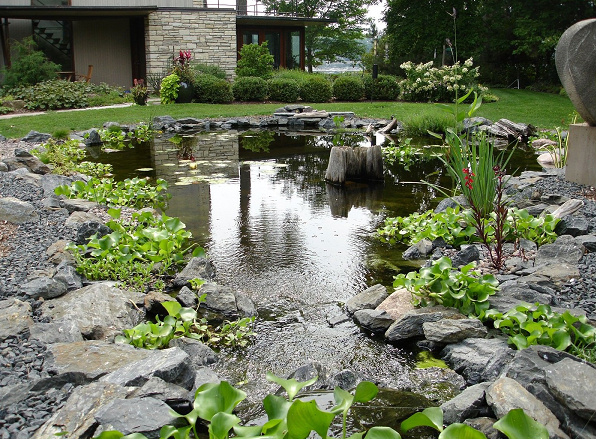
If there is a key somewhere on the site, it is logical to make a natural pond by digging or deepening the existing bowl, lining its borders with cobblestones or stones, and planting plants. The stream, which is sure to exist in this case, can also be improved by lining its edges with cobblestones, drowning them in the soggy soil, you will give greater strength to the bank, and you can plant moisture-loving plants between them.
Even a small waterfall is a magical sight. How to dam a pond if there is a natural stream on your site - dig a pit, cover it with stones and direct the stream into it
Not everyone has such a luxury on their property as a stream or a spring. We have to make artificial reservoirs. When properly designed, they look no worse than natural ones.
How to make an artificial pond with a bowl (without film)
The simplest and quick way to make an artificial pond at the dacha - bury the finished bowl in the ground, shaping and decorating its edges. There are plastic bowls - ready-made different forms, sizes and colors (mostly blue, green and black).

Setting up a plastic garden or country pond is not a difficult task. Here are the step-by-step instructions:
- It is necessary to dig a pit in the shape of a bowl. If the shape is very non-standard, you can turn it upside down at the installation site and outline the outline with something (even dig it with a shovel). The bowl is taken to the side and a pit is dug. It should be a little larger in size - a little wider, but not deeper. The edges should either be flush with the ground or protrude slightly. If you can raise the edges a little, it will be even better: when it rains, dirty water will not flow in.
- After the required depth is reached, the bottom is leveled to the horizon: it is first leveled with a shovel, then compacted and the excess is removed with an even bar. The surface must be smooth and hard: the plastic must have good support. If the ground is poorly leveled (clay), you can pour 5-10 cm of sand, wet it and compact it.
- The next stage is installing the bowl in the pit. If the bottom has been made level, the edges of the bowl will be level with the horizon. Now the space that remains between the wall of the bowl and the pit must be filled with soil or sand and compacted well.
- Now it’s time for the design: the installation is complete, you can add water.
How to use this technology to build a pond in the courtyard with lighting, see in this photo report (you can scroll through the photo gallery yourself by clicking on the thumbnails below).
We are digging a pit. We decided that the sides would be 1-2 cm higher than the level of the path - there would be less debris inside, and we would decorate the edges with stones. On this side, just below the maximum level, we cut a pipe into the bowl so that excess water would drain. She was taken to the sewer
But it is not always and not everywhere possible to constantly add and remove water to the pond. Then you will have to either plant plants that will clean it, or change it periodically.
Pond from an old bathroom
You don't have to buy a bowl at all. Any container can be used. Even old bath. It turns out very well. All the steps are the same, the pit is dug first, a bathtub is placed in it, what goes next, see the series of following photos. There's a pond on them old bath transforms into a truly lovely place.
The platform was also entangled with wire - so that the clay did not float and the platform did not sag. This is already a month later, such beauty - a garden pond built with my own hands makes me happy
Pond from a car tire (with film)
A mini pond can be made from an old one car tire, or rather from a tire. The larger it is, the larger the reservoir. The most difficult thing in this matter is to cut off one side part. If the resulting edges are sharp, they need to be processed sandpaper. The second most difficult task is to dig a hole of the appropriate size. The difficulties ended there. The rest is quite easy.
The cut tire is installed in the hole, covered with earth on the sides, and compacted well. Also, earth or sand is poured inside and the bottom is leveled. Take a piece of thick polyethylene film, you can fold it in half and cover the resulting tank. Don’t try too hard: just pour water, it will straighten the film itself.
Instead of polyethylene, you can take banner film (available from advertising companies that produce outdoor advertising) or a piece special for swimming pools and ponds. They are much stronger (but more expensive).
The protruding ends of the film are tucked around the walls of your pond and decorated with stones. The construction of the pond is completed, next comes decoration and planting. See how to make a pond from a tire in the photo report.
The next stage of making a mini-pond for a summer residence is decorating the edges with stones
There is certainly nothing complicated about such a device. Anyone can build such a pond at their dacha with their own hands, and the investment is minimal.
In general, mini-ponds are made from tanks, barrels, pans, even flower pots. The main thing is that there is a body, and designing it is not very difficult: experience gradually comes. They are placed in the garden, at the dacha, near the house. It is possible to supply water, make a stream, it can be placed under trees, for example, or shrubs. Both beauty and benefit at the same time.
Making a pond with film
By creating this artificial pond from film, you almost exactly repeat the work described above, only without installing a bowl:
- mark the shape of the future pond;
- dig a pit, forming ledges if necessary;
- clean the bottom of any sharp objects: roots, stones, etc.;
- level the banks of your pond;
- spread the waterproofing film;
- fill the pond with water;
- fix the edges of the film;
- decorate.
A country pond created using this technology can be of a more substantial size. Important point: on loose soil, simply making a pit and laying down a film will not work. We will have to come up with some measures to strengthen the banks. In this case, you will have to either install a bowl, or make a more serious structure - from brick or concrete. Next, let's look at examples of how to inexpensively make a pond from film.
First project: sides flush with the ground
Eight simple steps and your pond at the dacha is built. How to dig and arrange a pond at your dacha and make it look like a natural one, see the photo report.
Second project: raised sides
The second version of a homemade pond in the first stages is built in almost the same way as the first. Only after the pit reached the design depth were the sides raised, lined with bricks along the edges and concreted. The result was a pond with raised sides. A water circulation system has also been made. It is shown in the figure below.

As you can see, this pond is more multi-layered and its displacement is more serious. If you want to have a pond of at least medium size and not build a serious bowl, you can do as shown in the figure: fill the created pit with sand, cover it, and only lay the film on top. Geotextiles evenly distribute the load and do not allow plants to grow. This is especially true if you are building a pond in the garden and there are shrubs or trees nearby.
Serious projects: brick and concrete
If you want to have a large pond in your country house, and you want to build it yourself, you will have to study the topic of building swimming pools. Firstly, the construction of the bowls repeats all the stages one by one. Even the forms are sometimes made stepped. True, the banks are not decorated with plants, and they are not planted in the pool itself... But the construction process itself, with reinforcement, plaster, and waterproofing is the same. Moreover, the water supply and water treatment system is also similar. Except that they are not used in ponds. chemical methods cleaning, but filters, screamers and ultraviolet can be used.
In general, a large pond is not a cheap pleasure. Moreover, it requires expenses not only for construction, but also for maintaining a large reservoir in good condition: filters need to be regularly cleaned and cartridges or backfill replaced. But of course the pleasure is great...
Not the largest pond, but it required 10 bags of cement, 30 bags of sand (20 coarse and 10 fine), a hydrophobic additive - 5 bags to make the concrete water-repellent. Plastered on a mesh fixed in the ground
Pond Plants
When shaping or choosing a bowl, consider not only its shape and depth. If you want plants to grow in your pond, a marshy riparian area is necessary. If you form a pond using film, you can make a profile approximately like the one in the picture.

It is more convenient to do this if you fill the pit with a layer of sand at least 15 cm thick. With its help you can make the relief the way you like. To make the work easier and the film not torn, lay geotextiles on the sand. This thin membrane is very tear-resistant. You can do whatever you want without breaking it. Having formed the desired bottom topography with its help, you can line the film and lay stones on it, fill it with water and plant plants for the pond at different levels.
To ensure there is enough oxygen in the water, you can plant Canadian elodea, hornwort and swampweed. They are in the photo below. They are planted in water - these are aquatic plants.

A special place in landscape design garden plots occupy bodies of water: they have magic. The garden area is transformed and looks noticeably more interesting if there is a beautiful garden pond on the site. A small pond is visible from different points of the garden; it is pleasant to relax near it, enjoy the coolness and contemplation of the water surface, surrounded by picturesque vegetation. One of the most simple ways to create a pond on your site is to use a ready-made structure made in the form of a polymer bowl. How to choose and install plastic pond for a summer cottage on a personal plot?
Options and shapes of containers
Plastic containers for ponds of all sizes are available for sale. Assess the size of your site so that the created pond looks appropriate. On small area A compact design will look good. Large plastic ponds are mainly installed in large garden areas. For device artificial reservoirs They use plastic forms that are easy to install and maintain. The pond bowl can be made of several types of material:
- Polyethylene. Such an artificial reservoir has a small capacity, usually in the range of 130-900 liters of water. Stationary molds made of high-quality polyethylene will last for many years if handled and used carefully. The decorative pond is neutral to ultraviolet exposure, easy to maintain and install. However, such a plastic product requires careful handling during transportation and installation - a plastic pond bowl cannot withstand repeated bending and impacts.
- Pond containers made of polypropylene. The product is characterized by high strength, flexibility and ductility. Such a reservoir has a long service life - up to twenty years. Polypropylene is characterized by high temperature resistance. The polypropylene bowl has perfect tightness; no additional waterproofing is needed.
- Fiberglass structures. According to technical and operational characteristics fiberglass is superior to polyethylene and polypropylene. If cracks form, the pond bowl can be repaired special compounds. The service life of garden ponds made of fiberglass is 20-30 years. The material is resistant to temperature changes, exposure ultraviolet rays, lightweight and reliable to use. Fiberglass bowls can have great volume and depth.

How to choose a place for a pond
In different parts of the garden the degree of illumination is not the same. When choosing the most suitable place for setting up a decorative pond, you should avoid completely open areas, because in bright light algae will grow intensively in the water. Also avoid areas with tall vegetation growing nearby if you do not want to waste your time dealing with leaves and debris falling into the water. It is not recommended to place a plastic pond in a dacha near outbuildings: the mirror surface of the water will not reflect the most attractive “picture”.
When installing the bowl, take into account several key points:
- A garden pond should not be built on hills and slopes; it is better to choose flat areas. This helps to avoid pressure on the walls of the bowl, which can deform the structure.
- An area covered with turf, located near a low bush, is suitable for constructing a reservoir. Small plants do not block views and sunlight.
- Places with tall trees are excluded - leaves fly off them, needles fall off and fall into the pond. Branched roots interfere with digging a pit for plastic bowls.
- Far corners of the garden that obscure the view of the water are not suitable. Since the pond at the dacha will become the central element of the site, it should be viewed from different points.
- IN daytime plastic containers must be illuminated sun rays no more than six hours. Direct and prolonged exposure to light leads to flowering and evaporation of water.
- For convenient access to water, paths and paths are laid out. Benches, benches and gazebos are installed near the artificial plastic pond.
- When choosing plastic construction take into account the size of the garden plot. For small areas, a pond bowl with a depth of up to a meter and an area of 3x3 meters is suitable.
Note: you can breed fish in plastic reservoirs, but for them to live comfortably in the water you need containers of a sufficiently large size.
A pond bowl usually has multi-level steps, cascades and recesses. They can be used to decorate a pond with aquatic plants.
Installation of a plastic pond
An artificial reservoir is installed in a prepared pit; the dug hole should follow the curves of the shape. If the structure is small, it is turned upside down and the outline is beaten out with pegs. For large ponds, markings are made after measuring the bowl. To install a pond in the garden you need construction tools and materials: pegs, level, shovel, sand and finishing products - stones, slate, gravel, flagstone.
How to install a plastic pond:

Important: the cavities between the pit and the plastic mold must be compacted well with damp sand, while simultaneously increasing the water level in the container. This is necessary so that the walls of the plastic pond do not deform from the pressure of wet sand. After one to three days, when the container has settled thoroughly in the pit, they begin decorating the area near the water.
Composition with a pond on garden plot gives the landscape a special flavor. Even without mastering artistic design skills, you can decorate your site in an impressive and unusual way by digging in plants and placing decorative elements. For small ones plastic ponds It is better to avoid piling up large stones. Tall plants are excluded so that they do not interfere with the view of the water. Recommendations:
- The protruding edges of the plastic form are covered with stones to give the banks a natural look.
- The plants surrounding the plastic pond mold should be moisture-loving and have a small height.
- To decorate the banks, choose large round stones or flagstone
- Large reservoirs are decorated with large serpentine cobblestones, flagstone, and fine gravel.
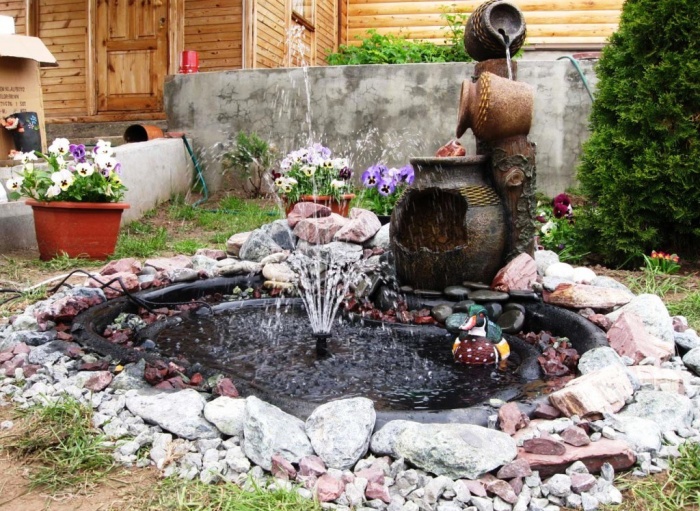
- If volume allows, you can arrange a fountain or waterfall in a reservoir using special pumps.
- Aquatic plants are populated in a plastic container; if desired, fish are bred in the reservoir.

Rules of care and use
The attractiveness of a plastic structure for a summer residence is that it is not necessary to drain the water from the reservoir in the winter. Containers can withstand low temperature up to -30°C. The bowls of ponds more than 80 cm deep do not freeze in mid-latitude climates.
How to care for a plastic pond:
- The bowl is periodically cleaned of excess algae and silt; this can be done without draining the water. However, in case of serious contamination or rotting of the water, it may be necessary to completely drain it using a pump, thoroughly clean the bowl and fill it with fresh water.
- To prevent water from stagnating and blooming, it is advisable to ensure its constant circulation using pumping equipment and water purification filters.
- If leaves, twigs and petals get into the water, they need to be removed. In the fall, you can cover the bowl with a net - then collecting garbage is much easier.

Caring for an artificial pond does not require much time and effort. Decorative plastic pond fits perfectly into landscape design, gives it aesthetic appeal. Thanks to the variety of shapes, you can realize interesting design ideas. A decorative pond is a luxury available to everyone.
