Steering wheel braid - choose the best one. About covering the steering wheel with leather: why do it, what seam to choose, instructions and self-upholstery How to properly sew a leather steering wheel cover
You can make your car look attractive yourself. All you need is imagination and, of course, desire. You can change or update interior elements or some parts under the hood. In this article I will tell you how to sheathe old steering wheel. Do-it-yourself leather steering wheel reupholstery is the first step towards updating and improving the car's interior. Don't think that only specialists can do this. Re-upholstering the steering wheel with your own hands is not only an instructive, but also quite an interesting process.
Considering the fact that the steering wheel is a part of the car, human contact with which is made throughout the entire route, therefore, it is necessary to choose only high-quality material for reupholstery and it is desirable that it should be genuine leather. Since any other fabric will deteriorate from constant rubbing of hands on the steering wheel after just a month of using the car. The intended skin should not be very thick, but it should not be thin either. If it is too thick, then you will not be able to pierce it with a needle, and if its thickness is small, then the new steering wheel cover can deteriorate very quickly. Optimal thickness material for the steering wheel cover – 1.3 millimeters. An ability such as extensibility should be of average value. This is very important criterion, which must be considered before purchasing. Its elasticity should allow the material to fit tightly on the steering wheel, otherwise there’s no point in thinking about quality.
You can consider the option of having perforation. This is a rather unusual and attractive look, and it is also pleasant to work with. But having such positive qualities, I can also highlight its negative side - wear and tear. The only optimal solution for you is natural smooth leather. 
Before purchasing, make sure that the material offered to you actually has necessary qualities, and they don’t slip you a substitute. You also need to pay attention special attention And additional materials, which will be used in this case. The thread should be as strong as possible, because it will pull the edges together, so it should not break easily. Choose a strong needle, make sure it does not bend. My advice is to buy several of them.
What will you need?
To reupholster you will need the following materials and tools:
- Leather (it must meet all necessary criteria);
- Stitching needle (the needle must be strong). If possible, use needles Soviet made, because they are really high quality;
- Strong thread (nylon is used);
- Two thimbles (it’s almost impossible to work without them). They will keep your fingers from getting punctured.
- Masking tape, sheets of Whatman paper (it is better to use thick cardboard);
- Pencil or felt-tip pen;
- Film;
- Knife (it is better to use a stationery knife).
After preparing all the material, you can proceed with the remaining processes: cutting and reupholstering.
Making a pattern
In order to correctly tighten the steering wheel, and for the result of your work to have an impressive appearance, you need to make a pattern. To do this, you need to make a preliminary layout (template).
It is made of adhesive tape and film, which must be used to cover the steering wheel. But before this you need to remove the steering wheel, as this will make the work easier.  The first step is to remove the cover from the signal and unscrew the fastening nut that holds the steering wheel to the shaft. After this, using loosening movements in different directions, remove the steering wheel from the splines. Now that the steering wheel is removed, you can do the preliminary layout. To create it, you need to wrap a film around the steering wheel and apply masking tape over it. Do not skimp on material, wrap it in several layers.
Once the entire rim is covered, you need to use a marker to make marks where the seam will go (where the parts join). This is done for the reason that it is very difficult to make a one-piece case, so it will be made of four parts. And those places where the parts will be connected to each other are marked with a marker. We also draw a marker along the inside of the steering wheel. It is advisable to draw all lines as evenly as possible. This will make it more even original parts when cutting. After all the lines have been drawn, the layout must be cut with a stationery knife along these lines.
After cutting, you should have four separate elements. Now they need to be leveled and attached to the cardboard to create patterns for the pattern.  After the patterns are ready, they need to be applied to the base material in order to produce the final version of the covering. But, it is important to remember that you do not need to cut it exactly to size, but give some allowances for each edge of the part and then bend it. This is necessary in order to sew them together efficiently, and so that the thread does not tear the skin during tightening.
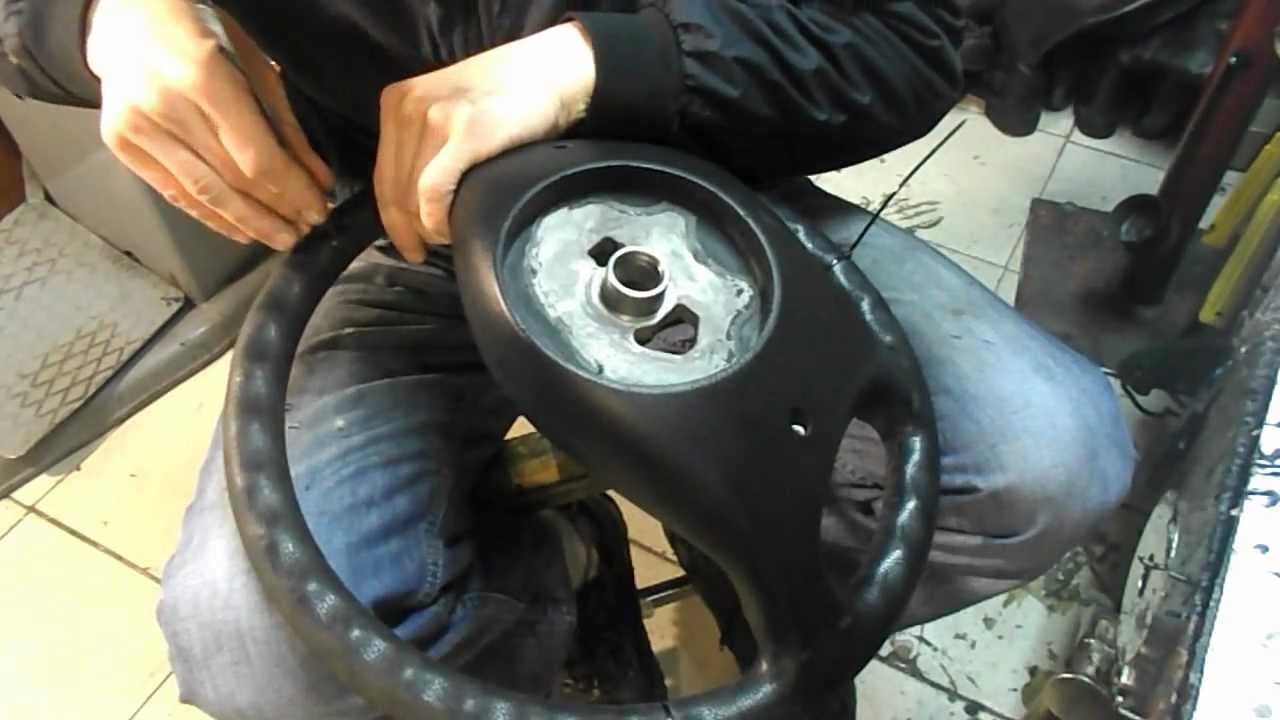
That is, the seam will be strong enough and the skin will not tear when stitched. In addition, the folds give the new steering wheel a more aesthetic appearance. Allowances can be given immediately while you are tracing the pattern. You can also first trace, and then use a ruler to add one centimeter to each edge. This way you will maintain an even retreat on each side.
After this, you can check how correctly the cutting of the elements was done. You need to place each of the patterns in the intended place and see how they are positioned: their edges should butt together. If the stock left is too large, you can trim the edges. If everything is fine, nothing bothers you, you can begin the final process - sewing the parts together.
Step-by-step instructions for reupholstering
So, everything is ready, you can start. At this stage, it is important to follow the order of doing the work so as not to confuse anything.
- The first step is to overcast all the edges that will be sewn together. The fact is that each edge will be bent (we left indentations specifically for this purpose), and since the thickness will double at the bend, this will not have any effect. beautiful view and it is very difficult to pierce such thickness with a needle. That's why stitching is necessary. It will allow you to maintain the required thickness of the leather along the edges and thereby make the edges strong.
- We lay out our (4) parts of the future steering wheel cover on some surface. They need to be laid out exactly in the order in which they will be located on the steering wheel.
- Prepare the needle (pull the thread into it).
- Now you need to sew everything in sequence individual elements among themselves.
As a result, you should have a hoop. - Now you need to pull it onto the steering wheel. Position it so that the seams match the cuts.
- Next, you can fix the cover on the steering wheel using glue or epoxy resin. Everyone makes this decision personally, you don’t have to stick it to them.
- Now try to stretch the leather (even it out) to determine how much to fold the edges before the final step.
The last stage is the most difficult, since here it is important to maintain uniform skin tension throughout the steering wheel. It is not only difficult, but also difficult. It is much better if you ask someone to help you (one tightens and the other sews). 
So, the first thing you need to do is decide which edge to start from. Basically, it just depends on convenience. You need to stretch the skin to form a joint; if the joint does not meet, it’s okay, thanks to its elasticity, the joint will be pulled together with thread. The entire cover is sewn together in this way.
In those places where the cover can go under the signal cover, you need to do without thread and use glue. After completion, you need to straighten the new cover on the steering wheel; if there are any folds, it’s not a big deal. After a few days they will smooth out and the surface will be completely smooth. Now you can install the steering wheel in its original place, secure it with a fastening nut and cover the signal cover.
Covering the steering wheel with leather will significantly change appearance not only this element, but will also emphasize general view car interior In addition, by doing this yourself, you not only saved your money, but also gained good experience in reupholstering, and also became more familiar with the steering structure of your car.
Video " Steering wheel reupholstery”
A video about the work of a master from the Rusty Brothers company reupholstering a steering wheel rim in the BMW M style with leather. After watching the recording, you will learn what tools you need to prepare and how to cover the steering wheel yourself with leather.
To add comfort to driving, many motorists buy special covers for the steering wheel. This modification not only improves comfort, but also reduces fatigue in the driver’s hands. Thanks to this innovation, the interior also changes for the better.
Today, the automobile market is simply inundated with similar products. But why pay more if you can create an original designer case in half a day? The most the best material The steering wheel will, of course, be made of genuine leather. It is not recommended to take dermantine or other artificial substitutes, because they wear out quickly and do not have the necessary elasticity.
Steering wheel reupholstery - tools and materials
Steering wheel reupholstery on our own involves the use of the following tools and materials:
- Masking tape or cling film are perfect for making a pattern;
- Cardboard or thick paper.
- Pencil/marker, sharp knife(it is desirable that it be clerical).
- Reliable and durable thread - best choice there will be nylon.
- Don't forget about thimbles for your fingers - safety first.
- Sewing needles made of hardened steel.
- A set of screwdrivers and wrenches that will be needed to install and remove the steering wheel.
- And most importantly - soft natural leather.

For manual tightening, it is recommended to take two types of material: smooth and perforated leather. This combination will provide comfort while driving and give the interior an aesthetic appearance. Perforated leather has high elasticity. Smooth leather is known for its resistance to wear and tear. Therefore, if you combine these two layers, you get a strong, soft, elastic material. Numerous experiments have shown that the best choice is leather with a thickness of 1.2-1.4 millimeters. The most popular color is black, but you can choose another color – it’s a matter of taste.
Create a template

In order to achieve high-quality leather covering of the steering wheel with your own hands, you need to start working by making a pattern. The template can be created from tape and film. Remove the steering wheel (do not forget to remove the signal cover), then unscrew the fastening nut connecting steering gear with shaft. When removing the steering wheel, you need to swing it in different directions. Next we make a layout of the steering wheel from masking tape and cling film, and then the template. This is done like this:
- The steering wheel is wrapped with film.
- Painting tape is glued on top.
- The places where the seams will be are marked with a pencil or marker.
- Carefully cut out the tape along the lines. As a result, you should have four elements in front of you: three cruciform and one rectangular.
- We unfold all the parts for the workpiece and number them.
- Next, we lay them out on thick paper (cardboard) and make patterns of the same shape that will be used for the pattern.
Leather pattern for steering wheel cover
Now you need to decide what style you want to reupholster the steering wheel. To do this, you can get acquainted with various sketches. But it is unlikely that many solutions can be obtained from four elements. But you can always make each sector from several elements by combining different shades material. Of course, it will take more time, and also effort. But the result will be a designer work of art. The best place You can use the Internet to search for ideas: a huge number of variations with a cover are collected here. When we have figured out the design, we can lay out the leather on the work surface and begin the pattern.
You will come across a huge number of seams. But among motorists they are more popular following styles: braid, macrame and sporty. They form the strongest possible connection and also look great on the steering wheel
While doing this procedure, do not miss important point: each sector of the template is transferred to the skin with a small margin. That is, you lay out the template and cut out 1-1.5 centimeters more from the edges. This reserve is needed for increased strength of the seams. If the skin is close to each other, then there is a high probability that the seams will come apart. Therefore, it is worth tightening the steering wheel well the first time, so as not to redo it later.

Once you have cut out the pieces you need, check that the dimensions are correct, taking into account the stock: simply apply the leather to the steering wheel. Don't be upset if you overdo it with the stock - you can always remove the excess with scissors.
After all procedures are completed, you can start sewing.
We make a case
Work loves order - we lay out materials and tools on the table in accordance with how they will be located in the case. We sew the elements in the given order. You should sweep the edges of each sector so that there is no tightening of the skin in the future. For stitching, the best choice would be strong nylon threads - you need to retreat at least 3 millimeters from the edge . All parts, except the marked seams, must be sewn in the form of a ring.
After you have all the edges sewn and the workpiece is completely sewn, begin to pull the new cover onto the steering wheel so that the seam joints are in the places of the cuts. Afterwards we eliminate sagging and smooth the skin. You can put the skin on epoxy resin or glue - but this is everyone’s choice.
Steering wheel reupholstery - the final stage

The reupholstery of the steering wheel has not yet been completed, the last stage remains. We need to tighten the edges of the cover so that it is tightly fixed to the steering wheel. We warn you that this procedure is quite labor-intensive and can take a lot of time. First of all, decide where the seam will start. You need to secure the thread and then sew the cover together with careful and precise movements. In the place where the edge tie touches the signal cover, you need to thoroughly coat the edges of the leather with glue - preferably if it is rubber glue.
When work on the cover is completed, you can safely install the steering wheel on the car. You may see slight creases on the cover - this is not a big deal. If you took natural high-quality leather, all minor defects will disappear over time due to increased elasticity. As you can see, covering a steering wheel with leather yourself is accessible not only to craftsmen; the main thing is patience and minimal sewing skills.
Steering wheel reupholstery on video
A car is not a luxury, we tell ourselves, but we still want to decorate the iron horse with a leather interior. Start with the steering wheel! Braiding the steering wheel with your own hands so that the leather fits like your own is a completely doable task even for those who have never done it.
Steering wheel braid - genuine leather for comfort and beauty
Leather-covered steering wheels are installed mainly on more expensive cars. Down with stereotypes - what difference does it make how old the car is, what brand it is and from what country? A leather steering wheel not only looks beautiful, but also feels much more comfortable in the hand. You will feel this especially well when you go on a long journey. Unlike plastic parts, leather lining allows air and moisture to pass through., so that it does not accumulate on the surface of the steering wheel. To enhance the effect, you can cover the steering wheel with perforated leather.
The disadvantages include the difficulty in washing off contaminants, and the service life of the casing is not that long. But you can come to terms with all this. But you shouldn’t put up with the cost of covering the steering wheel with leather in the cabin! After all, the work will take several hours, and not the most complicated one, but the service will cost several hundred, and far from rubles. Why not try to do everything yourself, and start doing it yourself with this particular detail.
One of the most simple options– purchase ready-made leather braiding in specialized stores or on the Internet. Ready-made solutions are offered for many models; there are also universal braids. All you need to do is work a little with the needle and thread that come with the kit. Usually 1-2 hours are enough to bring everything to fruition. If you have chosen the skin exactly for your model, then in a few days the braid will fit like original!
Do-it-yourself steering wheel braid – when there are no ready-made solutions
But ready-made solutions may not always suit your car. For example, you changed the steering wheel after buying a car, and now it is simply impossible to find the right braid. Or are you a do-it-yourself type? In these cases, stock up on a piece of good leather, thread, needles, scissors and, of course, patience - if you have never sewed, you will need a lot of the latter.
First, if possible, remove the steering wheel from the car. This is a rather labor-intensive process, so you can limit yourself to dismantling parts that will interfere, for example, an airbag or adjustment buttons. Be sure to turn off the battery.
As with any sewing, you can’t do without a stencil. And it is done very simply: we cover the steering wheel with cling film, wrap paper tape (painting tape) on top, draw a seam with a “painting” marker and use a utility knife to cut through this structure according to the markings. You may end up with at least three pieces of stencil. We cut out patterns from thick paper or cardboard using a stencil, providing 5 mm margins for the seams.
At the junctions of the pieces of leather themselves, we reduce the indentation to 3 mm so that the material can be pulled tightly.
Next, you should thread the thread, like a lace in a shoe, through the eyelets of the seams on different sides leather braid. Both laced options and options with stitching are possible, the main thing is that the leather is thick enough so that your steering wheel braid does not tear into pieces. You shouldn't try to tighten the thread the first time, it won't work anyway.
Choose a specific step and follow it, make a few loops, and then go back and tighten the first loop properly. Move on at this pace. If the leather is very strong, you can slightly wet it to increase elasticity. In this case, it will tighten even more when it dries. After pulling off the braid, install buttons and other elements. That's it! Your steering wheel has become leather.
The main part that the driver touches the most is the steering wheel. The steering wheel should not only be comfortable mechanically (easy to turn), but should also have a comfortable grip: not hard, not too soft, and not slipping. There are several ways to improve your steering wheel, for example, making your own steering wheel braid.
Steering wheel upholstery is classified according to the method of fastening, according to material, and according to durability. That is, the comfort, design, and control efficiency depend on the type of steering wheel trim. It may be that the braid will be too thick and this will create inconvenience for people with short fingers in gripping the steering wheel.
Leather steering wheel
The most expensive and respected steering wheel upholstery is leather. Compared to other materials, leather braid lasts longer and is easier to clean. Can be made from perforated (with holes) leather. Leather products with holes give volumetric view, hides irregularities, the steering wheel rim is ventilated. 
Leather steering wheel upholstery is in first place in terms of performance characteristics.
The ability to wash the steering wheel or treat it with alcohol, for example, is a very useful feature. Especially if you are not the only one driving a car.
In terms of cost, a leather steering wheel trim will be more expensive than, for example, one made of rag materials or wire, but you don’t have to change it every month. Therefore, such upholstery will pay for itself over a long period of use.
Do you know what the black plastic strip on the hood is called and what it is for? It is installed not as a tuning element, but to protect against insects crashing at high speed. It's called a deflector.
Fur braided steering wheel
At first it may seem that a fur-wrapped steering wheel is chic. But, after a couple of days of using such upholstery, disappointment will set in, because this material quickly gets dirty and cannot be wiped off like, for example, leather. Especially lint and fur light color will quickly lose their beautiful appearance.  In addition to the fact that such braiding is too easily soiled, in the summer the steering wheel may slip if your palms become sweaty. Accordingly, such material for such a critical machine part does not have a favorable effect on the safety of driving the vehicle.
Wire steering wheel braid
Since Soviet times, drivers of VAZ 2101-2107 cars have been willing to make the braid on the steering wheel themselves. It was fashionable at that time. The wire for weaving was chosen in different colors.
In terms of design and hygiene, the wire does not look as good on the steering wheel and is also not hygienic. A lot of dirt collects between the strands of wire. Even if you wash with cleaning solutions, the dirt will not completely come out of hard-to-reach places.
The advantage of wire braiding is that it is durable and easy to manufacture.  But there are also disadvantages:
- it's tough on the hands;
- also slipping of wet palms and fingers;
- The wire insulation blows out quickly in the cold and does not heat up for a long time, which is why you have to use gloves.
Other options
Thrill-seekers install special braided inserts that massage the fingers when grasping them and are believed to increase blood flow to the fingers. If blood circulation is poor, fingers begin to go numb.
Some people, on the contrary, don’t like it when sharp rubber spikes or other attachments put pressure on their fingers. Plus, some also make the steering wheel heated with a power button on the instrument panel. Very convenient for residents of the Far North, where temperatures reach -50 C.
Braid thickness and colors
Unless you are the owner of a super expensive car and you don't have servants, you shouldn't choose glamorous colors for the steering wheel trim. I'll get tired of washing these fur upholsteries. Besides, bright color gets boring quickly.  As for the thickness of the braid, it should not be too thick, otherwise your fingers will get tired of holding the steering wheel. This is especially noticeable when you have to travel long distances.
Volume inserts
Eat simple ways, what material to make the insert for the braid from in order to increase the diameter of the steering rim. For example, you can use foam rubber. It will add softness and increase the diameter (if the steering wheel is thin). But the foam insert will quickly lose its shape and sag somewhere.
Eat good way To make the steering wheel braid voluminous with your own hands - this is a gasket with helium inside. This insert will not allow it to lose its shape even after prolonged use.
Options for selecting steering wheel trim
To calculate the length and diameter of the steering wheel (by the way, who doesn’t know, according to geometry, a figure in the shape of a steering wheel is called a torus) you don’t need to remove it. You need to buy a flexible tailor's meter and measure the perimeter of the outer circle of the steering wheel and the diameter.
To the data obtained, you need to add another 3 to 5 mm for the overlap seam. The diameter of the steering wheel is generally 35-40 cm. Large steering wheels are installed from the factory on executive class cars, and small ones on sports class cars.
There are State standard, which regulates what diameter the steering wheel should be passenger car. According to GOST of the Russian Federation, the diameter of the steering wheel should not be more than 40 cm.
DIY steering wheel trim
There are tuning studios for cars that specialize in covering the steering wheel with leather and other materials, covering car seats, etc. But if there is required material and tools, you can easily do it yourself.
Materials and tools for steering wheel braid:
- leather strip, approximate size 10x120 centimeters;
- high strength nylon cord, approximately 3 meters long;
- awl or special punch;
- two needles from 5 cm long;
- a hook with a small head for pulling out nylon thread;
- a thimble to prevent holes in your fingertips;
- roll of tape;
- cling film;
- white sheet (whatman paper) of A1 format for the pattern.
The steering wheel can be sheathed completely, that is, with the steering wheel spokes or just the steering rim. Let's consider both options.
Steering wheel upholstery without spokes (only the steering wheel rim is upholstered)
We calculate the length of the leather strip using the formula: multiply the outer diameter of the steering wheel by the number P (3.14). Let's get the length of the circle. You can check with a tailor's flexible meter. When you approach the joint, you need to tighten the leather strip, since the leather itself will still stretch and you need to make sure that the upholstery does not sag.
It is not necessary to make the skin one color. Some sew together pieces of leather of different colors to create a custom design.
There are the following seam options:  You can coat the seams with special leather glue. This will protect the threads from ripping.
Holes are made for the nylon thread. A breakdown is a hollow metal tube with one sharp edge along its entire diameter. 
One side of it is placed on the skin, and on the other side it is hit with a hammer and a hole is created.
If you make holes for lacing with an awl, then the rope must be wound immediately after the awl.

Full steering wheel cover (with spokes)
This option is much more complicated. You need to make a pattern for sewing the trim. The pattern is made using cling film. To do this, you need to wrap all the parts of the steering wheel with film and secure it with tape so that it does not unravel.  Next, you need to draw all the seams and number them. On paper you need to draw diagrams of the numbered pieces of future upholstery.
  Now you can cut the film at the seams, put these pieces on whatman paper and trace them with a pencil. To the drawn contours we add 5 mm at the seam joints and cut them out.
Now we cut out the patterns from the leather. We sew the parts along the length of the steering wheel either by machine or by hand. Place it on the steering wheel and tighten it. Then we make holes and lace. If the plastic decoration of the steering wheel is in the way, then remove it first.
Video
This video shows in detail how to make a pattern for the steering wheel with your own hands.
5 mistakes when replacing steering wheel braid.
Video instructions for steering wheel braiding.
Hello, dear readers! Surely, many of you consider a car not a luxury, but simply a means of transportation, which should be without unnecessary features and bells and whistles. By at least, such a statement can often be heard among car enthusiasts, however, it is impossible to say for sure whether it corresponds to reality, because what driver does not want to provide himself with the maximum comfortable conditions travel, even short distances.
At a minimum, this manifests itself in the usual cleaning of the interior and washing the car body, and if you also have free money, then your imagination can soar very high.
Quite often, the process of improvement concerns not only “appearance” vehicle, but also its internal contents, which include car interior items. One of the most noticeable and frequently used such items is the steering wheel. Therefore, it is not surprising that, first of all, it is considered as an object for modernization, and today we will tell you about how and with what materials this can be done.
1. Leather steering wheel - a combination of comfort and beauty

Agree, we are used to seeing leather braiding (steering wheel cover) in the interiors of expensive foreign cars, and in addition to it there are usually leather seats and upholstery of almost everything internal space body
Naturally, the first thought that comes to mind after such a spectacle is the question of price. Yes, it’s really not cheap, but still, you shouldn’t focus on the cost, because this is just a stereotype: since it has a leather interior, it must be an expensive foreign car. IN modern reality There are a lot of leather substitutes that are very difficult to distinguish from the real material, and if you are only concerned about the issue of aesthetics, then this option is simply perfect for the owners of any car, no matter whether it is new or old.
In the case of a steering wheel braid, genuine leather will not only help decorate this car part, but will also add a couple of positive aspects to the quality of car control. The fact is that leather trim, unlike plastic, is capable of allowing air and moisture to pass through (drops will not accumulate on the surface of the steering wheel), and this will help avoid slipping if your hands suddenly become sweaty. IN winter time, thanks to the leather covering, the steering wheel becomes warmer and more pleasant to the touch, as this material retains heat better. Intensifying this effect is not a problem; you just need to buy a braid made of perforated leather.
I think no one will argue that holding the steering wheel in your hands leather-covered- much more pleasant than any other material, in particular plastic (soft skin helps to avoid the appearance of calluses from constant contact with hard and uncomfortable material). However, this accessory also has some disadvantages. First of all, it requires much more attention in terms of maintenance, and if you want this part of the car interior to serve for a long time, always having a presentable appearance, you will have to stock up on special products.
By using them to regularly wipe the surface of the leather braid, you will thereby protect it from drying out, which contributes to faster wear and tear. Basically, instead of special means, for these purposes, other liquids containing alcohol are also suitable, and if they are not at hand, then, as a last resort, you can use ordinary wet wipes, the main thing is that the material does not lack moisture.
 At correct operation and proper care leather braid can last up to 5 years, after which the material will still have to be replaced with a new one. Currently, the range of these products is simply huge. Manufacturers, depending on color, design and style, offer various options leather braids. You can choose a model for those who prefer a classic, strict style (in addition there is lacing), as well as for those who are interested in sporty or more glamorous notes in the design of the vehicle interior. Typically, such a leather case is sold complete with all materials necessary for installation (laces, threads, buttons and instructions with detailed description installation process), so if you decide to purchase a similar accessory for yourself, you will not have any problems with this.
2. How to make a steering wheel braid with your own hands?
In the event that for some reason you were unable to choose suitable model braids (you didn’t like the color, style, design, you don’t have the right size, or you just want something extraordinary), it’s quite possible to make it yourself. First, decide on the color and texture of the leather material. The most the best option, in this regard, there is perforated leather, which is a softer and more elastic material, and it is easier to work with than smooth leather. True, the latter is less susceptible to rapid wear. The thickness of the leather should be chosen in the range from 1.2 to 1.4 mm.
 And so, for work you will need: a piece of good leather material, threads, needles, scissors, and... endurance, especially if you didn’t have to sew much before. Before starting work, it is better to remove the steering wheel, but given the complexity of this process, you can limit yourself to dismantling interfering parts (for example, adjustment buttons or airbags). Before you do these steps NECESSARILY disconnect the battery.
Like any other sewing, creating a leather braid for the steering wheel will not be complete without developing a pattern. It’s not difficult to make, you just need to cover the steering wheel with cling film, wrap paper tape on top (you can use masking tape) and draw a seam along it with a marker, then cut through the structure according to the applied markings. For cutting it is best to use a sharp stationery knife, which will cut and not tear tape and film. As a result of these steps, you should end up with at least three pieces of stencil (all these parts should be numbered so that you don’t later face the consequences of an incorrect stitching sequence).
Next, we take them and apply them to thick cardboard or other thick paper, trace them with a marker and cut out the patterns, leaving 5 mm on each side for the seams (so that the material can stretch better, we leave 3 mm at the junctions of the skin). Notice! When the developed layout is transferred directly to the skin, when marking on the material on the sides, you will need to add another 1.5-1.7 cm. After carrying out all these actions, all the resulting parts are applied to the steering wheel and checked to see if everything matches in size, cutting off the excess parts before stitching. If everything is good, then all the parts are folded in the right order and sewn together.
When sewing pieces together, it is better to use sewing machine and synthetic threads (preferably nylon), the seams are then smoother, clearer and the product lasts longer. In addition, such a seam will simplify the task of tightening the finished braid on the steering wheel, since the holes for the loops will be ready. Of course, you can try to do it manually, but in this case the process will not be as easy as it might seem at first glance, therefore, you should first practice on a cheaper material (faux leather) and if everything works out, then with a clear conscience move on to leather . If the result of the “training” did not meet your expectations, it may be better to use the help of the employees of the nearest studio.
3. What determines the quality of the result?
 The positive result of any work is the totality of all its successfully completed stages. This statement also applies to the creation of the steering wheel braid. To finally make sure that all the previously performed actions are correct, you should carry out a general “trying on” of the product, and then fix it on the steering wheel. That is, the last stage will be the direct braiding of the steering wheel.
Remember!The quality of all work largely depends on your patience, accuracy and scrupulousness in this matter. The steering wheel braid is carried out as follows. To begin with, apply the pieces of workpiece sewn together to the steering wheel, making sure that they are positioned symmetrically (you need to focus on the inside steering wheel). Then the places of the steering wheel over which the seams pass connecting the individual parts are marked with a marker.
Also, if you do not want the seams to protrude, you can make indentations in them, but after this you will have to constantly use the braid, since without it the steering wheel will become completely unattractive and shabby. The next step is lacing the leather braid, which is carried out by analogy with lacing boots, only the thread, in in this case, threaded through the seam loops on different sides of the product.
Advice!If the braid does not stick to the steering wheel tightly enough, then to avoid future rotation, it is worth strengthening it, thin layer epoxy resin applied to the steering wheel.
 In addition to lacing, you can also secure the product using the stitching method, taking into account the thickness of the material (leather). If it is not thick enough, the braid may tear into pieces. Do not try to tighten the thread the first time; it is better to make several loops selected in advance, then go back and tighten the first loop. So, keeping to the set pace, move on.
If the leather is very hard and does not heat well, you can lightly moisten it with water, thereby increasing its elasticity. However, when it dries, it will shrink back, and this cannot be ignored, since after tightly stitching, the dried product may crack. When the braid is completely tightened, all previously removed elements are installed in their original place. Now you can evaluate your new leather steering wheel.