How to make roller blinds for windows at home? How to sew warm curtains for windows with your own hands
Every housewife wants to create an original, and at the same time, cozy interior V own home. Not last role V this process window decoration plays. It is worth noting that without textiles it is difficult to achieve the effect of completeness. And if you also prefer brevity and economy family budget, That ideal option- do roller blinds on plastic windows with your own hands.
Product advantages
Before you make it yourself, you should definitely familiarize yourself with the features of such crafts. First, you can understand their advantages.
The advantages of this alternative to conventional blinds are:
- Versatility, they can be installed on any window structure;
- ease of care;
- a wide selection of fabric options, which allows you to plan the lighting in the room;
- fit perfectly to the windows;
- design diversity;
- DIY roll curtains will be a great addition to your favorite curtains.
Unlike Roman blinds, the mechanism for roller blinds, which is very easy to make with your own hands, involves rolling it into a roll and tying it.
Let's start with fabric and colors
Before you make it yourself , It’s worth spending a little time choosing suitable fabric. In this matter, the following important nuances must be taken into account:
- the fabric must fit into the overall interior of the room, or become interesting accent;
- Before choosing, be sure to take measurements of the window frame;
- It is better to choose the density of the fabric based on whether the room is located on the sunny side;
- translucent fabric has the ability to make the room visually wider, the presence of a transverse strip visually expands the walls, and a vertical strip increases the height of the ceilings.
Choosing color scheme To make roller blinds with your own hands, follow the following rules:
- It is better to choose the fabric to match the color of the furniture. This also applies to patterns.
- Plain dark options cannot be called the best solution for the kitchen and dining room. Colorful fabrics are more suitable for such rooms.
- For southern rooms it is better to choose blue, green tint. For windows facing north, you should choose warm colors - yellow, orange, red.
- If you don’t know how to make roller blinds with your own hands , to completely darken a room, give preference to blackout material, which does not transmit at all sunnier rays. This is a very good solution, for example, for a home theater.
Successful combinations for all times remain chocolate and beige, red and white, blue and yellow. But in the end it all depends on your own taste preferences.
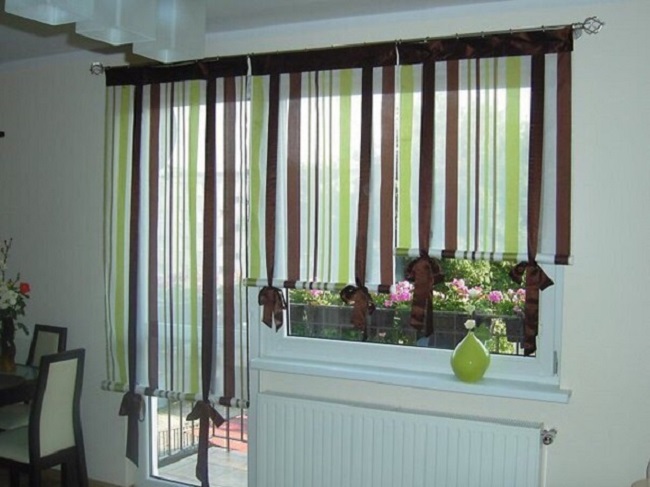
Bright shades of fabric for roller blinds
Required accessories
Before you make your own roller blinds , You will definitely need to prepare the materials necessary for the work:
- canvas of pre-selected fabric and pre-measured sizes (if in window design not two doors, but more, to determine required quantity the number of leaves should be multiplied by two);
- tapes, other decorative elements with which the fabrics will be tied (the length of such a tape should exceed the size of the curtain itself by 20-30 cm);
- wooden beam or metal tube for fastening;
- a metal rod or a regular wooden plank for weighting;
- furniture stapler;
- screwdriver;
- sewing supplies.

Markings for roller blinds

After preparing the materials, you can begin creating the product.
Step by step instructions
So, to do it yourself , You will need to perform the following simple steps:
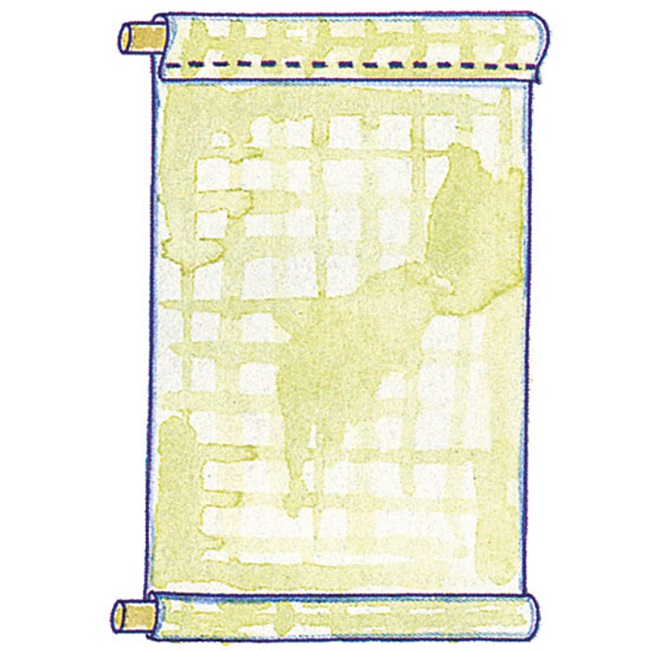
- We lay out the fabrics prepared in advance inside out, sew them along the length, and on one side - along the width. The resulting bag must be turned inside out.
- The gap should be sewn up if the strip is placed in a special pocket. Otherwise it is left open.
- When choosing the first method of action, you need to make a special pocket, iron the fabric, and then install the prepared strip.
- If you went the second way, you need to place the weighting material inside the bag, and at a distance of about 0.5 cm, sew the curtain and sew up the gap.
- Next, the fabric is ironed and wrapped around the block.
- After this, the fabric is attached to the block using a stapler.
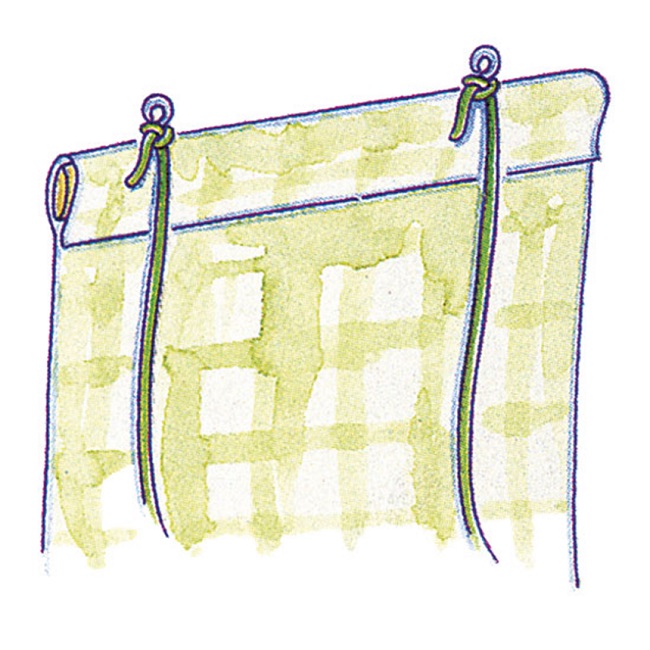
- Install the prepared garters using a stapler, or carefully stitch them with thread.
- At the end, the beam is attached to the window.

We install the weight in a special pocket
Roller blinds with side cord

Roller blinds with tape
Mounting options
After roller blinds , DIY ones are ready, you need to install them. To do this, you can choose several fastening options:
- Fastening to the opening. You need to drill holes in the ceiling and insert a profile there. In this case, the curtains will flow down freely.
- Mounting to frame. If you choose this method, required holes do directly in window frame/
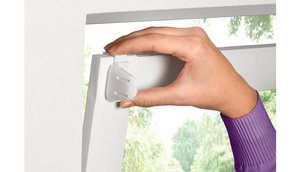
- Installation technology without drilling. This method the simplest and safest. Its essence is to use a construction adhesive mixture or tape.
Do-it-yourself roller blinds for plastic windows are a guarantee of attractiveness and completeness of the interior in any room. They are comfortable, laconic, and will be the best solution for the kitchen, living room and even children's room.
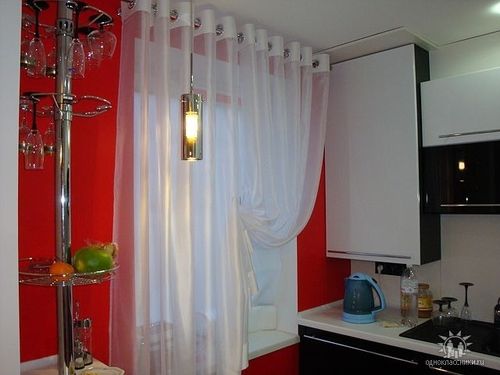
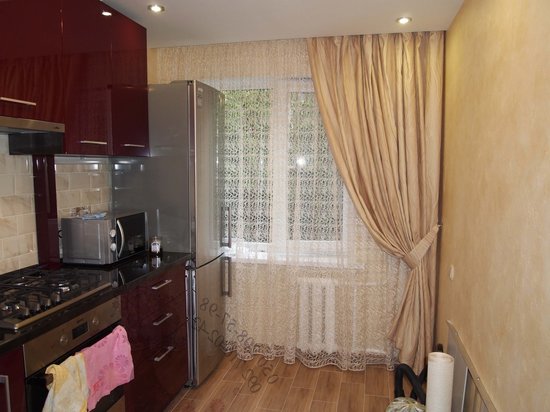
It is difficult to imagine windows in an apartment without curtains or blinds. Some people buy them in specialized stores or order exclusive ones, and some craftswomen make them themselves. DIY roller blinds can be an interesting alternative to blinds. They will perfectly cope with sun protection functions and add lightness to the interior.
Roller blinds - advantages and features
Such products have an interesting, stylish look and are suitable for almost any room. In addition to being functional and practical, roller blinds can refresh the interior and add a touch of originality and sophistication to it.
Main advantages:
DIY roller blinds: photo
Before you begin the process of making a product, you should look at the photo and read the recommendations in order to have an idea of the future masterpiece.
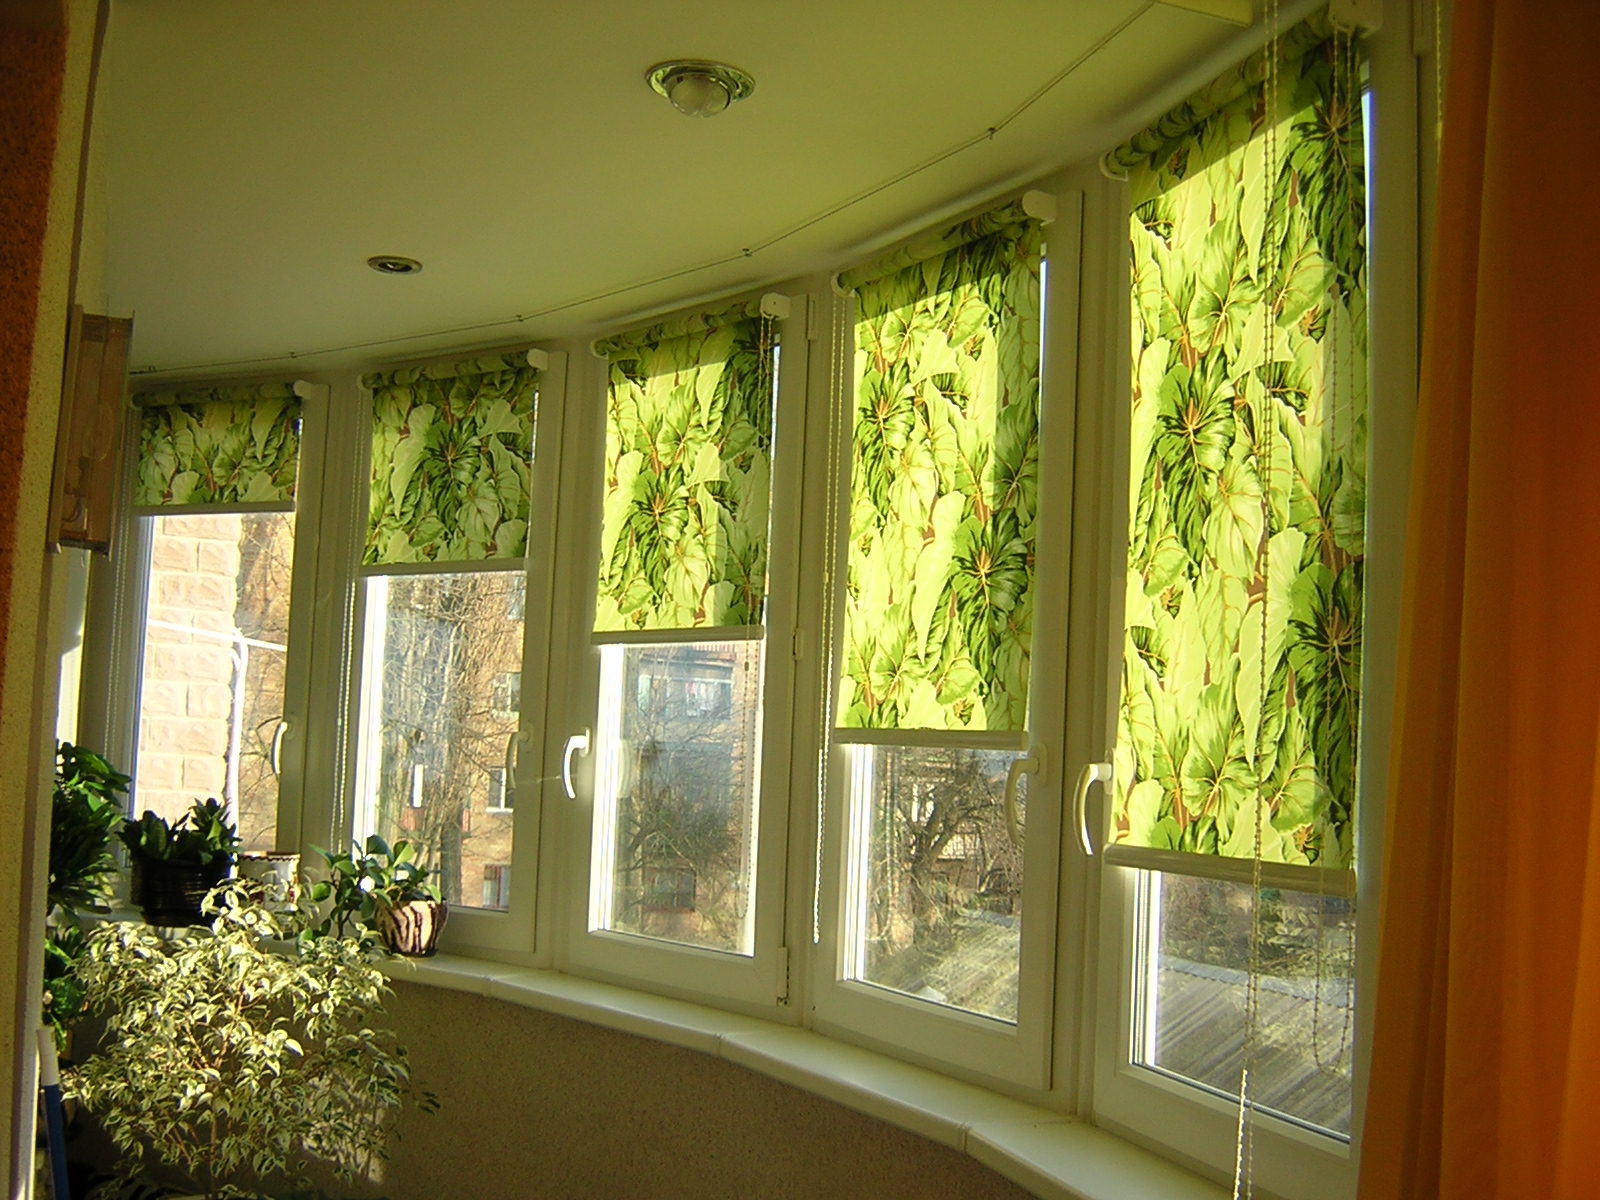
Roller blinds in the interior of premises


To work you will need:
- Fabric suitable for the interior.
- A wooden strip that will serve as a cornice for curtains.
- Weighting agent.
- Two ring screws.
- Decorative ribbons for lifting curtains.
- Two screw hooks.
Colors and fabric choice
When choosing a fabric, it is worth considering that it can either match the interior or become an interesting accent. IN modern interior Products with a metallic shade will look very stylish. You can get the effect of stained glass windows if you choose translucent fabric with an openwork pattern.

When choosing fabric, you should also consider the location of the windows:
- shades of cool colors (blue, light blue, gray) are most suitable for southern windows;
- bedding and warm colors It is better to choose for windows facing north.
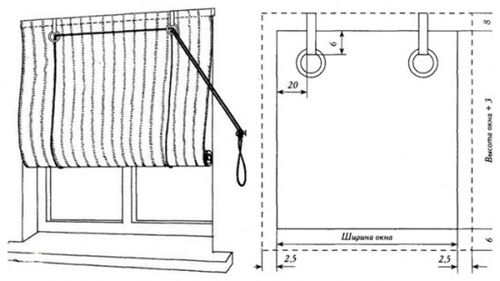
Before you buy fabric and start working, you should decide on the size of the curtain. To do this, you need to measure the window frame: the width of the curtains should be equal to the width of the frame, and eight to fifteen centimeters should be added to the double length of the window opening to get the desired length of the curtain.
Before you start cutting the material, you should add two and a half centimeters to the allowances.
Product intended for large window, you will have to sew it from several pieces of fabric. In this case, you need to make sure that the seams line up exactly in the center of the frame.
Procedure for sewing roller blinds
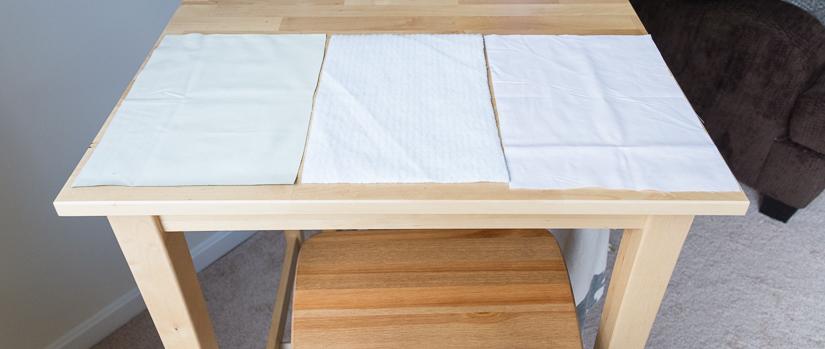
- Lay out on the table and cut out two pieces of fabric according to preliminary calculations. Sew the fabrics on both sides lengthwise and on one side widthwise. Turn the resulting bag inside out and iron all the seams.
- Attach a weighting agent to the product by placing it inside the workpiece. Back off a little and stitch. Sew up the curtain completely.
- Unfold the curtain flat surface and, stepping back five centimeters from its top, place a wooden block, which is carefully wrapped in cloth. Use a stapler to fasten the fabric to the wood.
- For functionality and beauty, prepare garters that will hold the curtain folded.
- Cut two ribbons from the fabric. Their width should be approximately eight centimeters, and their length should be thirty centimeters greater than twice the length of the window.
- From the wrong side of the tape, carefully bend it lengthwise and sew along one short side and along the long side. Turn out the garters, sew another short side, iron.
- Throw the garters over the wooden strip that is located at the top of the roller blind. Attach furniture stapler. You can use hooks or zippers instead of a stapler to secure them. This will make it easier to remove the curtains to wash them. If the curtain will be attached to plastic frame, then you can use double-sided tape as a fixation.
- The rod-shaft is fixed above window opening or to the frame.
How to attach roller blinds to plastic windows with your own hands
Fastening can be carried out in a variety of ways different ways. We should consider the three most popular types of fastening, which can be done with your own hands without any specific skills or knowledge.
Mounting on window opening. With this installation method, the canvas is fixed on the ceiling or on the wall surface and falls freely along the window. In order to secure the roller blind, holes are drilled in the ceiling or wall into which profiles are inserted for fastening. You must be very careful while drilling to avoid unwanted damage.
Fastening to the window frame. In its principle, this fastening method is similar to the previous one. However, in this case, the canvas is attached to a frame, in which several holes are drilled and special fasteners are inserted into them.
You should be as careful as possible with this installation method. roll design so as not to drill into the surface of the window and damage it. If you are not confident in your abilities, then it is better to seek the help of a specialist.
Installation without drilling
To attach curtains without risk, you can use the installation method without drilling. This is the safest, easiest and affordable way. For installation, use special construction tape or glue. Today you can find dozens of such materials on sale. They only differ characteristic features and cost.
It is best to abandon cheap compounds in favor of reliable and quality option, capable of providing durable and strong fixation when installing curtains on a window. Attach the roller blind like this building materials Can be used on any surface (frame, wall or ceiling).
Whether open or closed, hand-made roller blinds guarantee attractiveness to the window opening. They are easy to clean and are the best solution for children's rooms, kitchens, loggias and balconies.
Thanks to ergonomics and varied designs, roller blinds or, as they are also called, roller blinds and roller blinds are only becoming more popular every year. The production of roller shutters today is very profitable and the market has no shortage of their assortment, but you can create your own unique interior only by adding elements to it self made, for example, make roller blinds for plastic windows with your own hands. Of course they will remind roller blinds, offered to us on the market, only with a lifting design and laconicism, but will inevitably become the highlight of the entire situation in the room.
Sewing such curtains does not require large financial costs and time, and even a novice craftswoman can handle it.
Selecting textiles for making roller blinds with your own hands step by step instructions offered below is not limited in any way. On sale you can find fabrics designed specifically for window curtains of this type: thick and transparent, plain and printed, smooth and embossed, as well as light-proof materials of the new generation Blackout and Screen, which provide complete shading in the room. They are ideal for the bedroom, and if you are planning to update the curtains in the bathroom, give preference to fabric with water-repellent impregnation. Before sewing roller blinds from such materials, do not forget to study the recommendations for caring for them: is washing acceptable, if so, at what temperature, etc.
If you wish, you can also make roller shutters yourself from ordinary curtain or cotton fabrics. They do not have high antistatic and dirt-repellent properties, but they are also much cheaper. Moreover, the master class that we offer does not oblige you to choose only special materials for roller shutters. For curtains made using it step by step, you can choose any textile fabric suitable for realizing your design ideas: curtain fabric, satin, chintz, poplin, linen, cotton. The main condition is that the fabrics for the front and back sides must be of the same texture and not fade. Otherwise, when washed, they will shrink differently, the curtain will warp and lose its attractiveness.
How to make roller blinds with your own hands in a couple of hours: step-by-step instructions
To make roller blinds with your own hands, a minimum amount of fabric is required and at the same time you get a beautiful, stylish and maximally functional product. Such a curtain can cover not only a window, but also a glass door or be used as an original door for a small cabinet.
In order to sew roller blinds with your own hands we will need:
- sewing machine;
- two pieces of the same type, but different in design;
- two wooden bars approximately 2 and 1 cm wide and a length equal to the width of the finished curtain;
- five ring screws;
- three hook screws;
- screwdriver;
- cord, braid or tape for raising and lowering curtains;
- scissors, centimeter, thread, pencil.
Our roller blind will be mounted on window opening. When unfolded, it should extend 10-12 cm beyond its borders in width, and in length go down to the window sill. Based on this, we take measurements. To the results obtained, add 3 cm to the width for allowances on the side seams and 10 cm to the length, taking into account that we will fix the curtain at a height of 7 cm above the window.

If a roller blind is installed above the upper slope of a window opening, its size should be wider than the opening by at least 10 cm or more.
As an example, let's take a standard window opening with a width of 146 cm and a height of 140 cm. This means you need to cut out two rectangular pieces of fabric (since you plan to sew a double curtain) with a width of 149 cm and a length of at least 150 cm or more. By the way, if the width of the fabric is 150 cm, it is not at all necessary to trim the roller blind by this extra centimeter. Just cut out a square 150x150cm. If the width of the fabric you like is less than one and a half meters, you will have to sew the curtain from 4 cuts (2 for the front side and 2 for the back), and decorate the central seams with decorative tape or braid.
Step 1: Sew the curtain
Place the pieces of fabric right sides together and sew them on the sides and top, departing 1.5 cm from the edges. Leave the bottom edge unstitched. We turn the product right side out, bend the bottom edge inward by 1.5 cm, stitch and thoroughly iron what happened on both sides.
Now we need to sew “pockets” for the weighting and fastening strips. To do this, we decide which side of the curtain will be the front side (looking into the room) and which side will be the back side and lay it out on a flat surface with the wrong side up. Then we bend the top edge by 3 cm, the bottom by 1.5 cm, stitch and insert the strips: the one that is wider into the top pocket, and the one that is narrower into the bottom.
Step 2: Screw in the ring screws
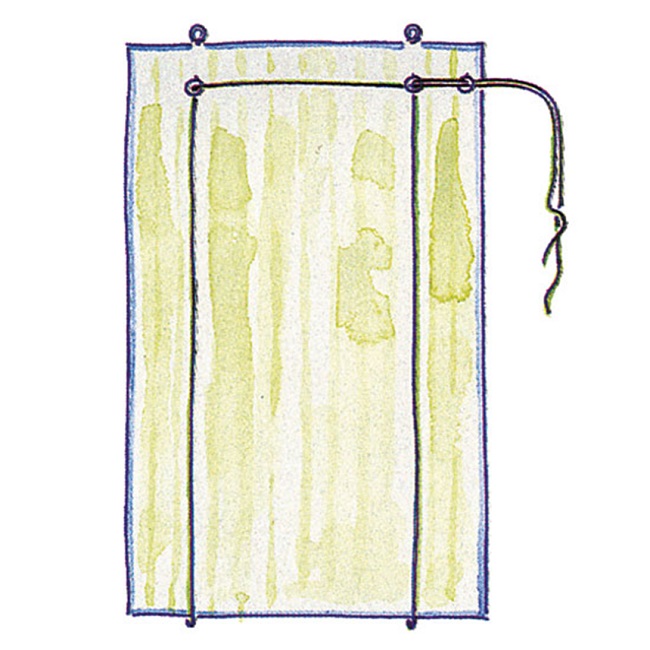
We screw ring screws into the upper (fastening) bar at a distance of 10 cm from the edges through the fabric (two on top and two below them on the front side). We also screw in the fifth screw from the front side, from one edge, stepping back from it at a distance of 5 cm.

Step 3: Attach the Lifting Cords
To roll the roller blind, you need cords. What they will be like depends only on your imagination: a regular cord, a nylon tape, a decorative braid, a tape made of fabric in a contrasting color to the curtains. Before cutting them to the required length, we make some simple calculations. The length of the first cord is equal to the length of the curtain multiplied by three. The length of the second cord is exactly the same plus another half the length of the curtain. In our case it will be 450 cm and 525 cm.
We thread both cords into the screw rings on the top bar and fasten them as shown in the figure. In this case, a longer cord must be tied to a ring located further from the separate, fifth side screw.
Step 4: The curtain and the original lifting mechanism are ready
We lower both cords along the wrong side of our curtain, bring it through the bottom to the front side, pass it through all three rings screwed into it and tie it together.
Step 5: Install the curtain on the window
Before hanging our wonderful curtain, you need to screw two hook-screws above the window opening. The main thing is to screw them in so that they are located exactly opposite the upper rings secured to the mounting strip. The same principle can be used to make not only curtains, but also blinds with your own hands.
To do this, we place the curtain on the opening above the window and, with a pencil, mark the places where the hooks and screws should be, screw them in and hang the curtain. It is advisable to screw in another hook on the side of the window, through which it will be convenient to throw the cords when the curtain is raised, thereby preventing them from getting tangled.

Ideas with photos and videos for inspiration
Our master class on how to make it yourself is just a guide to action. With its help, you can sew curtains completely different from the previous ones. They will differ in size, design, and type of lifting cords. By changing them according to your mood, weather, season, you can easily and simply transform your interior every time.
Hand Made curtains bring the warmth of human hands and a feeling of comfort and tranquility to the interior
Such curtains can be attached not only to a block, but also to a cornice using ordinary curtain rods, and if the width of the fabric does not allow, sew not one wide curtain, but several narrow curtains

Such curtains can be installed not only on the opening, but also on each sash

or into a window opening. In this case, you will have to take into account that you can open the window only when the curtain is raised to the very top

or use your imagination and come up with your own original mount
Ordinary nylon tapes can be used as lifting cords
Instead of screw rings, ordinary plastic rings threaded through ribbons are sometimes used to support lifting cords
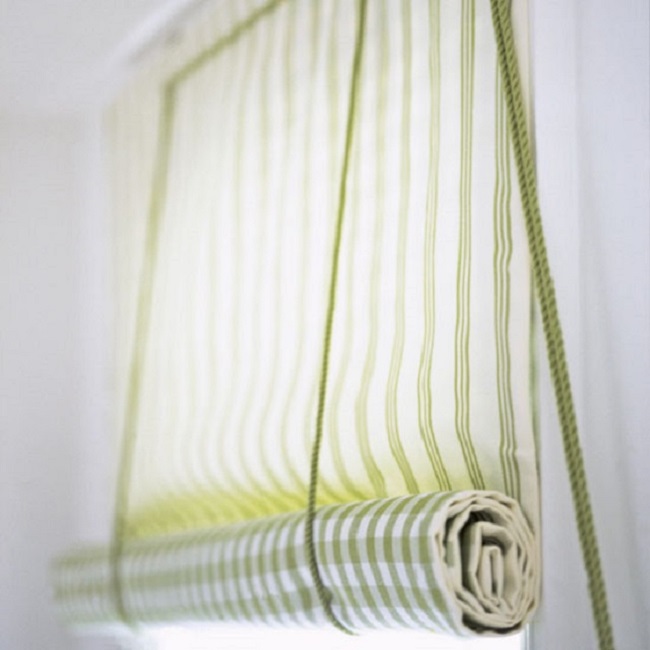
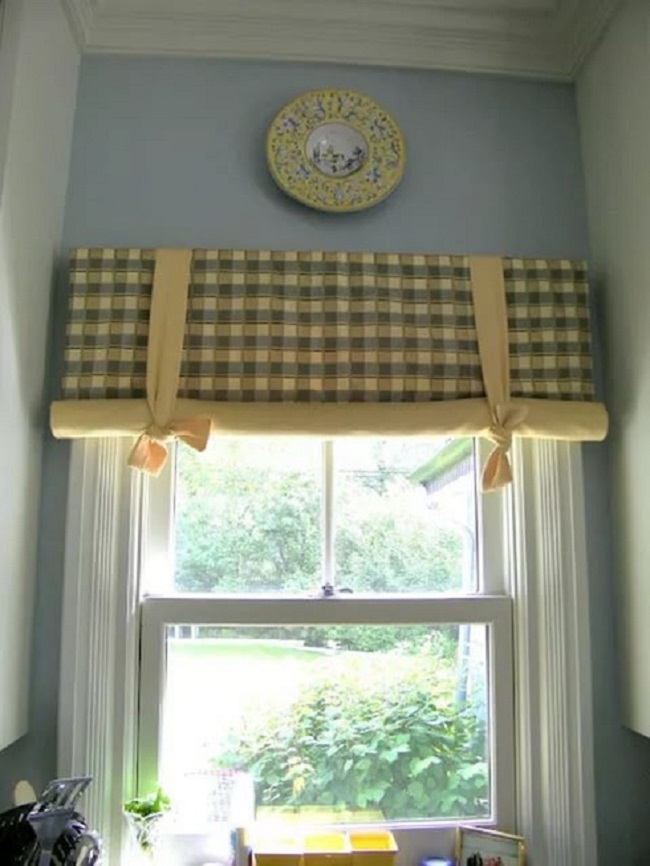
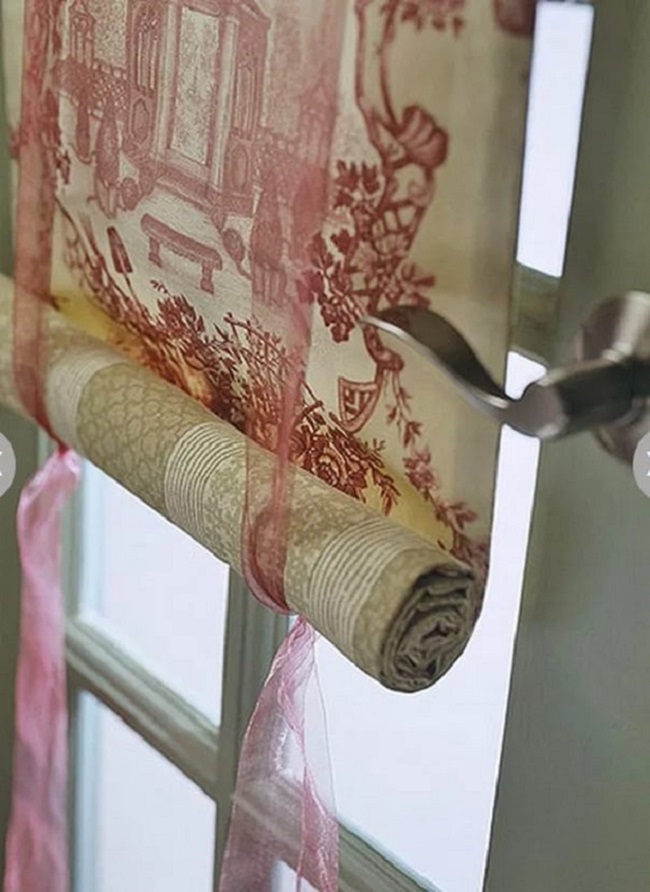
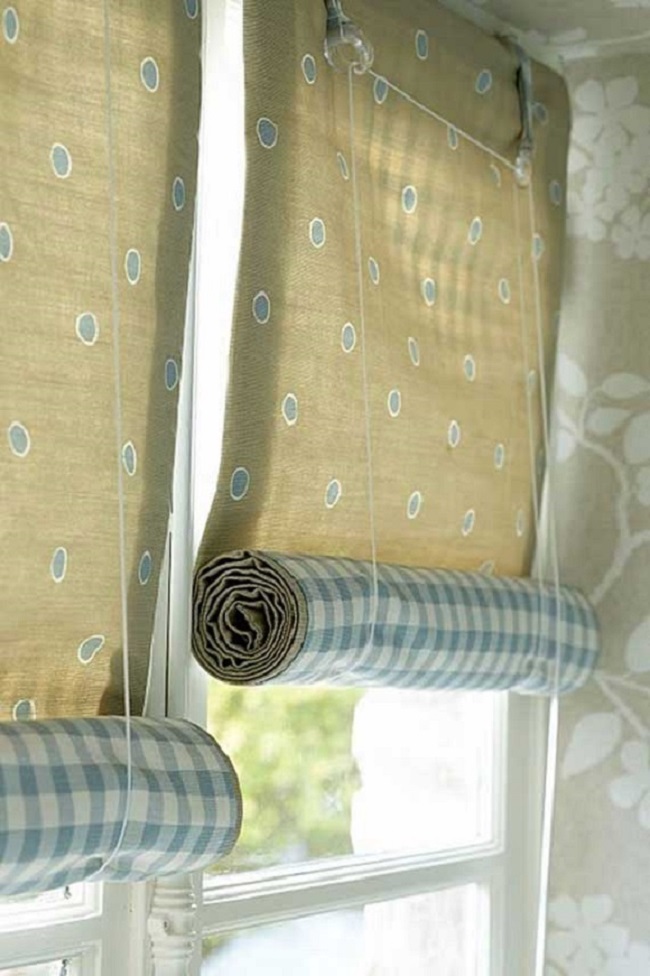
If the window is small, you can do without a lifting mechanism, and roll the curtain fabric manually and fix it with one tape in the center
Every housewife can create a cozy and unique atmosphere in her home or apartment. The main thing you need for this is the desire to create, imagination and a sense of proportion. And you can start with the simplest thing - change ready-made curtains to those made with your own hands and according to your own design.
For those who like to handicraft, this is a great opportunity to stylishly decorate the kitchen with curtains without the help of designers. You can even sew such products with your own hands.
To bring this idea to life, you can take advantage of special master classes that will teach you how to create original curtains.
DIY Venetian curtains
Delicate, elegant curtains in the Venice style are an extraordinary decoration for the kitchen. Lightness and weightlessness are imparted to these models by the construction of a satin strip horizontally, where the rod is hidden, to which the finished curtains should be attached to the window.
For a 1.5*1.2 meter window you will need:
- white or beige muslin (2.5*3.0 meters);
- printed variegated satin with flowers (0.8*1.5 meters);
- satin ribbon pink color(20*0.05 meters).
To make these curtains, you need to cut one strip measuring 3*0.17 m and four strips measuring 2.4*0.13 meters from satin. The tape is cut into eight strips (each 2.5 meters). You can watch this process on video.

Curtains are sewn in several stages.
- You need to pull out two threads from the fabric of the product for precise basting. In this case, the 1st thread should pass along the edge from above, and the 2nd - 17 cm from it. Next, you should pull out four threads vertically (two along the edge, two 13 cm from it). In the same way, it is worth noting where the vertical strips of satin in the curtain will be.
- Strips of printed satin, whose width is 13 cm, should be folded one cm, folded in half and ironed.
- Two vertical stripes are folded from the two side edges of the product and stitched, after which they are turned away and ironed (see photo).
- Two pink ribbons are placed between the curtain and vertical satin stripes at a distance of 5 cm from the edge, covered with a vertical satin strip, and the edges are pinned using pins, taking into account the previously made marks.
- The edges of the upper satin ribbons are secured with machine stitching. A satin strip of 3 * 0.17 m is hemmed on both sides by one cm and is also basted according to the marks to the vertical stripes. A horizontal strip is sewn along the edges, and then 5 cm from the edge at the top. Vertical stripes are sewn along the marked lines. The bottom of the rag product is also hemmed and steamed.
- Satin ribbons need to be pulled together to form folds, and it is recommended to tie their ends into bows.
- You need to thread a rod through the top strip and evenly distribute the resulting curtain (photo).
Master class on creating curtains with eyelets
Kitchen curtains with so-called eyelets turn out to be quite interesting. These are rings made of plastic or metal, attached to fabric and then put on the curtain rod. Such products slide easily along the cornice, have attractive folds, and are securely fastened. Eyelets are not only devices for conveniently securing curtains, but also original part in design.

To make such curtains for kitchen window, you will need:
- fabric for curtains (in this case, the width of the cornice is multiplied by 2.5);
- cuff material;
- tape for eyelets;
- the eyelets themselves (necessarily an even number).
Such window products are created in several stages:
- Excess material is cut off and the seams on the sides are processed.
- The width of the cuff is 25 cm. Strictly in the center you need to mark a line with chalk and attach grommet tape to it.
- This tape is glued by ironing. The cuff is then folded over to the glued side and ironed.
- The seam allowance will be pressed onto the tape, while the 2nd seam allowance should be pressed onto the front of the cuff.
- When the ends of the cuff are stitched, you need to turn it right side out.
- The curtain is placed in the cuff so that the glued part is at the top, while at the bottom there is a 1 mm edge. Next, you need to stitch everything and iron the cuffs.
- You need to step back 4 cm from the top edge and mark the places where the eyelets are attached, attach them and mark the diameter. Then holes are cut, 2 mm larger than the marked lines. Don't worry if the material starts to fray, as the eyelets hide these edges and hide any protruding curtain threads.
- Then you need to install the eyelets according to the existing instructions (you can watch the video).
- Curtains for the kitchen are assembled into an accordion, a cornice is threaded through the eyelets, after which they need to be hung over the window and the drapery distributed.
![]()
Do-it-yourself ordinary curtains
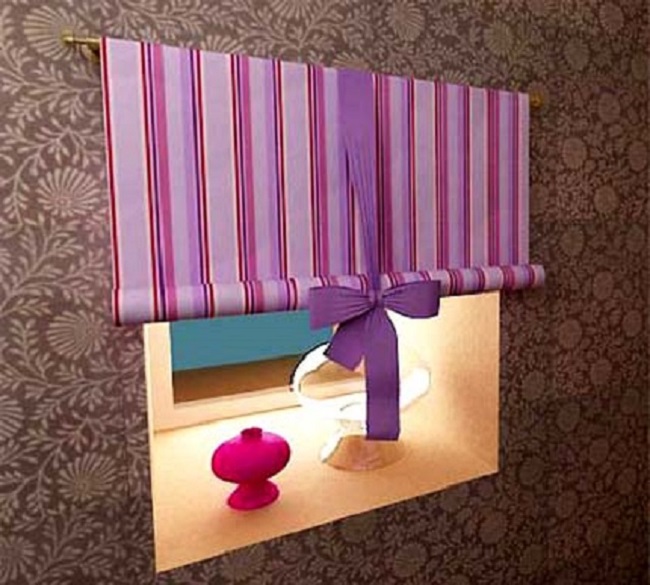
Original lambrequin curtains (pictured) are a great addition to a window where there are blinds and other types. It is in some way a gentle romantic accent, like an elusive kiss.
To sew such a curtain you will need:
- material for the curtain (height - 0.6 m, width - window opening);
- satin ribbon (2 meters);
- threads
To make this model with your own hands, you can use a wide variety of fabrics, both in color and texture. However, it is worth remembering that different textures will drape differently.
Cotton and even synthetic fabrics will look great in the kitchen. Since the satin ribbon acts as an accent here, it should be a different color than the curtains themselves. In this case, you can choose some very interesting combinations.
A master class on sewing such curtains can be seen in the photo.
- The fabric is ironed, edges are marked and stitched.
- The fabric is folded at the top based on the thickness of the cornice rod. Sewn.
- The seams on the sides must be manually gathered with thread (5-7 stitches, step 1.5 cm).
- After this, you can safely hang the curtain in the kitchen curtain rod.
- The tape is cut into 2 strips, each 1 meter long, which are thrown over the cornice and pulled together to form folds. You can tie a bow at the ends (see photo).
Results
Thus, you can create curtains for the kitchen yourself. You just need to know how to operate a sewing machine. Then you will get really interesting and original models.
Not only clothes are warm, but also… curtains. The special “design” of such curtains allows you to literally insulate the windows and protect them from the penetration of cold air from the outside.
This is especially true for regions with cold climates. After all, no matter how high-quality the windows are, no matter how well the heating works, in frosty weather the window glass still blows cold. This creates discomfort if you are sitting nearby. And it reduces the energy efficiency of housing, which is mentioned in recent years a lot is said - both from the point of view of saving money on heating, and in the light of the fight for the environment.
Warm curtains for the window. Photo
How to sew a warm curtain with your own hands? A simple master class will help you learn what is needed for this and in what sequence to build the process.
A simple recipe for warm curtains
As you know, the more layers, the warmer. This principle, which is valid for clothing, is also proposed to be used when creating warm curtains. They are made from several panels of fabric different types. It is important to follow the recommendations of specialists - then everything will definitely work out as it should.
You will need:
- material that will create a decorative layer; it can be any decorative fabric;
- material for the reverse side of the curtain (opaque); it can also be decorative;
- a special fabric that has the property of reflecting heat - something like felt; this will help make really warm curtains for the window.
Warm curtains for windows made from such materials will provide good protection from drafts and from the cold coming from the glass. You also need a regular sewing machine, needle, thread, scissors and tailor's meter.
Taking measurements of future warm curtains
The first step in how to sew a warm curtain is to measure the window. You need to take measurements of its height and width. It is advised to do this carefully.
Warm curtains can be made different sizes. Usually their dimensions are the same as those of ordinary curtains: the length reaches the floor.
Having decided on the width and length of the curtains, you need to add another two centimeters to the allowances - on the decorative and backing fabrics. The heat-reflecting fabric is cut exactly to the size of the curtain.
How to sew warm curtains. Photo master class
Putting on the cover
Then the blanks are stacked with each other. First, decorative and opaque fabrics are placed one on top of the other so that the front surfaces are inside. The edges of the parts must match exactly.

Then on sewing machine lay a stitch at a distance of two centimeters from the edge along each edge. Turn the part inside out and iron the edges thoroughly.
Now you need to place heat-reflecting material in this “case”. This can be done in two ways: insert the fabric inside or put a “cover” on it, as is done with pillowcases and a pillow.

Warm curtains. Master class
When this is done, the edges of this multi-layer “pie” are chipped along front side pins and stitch around the perimeter.
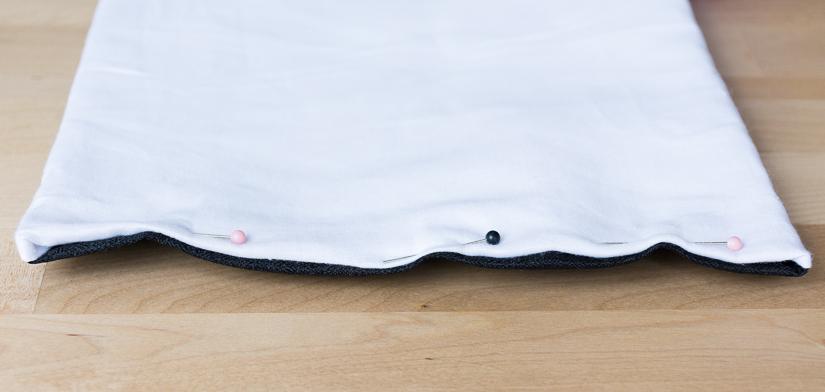


Now you need to attach braid for hooks to the top of the curtain or decorate it in another way, for example, using eyelets or sewing loops, or do something else. Warm curtains for the windows with your own hands are ready.
Let's find out more about MDF - what it is, especially... What is MDF MDF is one of the most popular materials for furniture production. But despite the fact that everyone has this name...