What to do if after repair you can see joints in the wallpaper. Correcting basic problems with wallpaper joints Joints on wallpaper after gluing how to fix
Before starting repairs, each master mentally imagines the result of his work, since it cannot be achieved without the intended goal. Of course, perfectly pasted wallpaper makes a significant contribution to a harmonious new environment!
However, in the actions of even the most sophisticated professional there are mistakes. A day after the sticker is high quality wallpaper, for example, it happens to observe a terrible panorama - the stripes have diverged in places and bare surfaces of the walls gape at the former joints or areas are covered with noticeable stains. This situation can greatly upset any person, forcing him to frantically analyze what happened and look for ways to correct this horror.
Let us consider in order what can be done to correct the consequences that disfigure the surroundings.
What causes the joints between sheets of wallpaper to separate?
The reasons for such unpleasant “behavior” decorative covering multitude. Let's look at the most common and significant of them.
1. The joints between the wallpaper sheets diverge - this is the most common defect, appearing after repair work. This behavior is typical for all types of paper and fabric wallpaper. The reason for this reaction of the wallpaper material is its ability to absorb moisture, which causes swelling of the structural fibers of paper or fabric. When the adhesive mass is applied to the wallpaper, water from it penetrates into the base of the sheets, causing them to expand. Immediately after gluing, it seems that the joints fit perfectly, but this is often not the case.
Attention! A wallpaper canvas 0.5 meters wide covered with water-based glue increases by three to six millimeters after a 15-minute exposure. Moreover, this behavior of cellulose manifests itself unevenly, for example, in a 16-centimeter section, wave-like discrepancies of 1.1 and 3.1 mm can simultaneously form!
Therefore, the reason for the formation of discrepancies and gaps lies precisely in this. After about a day, the surfaces dry out and the microfibers return to their original state, restoring the previous width of the wallpaper sheet.
This process can be prevented or significantly reduced by preventing severe soaking. A section of wallpaper must be pasted immediately after visible signs of sufficient moisture in the material appear. Gluing should be reasonably sequential - no more than 2 sheets with glue applied to the surface in a queue.
Warning! It is unacceptable to organize work in separate stages. For example, you cannot first cover all the sheets of wallpaper with glue and then stick them on one by one!
2. The second common defect in wallpaper joints is the appearance of stains and streaks along the contact lines of the panels. Such flaws are especially noticeable on plain wallpaper in light shades and colors.
There are three reasons for this imperfection:
- low-quality wallpaper, or rather, poor dyes and impregnations that were used in production;
- low-grade glue containing foreign ballast in the composition;
- characteristics of the water used to obtain the working adhesive mass. For example, an increased amount of compounds (oxides, sulfates, carbonates, etc.) of iron will appear as yellow-brown stains, and copper as green-blue.
To prevent the appearance of “dirty drawings” you should purchase proven, quality materials, and if there is any doubt about its purity, it is better to boil the water before use.
3. Other reasons that provoke defects in wallpaper joints include: mismatch in the range of purchased rolls, not perpendicular cut (the ends of the sheet are beveled in places), improper storage or rough transportation, etc.
Advice! When purchasing wallpaper, you should very carefully check the identity of the serial number on all packages. These are, as a rule, multi-valued markings of numbers and letters, and upon inspection it is very easy not to notice the difference of one character!

To avoid an unpleasant surprise the day after the repair (wallpapering), qualified specialists recommend:
- Avoid buying cheap wallpaper and glue - you shouldn't expect high-quality results from them!
- Try to choose an ornament without pronounced horizontal elements. Even the slightest unevenness will catch your eye and attract attention.
- It is necessary to store and transport wallpaper only in a horizontal position, otherwise bends, tears and dents will form at the ends of the rolls.
- Dilute glue granules in water with a temperature of no more than 30 C. Due to the temperature difference, the paste will be unevenly absorbed and flow outside the sheets.
- The wall surface must be prepared correctly, otherwise the glue will “go” into the wall.
- During the drying period of the pasted wallpaper, avoid drafts and rapid temperature changes - this will lead to deformations and uneven drying.
How can you remove defects in wallpaper joints?
When a defect appears (divergence of wallpaper joints), a logical desire arises to immediately eliminate the defects, so that the consequences are not noticeable. It can be done, but the technology will be different for different types wallpaper
1. So, the easiest way is to restore wallpaper for painting. The technology is as follows: before applying paint, all broken seams are sealed with a special sealant, and then carefully tinted in accordance with color design walls After complete evaporation of moisture (drying), you can begin applying the paintwork.
2. Now there is another option, more complex - re-gluing the wallpaper joints. You will need the following tools for this:
- PVA glue;
- container with spray bottle, filled warm water(≈23 C);
- brush, brush, sponge;
- rubber roller.
You need to start by wetting the edges of the canvases with water and moving them towards each other. The wallpaper material will be saturated with moisture for about four minutes, and after that PVA glue should be applied. The re-glued area is carefully leveled with a rubber roller in the direction from the center to the seam. In this way, air bubbles are expelled and wrinkles are smoothed out.
Clue! Absolutely all paper wallpapers can be significantly deformed when wet. Therefore, paper microfibers should not be allowed to swell too much to avoid uneven shrinkage and potential tears!

3. Layered wallpaper (vinyl, duplex, non-woven) is repaired using the same technology as paper, but with certain nuances. Firstly, only the underside edge of the re-glued areas is moistened. Secondly, you need to remember the ability of such wallpaper to restore its original shape as it dries. Thirdly, you need to use a rubber roller to smooth the area with pressure, in all directions.
4. More serious, complex joints require special restoration techniques. Let's consider one of the most effective techniques. Set required:
- wallpaper trimmings;
- tinting (powder, paste, liquid);
- decorative edging;
- sandpaper.
First, you need to rub the wallpaper scraps into fine crumbs on sandpaper. Mix the resulting powder with PVA glue. In order to mask an unaesthetic gap, you need to apply the prepared paste to it. This procedure requires attention and accuracy. To match the color of the putty to the wallpaper, use the appropriate tinting material, which can be purchased at most hardware stores.
Little trick! The edges of dark wallpaper can be tinted with a pencil of the desired color before correction!

Decorating joints on wallpaper
1. You can correct a deformed joint on pasted wallpaper using another method. Its essence is to form “patches” of the remaining fragments of material. After this, a suitable piece is trimmed to accurately match the pattern and glued to the reconstructed area.
2. “Creative” option - very interesting way, in which you will need to demonstrate artistic skills. Having imagined a little, we select a paper border that exactly matches the wallpaper in structure, quality and color. Alternatively, you can decorate the defective area with curtains, braid or all kinds of ribbons, and to create the effect of an original idea, decorate a nearby picture, photo frame, socket or switch in the same way. This will give guests the impression that this was the intention during the renovation.
Conclusion
Don’t be too upset if defects occur at the joints of the wallpaper after a recent renovation. Thanks to the latest technologies you can correct almost any disadvantages, including the joints between wallpaper strips. But in order not to be overburdened with additional repair worries, it is necessary to strictly adhere to the entire set of instructions, since the installation of each type of wallpaper is specific and has individual characteristics.
Many fans of wallpaper decor are well aware of the situation - it seems that the craftsmen are very good, and the wallpaper is expensive, and after gluing the wallpaper on the walls, seams between the panels clearly appeared. Unofficially, every third case of renovation with walls decorated with trellises is faced with the problem of how to hide the joints between the wallpaper. It is almost impossible to disguise the stripes by changing the lighting, and re-pasting the entire room is expensive, so before taking radical measures, you can try to eliminate the problem more by simple means.
Defect options
Most often, owners blame both the craftsmen and the quality of the wallpaper. But if the craftsmen are professionals, and before this room they managed to glue kilometers of canvases with high quality without any comments, why didn’t they take into account the peculiarities of the brand of trellises when gluing them. Indirect confirmation is the fact that the same problem occurs with both cheap paper and expensive non-woven wallpaper.

The answer to the question of how to make wallpaper joints invisible does not have a clear answer, since the defect itself at the joints can manifest itself in different ways:
- The neighboring canvases have separated, and a thin gap has formed through which the wall is visible;
- A lighter or darker uneven stripe of glue residue appeared along the joint;
- The joints at the border of the wallpaper have risen like a “house”;
- At the joints, the difference in shades of the two canvases is clearly visible.
The last point is the most unpleasant. It often happens that when buying wallpaper in a company store, you can purchase rolls from the same manufacturer, the same brand, but belonging to different batches. To sell mismatched items and make the product attractive, salons collect leftover rolls from different batches into one and sell them at a slightly reduced price.
For your information! Even within the same batch, wallpaper may differ in shades.
Many manufacturers, due to the peculiarities of the technology for applying paints to the panel, are not able to ensure ideal distribution of the toner; as a result, one edge turns out to be slightly darker and more saturated than the other. It is impossible to hide such a defect, so an icon with two vertical arrows pointing in the direction is placed on the roll. different sides. This means "reverse sticker sequence". To hide uneven coloring, each subsequent roll must be turned 180 degrees before cutting and gluing. If you do not pay attention in time to the icon hidden in the text of the marking, the discrepancy in shades at the joints can only be corrected by painting the trellises.
Five ways to hide joints
Correctly hiding a defect at a joint is often even more difficult than gluing wallpaper correctly. You can learn how to work with trellises from the instructions, while you have to come up with and look for ways to hide defects on your own.
You can hide joints using one of the following methods:
- Clean the edges of the wallpaper from any remaining glue;
- Shade or paint the walls to hide the background, revealing the gap between the joints;
- Try to flatten the wallpaper panels after first slightly moistening the trellis material;
- Paint the wallpaper or hide the joint using a special tinting paste.
Advice! Before trying to hide joints with paint or tinting compound, you will need to practice in a closed area, for example, behind a closet, where the furniture is covered by wallpaper.
The easiest way to hide revealing light spots is to try to paint over them with special paint or pencil. To do this, you will need to buy a special coloring composition.

To hide the white stripe between the panels, just apply a tinting color to the seam using a brush or ear stick. Wipe off excess paint with a clean napkin.

Unfortunately, hiding the joints is so in a simple way only possible on plain wallpaper, if you can choose the composition suitable color.

The riskiest way to hide seam problems is to use tinting paste. To prepare it, you will need to trim the wallpaper from which sharp knife or use sandpaper to remove painted surfaces. Colored paper dust mix with glue and rub the joint. In this way, restorers restore old books and paper products; the method is complex, so it is not always possible to hide the problem.
In particular difficult cases owners decide to use polyurethane decorative strips that are glued to the joints. In this way, you can hide any defects, even if the shade of the panels is different.

How to hide a joint contaminated with glue
Excess glue at the joint is the most simple case, but only under one condition, if you pay attention to the problem that has arisen in time. If the wallpaper is glued by hired craftsmen, you will need to check the quality of the work in the first hours, while the glue is still wet.
On vinyl or non-woven wallpaper, it is enough to simply wipe off the glue with a dry and clean napkin; on paper, excess adhesive material is blotted, like an ink stain, without rubbing on the canvas. After the wallpaper has dried, the joints must be checked again, since over time, glue stains tend to turn yellow and appear in the picture, after which it will be impossible to hide them.
On dark wallpaper Remains of glue at the joints can be hidden using a retouching pencil. Before decorating the seams on the wallpaper in the photo, the marks are wiped off with a paper eraser.
The most difficult case
It is most difficult to hide joints with a gap when the edges of the panels have diverged so much that the wall is visible. To hide the unmasking seam, you need to try to move the edges and fix the canvas using proven glue. Many two-layer wallpapers react differently to moisture. Most trellises when applied liquid glue swell and become plastic. After gluing to the wall and smoothing, the width of the canvas can increase by several millimeters, and after drying the reverse process occurs.

To hide the resulting gap, you first need to moisten the edges of the canvas using a spray bottle or spray bottle. After 10-15 minutes, the wallpaper will become soft, and you can lightly press the canvas with your hands and try to connect the edges of the panels. The seams are glued with PVA glue and rolled with a rubber roller.

If it is not possible to hide the joint in this way, for example, joints on paper wallpaper are very difficult to hide in this way, you can try to decorate the seams, as in the photo.

Colored stripes and individual fragments are suitable for decorating joints; you just need to stick them on the panel so as to hide the defect and at the same time distract attention from the problem area. Wallpapers of different patterns will help to ideally hide a frayed seam, since a brighter color always attracts the eye. Before making a joint from different wallpapers, it is necessary to plan the transition with an overlap. The glued new trellis does not even need to be cut.

Fighting the edges that have risen up like a house
Not the most difficult, but quite common case when joints rise and twist, photo. Usually craftsmen in such a situation, in order to hide their imperfections, blame the quality of the wallpaper and poor glue. In fact, the problem lies precisely in the lack of professionalism of the workers. During the process of coating the cloth experienced craftsmen Apply glue to the edges twice, because along the edge of the canvas the adhesive mass dries much faster. To hide raised joints, it is enough to coat under the seam line with additional adhesive layer and roll the trellis with a rubber roller.

It is much more difficult to hide a defect at the joints in a situation where the seams have risen along with pieces of soil and whitewash. This means that the preparation of the wall surface was carried out extremely carelessly, and when shrinking, the wallpaper tore off the adhesive seam at the joint. In this case, you have to spend a lot of time to soak and remove old glue from under the joint, and only then glue and roll the fabric. If you try to re-glue the seams as they are, the remnants of the old glue and whitewash will make the seam stand out, and under certain lighting the defect will appear in a new way.
Conclusion
A good way to hide joints involves using thin strips of paper or wallpaper of the same color as the main fabric. This will ensure normal adhesion strength, the absence of raised seams and unmasking light spots between the panels. To do this, you will need to moisten the edges of the panel, and after the glue has soaked, carefully lift the seam and glue in an additional strip. The method works with any wallpaper.
Butt wallpapering is the most popular and professional way application of canvases, requiring high professionalism.
If you are working with heavy and dense trellises, with photo wallpaper or patterned rolls, there is no question of non-lapping at all - in the situations described, only butt joints are used.
How do we mask the joints on the wallpaper?
1. We carefully read all the information that is printed on the packaging inserts for the rolls.
We try to lay the second strip as accurately and closely as possible.
10. When the second strip is glued, remove the remaining glue that has come through.
While the glue has not yet dried, the wallpaper can be slightly tightened and smoothed.
In the process of work, we try to correct not the second (new) sheet, but rather the first sheet, where the glue has already thickened a little.

If we see a gap, carefully tighten it inside palms section of the first canvas.
If we see an overlap or overlap, we try to move the trellises apart.
When the masking of the rough joint is finished, you can look at it from different angles and identify any shortcomings.
11. Now let's move on to the third stripe.
We glue it identically to the second sheet and carry out the same procedures.
12. After this, we return to the first joint again and mask the joints on the wallpaper (the first and second sheets) “for finishing”.
We bring the joint to an ideal and invisible state.
When dry, wallpaper can:
- tighten,
- narrow,
- disperse at the joints.
These problems can be avoided by frequent returns to previous butt joints.
It turns out that we are masking the joints on the new wallpaper by carefully pulling and spreading the edges of the pasted sheets. A main secret consists of frequent returns and unhurried, careful execution of work.
Useful notes on how to hide joints
A) During the final work with a butt joint, you can coat the edges with glue, but with high-quality preparation you will not have to do this.
B) Be sure to ensure that the remaining adhesive solution does not dry out on the front side of the sheet. Remove any remaining glue thoroughly.
C) Wallpapering begins after fixing the baguette and borders. If there is suspended ceiling, its borders are also laid BEFORE wallpapering. In general, all dirty and dusty procedures should be carried out in advance so as not to stain the new trellises.
D) When working with corrugation, pattern, pattern, foam front side, the quality of the joint depends on the accuracy of the convergence of the 2 canvases.
In some cases, it is impossible to achieve the ideal only because of the corrugated surface of the wallpaper, which breaks off at the joints and casts a noticeable shadow.

E) To evaluate a joint, it is necessary to view it along its entire height from different viewing angles.
If there is not enough glue at the joints, your efforts and pressing will not solve the problem. You'll have to take a brush and coat the edges.
G) Wallpaper with a longitudinal (vertical, parallel) pattern fits together more easily than with a transverse (perpendicular, horizontal) pattern.
If you do not properly prepare for the process of wallpapering, a joint between the wallpaper and other unpleasant defects may form that will have to be eliminated. How to prevent this from happening will be discussed below.
If the rules for wallpapering walls are not strictly followed, a joint between the wallpaper and other defects that are noticeable to the eye may form. There are several ways to eliminate this shortcoming, applicable in certain situations.
How to prevent gaps from forming between wallpaper?
Among the defects that may form, it is worth highlighting the following:
- the front side of the wallpaper is stained with glue at the seam;
- the canvases parted, forming a noticeable gap;
- the corners have twisted, perhaps along with the putty or plaster;
- the edges of the rolls are painted with blemishes or have unevenness;
- the color of one of the wallpaper fragments differs at the junction from the second canvas.
Vinyl, textile, certain types non-woven fabrics and paper wallpaper upon contact with the adhesive, they may swell slightly, increasing in size by 5 mm or more. During pasting, problems do not appear, but over time they dry out, regaining their original dimensions and forming a gap at the junction of the canvases.
Following a few simple tips will help you avoid the formation of gaps between the wallpaper:

How to hide the joints between wallpaper? For example, you can paint the surface. This method is very labor-intensive, so craftsmen often resort to fixing the problem using grout, designed to fill the gaps between the fragments ceramic tiles. To do this, the grout is mixed with a tint of a suitable color, adding it until the required shade is obtained. After this, the cracks are carefully filled with grout.
Another answer to the question of how to seal the joint between wallpaper is to fill the seams with a mixture of glue and wallpaper fragments from the front side. In this case, you need to use sandpaper remove particles of the top layer of wallpaper from the unnecessary trim of the canvas, mix them with glue and fill the cracks with the resulting mixture.
You can also disguise the seams between the wallpaper using special panels and moldings, which will become an additional touch in decorating the room. A less expensive solution would be to use patches of this wallpaper with a selected pattern, decorative edging, ribbons, cords and paper borders.
You can resort to re-gluing the wallpaper if the gap between the sheets is not too large. Before this, their edges need to be moistened with heated water using a household spray bottle. When they swell, you need to pry them off, spread them with glue and carefully pull them closer to each other, fixing them with a rubber roller and pressing them against the wall.
How to remove glue from the front side of wallpaper so that the joint of the wallpaper is not visible?
 Often, when carrying out repairs, the problem of glue protruding at the point of contact of two wallpaper sheets arises. This often occurs due to non-compliance with the adhesive manufacturer's recommendations. Despite its transparency, it can change the shade of the surface, irritate with glare in the light and make seams more visible.
If, when smoothing the wallpaper, it was not possible to avoid the formation of excess glue at the seam site, you should immediately try to wipe it off with a clean rag slightly moistened with water. In this case, it is important to moderately dose the force so as not to damage the canvas.
Curled edges at the junction of wallpaper. What to do?
If you use low-quality plaster or fail to follow the rules for its application, you may encounter the edges of the wallpaper peeling off at the joints along with the plaster. This problem is especially relevant when using textile wallpaper, in which, when drying, the wallpaper becomes narrower along with the decorative layer.
In this case, you will need to glue the edges of the wallpaper again using joint glue, additionally smoothing the canvas with a rubber roller.
Uneven cut and color of wallpaper. What to do?
Sometimes you may encounter that the two edges of the wallpaper are slightly different in color. Transition between different shades will be conspicuous and in this case Replacing the wallpaper or, if this is not possible, mirroring it will help solve the problem. In this case, before gluing the second canvas, it is turned over from top to bottom.
Also, an uneven cut and a different color of the edges of the wallpaper can be made less noticeable by coloring the joint with a felt-tip pen or special means from the store, matching the color. You can also disguise the seam using ribbons, borders and other decorative elements.
It is important to consider that roll wallpaper various types need to be glued taking into account their characteristics. It is necessary to familiarize yourself in detail with the manufacturer’s recommendations, which are described in the instructions on the packaging of the material. For example, non-woven wallpaper practically does not swell when glue is applied to it, unlike its paper counterparts.
Buying high-quality wallpaper and following the rules for working with it will help you avoid common difficulties when using it.
Popular 7 mistakes when hanging wallpaper
Watch a video with the main mistakes that many people make when hanging wallpaper. This will save you a lot of nerves and prevent many problems during operation.
We look at 7 popular mistakes that are made when hanging wallpaper. And it explains how these mistakes can be avoided. So that you do not repeat these mistakes in the renovation of your apartments.
Tsugunov Anton Valerievich
Reading time: 4 minutes
If you decide to update the room with modern wall coverings - vinyl, non-woven and even thick paper - you definitely need to glue the wallpaper end-to-end. With this method, the edges of the canvas touch, but do not overlap each other at the seams. If the rules are strictly followed, the joint lines are invisible, and the coating appears seamless.
Tools
To hang wallpaper without seams and visible joints, the first thing you need to do is take care of the adhesive appropriate for the type of wallpaper and suitable tools.
To work you will need:
- pencil, tape measure, plumb line or level;
- container and wooden stick for mixing glue;
- spatulas - metal and plastic wallpaper, scissors, sharp knife;
- brushes, rollers, rags.
Preparing the walls
The secret to success when wallpapering lies in preparing the wall.
- You need to start by completely removing the previous coatings.
- The next stage is plastering with a gypsum compound, which copes with most irregularities and crevices.
- Next is putty to remove roughness.
- The final operation is a primer, which increases the density and moisture resistance of the putty.
All stages of preparing walls for wallpaper are described in
Step-by-step instructions for treating plasterboard surfaces before gluing -.
If the walls have gained shine, it means that everything has been done correctly, the glue will lie on them evenly and the wallpaper will adhere well.
Advice. To check the walls are ready, attach a piece of cellophane masking tape to the surface. If after a day the inside becomes foggy, you should wait a while with gluing. If the film remains unchanged, you can start working.
Where to start
If preference is given to wallpaper made of non-woven fabric, vinyl or cork, the beginning border does not matter, because the joining makes the seams invisible. But still, one of the following options is usually chosen:
- From the window - according to a long-standing tradition.
- From the door, which is convenient to use as a vertical line.
- From the corner, if it has correct form, although such places are rarely level. But using a plumb line or level, you can mark a perpendicular next to it, retreating a distance identical to the width of the wallpaper, and start gluing from there, returning to the corner itself later.
- From a major landmark. When there are many passages and windows in a room, it is worth starting with the largest object.
- From several lines. The method is used when there is large window, and pasting is carried out from it in different directions.
Wall marking
Now let's figure out where to start making markings. If you choose vinyl, cork or non-woven wallpaper, it doesn't matter. Using a plumb line (preferably laser level), pencil, metal ruler, draw a vertical line in a convenient place along which the first canvas will be glued. Such lines are drawn along the entire wall at intervals equal to the width of the wallpaper.
Markings are needed so that the canvases can be glued without distortion.
Wallpaper cutting
The roll is rolled out on the floor and cut into the required lengths with sharp office scissors, taking into account the margin and matching of the pattern. Wallpaper with a large or embossed pattern is cut out with particular care.
When cutting, it is important to consider the size of the repeat - the height of the pattern repeated on the wallpaper.
Simple calculations are carried out. For example, the size of the repeat is 50 cm, the height of the wall being pasted is 280 cm. The number of repeats that will be placed at this height, rounded to the nearest whole number, is determined.
We round up to a higher value, we get 6 - the number of incomplete rapports that fits in a strip from the ceiling to the floor.
50 × 6 = 300 cm – the required length of the glued sheet.
We stack the cut sheets.
Advice. Marks made on back side each sheet and showing the top of the canvas will help you avoid getting confused during the gluing process.
How to glue paper wallpaper and paper-backed vinyl end to end?
For paper wallpaper:
- We select and prepare glue from starch with an antifungal additive according to the manufacturer's instructions.
- Lubricate the first strip evenly and leave it in the folded state for 3-7 minutes to soak.
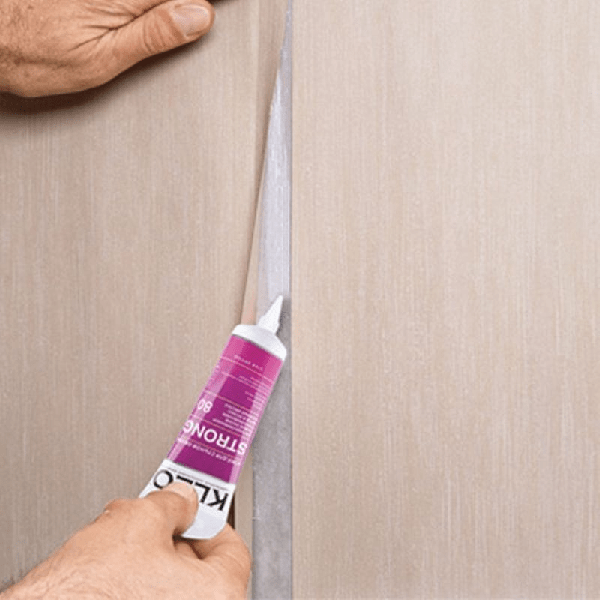
- We glue the canvases to the wall with a neat and very tight alignment of the edges. The joints can be additionally glued with PVA.
Pay attention! When wet, paper wallpaper stretches, so it is important that the same time interval is maintained for each panel from coating with glue to gluing it to the wall. After drying, they shrink, so the edges of the sheets need to be adjusted as tightly as possible so that gaps do not form between the sheets in the future.
Sticker terms vinyl wallpaper with a paper base are similar to the rules applied to canvases made entirely of paper. They are also pre-coated with the glue intended for them, given time for impregnation, and then glued to the surface.
How to tape corners
You should not try to use one canvas to connect both walls adjacent to the corner. The probability that the wallpaper will “work” is almost one hundred percent.
The correct algorithm for pasting an internal corner:
- The distance from the corner to the nearest glued strip of wallpaper is determined, the resulting value is increased by 5 cm.
- The wall and corner are well coated with glue.
- The fabric is glued with the provided margin extending to the other side of the corner.
- Using a rubber roller or a dry cloth, carefully level the pasted wallpaper both in the corner and on the wall.
- Due to the curvature of the angle, the amount of wallpaper overlap behind it will not be the same. You should determine the narrowest place and, stepping back 1 cm from the edge of the wallpaper towards the corner, make a mark here, from which a distance similar to the width of the roll is laid down along the wall, and a vertical line is drawn through this point. It is from this that the next canvas will be overlapped.
- Using a paint spatula, a ruler and a wallpaper knife, the seam is trimmed. It is important to cut through both sheets at the same time, otherwise there may be a gap along the cut line.
- Excess sections of wallpaper are removed. Upper part can be removed without any problems, the lower one is removed by slightly unscrewing the edge of the upper panel.