Which door locks to choose and how to choose them correctly. Door lock with handle and latch: device options and operating principle
From time immemorial, people locked their homes by bolting the doors. The advantage of a mortise lock compared to a rim lock is that when closed door You can't just grab it and unscrew it. The disadvantage of this device is that to install it you have to make a recess in the door leaf, as a result of which its integrity, and therefore its strength, is compromised.
Causes of broken door locks
Very often, lock manufacturers use rather soft steel or alloys of non-ferrous metals such as copper, aluminum for their manufacture, but they cannot withstand a long time high load. There are several main reasons why the lock device fails:
- Malfunctions door leaf, loots.
- Accumulation of dust in the locking mechanism, presence of rust.
- Malfunctions in internal elements, wear of the lock.
Malfunctions of the door leaf, traps
When the geometry of the door changes, the lock bolts begin to move relative to the striker plate. The mechanism by which the bolts move cannot overcome the effect of friction between the bolt and the bar, as a result of which the load increases and spreads throughout the entire lock mechanism, some parts are not able to withstand the increase in stress and soon fail, most often this happens with a secret, the weakest part of the mechanism. After the secretion, the risk of failure remains for crossbars with a movement mechanism.
Accumulation of dust in the locking mechanism, presence of rust
Very often, locks used in dusty areas do not receive timely maintenance. This increases the internal resistance in the moving parts of the lock. If no action is taken for a long time, the lock will jam. If a lock model with an increased number of locking rods is used, this is especially dangerous. The same number of problems is caused by the presence of rust inside the lock. In these cases, only regular cleaning of the lock mechanism can increase the operating time of the lock.
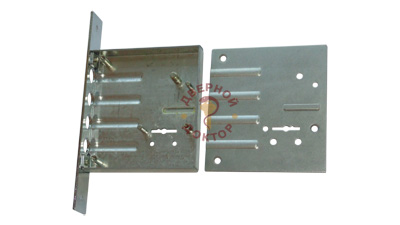
Mortise lock design

1.SHTULP
This part is also called the end or front strip. Its ends extend beyond the boundaries of the lock body; they have two holes through which the lock is secured to the end of the door leaf with two screws. The frame has cutouts for the latch and bolt. The length, width and thickness of the frame must correspond to the dimensions of the door end.
2. LATCH
This mini deadbolt automatically closes the door when the door leaf returns to the frame. Unlike a rectangular bolt, the latch is beveled on one edge, so when it comes into contact with the door frame, it first moves inside the lock body, and then the return spring pushes it into the cutout of the bolt (reciprocal) strip.
3. BEAM
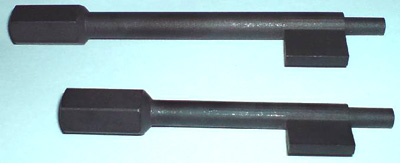
What in the old days was made from a massive piece of wood and was impressive in size, today is only a couple of centimeters in length and width and is made of hardened steel. In order for the lock to lock the door, the bolt is pushed into the locking bar under the action of a cylindrical mechanism. By turning the key one or several times, we adjust the depth of penetration of the bolt into the locking plate.
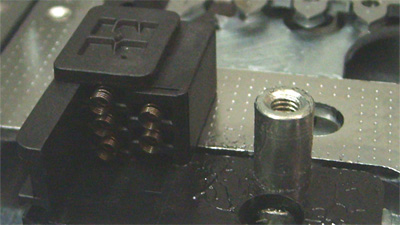
4. CYLINDER FASTENING
4. CYLINDER FASTENING
A long screw is inserted through the hole in the stem, which fits into the corresponding threaded hole in the cylinder. In this way, the cylinder is secured in the lock; it is no longer possible to remove it from there when the door is closed.
5.DORNMASS
This term means the distance from the center of the key or cylinder hole of the lock to the edge of the shtl. Dornmass is measured in millimeters. This indicator must be taken into account not only when installing a new lock, but also when replacing an old lock with a new one. Even if two locks have the same dimensions and mounting locations, but different backbone masses, many problems may arise during installation, the best solution which will be the search for a model with the required backbone mass.
6. CASE WIDTH
To install a mortise lock, a notch is made in the canvas using a drill and chisel. It is important not to make a mistake in the drilling depth. In order for the lock body to fit into the recess without any problems, its depth should be slightly greater than the width of the lock body. Sometimes the description of the lock also indicates the rear door frame (the distance from the center of the key or cylinder hole of the lock to the edge of its back plate). Then backmass + rear backmass = recess depth (width of lock body).
7. RETURN SPRING
To ensure that the lock handle does not hang down, but is always in a horizontal position, a return spring is installed in the locks. When the handle is pressed, the spring is compressed. But as soon as the handle is released, the spring immediately returns it and the latch to their original position.
8. WALNUT WITH HANDLE HOLE
A nut is a mechanism with a quadrangular hole for a push set (handles). The most common headsets are with a pin size of 8x8 mm for locks for room doors and 10 x 10 mm for locks for entrance doors.
9. CENTER DISTANCE OF LOCK– the distance between the center of the rotating part of the cylinder and the center of the hole for the handle. This indicator is very important for determining the location of the hole for the push set in the door leaf.
10. LOCKING MECHANISM
The so-called cam (or bit) located in the center of the cylinder moves the bolt forward with each turn of the key. In this case, when the key is turned to the left, the cam enters the cutouts on the bolt and pushes the bolt out of the lock body. When unlocking, the same thing happens, but when you turn the key to the right.
11. CYLINDER INSTALLATION
When installing the cylinder, it is simply inserted into the hole provided for this purpose in the lock and secured with a screw. The main thing is to get the screw into the hole intended for fastening. A slight movement of the cylinder in the lock will help to cope with this task. The key must be inserted into the cylinder in the “closed” position. After installation, check the lock for functionality, first with open door, and then - with it closed.
How to embed a lock - video
 1 piece thickening the wall of the mute door Stick Golf Style rubber…
26.34 rub.
Free shipping★★ ★★ ★★ ★★ ★★ (4.70) | Orders (582)
In the classification according to the method of fastening to the door, locking devices are divided into 3 types:
- invoices;
- mortise;
- built-in
Depending on the location, types of secret and deadbolts, the lock mechanism also varies. Devices for entrance and interior doors are similar only in some operating principles, but in structure they are different elements.
The generalized scheme has the following structure:
- Housing and cover panel.
- Mask (secret mechanism).
- Crossbars (retractable bolts).
- Executive device.
Common models include a halyard latch (tongue) and a handle. Regardless of the method of fastening, there are always two components: a secret system that recognizes the key, and an executive component that implements the ability to lock.
Structural door lock mechanism
The following types of secrets are distinguished:
- Cylinder. Elements that prevent the lock from being picked are placed inside the cylinder. When the key is inserted into the keyhole, the grooves on it contact the pins, moving them to the level required to move the cylinder.
- Suvaldny. Inside are complex shape plates, spring-loaded and placed in one block. The “safe” key, characteristic of this mechanism, has as many teeth as you need to move the levers, the combination of which is individual for each device.
- Disk. The cross-section of the key is almost a semicircle with several notches. Inside the secret there are discs that, when turned, release the locking mechanism of the door lock.
- Combined. Can be present at the same time various types secrets. There are versions in which the lever part is placed in the cylinder, which provides better protection from burglary.
Regarding actuators, mechanical, electromagnetic and electromechanical principles of closure are distinguished. The most popular is the first option, the operation of which is based on the insertion of a metal rod from the door into a special groove in the frame.
How does a lever-type door lock work?
The main element that provides protection against forceful burglary is the bolt shank post. The gap between it and the code slot directly affects the protection function.
The time that can be spent breaking the door depends on the number of levers. The most commonly used option is the one with six plates. But the more there are, the more reliable it is. Proper work provide springs that allow the levers to return to their original position.
Armor plates cover the most vulnerable places, and face with a frame is not only a decorative element, but also protection against forced burglary.
The principle of operation of a door lock with a lever secret
The mechanism is based on a set of plates that have shaped cutouts.
The opening scheme is quite simple: the key, with its teeth, aligns these levers in a certain position, allowing you to turn and open the system. If at least one of the plates does not fall into its groove, then the mechanism will remain closed.
The key is the carrier of the code for arranging the desired combination of plates, and high degree sufficient reliability is ensured large sizes devices and the presence of armor protection. It is very difficult to hack such a system by force.
What are the features of cylinder type
IN general scheme The design of a door lock of this type has the following structure:
- disguise;
- deadbolt and deadbolt;
- body and front frame;
- lever for controlling the latch;
- a strike plate into which the bolts are immersed when locked.
The cylinder inside the box is “frozen” using coding pins. When the key is immersed in the lock slot, it performs the task of arranging them to the required positions, obtaining such a separation line that allows you to unlock the cylinder and move the bolts.
Installing a lock on the door
Possibility to attach locking device with your own hands depends on its type and complexity, as well as the material of the door leaf. There are models that come with pockets for a certain type of deadbolt. And if we're talking about wooden door and the need to install an internal door lock with your own hands, you will have to cut out the appropriate holes in it, making accurate measurements and calculations. It is still recommended to contact specialists for installation.
How to make a door lock
There are craftsmen who like to build something non-standard with their own hands. They are for the door too interesting mechanism they'll come up with it. The easiest option is to make a regular deadbolt from improvised means. But there are mechanisms that are much more complex. You can independently make parts of a door lock or an entire electromechanical locking device.
Alternatively, it could have the following structure:
- bolt;
- actuator from car lock;
- remote control with keyboard (or other type of secret);
- power unit;
- a certain set of electronics and components (you can use the Arduino platform and the like).
If you need to make a lock for the box with your own hands, then you can get by with a conventional mechanical design in the form of a latch. Or buy ready-made fittings and install them yourself.
The assortment of stores in Moscow, and other cities, allows you to find any parts, so if you wish, you can not only build the latch itself, but also an entire door locking mechanism with coded access or even a fingerprint sensor.
The door lock must meet the required reliability criteria. The internal structure of a door lock is one of the main factors taken into account when choosing a locking mechanism.
Types of modern castles
Before you begin to study the structure of the lock, you need to decide on the types of locking devices that can be purchased in stores at the present time.
All locks can be divided into several types:
- mechanical devices that can be opened using keys;

- electronic locks that open when the locking mechanism is exposed to a signal issued by a key fob, card or other device;

- electromechanical, combining the ability to open with a key and a special device that gives a certain signal;

- combination locks that open when a specific code is entered. Most often used for.

Each lock can be made of various materials, and have different degrees of protection. All locks can be divided according to one more characteristic, namely, according to the method of installation on the door. The following types are distinguished:
- mortise locks. The main body of the lock is located inside the door leaf. Such locks are used for entrance doors to premises, interior doors and so on. Mortise locks are considered the most resistant to hacking, since getting close to working structure it is impossible without removing the door;

- overhead locks. The lock body is installed on the door leaf. The lock is opened from the outside with a key, and from the inside by a latching mechanism;

- padlocks. Mainly used for utility room doors. The lock is secured by two metal shackles, one of which is attached to the door leaf and the other to the door jamb.

All types of locks can be coded, mechanical, electronic or electromechanical.
Types of modern locks and their design
The types of locks are determined based on the design of the locking mechanism, with a distinction being made between:
- cylinder locks;
- level locks;
- rack locks.
Cylinder locks
Cylinder locks got their name based on the appearance of the working mechanism, which has the shape of a cylinder. The diagram of a cylinder type door lock is shown in the figure below.

The cylinder mechanism consists of a number of elements:
- housing made of high-strength steel;
- key holes;
- the core in which the pins are located;
- locking and coding pins.

Cylinder locking mechanisms, depending on the location of the pins inside the cylinder, can be:
- single-row - the pins in the locking cylinder are located in one row;
- double-sided - the locking pins are located in two rows. The key to such a lock has double-sided notches;
- devices with rotating pins. Unlike previous types, the pins can not only lower and rise, but also rotate around their axis;
- cross-shaped - the keyhole and the key to the lock resemble the shape of a cross. Inside the cylinder, the pins are arranged in three or four rows;
- devices with conical keys. The pins in the locking cylinder are located in several planes, which gives the device an increased degree of secrecy.
More details about the design and selection of a cylinder lock can be seen in the video.
Cylinder locks are considered quite reliable. Main advantage of this type locking devices is the ability to change the cylinder if it fails or the keys are lost. There is no need to change the entire lock.
Level locks
The operation of a lever lock is based on the arrangement of plates called levers in a certain order. The lever-type door lock device includes:
- crossbar bolts, which are activated when the levers are set in a certain order;
- a plate to which the levers are attached;
- key hole;
- the plates themselves.

The more levers a lock has, the higher its reliability.
Currently, two types of lever locks are produced:
- with one-way keys. They are the least reliable, so they gradually cease to be produced;
- with double-sided keys. The key, interacting with the locking plates, becomes active either on the right or on the left side, which significantly increases the secrecy of the device.
A reliable lever lock must have:
- at least 6 locking plates. Six levers can be arranged in approximately 100,000 different combinations, and eight have approximately 250,000 variations;
- additional linings that protect the working mechanism from drilling;
- reinforced crossbars that cannot be sawed;
- false grooves that direct the burglar to incorrectly identify the intended design;
- replacement lever block in case of loss of keys or additional option recoding. Recoding can be done without the participation of specialists. To do this, the lock must have a special key made in the shape of the letter L and a spare set of keys.
Rack locks
Rack locks do not have a high degree of security. They are used for garage doors, gates, utility rooms.
The rack-type door lock scheme includes:
- springs that activate the locking bolt;
- crossbar. The device is a metal bar rectangular shape on both sides, on which grooves are made;
- hole into which the key is inserted;
- external deadbolt

The deadbolt lock opens when the grooves on the key and the locking bolt coincide. If a coincidence occurs, then when pressed, the bolt is pulled out as if with a key. Otherwise, the locking mechanism cannot be moved from its place.
Depending on the type of lock, it may have one, two or three bolts. Mechanisms with two locking bars are predominantly used.
The biggest disadvantages deadbolt locks are low resistance to hacking and the high cost of producing duplicate keys.
Thus, when choosing a lock, you should be guided by the definition of the internal structure of the locking mechanism, which affects the degree of secrecy. For maximum protection, experts recommend using several locks and be sure to different types. The optimal combination is to install a lever and cylinder lock, one of them can be mortise and the other can be overhead.
There are dwellings on our planet whose inhabitants do not lock the door. We do not belong to this category. For us, a door lock is a reliable protector designed to protect the house from unwanted intrusions. There are different types of door locks, let's try to figure out how they differ and how they work.
Based on the type of installation, door locks are divided into three types:
- Invoices. The simplest option. It is easy to change the padlock yourself, because it is attached to the top of the door leaf. The kit also includes a metal jamb attachment, but the handle usually does not. Rim locks cannot be called reliable option.
- Mortise locks. They are placed inside the door leaf, both entrance and interior. Most modern castles can now be classified as this type.
- Built-in. Option for metal door. The lock acts as a direct part of the door leaf, that is, the door is sold with a closing mechanism.

Whatever the door lock, its structure includes the following parts:
- pen;
- halyard tongue;
- retractable crossbars;
- overlay panel;
- a secret mechanism, which is also commonly called the larva.
We emphasize that the reliability of the lock will depend on the cylinder. The more combinations of the secret mechanism available, the more difficult it will be to pick the lock. Some modern models Locks cannot be opened with a master key at all; their level of secrecy implies opening exclusively with a native key.


So, the larva is the mechanism that blocks the structure in doorway, preventing unwanted guests from entering the premises. Based on the type of secret mechanism, it is customary to distinguish the following types of locks:
- Cylinder locks. Familiar to everyone and enough simple products. The secret part is located in the main part, which is shaped like a cylinder, which gives this type of lock its name. In this case, there are pins inside the cylinder; they block the mechanism when the lock is closed. On the key in mandatory there should be notches that fit the pins and help move them out of place. Such castles are also often called English.
- Disk. Experts consider such locks unreliable. Inside the lock there are disks that are moved with a special key, which looks like a rod cut in half with notches. The key moves the discs, they rotate, a tunnel is formed and the door opens. Such disk locks used to be often installed on iron doors entrances, but now this option is becoming a thing of the past.
- Cross locks. As the name implies, the larva is cross-shaped, and the same key is attached to it. It is noteworthy that the degree of secrecy of cross locks is quite high - no less than 20 thousand combinations. However, such a device can be hacked even with an ordinary Phillips screwdriver, and the secret mechanism itself is attached to the lock body with only two screws and is not protected by an armored pad.
- Deadbolt locks. From German the word “crossbar” is translated as “bolt or bolt.” This is the principle of operation of this type of device - the key pushes or pushes a special metal bolt inside the lock, that is, the deadbolt. WITH reverse side deadbolt locks equipped with a latch.

- Level locks. Experts call them the most reliable option. Inside the lock mechanism there are plates - levers. The special key is shaped like a soldier or a butterfly. When you turn the key, the levers are raised to the level specified by the coding. The security of the lock can exceed 5 million combinations. The disadvantage can be called enough big hole for a key, but the work of a burglar can be hampered by a protective lever and false grooves.
- Code locks. In this case, instead of a key, a secret set of numbers is used, the entry of which opens the device.


All types of locks listed by us are mechanical type. However, door locks can also be electromechanical. In this case, the bolt will operate from electric motor. Such locks are not widely used in everyday life; they are more often used in massive bank safes, where it is too difficult to close the bolt manually.

IN electromagnetic locks as locking mechanism a magnet protrudes. To the most modern options applies electronic lock, which has the following features:
- there is a built-in controller;
- you can use internal or street version;
- opens with a key fob or contactless card;
- protected from vandals.
In addition, electronic locks can simply be connected to an alarm system or complex “ smart home" It is impossible to open the electronic lock using conventional methods; there is no keyhole. You will have to use methods such as signal interception or code selection. Well, or break down the entire front door, saw through the metal rods locking the entrance, that is, use harsh force methods.

The main disadvantage of an electronic lock is that it is strictly tied to the power supply. Simply - there is no light - the door does not lock. You either have to provide backup source power supply, or additionally install mechanical lock in case of power outage.

As you can see, the choice of modern locks is very large, and the price, of course, will depend on the degree of reliability, the metal used, and the manufacturer. Let us clarify that our article concerned locks for entrance doors; interior doors have their own characteristics; far fewer requirements are put forward for them in terms of reliability.
A locksmith or a seller of locks and hardware often has to deal with philistine myths and legends regarding the subject of our work. And the emergence of such myths and legends in most cases is associated with low literacy of both consumers and many salespeople. A person does not master the topic, and in order to explain some incomprehensible point, he has to use imagination, which often borders on feeblemindedness.
Here we will talk to you about lever locks. Let's look at their structure, and also discuss the legends and absurdities that surround the level castle.
Locks with keys of this type are called level locks, and not level ones, as some call them.
From the word “suvald”, and not from the verb “suvat”. We'll talk about the origin of this unusual name below.
Locks with a lever type mechanism are among the most ancient in the world. In one of the previous materials, where we looked at general information on castles, there was an introductory part about an Egyptian castle that appeared about 4000 years ago. So, despite the fact that the code elements of the Egyptian lock were pins, in terms of its operating principle it was more similar to a lever lock, because the bolt was controlled directly by a key, and not by some drive elements. And the Egyptian castle is the first official mention of castles in the world.

Sometimes lever locks are called safe locks. It is not clear who was the first to use this incorrect definition: cunning sellers who, using the word “safe,” wanted to emphasize the secrecy of the product being sold, or ordinary people who hoped that magic word“safe” will elevate their locks to the level of inaccessibility.
A safe lock is called a safe lock because it is intended to be used only on a safe. Installing a safe lock on an apartment door or anywhere else other than a safe door is extremely difficult. But if you get smart and install it, then it’s impossible to use it. A safe lock can only be opened and closed from the outside. Even if some kind of “babyka” gets inside the safe, it should not be able to open the lock from the inside.

Once again, a safe lock is not one that has a specific type of mechanism, but one that is designed to be installed and operated specifically on the safe door. There are safe locks with a lever type mechanism. But not all lever locks are safe. We are with you within the framework of this material We are talking about apartment locks with a lever type mechanism, and they are not safe. It is wrong to talk about some kind of safe-keeping in relation to these locks.
We will study a lock with a lever type mechanism in detail. We will look at each component in detail, find out the purpose of each detail, and only after that we will assemble the lever lock and through the transparent cover we will see the principle of operation of the lever lock.
Frame
Like any other lock, a lever lock has a body. The case, roughly speaking, is a metal box in which all the components of the lock are placed and operate. In most cases, the case is closed with a lid, as in our case.
But there are lever locks in which there is no cover, and the package of code elements is pressed and held in the body by a metal sheet, the base of the door on which the lock is mounted. This occurs most often on safes and metal boxes.
In some cases, the cover of the lever lock is made of heat-treated steel. Such locks are better able to withstand forceful opening methods, but the cost of a lock with such a cover, of course, increases.
In our case, the lever lock has a non-heat-treated body and cover, which are galvanized.
Level lock hasp
Direct locking of the door is carried out by the lock bolt. In a lever lock, the bolt in most cases looks like this:

The pins, fingers and plates that come out of the body represent the bolt or crossbar if there are several of them. It is the crossbars that secure the door leaf.

In addition to the visible part, the lock in particular and the lever lock have a hidden part of the bolt, which cannot be seen without disassembling the lock.
In particular, this is the shank of the bolt. The shank is a steel plate that is fixedly connected to the crossbars.

There are several important locations on the shank:
Tooth comb
Through it, the key of the lever lock moves the bolt.

Literally 8-10 years ago there was such a type of hacking of a lever lock as opening with a roll.
The so-called pre-fabricated “roll” was inserted into the hole of the lever lock. The shape of the package was very similar to the key of a lever lock, only it had no teeth. The roll was made of very hard alloys, hardened steel of certain grades, etc. With the help of a lever that was attached to the handle, the package was rotated with enormous effort in the lever lock, broke the levers and forcibly moved the lock bolt. I moved it just through the toothed comb. The hacking method was very fast and relatively quiet.
But about ten years ago, manufacturers introduced an elegant solution into their locks, which provided 100% protection against opening the lever lock with a roll. Artificially weakened toothed comb. The lock we have shown shows that the lock tooth has been artificially weakened by a drilled hole.

Now, when you try to open such a lock with a roll, the weakened tooth will break and will not let the intruder inside. True, after this the lock will no longer open with the original key, but that’s a different question. He coped with his main task - he did not let the swindler inside.
With the introduction of an artificially weakened toothed comb, the method of opening a lever lock with a roll disappeared completely. Ten years ago this was often talked about, and security officials often greeted hacked lever locks with a roll. Today this no longer occurs.
We've moved away from the topic a little, let's continue to look at the lock bolt.
Bolt shank stand
In addition to the toothed comb, the bolt shank has the following important detail, like the shank of a bolt. We especially draw your attention to this detail and repeat its name: the bolt shank stand.
In our case, here it is:

The bolt shank post is the part through which the lock bolt is locked. If you press on the bolts on a completely closed lock, trying to push them inside with your hand, then it is the post that will prevent the bolt from sliding, it will rest against the code elements.
There is a method for opening lever locks, such as removing the bolt shank post by drilling. If you surf the Internet, you can even dig up some templates that show the exact location of the stand on a closed lock, if you center the template along the keyhole.
Drilling the rack, both previously and now, is a very popular method of opening lever locks in the criminal environment. Therefore, by default, many manufacturers make the rack from hard alloys (for example, hardened steel), or they insert something hard into her body, like a steel ball. You can even further protect this important element level lock with armor plate.
Some individuals, having gathered “tops” from the Internet about drilling, begin to convince others (and us sellers, after all, we are the most stupid, we don’t know anything about our product, we’re just waiting for someone to come and tell us) that drilling Locks are completely useless products, since they are easily, quickly and relatively quietly drilled. In this case, we usually ask - what and when was the last time a person drilled and held a power tool in his hands? In half the cases, it turns out that the sofa opener standing in front of you doesn’t have a drill or a “shurik” at all.
Our company’s specialists have repeatedly had to use the method of drilling out the pillar in the event of an emergency opening of a door, when the keys are lost or when the lock is broken. We confidently assert that opening a lock using the pinhole drilling method is a hemorrhoidal and difficult task. When drilling out the bolt shank post, you can get stuck very long time– you can spend up to two hours poking around on a call. At the same time, drilling out the shank stand is a difficult to predict process. When drilling, the lock can become very clogged; chips can form at the drilling site, which will continue to lock the bolt; in the end, the bolt can become warped, because in some models of locks the movement of the bolt is positioned along the rack. There were cases when drilled hole the drill broke, those who drilled on a horizontal plane two objects superimposed on each other, I know that this happens. And now it will take some time to crumble the broken drill and pull it out of the hole, and only then continue drilling.
In short, the process is incredibly hemorrhoidal. Of course, with experience and with an increase in the number of drilled locks, the time for this action decreases.
But those people who professionally provide services for emergency opening of locks and doors have moved away from drilling towards other types of opening, including because drilling is long, difficult and poorly predictable.
The bolt shank post is in most cases made in the form of a square. But there are a wide variety of forms of racks. For example, in some domestic locks the post may be round in cross-section - this shape simplifies the opening of the lock using intelligent methods, using master keys.

In most cases, the shank of the bolt has an anti-pick design. In our case, we see that the rack has an anti-pick groove. We'll see how it works further.

On heavy-duty locks, where there are exits along the vertical drive (for rods), the bolt shank often has a detail for controlling the exits for the rods. This is not the case in our example.
Well, now about the code elements!
Levers
The code elements of lever locks are plates different forms and are called suvalds.

One theory states that the word "lever" comes from the German word Zuhaltung, which translates to blocking or locking. And the code element itself in German sounds like Zuhalt. In our country, this word has been somewhat transformed and turned into the word “tsugal”, which is now extremely rare.
There is enough large number types of levers. They may differ from each other in shape, material used, method of movement, thickness, dimensions, method of anti-corrosion treatment, etc. But all levers now and previously have a very similar structure, and also have the same functions.
To put it roughly, a lever is metal plate a certain shape with some holes.
Let's pay attention to the code labyrinth of the lever.

It is here that the bolt shank strut walks and dances as it moves. We will see this with you later.
The code labyrinth is formed by code protrusions.

The post of the bolt shank rests against them when they try to open the lock with the wrong key, when they hammer in the bolt from the end. It is against the code protrusions of the lever that the post of the bolt shank rubs when they try to open the lock with master keys.
The distance between the code protrusions is called the code groove. It can also be called a “pass-through groove”.

The code groove is the distance or gap between the edges of the tops of the code lugs. It is through the code groove that the post passes through, and with it the deadbolt, when the lock is opened or closed with the correct key.
The more accurate the lock, the smaller the code groove of this lock, the more difficult it is to open intelligently. In a high-quality lever lock, the code groove is 0.4 - 0.6 millimeters larger than the thickness of the bolt shank post.
The code groove is extremely rarely made with a smaller gap relative to the stand. Because after some time, the key with which you open or close the lock will wear out a little. If the gap between the stand and the code protrusions is very tiny, then the original keys will stop working in the lock very, very soon, say, after 5,000 opening and closing cycles. But for the average family this is very, very little. In other words, the size of the gap determines not only the secrecy of the lever lock, but also, to some extent, the service life.
Our company’s specialists quite often have to go to emergency openings of safes when all the keys are lost. And quite often you come across Soviet-era safes with old ugly lever locks.
These are one and a half meter supposedly fireproof cabinets that weigh three hundred kilograms. Level locks on these safes worked for 50-60 years (safes began to be produced in the post-war period). And they will work for a huge number of years.
Why?
Just because the code groove is several millimeters larger in comparison with the thickness of the rack.

Yes, such a lock can last 200 years. But what is its disadvantage? The fact is that without damage, with very little experience and some tools, it can be opened in seconds in the literal sense of the word. That is, due to the huge gap, the lock has very low protection against even the simplest intelligent types of opening.
To be fair, it should be noted that such ugly locks are no longer produced today.
But let's return to our levers.
As you can see, the code protrusions can contain so-called “anti-pick grooves”. They represent some kind of recess or depression.

A counter key slot is present on the bolt shank post.
They work or catch each other in the following way.
As mentioned earlier, if you try to press the bolt into the lock body, it will rest just against the code protrusions through the post. That is, friction forces will arise between the bolt shank stand and the code protrusions of the levers. When performing an intelligent opening, the task is to position the lever in such a way that the passage groove stands exactly opposite the rack, that is, so that the code protrusions stop blocking the bolt. And for this we should raise the lever.
But when lifting the lever, at some point it will happen when the groove of the bolt shank post falls into the anti-pick groove of the code protrusion and further movement of the lever will thereby be blocked.

This is a fairly elegant and low-cost solution.
Today, anti-pick grooves of this type are found on most lever locks of domestic and foreign production.
According to the method of movement, there are two types of levers, the so-called swinging type...

...and translational plane-parallel type.
In our case, the levers are of the second type. Under the action of the key, it moves along the body racks within the groove holes.
In most cases, levers are loaded with spring force. The spring is needed to return the lever to its original position, resetting the typed code.

In most modern locks, each lever has its own separate spring. Sometimes a wire spring is used, as in our case. That is, the spring is a hardened steel wire bent into a certain shape. Some locks use coil springs that are inserted into a separate unit.
A small percentage of locks used and still use so-called “band” springs, which simultaneously load all existing levers.
From an operational point of view, the shape of the lever of great importance it does not, as long as it is correctly designed from a mechanical point of view and suitable materials are used in its manufacture.
And the variety of shapes of lever springs is more likely due to production features a specific manufacturer and with the design features of a specific model.
Well, let’s consider, perhaps, the last important location of the code element - the key window and the working edge.
Each of you probably already understood that the movement of the lever is carried out by a key. So, the place where the key touches when turning on the lever is called the “working edge”.

And that space, near the lever, where the key turns, is called the “key window.”

There is nothing interesting in the working edge of the lever. Its shape depends on design feature specific model.
But the key window comes in two types: open and closed.
On the levers of the lock, which we are now examining, there is an open key window.
And here in this image:

key window is closed. And in this case, pay attention that the key works with both bits when turning.
Well, that's all. Most complex element level lock is considered.
Just a little bit left and we'll start assembling it!
Level lock key
The last component of the lever lock that we need to consider is, of course, the key.
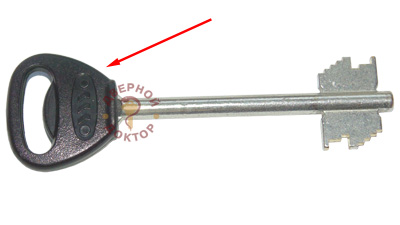
The lever lock has a characteristic key. Some call it a “safe”, some call it a “butterfly”. Neither one nor the other is correct, but to hell with it.

The key of a lever lock is in most cases made of brass, much less often of steel or aluminum alloys.
The key of a lever lock, like any other, has a head, or head, which we hold when we open the lock with it. Often the name of the castle or manufacturer is located here, sometimes the logo is also located.
In some cases, the head shape is patented and used by some manufacturer under a patent. This means that other lock manufacturers do not have the right to use keys with the same head shape for their locks.
The lever wrench has a fairly long shaft.

It is needed not only to deliver the working part to the lock body (after all, the levers are in the body, and the body itself is hidden in the door - you need to somehow reach the code mechanism...), but also in order to position the key in the keyhole . The height of the key secret is measured and designed in the lever lock precisely from the center of the rod, which in turn is positioned along the keyhole.
The most important part of the lever wrench, its working part, is the bits.

There are single-bit and double-bit keys.
The bit of the lever key contains the drive tooth, or the place by which the bolt moves. In our example, the drive tooth is contained in the middle of the key bit. And of course, the drive tooth is contained on both bits - the bolt must be moved with each half-turn.

In addition to the drive tooth, the key bit contains secretion heights. Each height of the secret interacts in the lock with one specific lever, raising it to the required height at each half-turn.
The lock we are considering has 8 code elements and eight levers. They are located along different sides from the bolt shank. Therefore, our lever key bit has the following structure relative to the mechanism.
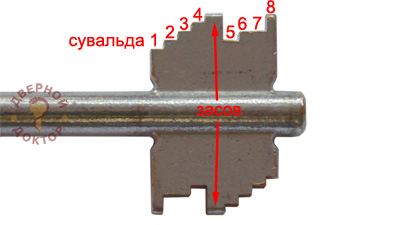
The second beard is similar in structure to the first beard, the only difference being that the height of the secretions is slightly different.
The height of the secret, as you already understood, determines how high the lever rises when you turn the key. And whether the bolt will move depends on the correspondence of the height of the secret on the key to the specific passage groove in the code labyrinth of the lever.
Regarding the heights of the key secret, about the correspondence of the code protrusions of the lever, we will most likely talk in subsequent materials, where we will talk about how the number of code combinations for a particular lock model is set and what it all depends on.
This material is already overloaded with information, so let’s not insert formulas into it.
On one of the key bits there is a guide protrusion or simply a guide. There is a corresponding cut under it in the keyhole of the castle.

The guide is designed to correctly orient the key inside the lever lock body. The guide helps us insert the key into the lock with the correct side, and also prevents it from jumping out when inserted.
When we insert the lever wrench into the well, we insert it all the way - it is the guide that rests against the body.
The guide may look not only like a protrusion, but also like a recess or groove in the bit of a lever wrench.
Assembling a level lock
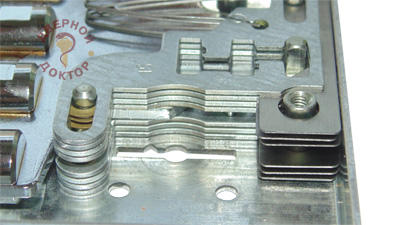
Now let's stuff everything we discussed above into the case and try to assemble something similar to a lever lock.
In our case, the code mechanism of the lever lock contains eight levers. Four are located on one side of the bolt shank, four on the other.
Sometimes the security mechanism of a lever lock is called a “lever package”. Well, because the levers are laid out each strictly in a certain sequence relative to the given code on the key.
In order to reduce friction forces, in order to make the operation of the lever lock more comfortable and the mechanism more durable, the levers in the package are usually separated in some way. In our case, the levers are separated from each other by washers and metal spacers.
Some locks have plastic gaskets.
Well, in most castles the levers are separated from each other by bulges, bulges on the surface of the lever itself.
In the lock we are considering, the lever package is separated by the bolt shank.
They also say that the lever lock package is 4+4. This means that four levers in the mechanism are located before the bolt shank, and four - after.
Operation of the lever lock
Well, comrades, now the time has come to see with your own eyes the work of the lever lock.
Now, after everything that has been said above, you will have practically no questions left about what moves there and how it moves when you turn the key.
But nevertheless, we will give some explanations.
So, the key is inserted into the body of the lever lock until it stops.
Now, under each key height there is a lever with which it (the height) will interact.
When turning the key, we overcome the force of the springs of the working elements and raise the levers until the passage groove on all of them is positioned exactly opposite the bolt shank post.
Now nothing is blocking the bolt.
But what will motivate him?
That's right, the drive tooth of the key. We continue to turn the key in the direction of opening the lock and it begins to move the bolt in the direction of opening with its drive tooth.
At the end of the movement of the rack along the code groove, the drive tooth of the key comes out of engagement with the toothed comb of the bolt and stops lifting the levers. Rather, on the contrary, the levers, under the load of their springs, tend to return to their original position and put pressure on the key at the end of each half-turn.
The second half-turn is identical to the first with the only difference being that other key cutting heights correspond to other code protrusions and code grooves.
That's the whole principle of the lever lock!
Now let's imagine that they are trying to open our lock with the wrong key, the cutting of which is not correct.
The beginning of the work in this case is exactly the same: when turning the key, we overcome the force of the springs and raise the levers upward until the drive tooth touches the toothed comb of the bolt and begins to move the bolt. The cutting of the key does not correspond to the lock code; the shank of the bolt rests against the code lugs. The lever lock and door remain closed.
We hope that readers have learned a lot useful information about the suvaldnykh from this opus.
Your comments and related questions are accepted in the comments below.