DIY kitchen table. Furniture legs: main types and methods of application Methods for attaching the legs of a rectangular wooden table
A dacha is, of course, the place where you want to take a break from the bustle of the city, to breathe fresh air and just drink fragrant herbal tea on the veranda. And decorating the dacha with furniture made by yourself will add a special charm to such a simple ceremony.

When choosing materials for a table, first of all you should pay attention to the quality of the wood - not all wood is suitable for use. Conifers, such as spruce and pine, are pliable and easy to work with, but such material without proper treatment is more flammable, and the resins released can ruin the tablecloth.


Hardwoods (aspen, oak, ash) are more advantageous; products made from them are strong, durable and have an attractive appearance. appearance.
| Wood type | Brinell hardness) | Density (kg/m3) | Stability | Color trends |
|---|---|---|---|---|
| Birch | 3,0 | 600 | average | the color becomes deeper |
| Larch | 2,6 | 500 | good | takes on shades of gray |
| European oak | 3,7 | 700 | good | the color becomes deeper |
| Ash | 4,0 | 700 | average | light to straw, yellowish brown |
| Pear | 3,3 | 680 | average | blushes |
| Cherry | 3,0 | 580 | good | from light pink to deep reddish hue |

Materials and tools
For interior design dachas and country houses Long narrow ones are more acceptable, allowing you to move around the room unhindered. This should be taken into account when preparing everything necessary for work and designing the table itself.
For the table, it is preferable to use a board with a thickness of at least 30 mm. This thickness will ensure the strength of the table and the ability to withstand heavy loads. The optimal length ranges from 150-200 cm. You can purchase two ready-made wooden panels measuring 30-2000 mm.

Balusters or wooden beams for legs. Curly balusters will give homemade table industrial chic and luxurious look. And to make legs from timber, you need to choose boards with a minimum cross-section of 50x50 mm. A comfortable table height is ensured with a leg height of approximately 73-75 cm.

Other materials and tools
- Boards 20 mm thick and 8-10 cm wide for the tabletop frame.
- Wood putty.
- Screwdriver and screws for 30 and 50 mm.
- Sandpaper of various grits, as well as a holder.
- Clamps for fixing legs and table top.
- Electric drill.
- Grinding machine.
- Construction level.
- Square.
- Tape measure or centimeter.
- Marker.
- Glue.
Manufacturing stages

When preparing materials, all boards and beams are processed with a plane, sander or coarse sandpaper to remove unevenness, remnants of cut knots, and clean out cracks. The boards must be even and smooth, so they are sanded on all sides, including the ends, edges and corners.
If it is intended to be manufactured as a solid panel without gaps, then it is better to purchase tongue-and-groove materials - this will create a stronger adhesion of the single sheet and save time on adjusting the elements. Chamfers are cut from the edges of the beams for the legs.

Assembling the frame for the tabletop
The frame helps to enhance the strength and stability of the table; its dimensions depend entirely on the parameters of the table top, but there are several general rules: both in length and width, the frame should be 30-25 cm smaller than the tabletop.
Video - Making a dining table for a summer house


The frame itself is assembled from 4 boards that form the outer frame, and 6 internal transverse strips. The boards are installed on the edge at a right angle using a square and tightened with 50 mm screws. The joints are pre-coated with glue (PVA or wood glue). To prevent the boards from splitting, you can drill guide holes in them and only then screw in the screws.


Along the length of the frame, markings are made for the transverse strips, and guides are drilled. It is very important that the cross members are strictly perpendicular to both sides of the frame frame. The ends of the transverse strips are coated with glue, and the entire structure is fixed with self-tapping screws. Make sure that the screw heads do not protrude, but are completely “recessed” into the wood.


Table frame (production option)
The tabletop boards are connected, aligned with a tape measure and laid face down on the floor, the frame is placed on top so that the transverse planks lie tightly on the tabletop. Guides for self-tapping screws are drilled into the planks, and all elements are tightened with 30 mm screws. There are 5-6 screws for each cross board.
Assembling the table legs


The tabletop is placed on a workbench or several stools for subsequent installation of legs. The table leg is fixed in the corner of the frame with clamps, and guides for self-tapping screws are drilled into the frame.


Before attaching the leg, glue is applied to the end of the block - this will protect the table from loosening and will contribute to greater strength. It is recommended to fix the leg on each side with four screws, but if desired, you can additionally use metal corners. Round balusters are fixed with long self-tapping screws front side table, and square ones - on corner fasteners.
Finishing
After installing the legs, the table is turned over and placed on the floor. Depending on the design of the table, the corners are sawed off along the radius with a jigsaw or the end is completely rounded. You can cut chamfers from the edges of the tabletop and sand everything thoroughly.

If necessary, scratches and cracks resulting during the work are repaired using wood. It is better not to touch the screw heads so that the structure can be tightened.
After the final sanding, all dust and shavings are removed from the table, and the product itself is covered with stain or several layers of varnish.


Tables with elements of decoupage decor or single painting look beautiful and unusual. But there’s no point in hiding the beauty of natural wood under a layer of paint; modern varnishes and impregnations will do the job necessary work to protect the product from moisture.

Video - Table with legs for a summer house
Option 2. Tree stump table
An unusual and non-standard way to arrange a personal space is to create interior items from natural materials. When landscaping an area, trees that are old or that threaten buildings are often cut down. If your dacha has or had just such a tree, then you definitely won’t have any problems finding a suitable stump. If the idea came spontaneously, then you can look for the desired stump in clearings, in the nearest forest, or ask the owners of neighboring plots.

Materials and tools
To make such a fantasy table from a stump you will need very little:
- wood for the tabletop, the recommended thickness of the tabletop is from 20 mm, when choosing boards you need to adhere to the rule “the larger the tabletop, the larger the cut of the board”;
- stump. For the work you will need a dried stump of any type of tree, the main thing is that the wood is intact, not damp or rotten. If the tree was cut down recently, the stump needs to be dried thoroughly. And it’s better to do this by placing the stump in a warm dry room or outdoors in sunny weather. It must be remembered that several weeks is not enough time for proper drying. As a rule, the entire process takes at least two months. You can determine the condition of the wood by the ease of removing the bark - if the bark comes off without effort, then you can start working;
- wood varnish on water based natural shade or transparent. It is this composition that will best emphasize the texture and advantages of natural wood;
- sandpaper various grain sizes and holder;
- plane or sander;
- chisel;
- building level;
- roulette;
- hammer and nails;
- screwdriver and screws;
- abrasive fiber.
Manufacturing stages

Stage 1
The dried blank of the future table must be cleared of bark. A chisel or chisel will be useful for this step. The bark must be removed with extreme caution and precision so as not to damage the wood and prevent cracks and splits from appearing. Any soft or rotten areas should also be removed.


Stage 2
After the bark has been removed, the stump must be leveled relative to the horizontal plane. To do this, use a level to prepare flat surface, and the base of the future table is installed on it.
If curvature is observed, the imperfections are eliminated using a plane. At the same stage of work, excessively large rhizomes of the stump and all unnecessary parts are sawed off with a hacksaw, the sections from which are then sanded.

Stage 3
The leveled stump is sanded with a disk grinder, especially its horizontal parts. The sides of the stump are also sanded, and hard to reach places processed with coarse sandpaper. This is a rather labor-intensive process that requires a significant amount of time.

Stage 4
Cracks and depressions in the barrel must be cleaned of dirt and debris using a chisel, then sandpaper folded in half (with the working layer facing outward) should be carefully processed from the inside. Remains of wood dust are cleaned with a brush or a construction vacuum cleaner.
Stage 5


To prevent the stump from rotting and ensure air circulation between the table and the floor, it can be attached to the base from below furniture legs. The presence of legs will make moving the table more convenient.
You can choose any legs: metal, furniture wheels or special rubberized stands. It is best to attach them using self-tapping screws to the base of the stump; the number is chosen arbitrarily, based on the size of the table.

Stage 6
After installing the legs, we proceed to sheathing the top of the stump. To do this, we put two parallel strips perpendicularly on the sidewalls, and two more rows of holders on top - a total of 6 strips, fastened together with nails. This will be the frame for the tabletop.
Stage 7

We fasten the prepared tabletop boards from below with transverse strips. The shape of the tabletop can be very diverse: round, rectangular, with rounded corners. A table option with a round or oval tabletop looks more advantageous.

To give this shape, you can use homemade device from thread, pencil and nail: the end of the thread is tied around a pencil, and the tip of the nail is placed in the middle of the tabletop, outlining a circle with a selected radius, after which all excess is sawed off, and the edges and surface of the tabletop are processed with a grinding machine.


Stage 8
Holes and defects in the boards can be decorated with finely chopped shiny stones, filling them with varnish and after drying, sanding them again to smooth the surface.
The finished tabletop is fixed from below to the sheathing with holders on nails or self-tapping screws selected to size.

The finished table is varnished in several layers. After applying the first layer, the product is thoroughly dried and processed with fine-grained sandpaper. This will prevent the varnish from peeling off, and subsequent layers will lay down more evenly.


After removing the dust, apply the second and subsequent layers of varnish without grouting. If desired, after drying, the last layer can be treated with abrasive fiber - this will remove excess shine and give the surface a matte finish.

Such creative table will decorate any veranda, especially if surrounded by green bushes or flower beds.


Video - DIY garden table made from a stump
A variety of furniture fittings largely determine the practicality and functionality of an interior item, and also affect its external aesthetics. We invite you to find out what furniture legs should be like so that they last as long as possible, and the room itself acquires an attractive, luxurious look.
Furniture legs and supports, as in the photo, are a type of furniture fittings for various purposes, shapes, colors. Often such components are made in the same style and color as the piece of furniture itself, therefore they are harmoniously combined with it and complement it with their beauty. However, you should not think that they perform a purely decorative function. Such products are characterized by a high functional load, therefore they are indispensable in the manufacture of cabinets, cabinets, chests of drawers, and so on:
- First, let's note the support function - thanks to the presence of such structural elements The cabinets stand firmly on the base, do not wobble or warp. Many furniture legs are equipped with the ability to adjust their height and slope. This property of sliding models allows you to reliably install the cabinet even on uneven floor. This fact is the fundamental basis for the comfortable, safe use of a piece of furniture;
- The protective function of furniture fittings is no less important. Table legs protect the bottom of the structure from scratches, chips and other types of damage. The better the product is made, the more effectively it copes with the protective function;
- In addition, the legs of the bedside tables provide the user with high comfort when using the piece of furniture.
Telescopic models have the ability to choose the height of furniture installation, which allows a person to choose optimal height from the point of view of ergonomics and personal comfort.


Species
Absolutely all types of furniture legs that exist today allow you to establish interaction between the structure and other objects in the room. Such small-sized elements make the design complete, giving the space laconicism and comfort. It is difficult to imagine a comfortable residential building today without the most ordinary leg. Such fastening devices can give furniture stability, a luxurious, stylish look. But what type of such products should you prefer? Let us characterize the main ones below:
- regular stands without the function of adjusting their height are available at an affordable price. Often, such legs have a laconic design without any special decorative elements;
- legs with the ability to adjust the height of the furniture. Combine aesthetic appeal and high functionality;
- decorative legs are used to decorate a piece of furniture, as designers give them an original look with their own hands. Curly supports can have a non-standard shape, attractive coating, various kinds decorations. For example, carved furniture legs act as an independent element of room design.


Manufacturing materials
Today you can see a huge variety: smooth, bent legs for furniture, with or without the ability to change the height. But first of all, it is important to pay attention to the material of the product:
- metal - look very attractive, strong, durable, made according to drawings from metals such as chrome, aluminum. Chrome is heavier than aluminum, but also stronger. Owners prefer chrome modern interiors for whom the durability and strength of furniture is important. Chrome legs are perfect for high-tech interiors where a lot of glass and metal are used. The most original form for metal support- wheel. Wheels can be used for furniture of very original design;
- made of solid wood ideal for wooden furniture. If durable wood is used to make a product, it will last long time, will look luxurious and expensive. To give strength to cheap wood species, a metal support is used;
- plastic supports do not look very attractive, but have a wide range of sizes and high functionality.
The plastic leg is optimally used for kitchen furniture or a headset in the country.


Nuances of choice
When choosing supports, it is important to pay attention to the following points.
| Selection criterion | Characteristic |
| The presence of soft padding on furniture legs | Felt protective pads on furniture legs prevent the leg from damaging the bottom of the furniture. Felt is also used for their manufacture. Felt underlayment is very effective and affordable, and extends the life of the support. Therefore, you should not refuse to purchase such gaskets. Stickers for furniture legs can be picked up in the store. The choice of lining shapes is wide. |
| Material of manufacture | More durable and practical to use metal models, slightly less – wooden and plastic. However, when choosing a manufacturing material, a lot depends on the design features and its stylistic direction of decoration. For laconic high-tech only metal models are suitable, for country - wooden supports. |
| Design | The external aesthetics of the design must fully match the aesthetics of the headset, so when choosing such products, be sure to bring a photo of it to the store. This will allow you not to make a mistake in your choice and choose the most attractive supports. |


Video
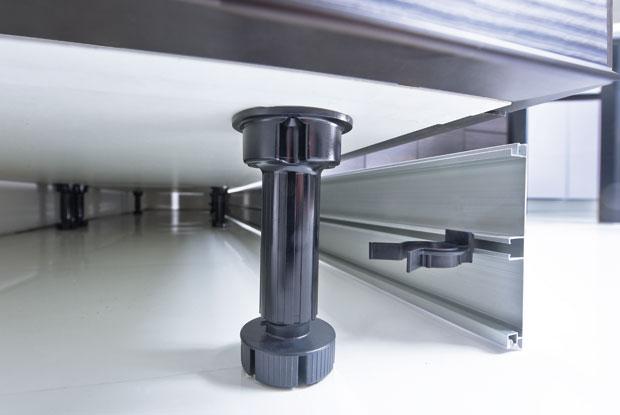
In most modern kitchen sets, the lower modules are installed on adjustable legs - supports and covered with a single tabletop. Using adjustable legs, you can compensate for unevenness and slope of the floor, thereby leveling the overall tabletop covering the lower cabinets. Adjustable ones can withstand significant loads and can be made of plastic or metal, which also perform a decorative function.
Plastic kitchen supports do not have a very attractive appearance, but the leg comes with a special clip with which it is attached to the support. The kitchen set, installed entirely on plastic legs, is closed at the bottom with a decorative plinth, which can be removed if necessary. If you want to leave the legs open, you should install decorative ones in visible areas. metal legs- supports.
For one lower module up to 800 mm wide, four kitchen supports are enough. Wider and corner cabinets require more furniture legs. Also, if there is a vertical partition in the lower module, it is also advisable to install supports under it.
Regardless of the material, installation of adjustable supports similar to each other. The kitchen leg is attached to the chipboard using four 16 mm self-tapping screws and one central bolt. Before installing the kitchen legs, set all the supports to the lowest position, that is, screw them completely.

Turn the bottom module over and start marking. Please note that if you plan to cover the bottom of the kitchen unit with a plinth, then step back 80 - 100 mm along the front edge to secure the legs. This is done for the purpose that when you stand at the desktop, your feet will not rest against the plinth. Where the legs will not be closed with a plinth, move 50 mm away from the edge enough.
To fix and install one kitchen leg, move 50 mm away from both sides, draw a cross and place a dot at the intersection. Attach kitchen leg to the bottom of the module so that the point is under one of the four holes. The other two holes should be above the lines of the drawn cross. Screw in three screws according to the markings, then screw in the fourth. Do the same with the remaining legs.

Then when set to kitchen set all legs, proceed to level the lower cabinets to the tabletop using a level and adjustable supports. Cover the lower modules with a tabletop. Achieve a horizontal position of the countertop by adjusting the outer legs of the kitchen set. Then unscrew the remaining supports so they sit firmly on the floor.
Installing legs on a kitchen set with your own hands is not difficult; it requires care and accuracy.
A table is a necessary attribute of kitchen furniture. Today, manufacturers use a lot of materials to produce tables. There is a great variety of table leg shapes; there are more than twenty of them. The traditional version has four legs. In most cases, standard models The shape of the tabletop is square or rectangular.
Wooden dining table rectangular shape with four legs
A table with three legs is usually round. It can be used as a small coffee table or as a dining area.

Round wooden kitchen table with three legs
They also produce tables with two legs, they can be various types, but the most common models are those with two X-shaped legs or durable ones made of solid wood.

Wooden table with X-shaped legs complete with chairs for a summer cottage

The table legs are attached to the sides of the supporting frame, and the table top is, in turn, attached to them
Many craftsmen know that improperly secured legs are the root cause of the table swaying and tilting. There are adjustable mounts that can correct a large percentage of the tilt, but quality assembly is paramount.
There are several options for attaching legs to tabletops:

Attaching the leg with surface plates

Attaching the Legs with T-Nuts

An option for attaching the table top to the table frames without using additional fittings using screws

Using small metal Z-brackets is another popular way to secure a tabletop.
| Fixation with surface plates | Let's say you bought legs without the appropriate fittings. To install them you will need table eye bolts and lugs. larger size and threaded pins for small ones. |
| Fixing with T-nuts | This mounting option is suitable if you intend to restore the front surface of the table and thus give the interior an updated look. You should have T-nuts, eye bolts and eye bolts available. |
| Screw mounting | This is normal and time-tested a method of attaching the table surface to the drawers without the use of auxiliary fittings. Suitable for classic furniture. |
| Application of Z-shaped holders | The use of small iron Z-fasteners is another popular method of fixation. Main advantages this method– low cost, simple and reliable installation. |
| Use of wooden clamps | An easy and durable method of attaching a tabletop without using commercial hardware. They are similar to Z-shaped holders. They are made from any scraps; it is enough to observe the orientation of the fibers. |
| Using Figure Eight Holders | These metal fasteners are widely used in securing countertops. They come in two types - with washers of the same and different sizes. |
| Application of spacers with grooves | IN in this case 2 or 3 auxiliary spacers with rectangular grooves, the length of which is 10-15 mm, are attached to the frames of the set. |

Using homemade wooden clamps is simple and reliable way fastening the tabletop to the undertable without purchased fittings

Steel figure-eight fasteners - an option using inexpensive fittings

In this case, two or three additional spacers with rectangular grooves 10-15 mm long are attached to the side of the headset.
Required materials
The materials that are used to make tables are very different; we will tell you about some of them.
- Solids of different types of wood are suitable for this, for example, conifers, oak, etc. If you are a novice craftsman, it is better to use pine, as it is easy to process. It should be remembered that such furniture fades, absorbs odors and liquids, and does not tolerate temperature changes well. On the plus side, the material is environmentally friendly, durable, and looks elegant.

Solid pine for making a table with your own hands
- Chipboard is a fairly popular material for furniture production. Dry wood chips and resins are used in production. Among the disadvantages, environmental risks can be noted. The advantage is a relatively cheap price.

Chipboard – inexpensive option material for making dining table
- MDF is more environmentally friendly compared to chipboard, but also more expensive. In production they use wood shavings, carbide resins, modified melamine. Disadvantage - it ignites freely, there is a possible risk of fire even from rapidly heating objects.

MDF is suitable for making a table, it is of higher quality and environmentally friendly
- Furniture board is the exact opposite of MDF and chipboard. Acceptable price equivalent, the material is durable and environmentally friendly. They are made from glued bars, tightened with a press.

Furniture board - square or rectangular sheets of wood, which are made by gluing together wooden blocks along the width or length
- Metal – in most cases, stainless steel is used. Such a thing will be expensive, but such a table will attract attention.

Stainless steel products are easy to maintain, durable, practical, and versatile in use.
These materials are suitable for both the tabletop and legs. They also make plastic, chrome-plated, and forged legs. When choosing, rely on your preferences.

Chromed furniture support for tables with side fastening

Coffee table with forged legs

White round table plastic outdoor
Required Tools

The necessary set of tools for making and assembling a table
For production, the following tools are needed: a plane, a grinding machine, a jigsaw, a saw, a drill, drills, sandpaper, a screwdriver, self-tapping screws, glue, dowels, clamps, a tape measure, a pencil, protective equipment - glasses, gloves.
Manufacturing process: step-by-step instructions

Drawing wooden table with four legs
First in mandatory need to make a drawing. Decide which legs you will attach - purchased ones or make them yourself. The form can be any.

Curly balusters or legs for a homemade table
If the tabletop is 0.8 m wide, then the legs should be 1.2 m long. To ensure the tabletop is smooth, sand it with a sander. There should be no gaps between the joints. To prevent the tabletop from becoming deformed high humidity, the boards must be laid with a counter texture.

Tabletop boards at least 30cm thick
At the ends of the boards to be joined, you need to drill holes 8 cm deep, maintaining the gap between them at an interval of 10-15 cm. We go through the prepared areas with sandpaper and lubricate the edges, dowels and holes with glue. We insert the dowels into the holes, thus connecting the tabletop. Remove excess glue.

Option for attaching legs to a wooden table
Using glue and screws, we connect the transverse and longitudinal boards to the legs. On top of the latter we make two recesses to attach the tabletop. We wait twelve hours and install it. We cover the structure with varnish, stain or paint.

Table with fixed top, frame and legs
Important! When using stain, consider the following: choose the thinner wisely, the surface before coating must be carefully sanded, the main thing is to properly adjust the gun (the shape of the torch should be oval, and the layer you apply should cover the existing one by half).

Cover with varnish or wax to protect the top layer
Having familiarized yourself with the options for attaching legs to the tabletop, it will not be difficult for you to make a table with your own hands, thereby updating the interior with such an original thing.
Video: Solid wood table top. My mounting option
The stability of furniture and safety of use depend on the quality and reliability of furniture legs. furniture products. The design of this type is also important. furniture fittings, which adds the finishing touch to the complete appearance of any product.
In addition, supports perform other functions:
- increase the mobility of individual items;
- adjustable legs make it possible to give the product the most comfortable position;
- decorative fittings complement the style of specific models made in a certain design style.
Based on the main functional purpose, furniture supports must have certain parameters:
- withstand the weight of the structure installed on them and the objects located on it;
- have anti-vandal (anti-friction, non-abrasive) properties to prevent damage flooring when moving objects;
- if necessary, have a simple adjustment or transformation mechanism;
- have an appropriate design that is in harmony with the architectural and style solution of the furniture sample.

Varieties
When the conversation turns to furniture supports, the legs of a computer or dining table, chairs and beds or small supports of sofas, bedside tables or chests of drawers appear in the mind's eye. Despite its apparent insignificance, the furniture support leg plays a fairly important role in the design of furniture and can perform several functions simultaneously. Today, the industry produces a wide range of various accessories, among which supporting elements form a separate category.
Currently, in the production of support legs, various materials, and due to the constant change in furniture fashion and style, the design of supporting elements is constantly being improved. However, the basic requirements for them - strength, reliability and harmony - remain the same.

Wheel (roller) supports, previously used primarily in the production of medical specimens, today can be found in any type household use. Roller bearings and supporting elements in the form of small wheels are most widespread in various models coffee tables, computer chairs and transformable sofas. They differ:
- by type - linear or rotary;
- on the roller support unit - bearing or bushing;
- according to the method of fastening to the furniture structure
IN modern furniture, with the exception of large-sized products, rotary roller supports are mainly used, which significantly increase its mobility and cause less damage to the floor covering.
Most roller bearings are able to withstand significant loads and do not make noise when moving objects. A heavy sofa bed mounted on straight casters can be easily moved inside the room by one person. Fastening can be different and depends on the category and purpose of the furniture.
Rollers are made from metal lined with rubber or plastic (often reinforced). Many modern models are equipped with a brake (stopper), which prevents spontaneous movement of the product.

Decorative legs They are used not only as supports, but also are a significant design element. Using different materials, shapes and color scheme This fittings can completely reformat the appearance specific subject by changing his style. Of course, in addition to a purely decorative function, these parts must have sufficient strength and rigidity.
This goal is achieved by using certain materials. A classic example of decorative fittings is carved wooden support posts, which are widely used in chairs, sofas and other products, made in a classic or empire style. Wood is mainly used for their manufacture. hard rocks, which is given additional decorativeness by a special surface tinting. Often decorative legs are made in combination, in which the main, straight support is complemented from the outside with decorative elements.

Note!
Furniture made in modern minimalist or modernist styles has metal support posts that are chrome plated, anodized or powder coated.
Metal support posts are considered the most durable and reliable. If previously they were used in budget and dacha options furniture, then today they are an integral part of most items dropped in the power of “high-tech”. Today, forged or cast furniture legs are quite common, which significantly increase the decorative effect of furniture products.

Adjustable
Due to uneven floor surfaces, problems sometimes arise with the installation of furniture. In order to new furniture install on an unprepared surface, many manufacturers equip their products with adjustable supports. In addition, such supports are necessary for furniture products (tables, cabinets, chests of drawers), in which the upper surface must be set strictly horizontally. Thanks to adjustable legs Furniture can be placed not only horizontally, but also given the necessary slope. Most adjustable supports have a screw mechanism. Additionally, on some products, the support pad may be hinged to the screw, allowing adjustments to be made without lifting the product.
The advantages of adjustable supports with a screw mechanism include ease of adjustment and low cost of fittings. They are able to withstand significant loads and have a significant range of adjustment. Some unaesthetic design of screw supports is usually masked by a decorative cover or nameplate.

Choice
Furniture supports are often purchased by hotels to complement existing furniture. This is usually done when the modification is made for the purpose of:
- implementation of the possibility of adjusting the height of furniture;
- to increase product mobility;
- to change the design by replacing ordinary legs with decorative ones.
When choosing a specific support element design, you should pay attention to the following characteristics:
- ergonomics and practicality of the product, ensuring maximum ease of use;
- ability to perform assigned functions;
- ability to bear the required weight loads;
- decorativeness and style of the product.

From the video you will learn about all types of furniture supports, features of their fastening and application.