Sliding wardrobe in the hallway with hands. DIY hallway
The main, and sometimes the only piece of furniture in the hallway is a storage closet, which often has a sliding wardrobe design. Some people buy a similar product ready for installation, while others, showing enviable ingenuity, patience and hard work, make it themselves. Home craftsmen deciding how to make a hallway cabinet with their own hands will have to decide on a number of issues before starting assembly: its size, what material it will be made from, how much money they are willing to spend on it, etc.
What should the designer rely on?
When developing a built-in wardrobe for your apartment, its design is worked out in three directions, focusing on:
- on functionality;
- design;
- engineering solution.
It turns out that in order to assemble a wardrobe in the hallway, made by yourself, you will need knowledge in the field of usability, creating an interior and furniture designs, as well as the practical skills of a home craftsman.
Functionality
Sliding wardrobes are a general name for furniture with sliding (sliding) doors; they can be installed separately (cabinet version), as well as built into niches or corners (cabinet and open-frame options). At the same time, they allow:
- Optimally organize living space, often occupying little-used areas or playing the role of zoning partitions.
- It is convenient to place things, guided by the principles of ergonomics, in all spatial directions: from floor to ceiling, completely along the width and depth of the niche. In addition, built-in furniture may have unusual sections for placing communication elements: electrical panels, ventilation ducts, etc.
- Avoid hard-to-reach areas (behind the side and rear walls, top and bottom) where dirt has accumulated over the years.

Design
Designing an installable furniture assembly, you can adapt it to any, even non-standard interior solutions, for any renovation. The variety of modern facade materials allows you to fit the cabinet, for example, into the high-tech style or the opposite baroque style, and by decorating the facade with original drawings, you will get a truly unique design solution. However, often a built-in wardrobe in a hallway has almost the entire outer surface covered with mirrors, which visually expand the limited space of a typical hallway, and are also convenient functional elements.
Engineering solutions
Collecting homemade cabinets coupe, or purchasing ready-made factory furniture models, pay attention to a number of important points:
- The design of sliding doors is the first thing that largely determines the design, functionality, and ease of use of the entire product. Today, the most popular system is with a lower support roller (single) and an upper auxiliary roller (double). This arrangement allows most of the weight of the door (reaches 150-180 kg) to be transferred to the lower support, which rolls almost on the floor, while the upper roller only has the function of vertically supporting the sliding leaf.
- Efficient use of internal space. It is important not only the quantity, purpose, dimensions, placement of compartments, but also the use of targeted accessories: baskets, pantographs, clothes rails, tie holders and others. Sufficient space should be allocated for each product, taking into account the necessary work area for retractable mechanisms.
- Interior lighting, which is not just done in the chosen place, it must correspond higher standards electrical and fire safety. It is recommended to install low-current low-voltage LED lamps or, as a last resort, halogen ones for a voltage of 12 V.

How to correctly perform measurements and calculations?
When preparing the design details of furniture elements, it is necessary to take the measurement stage especially seriously. A suitable niche is often adapted for a built-in wardrobe in the hallway, so an error in its measurements or calculations of the external dimensions of the furniture may then require significant alterations, and as a result, unforeseen financial costs.
Features of niche measurement
A niche, which is a natural architectural element of a building, is rarely geometrically ideal. This point should be carefully examined by displaying the errors of the walls in the drawing, in order to then obtain the dimensions of the “clean” opening. Necessary:
- make sure there is no general curvature and local sagging on the walls, floor and ceiling, applying a rule or an even strip in the longitudinal and transverse directions, as well as crosswise along the planes;
- determine, by measuring the diagonals of the opening, the parallelism of opposite surfaces, and their vertical and horizontal orientation using the usual bubble building level;
- examine the corners of the niche. They often have fillets that will either have to be cut down or taken into account during calculations.
Calculation of overall and nodal dimensions
Developing a built-in furniture project requires the designer to have a certain amount of professional knowledge. It will be quite difficult to make competent calculations yourself, however, if you still decide to take such a step, you will have to take into account many engineering and practical aspects, as well as the features of source materials, mechanisms, and accessories from different manufacturers.

Furniture structures built into the hallway can have a practical standard depth of 60 cm, however, when the hallway is not wide enough, choose a narrow standard size of 40-45 cm. The depth of the product is essential if you plan to use hangers hung on a longitudinal clothing rod. If the project includes a pantograph or other mechanisms for the transverse hanging of hangers, then they are convenient to use at any depth of the compartments.
When designing a cabinet for a corridor to be assembled with your own hands, its height is determined based on the planned content, taking into account that a person of average height can reach things at a height of 2.1 m. However, structures are often designed that occupy the entire space up to the ceiling. For example, you can complement a homemade wardrobe by assembling mezzanines on top with your own hands. Thus, the functionality and capacity of the entire installation increases, and dust collector pockets are eliminated.
The width of furniture in a niche is usually chosen according to the maximum possible size. If the product is case-based and stands apart, then it all depends on personal desires or capabilities. It is taken into account that the wardrobe includes sliding doors, so their width should be such that there is free access to internal space. The minimum leaf width is 50 cm (if less, the door warps when moving), the maximum is 90 cm (with a larger width, the door becomes heavy, the load on the guides increases, and when opening, impacts occur). side walls).

Assembly materials
The material for a niche cabinet can be laminated chipboard, MDF, wood, glass, laminated panels. If we choose laminated chipboard, then you need to pay attention to the following point. Only medium or medium grade material should be used. high density, type E 1 or E 0.5 (low formaldehyde content). Also analogous to laminated chipboard medium density MDF can serve, and this material is more environmentally friendly. Laminated chipboard and MDF coatings are available in a wide range of colors and textures, so they can be selected to suit the most sophisticated needs.
Having completed a detailed study of the project, you can order cutting of the material at the selected specialized enterprise. You will need to provide the sawing shop with a full-fledged sketch with the dimensions of the parts (it will be difficult to remake the parts due to an error in the calculations), also indicating the type of slabs, edges, glass and other parts, in accordance with the factory catalog markings.
Assembly events
Do-it-yourself assembly activities should be considered if you are willing to devote a few days to them. Let's look at how to make a hallway cabinet with your own hands using the example of a cabinet product with three doors. The width of the doors is 60 cm, the width of the shelves in the amount of 4 pieces is 57 cm, the mezzanine with 5 compartments is 57 cm wide, shoe shelves– 2 pcs., same width. Assembly height – 240 cm.

- Assembly Tools:
- 4 mm hex key for confirmats (Euro screws);
- hammer;
- Phillips screwdrivers No. 1 and No. 2;
- tape measure 3-5 m;
- building level;
- screwdriver or drill;
- drills 2.5, 5, 7 mm.
- Preparing the base.
First, let's prepare the base by securing the front and back stands with confirmations. To do this, through holes (for thickening the confirmat) are drilled 7 mm with a countersink for the head, and 5 mm for the screw part of the Euroscrew.
- Installation of partitions and shelves.
After the base is ready, place it vertically on the long side. We also attach the internal and lateral vertical partitions to it with confirmations. We attach the shelves with the top cover, but do not tighten them all the way yet. Since the section for outerwear is large, it is necessary to secure additional stiffeners inside it on the back of the closet between the side wall and the partition.
We turn the structure over, resting it completely on the base, and check with a building level that it is installed without slopes. At this stage, you may need an assistant.

- Rear wall
We check the diagonals: lower left corner and upper right, upper left corner and lower right. If the distances coincide, we wrap all the untwisted confirmations until they stop and fasten the back wall. Fiberboard sheets are usually used for it, ideal option for a three-section cabinet - that’s three fiberboard sheet. We nail them with small nails; you should not rush, as if you miss, you can damage the edges of the shelves or partitions. The joints are additionally nailed with special spider-shaped brackets.
- Installation of door guides.
Screw the bottom rail onto the self-tapping screws checkerboard pattern, deepening them so that the door rollers do not subsequently “stumble” over the fastener heads. Holes for self-tapping screws must be prepared with a 2.5 mm drill. The distance from the rail to the edge of the base should be 15 mm. Next, similarly fix the top rail to the lid. 
- Clothes rails and accessories.
We prepare 2.5 mm blind holes on the walls. The distance from the top cover to the center of the rod should be the same on both sides. We secure the base of the bar under the outerwear with self-tapping screws on the left side, insert the bar with the base on the right, screw the fasteners on the right side (for a solid bar) or fasten it to the stand.
We mark and fasten accessories with self-tapping screws.
- Hanging doors.
The side doors are hung first, then the central door. To hang, we place the upper part of the sash into the far groove of the upper guide, then, pressing it upward, we insert bottom part into the far groove of the bottom rail. Similarly, we hang the front sash into the nearby grooves of the guides.
The final stage is installing plugs to match the color of the cabinet into the heads of euroscrews and gluing self-adhesive seals to the edges of the doors. The seal will protect the contents of the cabinet from dust, as well as from structurally destructive impacts of doors on the side walls or each other.
- How to make a mezzanine in the hallway with your own hands for a wardrobe?
There are two options. The first is to make a built-in wardrobe combined with a mezzanine. It is assembled according to the same scheme as without it, only in this case the mezzanine cover will be the attachment point for the upper guide sliding door. The second, when the mezzanine is a separate block, installed already in assembled form on a mounted wardrobe.

Conclusion
The article describes the main points that those who want to build their own unique cabinet model with sliding doors. Manufacturing and assembly of furniture, even experienced craftsmen does not always go smoothly, so the home craftsman will have to show maximum attention and responsibility at all stages from design to assembly of the wardrobe.
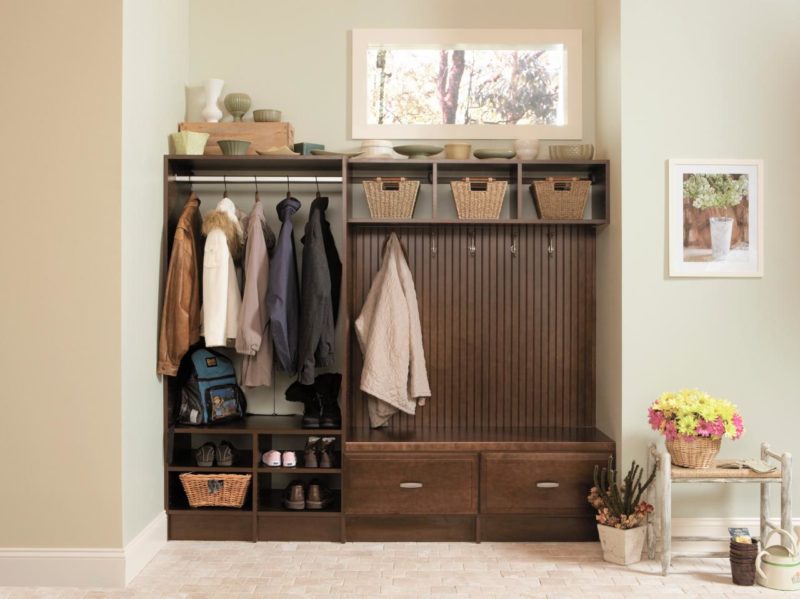
The hallway is the first thing they see when entering the apartment. Often the selection in stores is the same, and choosing furniture for the hallway is not easy. And if it is not large, then the cabinet simply may not fit or will take up all the space. In this case, you can make furniture for the hallway yourself. In addition to saving money, you'll get a custom model that fits your space.
What furniture is needed for the hallway
The main rule for furniture in the hallway is that it should be roomy, compact, with a neat appearance. There is no need to decorate it excessively. In addition to decoration, it has the function of storing things. You should carefully consider the size, the presence of drawers and cabinets. It’s better if there are more of them, but you need to start from the area of the corridor; there’s no need to overload.
The unusually shaped hooks on the wall, plus the shoe rack, look beautiful.
In the presence of a large hallway, a wooden bench looks original; it will add zest to the interior. A win-win wardrobe option, it will fit into any interior. And a wardrobe, if space allows - perfect solution, it is comfortable and roomy.
At small sizes, you should use:
- built-in wardrobes - take up minimal space,
- mirrors and light finishes will visually expand the space.

DIY hallway furniture
With the help of the right project, you can transform even a small area, and the hallway will look organic and spacious.
The design of this room should be combined with the interior of the entire apartment. It is acceptable to choose different decor or floor coverings that are different from other rooms, but the stylistic direction should be uniform.

Practicality
When choosing a model, you should pay attention to practicality. If you have a small hallway, you should stop at standard version and choose multifunctional furniture: compartments for things, shoes.
The compromise between capacity and external beauty - corner cabinet. It looks small, but has great depth, so it is roomy.
Subject to availability big family, it is necessary to think about a place for the belongings of each inhabitant of the apartment.
The hallway is a room into which dirt rushes from the street. Therefore, you should not make it in light colors, it will quickly get dirty. It is not advisable to carry things such as umbrellas, strollers, bicycles deep into the apartment; it is worth providing a storage system for them in the hallway.

Individuality
Everything that is made with your own hands, including furniture, is always the embodiment of your ideas and desires. You can decorate the hallway to your taste and give it individuality. Such furniture will be one of a kind, and not mass-produced at the factory, and guests will be surprised by its exclusivity.

What you need for work
Having chosen a model and made a drawing, you should prepare everything that is needed for the work: material, fittings, tools.
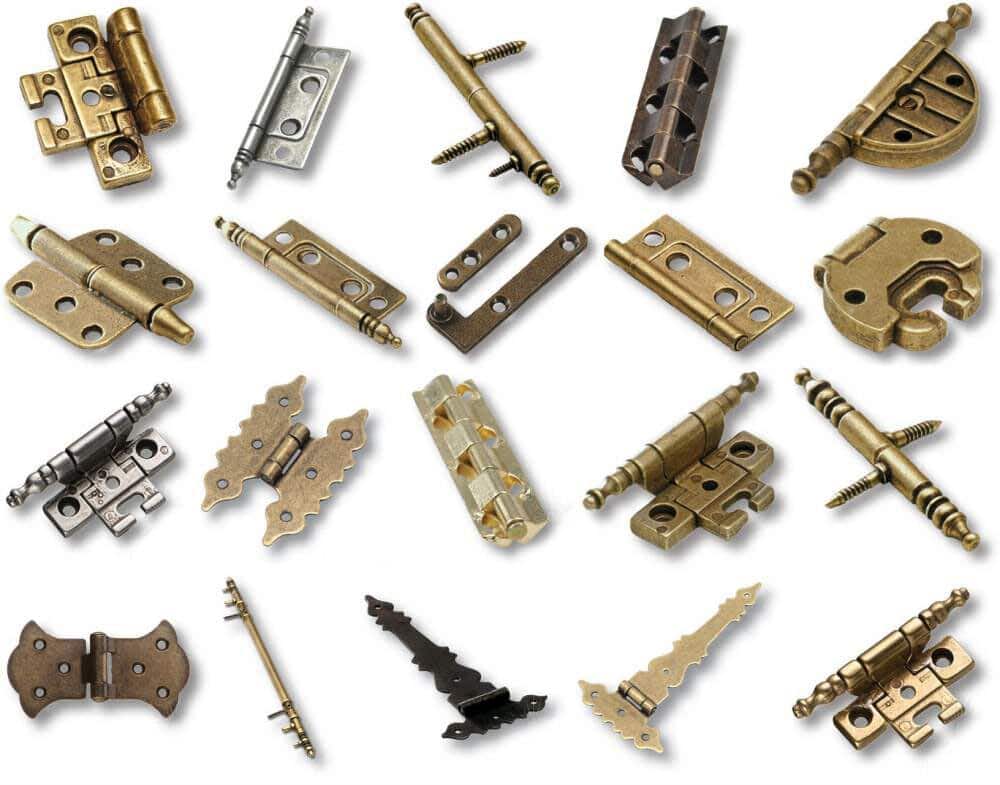
Depending on the type of furniture, different fittings are needed:
- wardrobe - guides for drawers, rails for the sliding system;
- wardrobe with swing doors– hinges, handles, locks;
- hooks for clothes.

Tools
You should stock up on the following tools:
- saw or jigsaw;
- screwdriver or screwdriver;
- sandpaper;
- with a knife;
- screws;
- tape measure;
- corners;
- loops;
- plugs;
- special wooden fasteners;
- with a pipe pipe
This is a basic set that can be useful in making furniture.
We make the hallway ourselves: choosing the material
The choice of material is important; you should not choose too expensive one. In addition, it should be easy to process and safe for health.
Suitable: plywood, chipboard, fibreboard, MDF, furniture board, edged board, wooden block, drywall - they have long term service and good quality.
- Tree. Wood - environmentally friendly pure material, so it's perfect for an apartment. It never goes out of fashion, and furniture made from it speaks of the wealth and excellent taste of the owners. A hallway made of wood will harmoniously fit into any style. You can carve it, thereby adding individuality. Different species are used to make furniture: oak, birch, pine, beech, walnut. The only negative is the high price, but given the long service life, this cost will be well worth it.
- Furniture board. Made from natural materials, therefore safe for health. Looks elegant and lasts a long time. The cost is high, but below the tree.
- Chipboard. Chipboard is a common and comfortable material for making a hallway yourself. It is simply cut and processed, weighs little, and there is no need for reinforced fasteners. With all the advantages, it is affordable.
- Plywood...Has the same qualities as chipboard, but is denser and more durable. From it you can make not only parts with curved lines, but also a slotted pattern.
- MDF. Slightly less durable than plywood. But it has limitless possibilities in processing: painting, tinting, applying stain.
- Fiberboard. It is used only for making the back wall of cabinets.
- Wooden beam. Designed for assembling frame structures.
- Edged boards. Relatively expensive material; pine boards are the most affordable.
- Drywall. Built-in niches are equipped with plasterboard.
- Mirror or glass. Glass or mirror inserts will decorate any room, and you can’t do without a mirror in the hallway. However, they are heavy and cannot be handled alone.

Choosing a hallway depending on the type of room
When developing the design of the hallway, you need to take into account the characteristics of the room and the number of household members. You should decide on the functional accessories of the hallway so that it is practical and comfortable. With a small area, the beauty of the wardrobe will not be visible and it will look bulky. It is better to choose a corner hallway option. In addition, there should be enough shelves and hooks for all family members.
The right decision– install furniture along a long wall.
Regular hallway: instructions, diagrams and drawings
Do simple hallway It’s not difficult for yourself. It includes: a hanger, a shoe rack, a small pencil case or a chest of drawers with a mirror.
For this you will need:
- loops;
- furniture board;
- plywood;
- tongue and groove boards;
- three-dimensional strip.;
- pens.
The first thing you need to start with is a pencil case. To do this, planks of the required size, a cover for the top (with an overlap) and shelves are cut out of the shield. Assembly is not difficult - the strips are attached to the lid using self-tapping screws, and the shelves are installed in the same way. For structural strength, corners are cut out of plywood and fixed in the corners. A door is made from the shield, which is mounted on 3 hinges.

Now we make the cabinets. If desired, you can make only one cabinet. To make it, you need 2 sidewalls of the same size and a bottom that will connect them to each other. The lid should be made smaller than the bottom. All parts are fixed with glue and screws. Doors are cut out of the shield and attached to hinges. Subject to availability drawer runners will be required. You can make them yourself from plywood, but it’s better to buy them (the box will roll out easily). The second cabinet is made according to the same principle as the first.
Now, the whole structure is assembled. The prepared boards are attached to the edge of the pencil case and to the cabinet - this will be the base of the hanger. The boards are connected at the top with a lath for strength. Hooks for clothes are attached to the slats, and a shelf for hats is screwed on top.
The final stage is the installation of handles and varnishing.

Corner option: instructions, diagrams and drawings
It’s easy to make a corner hallway yourself, but to make it stable, you need to use solid material: chipboard, plywood. The module consists of 2 parts that are connected at right angles. In addition, you should decide whether there will be a frame or the walls themselves will become the base. If the walls are smooth, then you can do without a frame; attach the shelves directly to the walls - this will be economical.
Manufacturing principle:
- a drawing is made according to dimensions, areas for attaching shelves are marked;
- Chipboard is cut with a jigsaw;
- holes are drilled for dowels on the front side of one panel and at the end of the other, holes are made for confirmations;
- the dowels are lubricated with glue and the sidewalls are assembled;
- The shelves are attached to confirmations and clothes hooks.
If necessary, you can attach a mirror to the door or make compartment doors, thereby creating corner wardrobe.

Custom hallway with your own hands: drawings and diagrams
If you have a non-standard corridor, into which the wardrobe or hallways sold in the store will not fit, you can resort to the original and simple solution. For example, the presence of a bedside table or shoe rack, plus a hanger and a mirror.
You should start with the bedside table. 2 sidewalls of the same size, a base and a lid are cut from a furniture panel. If there are skirting boards, then the corners are cut off from the sides (on one side). The back wall is made of plywood. All parts are fastened with self-tapping screws. Runners for drawers and fastenings for shelves are made inside. The doors are screwed on hinges.
A hanger in the hallway is an element you can’t do without. It’s not difficult to make and you can give free rein to your imagination. For lovers of eco-style and everything natural, tree branches are suitable instead of a hanger. Those who prefer country style need a vintage option.

Wardrobe capabilities: instructions, diagrams and drawings
A sliding wardrobe is an excellent choice for a hallway, it can be built-in or separate. If there is a niche, shelves are mounted in it and it is equipped with a sliding system.
The process of making a cabinet with side walls:
- A wooden frame is made.
- A place for the closet is determined. Holes are made on the walls, floor, and ceiling to fix the frame.
- The front frame is attached to the wall and ceiling with dowels, and then the side frames.
- The slats for the shelves are mounted inside. The shelves themselves are cut out of plywood.
- The sides are sheathed with plasterboard, then pasted over or painted as desired.
- Guides are mounted on the floor and ceiling.
- The doors are installed - first in the upper tire, and then in the lower one. The doors must move freely, their position is adjusted with screws.

You can make a wardrobe different sizes and models, depending on preferences and room area.
You can really make furniture for the hallway yourself. The models are quite simple and small in size. And if you have imagination, you can turn an ordinary hanger into a one-piece and unique thing.
Photo gallery
Video
Often in small apartments there is not enough space to store things, so they are often in plain sight, creating clutter.
If you're tired of this, then you should think about it.
Let's look at how to install it in the hallway yourself.
Before starting work, you need to collect the necessary tool:
- construction angle;
- drill;
- roulette;
- level;
- screwdriver;
- pencil;
- electric jigsaw.
Materials
 The most popular material for the construction of wardrobe walls is laminated chipboard 16 mm thick.
This is not a mandatory material; if you want to save money, you can use gypsum plasterboard or fiberboard, only after assembly this material will need to be further refined.
But it is worth remembering that using leftover material, the result will be appropriate.
You can also use MDF to build a wardrobe; furniture boards are sold in construction stores. It is worth noting that this material is slightly cheaper than laminated chipboard.
Solid wood– the most environmentally friendly, natural material, but quite expensive, especially if you buy already cut and planed boards with groove fasteners. Despite the high cost, many ordinary people prefer this particular material for making furniture with their own hands, for its advantages:
- environmentally friendly;
- “breathable” - things will not suffocate in such a design;
- easy to process and assemble;
- Possibility to decorate with wood carvings.
The material can be purchased everywhere, but when used, the cost of the structure will increase several times.
For doors, it is better to purchase non-staining materials. The most preferred is - patterned glass or mirror. Also suitable for doors Chipboard thickness 10 mm.
Filling
 Once the issue with the manufacturing material is resolved, the next problem arises - accessories and content:
- shelves– they can be made of either wood or laminated chipboard, but you should understand that if you do not install special edges on the second option, the shelves will not last long;
- tubes for clothes hangers. If the cabinet in the hallway is less than 50 cm thick, it would be more relevant to use end guides for hangers. In this case, it is better not to save money, but to use ball elements;
- drawers, you can buy ready-made ones or build them yourself from chipboard and plywood. It’s also better not to skimp on fittings for drawers, since a simple retractable mechanism will not work for long, and there is always a chance that the drawer may fall out;
- shoe net– it is advisable to buy a multi-level one. This way, each household member will have their own place for shoes.
It’s worth noting right away that the more fittings are installed in a cabinet, the more expensive it becomes.
Drawings and diagrams of a wardrobe in a niche
 When filling, the cabinet must be divided into zones using partitions. During installation classic wardrobe, the main part of the closet is occupied by space for hangers with clothes, a mesh for shoes and open or closed shelves under things. The remaining space is taken up by storage space for household items, for example, a vacuum cleaner, ironing board, buckets, broom, and so on.
You can design a wardrobe using special program on the Internet or a ruler and pencil on plain paper.
Usually the wall serves as one of the side walls of the built-in closet, so you will need few parts:
- one wall height from floor to ceiling;
- depending on how many doors you plan to install, you will need 1 or 2 partitions, height from floor to ceiling;
- a small piece 10-15 cm wide - in order to refine the opening after assembling the cabinet;
- shelf under the mezzanine - things that are used very rarely will be stored there. Other shelves and drawers as needed.
Advice. If there is a niche in the hallway, then you can use it to install a built-in wardrobe with your own hands. This option will cost less, since the walls of the niche will serve as the side walls. It is enough to mount the filling with partitions and install the door.
 The depth of the shelves is calculated based on door design who is planning to adopt. Some rails allow you to install shelves of maximum depth - just step back a centimeter from the edge. In others, for quality work door leaf it will take almost 10 cm.
Important. If after installing the wardrobe, you plan suspended ceiling, then it is worth providing a mortgage for fastening the profile. Step back a few centimeters from the ceiling, rather than making the door from ceiling to floor. This is very easy to do; just build a U-shaped box from profiles and chipboard and attach it to the ceiling. In this case, the end of the box will serve as a support for the ceiling, and a rail will be installed on the lower part.
In the drawing you need to indicate the size of each individual part, and do not forget that an edge must be applied to each shelf and partition, the thickness of which must be taken into account.
Advice. It is better to order edging immediately after cutting the material from the same company from which the material is purchased and sawed. In addition, it is worth knowing that visible parts are sealed PVC edge 2 mm, and the remaining parts - 0.4 mm. There is no need to cover the joining parts with an edge.
 During the design process, you may encounter a problem such as curved wall surfaces.
Often this is not visible visually, but as soon as you start installing the cabinet element to the wall, the unevenness is immediately revealed.
Of course, you can, of course, disguise a gap of several centimeters PVC corner. But we advise you to check the evenness of the walls in advance using a level or rule and carry out the work of leveling the walls.
You should not file the chipboard - firstly, without a special tool you will not be able to do it as smoothly as possible, and secondly, there will be no edge and the cut will open, into which moisture can get in and the material will begin to deteriorate. It will be difficult to install even a U-shaped plastic profile on a curved cut.
As for the inside, the walls can be painted or finished with a washable material, for example, non-woven wallpaper.
Assembly
Assembly should begin by installing the main walls and forming an opening around the entire perimeter using pre-prepared chipboard strips.
How to make a frame yourself?
 There are two steps to complete:
- The frame is attached around the perimeter to the walls, floor and ceiling on dowel nails.
- The elements are fastened together with special corners. If you want to do it beautifully, you can use furniture or plastic corners.
If reliability is taken as a basis, then simply buy steel corners.
Advice. Modern way fastening parts - furniture euroscrews, but for them you first need to drill holes, but this is very difficult to do by eye. In this case, you will have to buy a special drill.
As soon as the base of the cafe is assembled, they begin installing the partitions, and only then proceed to the shelves.
Shelves
Special shelf holders made of metal or plastic are used. We list the most common options for mounting shelves:

Once you have decided on the mounting option, you can begin installation. The shelves are installed according to a pre-planned plan.
Important. The shelves should be slightly smaller than the overall depth of the cabinet so that nothing interferes with the closing of the doors. As for closed drawers, it is worth leaving space for handles, that is, they should be 10 cm smaller.
Crossbar
Before starting installation, cut the rod to the required length from the workpiece.
- Mark its location.
- Install the holder on the main wall and the chipboard wall.
- Install the crossbar into the holders.
The holders need to be installed not only with screws, but also with glue. To do this, before fastening, apply glue to the inside, apply it to the markings and screw it on.
Shoe net
 If you compare the grids with shelves made of chipboard, they are much lighter and create less load on the entire structure.
In addition, mesh shelves for shoes make the design very convenient and ergonomic. The fastenings are very convenient, they several types:
- support brackets;
- clips;
- pockets;
- brackets.
When installing, shoe nets are cut in the middle, since plastic tips are installed on them. The pitch of the shoe rack should be a multiple of 25 mm. The clips are installed in increments of 245 mm.
Often, shoe nets are installed at an angle of 45 degrees for easy storage of shoes and boots.
Coupe doors
Assembling and installing doors is the most difficult stage in this design. Save in in this case You can’t do it on the fittings, otherwise the door may jam or fall out.
Manufacturing
 Usually the wardrobe in the hallway consists of two doors, less often they have three doors. Each door is a leaf, which is framed on 4 sides, made of special aluminum profiles.
It is worth noting right away that the canvas may be heterogeneous, but the material must be compatible. For joining, a connecting profile is used. The door profile is designed for a material thickness of 10 mm.
It is very easy to insert a profile into such a profile, despite the fact that its thickness is only 4 mm; the missing 6 mm are simply supplemented with a silicone seal.
You need to buy a special mirror for doors, with protective film so that upon impact it does not shatter into small fragments.
Doors should not be wider than 1 meter because:
- it's quite inconvenient;
- It is very difficult to deliver material this wide without damaging it.
You can order doors in furniture store, or you can assemble it yourself. This is not difficult to do - a frame is put on the canvas and screwed together.
The algorithm of actions is as follows:
- It is better to start assembly with cross profiles. To do this, prepare a wooden spacer, onto which, using rubber mallet plant the profile.
- As soon as the horizontal profiles are ready, proceed to the vertical ones, they are secured with 6x35 or 5x30 mm self-tapping screws. Before you finally tighten the frame, don’t forget install rollers top and bottom.
- If you want to make the fastener invisible, you should use drills of several diameters: the first hole is made with a diameter of 9 mm, under the screw head, the second 5 mm, under the leg.
- It is worth immediately warning that vertical and horizontal profiles are very different. Three holes are made in the vertical ones for attaching the profiles to each other and for the rollers.
- The rollers will move along the guides - they are installed in the same plane at the top and bottom. The upper guides provide fixation of the blade relative to the depth, and the lower rails provide closing/opening. Often bottom rollers made of plastic with a shock-absorbing spring and a screw for height adjustment. Top rollers with rubberized surface.
- A door stopper is installed in the bottom rail, and closers can also be installed upward, which will smoothly close the door themselves.
Installation
 To install the door, you must first install it in the far recess of the top track, and then install it in the lower corresponding channel.
The second canvas is installed using the same principle.
After the canvases are installed, you need adjust the rollers so that there is no gap between the canvas and the walls. Apply buffer tape to the handles.
We check the doors - if the movement is free and the rollers do not cling anywhere, then the work on installing the doors can be considered complete.
Photo
A few more photos where you can evaluate the result:


Video
The entire process is shown in the video below:
Conclusion
If you want to test your skills, start assembling a wardrobe in the hallway with your own hands. This furniture does not require any special design skills and is quite simple to install. The main requirement will be to choose the right color of the structure so that it fits harmoniously into the overall interior of the hallway, correctly cut the material and assemble it efficiently.
Wardrobe – great solution for rooms with limited space. The doors slide apart, like on a train, which allows you to install the cabinet in small hallways and narrow corridors. A similar design is offered in all furniture showrooms, but the standard dimensions do not always suit your room size. You can order a cabinet designed according to your measurements based on the features of your room, but the cost of one copy doubles. For those who need a cabinet larger or smaller than a standard one, there is another solution - to assemble the structure with your own hands. This is not very difficult to do if you know where to start.

photos
Choosing a cabinet design and placement option
Placing the cabinet in a niche. Designers of residential premises are sometimes very inventive, which is why half of the typical houses have niches of unknown purpose in the hallway. It is in this niche that you can make a wardrobe. To do this, you will need to install door guides and order the doors themselves with fittings. This way you save space, time and money.

Wardrobe along the entire length of the wall. Good decision is the installation of a cabinet along the entire length of the wall. Firstly, the room is not broken up by the corners of the furniture and does not visually lose space. Secondly, such a cabinet can serve not only as a wardrobe, but also as a storage room where skates, skateboards, skis and even car tires are stored.
A sliding wardrobe can separate the hallway area from the living area in studio apartments. The wardrobe is installed across the entire width of the room, with a through compartment door in its center and compartments for clothes on the sides. Some people prefer to make all doors on two sides, which provides access to clothes from the hallway and bedroom at the same time. Very convenient option, when access to outerwear is from the hallway, and access to bed linen is from the living room.

Materials
The most optimal materials for creating a cabinet are chipboard and high- or medium-density MDF. This material not very expensive and relatively dense. But when choosing chipboard be sure to pay attention to its category (must be E-1) and coating (preferably laminated on all sides). When heated, chipboard releases formaldehyde and phenol, so if your hallway has heating pipes, then don’t take risks and choose another material. Another disadvantage of chipboard can be considered the weak retention of screws.


MDF is safe for humans because when heated, lignin, which is contained in natural wood, is released. True, the price of MDF is significantly higher, and it is a fire hazardous material.


Wood is a traditional material, however, if you are planning to make a built-in wardrobe, it is better not to use it. concrete wall additional moisture is created, and spruce and pine, from which boards are usually made, have low moisture resistance.
It is better not to use drywall, because this material is not for the manufacture of load-bearing structures. It's fragile and if you don't think it through complex design bases, will not hold the wardrobe doors.

One of possible options is to preliminary design a cabinet, and then purchase ready-made components in stores or create such components to order in a workshop (it’s still cheaper than buying ready-made furniture).

What to consider when designing
When you design your own wardrobe, consider the following:
- useless space (this is something that takes up space, but is not used for its intended purpose. In a particular case, this is a sliding system. It is necessary to lay 10 cm on it and add to the useful space, which should be at least the width of the hanger. Thus, the depth of the wardrobe with a standard bar is: the width of the largest hanger + 10 cm for the convenience of placing things + 10 cm for the door mechanism);
- if you are assembling on the floor (do not mount the cabinet in a niche or directly to the wall), then the height of the structure must be at least 10 cm lower than the height of the ceiling in the hallway with a depth of 70 cm, and preferably even more so that you can raise and place the cabinet vertically;
- if you plan to place the cabinet on adjustable support legs, then make room for them next to the nearest partition (no further than 30 cm from it);
- The rigidity of the structure is ensured by transverse ribs on the rear wall of the cabinet; without them, the structure will wobble;
- if the space does not allow you to install a cabinet with a standard longitudinal rod, lay down several sections for the transverse rod;
- When designing drawers, add 7 mm in the gap between the fronts to the protruding width of the bottom rail. If this is not done, the drawers will not close;
- the most important thing when designing internal sections is to take into account the width sliding design! Therefore, decide in advance on the number and width of doors, so that you can then adjust the entire system to them. If the width of the door does not match the width of the chest of drawers, the drawers will not open. Bulkheads between compartments must coincide with the boundaries of the doors;
- the shelves have a distance of about 30 cm;
- the compartment for hanging clothes is calculated based on the length of the longest item and another 10 cm is added to it;


Any closet, especially if there is only one in an apartment, should have storage sections outerwear, shoes, hats, linen, bed linen, suitcases, pillows, blankets, dresses, jackets and trousers. The picture shows the optimal placement of sections in a hallway closet.
Drawings can be made in design programs: "Astro Furniture Designer", "Pro 100", "bCAD" and others.

Sometimes the assortment in stores is striking in its monotony. Many apartment owners know that choosing furniture for the hallway is very difficult. If the room is small, then the cabinets simply do not fit into it or they fill everything free space. But owners of spacious hallways also find themselves in difficult situation- the presented models do not always meet the needs of the owners and often look ridiculous in a large room.
If you cannot choose a suitable cabinet, then do not be upset and think about creating the ideal furniture for the hallway with your own hands. This approach will help you save money and also get a model that suits you in all respects.
Can a beginner cope with such a task? home handyman"? Yes, the desire and presence of everyone necessary tools and materials will lead you to a positive result. Of course, it is better for inexperienced craftsmen to stick to the most simple models. But those who have made furniture more than once can create a real work of art.
To make it easier for you to deal with difficult work, we have prepared special instructions, drawings and diagrams.

How to make a hallway with your own hands?
First, you should decide on the model and dimensions. If we are talking about a tiny room, then you should not overload it with furniture - use a standard hallway with a small compartment for outerwear, shoes and necessary things.
In the spacious hallway you can place a spacious wardrobe. If the space allows, then such a closet can easily turn into a real one - the dream of every woman. The costs of such a complex project increase in proportion to the size and content of the cabinet.

You may also want to consider an option that compromises between space and appearance. So, corner hallways visually look much smaller. But at the same time, the greater depth allows you to place a lot of things inside.
By selecting suitable model, you can start taking measurements and preparing calculations. Also be sure that you have all the tools that professionals use.

Required materials and tools
Prepare in advance:
- saw or jigsaw,
- screwdriver,
- sandpaper,
- construction knife,
- furniture screws,
- roulette,
- corners,
- loops.

You will also need material for making a hallway. We recommend giving you preference to furniture board, since it is made from natural ingredients without the use of synthetic resins. Such a shield is completely safe for the health of people living in the house. However, this material has a high cost.
More popular common laminated chipboard. It contains bonding resins, which can negatively affect the occupants of the house if the edges of the laminated board are not covered with edging. But at the same time, the material has relatively low price and excellent characteristics (easy to work with).

Do-it-yourself standard hallway: instructions, diagrams and drawings
To make such a simple hallway, you will need the following materials:
- loops - 12 pcs.
- furniture panels- 7 pcs (dimensions 1600x400x18 mm),
- piece of plywood 6 mm,
- tongue and groove boards - 2 pcs (dimensions 2000x240x18 mm),
- furniture handles - 6 pcs.,
- three-dimensional rail - 1 piece (dimensions 3000x40x12).

We recommend you start with a pencil case. Its dimensions are 2000x400x400 mm. The corresponding strips are cut out from the furniture sheet, as well as the top cover in an “overlapping” manner. Also you will need two shelves. Assembly is quite simple. The slats are arranged parallel and fastened into the lid using self-tapping screws; shelves are also installed. For strength in the corners, the frame is fixed with corners cut from plywood.
Since two doors located one below the other are much lighter than one, this option is preferable. From the shield you need to cut two identical doors and several internal shelves (optional). Secure the doors on their hinges. You can get by with two for each door, but for reliability and proper weight distribution, we recommend using three.
The dimensions of one cabinet are 400x400x820, and the other - 820x400x490 mm. You can refuse any of them without damaging the design as a whole.

To assemble the first cabinet you will need 2 identical side panels and an internal shelf that will hold the structure together from below. Upper part the future cabinet narrows greatly, so the lid should be noticeably smaller than the main part. All elements are fastened with self-tapping screws. If desired, you can use furniture dowels. Don't forget to pre-drill the holes and use glue.
A door for the bedside table is cut out of the shield; it needs to be secured on two hinges. But for the drawer you need runners. We recommend that you purchase necessary elements in a specialty store. You can make them yourself from plywood, but in this case the box will pull out rather than roll out, making it much more difficult to use.

Making a second cabinet is very easy. You only need two sides and 2 internal shelves that form the frame. The internal filling of this cabinet can be absolutely anything. All parts are attached with self-tapping screws or dowels.
After this, the hallway needs to be assembled. Fasten all the elements together, and then prepare the boards. They should be beautifully located from the edge of the pencil case to the edge of the cabinet, creating the basis for the hanger. Maintain the same spacing when attaching the boards to the underside of the nightstands. To ensure that the upper part of the structure is also strong, fasten the boards with a lath. Place it at such a height that you can later attach coat hooks to the rail. If you wish, you can complement the design with a shelf for hats.
Don't forget to varnish the hallway and attach handles and hooks.

DIY wardrobe: instructions, diagrams and drawings
It's much easier to do than it might seem. But first you need to decide on the exact meaning of this term. "Wardrobe" involves special design doors that move on runners along the cabinet body. It can be either built-in or free-standing.
If you wish, you you can make the cabinet body from plasterboard and thus hide it in a false wall. But we'll consider classic scheme manufacturing a wardrobe with side walls.

This model with dimensions 2020x625x2320 consists of several main parts.
- The side racks should be 2288x625 mm high (these calculations take into account the thickness of the sheets of the upper and lower strips - 32mm).
- Also large parts are the lower and upper strips: 2020x625 mm.
- The middle vertical posts are inextricably linked to the clothes rail. As a rule, it is mounted at a height of 1900 mm, so standard size for them - height 1900 mm, width 525 mm. The remaining 100 mm is a margin for the normal functioning of sliding doors.

The filling of the cabinet can be anything. It all depends on your desires and preferences, but remember that there should be room inside to accommodate mounting systems.
It is best to order all parts from a carpentry workshop. Even an experienced craftsman will not always be able to cut out elements of the desired shape at home.
After this you can start assembling the cabinet. For installation, we recommend using not only screws and dowels, but also furniture corners. The rails are installed inside the cabinet in a specially designated area (those 100mm that we left when preparing the parts). After this, you can put the door back in place and use the cabinet.

DIY corner hallway: instructions, diagrams and drawings
Problem encountered when creating corner hallway, is that it is required careful calculations, the slightest mistake can cost a whole sheet of material. First you need to take measurements and check the walls. If the surface of the walls is curved, then you cannot do without a common frame. Otherwise, the walls themselves can serve as a base to which you can screw shelves. The second option is more economical and simpler, but we will consider a separate cabinet, since it is ideal smooth walls- this is very rare.

Choose the right drawing, based on the size of the room, the length of the walls and proximity doorways. Consider the interior of the cabinet. According to the chosen dimensions, make six main body elements:
- lower and upper bars,
- back walls (2 pcs),
- side walls (you can do without them, but the functionality of the cabinet will decrease).
Once you have the frame assembled, you can begin installing interior shelves, baskets and drawers, as well as hooks and rods.
The corner hallway can be equipped with doors on rollers, turning the structure into a corner wardrobe. But budget swing doors will also look good.

How to make a hallway with your own hands: video