The window sashes must be completely removed. Plastic hinge for windows: rules of operation and care
To replace a broken glass unit or improve window design, there is a need to remove it from the plastic window. The same operation is carried out when the structure loses its tightness, has low energy efficiency, or is completely or partially damaged.
Preparing for work
The glass unit is held in the frame with glazing beads, in the same way as in older structures. All parts, including plugs and profiles, are made of PVC and are located in the same plane with the glass. At correct parsing the location of the elements is immediately taken into account so as not to damage the structure.
To work, you will need a mounting knife to cut off the sealant layer. Remove the glazing beads with a sharp chisel or a suitable spatula. It is convenient to hammer the chisel for removal with a rubber mallet. The plugs are pulled out of the loop with a screwdriver; you will also need a Phillips screwdriver to unscrew the fittings and fastening bolts.

How to remove a window
Removal takes place only using strict technology, otherwise the integrity of the glass unit may be compromised and the entire structure will need to be repaired:
- First they take it off. The polyurethane foam is cut off with a blade or knife and with a short sharp jerk the window sill is pulled out towards you, at the end pointing it slightly upward.
- The second step of dismantling involves removing the decorative plugs using a flat screwdriver. The upper pin is pryed so that it can be easily grabbed with pliers and pulled without difficulty.
- Then you should remove the glass unit from the frame. Experts recommend starting the process from the side of the blind sash. The glass unit is removed from a plastic window using a chisel and a rubber mallet.
- At the last stage, you need to unscrew the fastening screws. Then the mounting foam is cut to fill the gaps between the wall and the window structure. The frame itself is pulled towards itself with a short jerk and carefully removed from the opening.
For reference!
It is best removed in dry weather, since high humidity Window structures can sag, making dismantling more difficult.

How to remove a double glazed window
In addition to dismantling, improvement and repair, situations arise in which it is necessary to remove the double-glazed window. Most often, owners of fixed windows without moving sashes face this situation. In this case, the most important and critical stage is removing the glazing beads. It is convenient to do this with a narrow rubber spatula:
- It is most convenient to remove it from the side of the opening sash. The sash is removed from its hinges - first the plugs are carefully removed, then the opening sash is removed. It can be installed on hard surface and pull out the beads.
- Experts recommend marking them before pulling them out. Then, when reverse installation, no mistakes will be made and the window will become straight. In addition, the seal will not be compromised. Next, a chisel is driven into the gap to pull the glazing beads out of the frame. If you don't have a chisel, you can use a rubber spatula or knife, but be very careful. You need to hammer it in with a rubber hammer. First, the longer elements are pulled out, then the shorter ones.
- Under the glazing beads there is usually a layer of sealant - it is carefully removed with a spatula and a knife. When the glass is clear of insulating material and the aluminum rim is visible, the removal process is considered complete.
- When assembling fittings and windows, it is advisable to label the sides of the frame and parts - during installation there will be no problems with the tightness of the structure.
- Removing the glass is only possible when the aluminum frame is visible - by carefully lifting it, you can remove each glass individually, each time removing the sealant that connects all the glasses to each other. It is better to work with large structures together - while one removes the glazing beads, the second supports the glass, insuring it from falling.
When removing glass, it is not necessary to remove the frame. If the frame is sealed and does not require dismantling, it is enough to remove the insulating elements and the profile holding the glass.

Glass installation
Before you return the glass to its place or install a new one, you need to make sure that the frame is clean and there is no dust or dust on the folds. construction waste. The installation process is slightly different than removal. First you need to hammer in the horizontal and short glazing beads, only then the vertical and lateral ones.
To do this, the shank is inserted into a special groove in the frame. Using a rubber hammer, the bead is driven into the grooves. Then you can insert the glass - first fix the bottom, then the top, and only then on the sides.
For reference!
Have the glass installed in place better for specialists. The process does not require serious knowledge, but it will not be possible to reseal the structure with improvised means.

Work to replace broken glass should only be carried out with rubberized gloves. If there is a serious crack in the glass and the glass is being replaced, it is better to knock it out before dismantling damaged part, since it will inevitably fall off during operation.
At self-installation glass it is difficult to create a completely sealed structure. Sealants used in double glazed windows are not sold in construction stores. Each company produces them independently for its products.
In double-glazed windows with several chambers, the sealant is placed around the perimeter between all the glasses. The sealant must be removed carefully and sequentially, removing glass after glass.
The glass dismantling process can be done independently; it is enough to follow a strict sequence of actions. In this case, the frame will remain intact, and the new window will become smooth and airtight.

Video
After watching the video, you will learn how to properly remove a double-glazed window from a plastic window with your own hands.
Sooner or later the question arises about the need to dismantle the old double-glazed window. According to experts, this is one of the most labor-intensive jobs, surpassing in complexity the process of installing new windows. Therefore, you need to know all the features of dismantling and subtleties, which will be discussed below.
In what cases will it be necessary to dismantle plastic windows?
Plastic windows are so popular, not least due to their durability. Their service life is up to 50 years, so the issue of dismantling and replacement is more important either in the desire to install a new double-glazed window with better heat-insulating and energy-saving characteristics, or in case of mechanical damage window frame or glass. The question is how to remove plastic window It's more about what steps of work need to be done.

Preparing to dismantle a plastic window
Removing a plastic window requires preliminary preparation. It means:
- emptying the premises of household items and equipment,
- furniture insulation protective film, to protect it from damage and dust,
- insulation of floors and walls.
During any dismantling, no matter how carefully it is carried out, a sufficient amount of construction dust. To cover flooring at the place of work, it makes sense to purchase dense construction polyethylene.
The second important aspect during dismantling is ensuring safety, so it is important to fence and mark the place where the work will be carried out. Marking tape is stretched outside to inform bystanders about the possible collapse of stones or other construction debris. It is necessary to exclude the possibility of random elements of the window frame falling out onto the street in order to avoid dangerous situations.
What tools are needed to dismantle a plastic window?
After the preparation has been made, you need to stock up on tools for the work. In order to remove the glass unit of a plastic window, you will need the following:
- shoemaker or multifunctional knife with a folding blade,
- chisel,
- screwdrivers,
- spatula,
- a pair of small crowbars that are used as levers,
- hacksaw for plastic and metal,
- pliers,
- hammer and chisel.
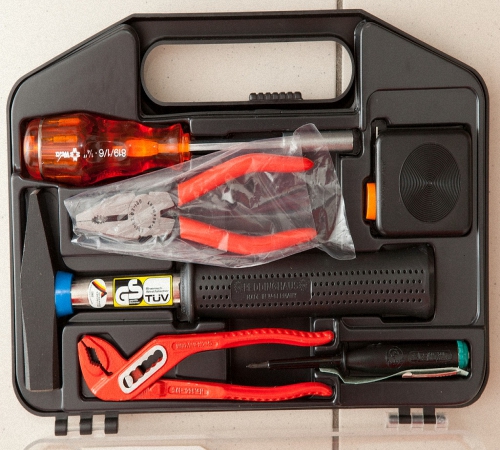
If you have a hammer drill and a screwdriver, this will significantly speed up the dismantling process.
Stages of work on dismantling a plastic window
It makes sense to divide all the work into several points:
- removing window sashes,
- sawing the structure,
- dismantling the old window frame,
- removing the tide,
- removing the window sill,
- finishing work.
Since the double-glazed window itself is quite advisable to reuse, then the method will be considered further safe removal glass from window sashes.

Removing window sashes
Each stage is important in its own way. For example, without removing the old sash it will be extremely difficult to install a new window. You need to know how to remove the window sash and what is required for this.
To remove the sash, you need to arm yourself with a chisel or a large flat-head screwdriver, a hammer and pliers. The work consists of the following stages:
- The window sash is set to the open position. At the same time, attention is drawn to top part windows, at the junction where the loop passes. This is what needs to be removed.

- From the loop using a small Phillips screwdriver and the hammer is carefully knocked out rotary shaft, which is also called a spindle.
- After the spindle has been knocked out, the window sash is pulled towards itself and upward, gradually freeing it from its fastenings.
In cases where the installed slope prevents you from placing a screwdriver and knocking out the spindle from above, the spindle is pulled out using pliers from below. First, you need to apply a little force on top of it to grab the protruding part with pliers.
The sash is installed back into the frame in the reverse order, when the lower hinge is put on the spindle, then the upper one is aligned and another spindle is inserted into it, after which the sash is secured. If it enters with considerable effort, then you should use a hammer. In order not to damage the coating on the surface, you need to use an intermediate gasket, the role of which can be played by a thin piece of plywood, which has already been struck with a hammer. This solution will allow you to evenly distribute the load over the entire surface.
Sawing the window frame structure
Next, you will have to make several cuts in the glass unit in order to facilitate the process of removing the panels. This stage will take a little time for the reason that all cuts must be made manually, using hacksaws for plastic or a simple saw for wood. It is not advisable to use a grinder, since in this case the working area will be heavily clogged with small particles and smoke. In addition, simple discs for metal or wood periodically jam in the material, or are even capable of cracking, which can cause injury.
Two cuts are made along the width of the window frame, three in height, after which they proceed to the next stage of work.
Removing an old window frame
The cuts are necessary to make it easier to dismantle the old window frame in parts using improvised means such as a crowbar, or with a hammer drill with a “spatula” attachment.
If the window frame structure was fixed in place using bolts or self-tapping screws, then they are simply unscrewed from the grooves and parts of the frame are removed.

It is best to cut the polyurethane foam at the junction of the frame and the wall along the entire perimeter using a shoe knife, and then cut the frame in parts.
In some variations, plastic windows are installed in wooden frames. This cannot be called advisable, and when dismantling the window, such a frame must also be removed.
Removing low tide
It is necessary to dismantle the ebb carefully so as not to damage the remaining elements of the window opening. Force is applied to the ebb itself, tearing it off the surface of the opening and the applied sealant, which is often used as polyurethane foam. In that case, if the ebb was additionally secured using self-tapping screws or bolts, you must first remove them and only then carry out direct removal using brute force.
Removing the window sill
The process of removing an old window sill depends on the material from which it is made. As a rule, plastic windows are installed complete with PVC sills and window sills, since they have a number of advantages, such as:
- light weight,
- significant service life, reaching up to 20 years,
- have self-extinguishing properties and do not support combustion,
- resistant to impact sun rays,
- easy to clean and care for.
They need to be dismantled by analogy with low tide.
In the case of wooden window sills, they must be sawed in several places using a hacksaw and then removed by hand or with a crowbar.
If the window sill is made of concrete, then it will have to be broken into pieces using a hammer drill set to the chipper mode, or by manual labor: with a hammer, chisel or crowbar. If you have a grinder with a circle for concrete, this will be the most in a fast way, but in this case it must be taken into account that when cutting a concrete surface, a significant amount of construction dust will be generated. Therefore, after each cut, it is necessary to sweep away the resulting debris with a broom. In addition, when working with an angle grinder, you need to remember the following protective equipment:
- a respirator to protect the respiratory tract from dust floating in the air,
- safety glasses with polycarbonate glass, resistant to mechanical damage and particles entering the lenses,
- construction gloves to protect hands.
It often happens that a concrete window sill has been preserved in excellent condition and the owners have no desire to replace it. Dismantling old plastic windows or installing new double-glazed windows does not oblige you to change the window sill, but in this case you need to know that plastic and concrete do not mix well for the following reasons:
- Plastic products have a greater heat capacity, they are much warmer, unlike concrete, which leads to the formation of condensation.
- The presence of an old window sill creates a gap between it and the installed plastic window. Despite the sealing, microcracks will appear in the structure over time.
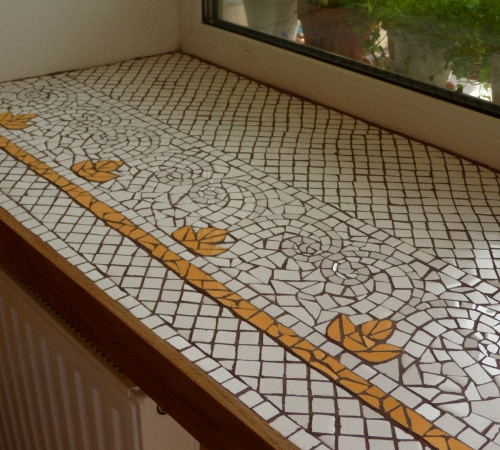
To solve this problem, concrete window sills are often covered with tiles. If there is a special desire to give a simple design decoration, then concrete surface decorated with ceramic mosaics, often using mosaics different shades. Using glass will give an old window sill a beautiful and artistic view, and the glare from the sun's rays will bring additional comfort.

Finishing work
Any construction work is characterized by the fact that a significant amount of construction waste is generated, especially if you use an angle grinder. Small particles of dust can firmly eat into the surface of furniture, so it is highly advisable to promptly clean construction debris after each action. Large particles and pieces of concrete are swept away with a broom, and construction foam requires complete removal with a shoe knife and chisel.
It is advisable to leave the protective film made of dense construction polyethylene until a new one is installed in place of the old plastic window.
Removing glass from window sashes
If a situation arises with glass damage, it is not necessary to replace the entire sash. Of course, sellers are not interested in selling one double-glazed window, but replacement itself is possible. In addition, sometimes the need for replacement arises not in case of damage to the glass, but in the desire to install a new double-glazed window that has best properties, or having more cameras.
In this case, the stages of work are divided into the following:
- First, the glazing beads are removed from the window sash, inserting gaskets made of plastic or other available material into the cracks that appear. It is important to know that the removal of glazing beads occurs in the following sequence: first, the long side ones are removed, then the short bottom one, and finally the top one is removed. The work must be carried out in this sequence to prevent the possibility of premature glass falling out.
- The places where the beads are attached must be marked with a marker so that after installing a new double-glazed window they can be returned to the same position.
- Next, the glass unit is removed from the glass. It must be remembered that it has significant weight, so all work is carried out together with an assistant and wearing gloves.
- A new double-glazed window is installed in place of the old one, and the position is fixed.
- The beads are installed in the reverse order, starting with the top one, then the bottom one is inserted, and after that the side ones. Glazing beads provide good insulation, so no further sealing is required. It is necessary to take into account that the glazing beads are driven into their original place, using either rubber mallet, or flat chisel and a regular hammer. It is not necessary to apply significant force so as not to damage the glazing bead itself or the glass.

It will take specialists no more than 30 minutes to replace an old double-glazed window with a new one, so this work, with due care, will not be labor-intensive. The video below will clearly demonstrate how to remove a plastic window.
In some cases, it is necessary to remove a window from its hinges, for example to lubricate them, replace hinges, or completely replace windows.
How to remove a plastic window sash
To change windows or lubricate hinges, you will need to remove the sashes on the windows. To do this, you need to close the sash and turn the handle to the closed position, but not all the way so that the window is not tightly closed but does not open itself. Remove the protective covers from the hinges plastic caps, prying them first with a screwdriver from below. The lower cap is removed strictly vertically upward, and the lower one horizontally towards the room.
Let's remove the pin from the hinge and replace the windows
Then take a flat-head screwdriver and press down on the pin protruding from top loop. The pin will come out a little from the bottom; you will need to pry it with a screwdriver and pull it out. When pulling out the pin, it is necessary to support the sash in the area of the top hinge. When the pin is pulled out, you need to turn the handle to the open position.
 Window replacement
 Then, holding the sash on both sides in the upper part, you need to slightly tilt the sash away from the frame and pull it up so that the window sash is removed from the lower pin. After this, the plastic windows are replaced or the hinges are lubricated.
Video
This video shows how to remove a plastic window in order to tighten the hinges on plastic windows or completely replace plastic windows with new ones.
The emphasis is on protection against low temperatures, dust and external noise, ease of use and durability. And these are the dependent components of the work process namely window fittings. Its quality will affect 97% of the direct operation of the window structure.
The hinge affects the reliability of fastening the sash to the frame. Material of manufacture - aluminum, steel or brass alloys, finished with high-strength plastic. They are produced by pressed and forged methods.
Basic and additional parameters:
- Type of manufacturing raw materials used.
- Design dynamic and mechanical load.
- Raw materials and diameter of the axial element.
- Range and ease of adjustment, defense mechanism from burglary.
These mechanisms are the main components for swing, tilt, turn-tilt or hinged openings, designed for the smooth movement of the sash along the horizon of the window without distortions when opening and closing it.
They are required to withstand up to 16,000 operating cycles for the standard class, and for premium – up to 50,000.
Window hinges
Classification by location:
- Upper;
- Lower ones.
Classification by purpose:
- Rotary – provide external and internal opening;
- Folding – provide top opening;
- Overhead – reinforced mechanisms for fairly weighty structures.
Classification by size:
- ordinary, following the standard;
- small-sized;
- more than usual.
Adjustability classification:
- Adjustable. It is preferable due to the possibility of the sash sagging over time under its own weight, and this will make it difficult to close them and will have a bad effect on the clamping density.
- Unregulated.
Classification according to the manufacturing raw materials used, which must withstand the load of the sash and avoid its sagging:
- Brass;
- Aluminum alloy;
- Steel coated with a galvanizing compound to protect it from corrosion.
- Decorating plastic as a hinge strip.
Before purchasing hinges, the weight of each sash is taken into account, reaching up to 180 kg. Calculation of the severity of the sash includes the weight indicators of the following components: double-glazed window, profile and fittings.
By type, loops are classified into:
- Hidden ones - they are installed in the thickness of the profile - are more heat and noise insulated;
- Open - they are installed on internal profile and are closed for beauty with a plastic cover;
- Partially hidden for unusual designs small size tilt and turn windows.
Advantages of the hidden option:

- Tightness is ensured thanks to the additional pressure of the sash structure.
- Reliability from burglary on the hinge located at the bottom.
- They allow you to avoid the formation of drafts due to the closed rubber window seal, which does not allow air flows from the street to pass through.
- Laconic and stylish design thanks to their integration into the sash rebate.
- Possibility of light or roller shutters, due to the presence of free space due to the displacement of the sash to the center from the window plane when it is opened.
- No need for loop plugs.
- Availability of all types of opening with an increase in light opening due to an increased rotation angle of up to 100 degrees.
- The presence of special grooves with the possibility of additional lubrication of parts, reducing wear of the mechanism.
Disadvantages of the hidden option:
- Load capacity up to 100 kg only.
- Expensive.
On the outside, steel mechanisms are covered with decorative overlays, whose function is to:
- Protect hinges from construction debris and dust.
- Protect hinges from moisture penetration and, accordingly, from rust;
- Hiding unattractive details;
- Color combination with the window thanks to their rich colors.
Classification of linings by material of manufacture:
- PVC products;
- Steel, laminated in a specific color or acquired color thanks to powder dyes.
Adjustment issue
Cases of need for regulation:

- With an old and worn-out design.
- With incorrectly installed windows.
- If the sash is not closed tightly enough.
- When the window sash sags.
- When the shape of a window sash or frame changes due to an installation error.
- When the sash leaks or freezes.
Tools required for adjustment:
- screwdrivers of different sizes;
- hexagons;
- star-shaped keys;
- pliers.
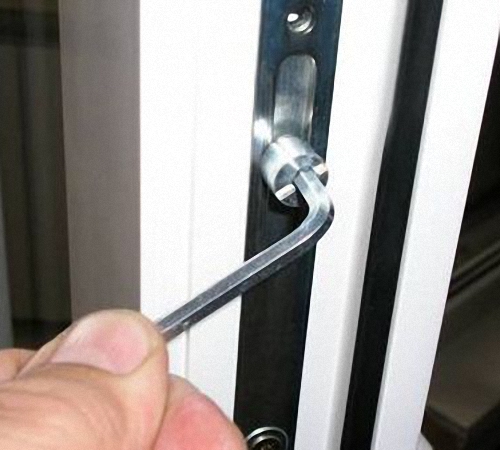
Horizontal adjustment is made on the sash hinges with a hexagon recess. When the window structure is open, the hexagon is inserted into the recess and rotated clockwise.
As a result, the sash structure moves away and it lowers opposite side. Regulation of the lower canopy is carried out externally with the window structure in the closed state. Its shift is carried out no more than 2 mm.
Vertical adjustment is possible using a hinged loop located at the bottom. Start by lifting the cap. When the hexagon rotates clockwise, the sash element is raised, and counterclockwise, it is lowered. It is permissible to adjust the window by only 2 mm.
The pressure affects the density of the window structure. Checking for the presence of gaps is carried out in a closed state and holding a lit candle.
When the flame fluctuates, adjustment is required, which is made by eccentrics along the perimeter of the sash.
To press it to the frame, the eccentric is shifted clockwise, to loosen it - counterclockwise. To change the state of the eccentrics, which is the same for each of them, a rotation of 2 mm is sufficient.
Determining the pressing density is done by scoring. When it is directed toward the seal, there is tight pressure. When it is directed away from the seal, the pressure is weakened.
Depending on the type of profile, you can use wrench or pliers. Pressing with plates is also possible.
In this case, the clamping mechanism with the tongue is located on the hinge side. When the tongue is extended, the sash is pressed against the frame. When the hinges are located on the left for pressing, the key rotates counterclockwise, when positioned on the right, the key rotates clockwise.
It is more correct to carry out the adjustment along 3 planes in order to distribute the mass along the perimeter of the sash and ensure the seal fits.
How to remove a plastic window from its hinges

The top loop is the beginning of the whole process. The sash is opened slightly to gain access to the hinges. Removal instructions:
- Removing the decorative plastic trim.
- Opening the sash.
- Pulling out the rotating shaft by pressing a screwdriver on the upper hinged end. The edge of the shaft will be visible from below, which is grabbed with pliers and pulled out. At the same time, the sash structure is held.
- To remove it from the lower loop, the structure is lifted up and pulled out of the socket.
When replacing a window structure, before installation, remove the spindle or rotation shaft from the top hinge using a hammer and a thin screwdriver, which is attached to the spindle, which is knocked out with a hammer.
Reverse installation:
- Installing the sash with a hinge located at the bottom onto the spindle.
- The 2 parts of the loop located on top are connected and fixed with a rotation shaft, which is inserted from bottom to top.
Repair and replacement
Cases of necessary replacement of the mechanism:
- Expiration of the service life of the fittings (10 years).
- Setting a lower number necessary details, which led to deformation of the sash.
- To add the number of openings of the door mechanism.
Instructions:
- Removing decorative trims from hinges at the top and bottom.
- The axle is knocked out of the loop from above by hitting it from above in order to remove it from below using pliers. The sash must be supported.
- Removing the sash from the loop located below and placing it on the table.
- Removing the handle and unscrewing the fastening screws around the perimeter of the sash structure.
- Removing the hinge mechanism from the special groove.
- Laying out the fittings on the table and thoroughly washing them with a brush.
- Drying the mechanism with a bicycle pump.
- Lubrication of transmission elements and parts involved in friction with a special hardware lubricant.
- Reinstalling the fittings. Fastening with screws. Installation of the handle.
- Lubricating hinges and hanging the sash structure.
Rules of operation and care
- To enlarge operational period and conservation To ensure aesthetic appeal, the moving hinge parts should be lubricated at least once a year with oil that does not contain acids or resins that can destroy the corrosion protection.
- With a loose handle the decorative strip underneath is raised and the handle is secured by tightening the screws.
- To clean the fittings, use a stiff brush. With an open structure, all hidden parts are wiped with a damp cloth - especially the places where the moving mechanisms are attached to the static frames.
- Lubrication is carried out by spraying 2 drops silicone grease for each element of the roller mechanism. In this case, the control handle must be constantly rotated, as when opening and closing a window, to evenly distribute the lubricant over the surface of the parts experiencing friction.
- Vegetable and vegetable oils should not be used for lubrication. butter, Vaseline, shoe gel, which will lead to rapid wear of parts.
- When ordering the installation of plastic window structures, the choice of hinge structure is made by the manufacturer, and depends on the type of opening, profile, glass package and fittings weight.
- The quality of the hinges largely determines the service life of the windows.
- If necessary, adjustment of the sash structure is mandatory to avoid serious breakdowns.
- You can lubricate and adjust the hinges yourself.
- If there is a warranty and a defect is detected in the design, the problem is solved by contacting the installers.
All sorts of situations happen in life. And it so happened that for some purpose you needed to remove one of the sashes of a plastic window in one of the rooms. It doesn’t matter for what purpose this is done, since it does not in any way affect the process itself. So how to remove the sash of a plastic window with your own hands?
Preparing tools
In order to remove the sash, some special tools not required. There are, of course, special pullers designed for this procedure, but we will focus on available tools, namely, those tools that are at hand in every house or apartment, that is:
- screwdriver;
- knife;
- pliers.
Instructions on how to remove the sash of a regular plastic window
Regardless of the design, anyone can remove the sash of a plastic window with their own hands. But first you should delve a little into the essence of the design. If earlier the sash window was with ordinary wooden frames It was possible to remove them from the awnings by simply lifting them up, but with plastic windows everything looks a little different. Only the lower one now resembles the structure of the previous canopy. The top one is held on a pin (rod), which has to be pulled out. The sash rotates on it. So, how to remove the sash of a conventional plastic window:

That's it, the removal process is complete. The back sash is installed according to the same principle. We insert the lower rod into the bushing, put it in its place, lock it, adjust the middle of the upper part of the canopy so that the removed rod fits freely through it. We quietly hammer it into place, put on the decorative panels, and everything is back in its place.
Video instructions are provided below.

How to remove the flap of a plastic window. Instructions
Now that we have figured out how to remove the sash of a conventional plastic window from its hinges, let’s figure out how to do this with a folding modification (transom).

Here, before taking on the awnings, which are in in this case are located in a horizontal position, you should first deal with the limiters. There will be no difficulties with this either if you follow the instructions.
Removal process for limiters
Since removing the flap of a plastic window is hindered by limiters that prevent the sash from falling down when opening wide open, they should be disconnected. Depending on the type of fittings with which the plastic window is equipped, there should be a small lever at the edge of the limiter on the side of the window right on the sash, by turning which we force the limiter bar to jump off the slot holding it. We turn the lever, remove the bar (in some cases it may be necessary to pry off the edge of the bar with a screwdriver), we have dealt with one limiter. Now we proceed to the second, following the same scheme.

When the sash is freed from the restraints, you can begin to remove it from the horizontal canopies according to the same principle as was described in the first case. We remove the decorative covers, determine in which side the canopy with the pin is located, take it out and, opening the lock, remove the sash from the pin of the second canopy.
The sash is mounted in its place in the same way. First, we deal with the canopies, then we put the holes of the limiter bars onto the slots on which they were previously held. We turn the locks and sashes.
Video instructions for the process are presented below.

We hope that the question of how to remove the sash of a plastic window has been completely resolved. Have a good mood and success in everything!