DIY scale model railways. Railroad Layout Size (HO)
For young modelers and enthusiasts who feel sorry or don’t have money for purchased rails, but at least have time, below we present you an example of a budget modeling railway track.
The basis Our road is a subframe made of slats and plywood. Its size can be approximately 3000x500x120 mm or more. It depends on the area of the room. The role of ballast is performed wooden blocks, on which sleepers are laid. Homemade rails are attached to the sleepers.
To make your road surface look like the real thing, lubricate it with liquid wood glue and sprinkle with sand sifted through a fine sieve. When the glue is dry, shake off any excess sand. You can do it another way: paint the stretcher with paint. Of course, first it needs to be puttied and sanded...
Sleepers can be made from strips of plywood or pine planks 60x10x4 mm. In order not to bother with making each sleeper, the work can be simplified. Take a sheet of plywood, mark it according to the size of the sleepers and cut it with a fine-toothed hacksaw, then smooth out all the irregularities with a hog file and sandpaper and paint it oil paint or black ink.
The finished sleepers are laid on the canvas - glued at a distance of 20-25 mm from each other.

To make them you need a stamp. It is made from two metal rectangular bars of the same section.
Process these bars on a milling or planing machine. On one, mill a groove measuring 7x10 mm and two notches with a diameter of 3 and 4 mm, on the other, the same notches, but instead of a groove, a protrusion. You will get a device like a punch and a matrix. The rail head is stamped into the recess (see figure below). For a 1:50 scale model, a 3.5mm notch is used, and for a 1:100 scale model, a 2.5mm notch is used.
Let's talk about the sequence of operations. Take a strip of tin (see picture below), draw center line, fold. Place a wire with a diameter of 2.5-3 mm inside for the rail head, crimp it with wire cutters and now put it in the stamp. Clamp the die in a vice and you will get a rail that is even along the entire length with a good head and neck.
Without removing the rail from the die, flare its base with a screwdriver different sides and level with a mallet.
Attach the finished rail to the sleepers with nails. Do this carefully and as accurately as possible. First of all, mark a line of one thread of rails along the entire length of the canvas. To do this, pull the thread exactly at a distance of 15 mm from the edge of the sleepers, securing it to two nails temporarily driven into the first and last sleepers. Lay and nail the rails exactly under this thread. At the same time, they should neither touch it nor pull it to the side.
There is another way. Plane rectangular block size 1000x32x10 mm. Place it in the center of the ballast, secure it with nails and lay rails on either side of it. You will see how evenly they will fit, and the distance between them will be precise along the entire length - equal to 32 mm between heads.
The rails must be connected to each other at the joints with rods that are inserted into the rail heads. The rail joints should be in the middle of the sleepers.
When you have completed one section of the track, test the locomotive on it and begin building the next section.
Fasten the sections together with metal hooks or loops attached to the stretcher.
So, you have built a railway track, laid sleepers and rails. Now you need to install the support masts and tension the contact wire.


Support masts. Plan a support from a block 200 mm long and 21 x 21 mm in cross section. Take plywood (30 x 30 mm) for the base. Drill a hole with a diameter of 10 mm in the center, sand it and adjust it to fit bottom part masts.
You can make the pendant on which the contact wire is attached from any wire with a diameter of 2-3 mm. Don’t forget to wind the spring as shown in the figure; to do this, take a nail with a diameter of 2 mm, clamp it in a vice and wrap a spiral 10-12 mm high around it. The pendant is ready. It is attached to the support mast through a bracket and, in addition, for greater strength, it is tightened with a string - regular thread or thin wire.
Insulators there may be plastic beads or small buttons.
Contact wire runs along the entire railway track. It is supported by the support masts we just told you about and the support wire. It is fixed above the contact wire and connected to it with guy wires.
To make the model portable, the hanging wires have a break in several places and are connected by connectors - two metal plates: the contact wire is soldered to one, the support wire to the other. The plates are equipped with a lock - cutouts are made on one, rivets are soldered on the other. Thanks to this, the plates are easily and quickly separated.
You can “green” the finished railway. The material for the “grass” is dry sawdust painted with gouache green. They are sifted through a sieve onto a tablet greased with wood glue, drying oil or oil varnish.
“Trees” are made of rubber sponge, foam rubber or rope copper wire. The harness is folded in half and twisted to the distance of the “trunk”, and for the “branches” the wire is separated. To make the “tree” “green”, it is dipped in liquid glue, allowed to drain and the “crown” is sprinkled with finely chopped colored tissue paper.
Layout is a very interesting activity.
Make a layout railway I have always dreamed of it since childhood, in reality I only made a few flights of experimental paths. Unfortunately, during my work I encountered many problems and scarce parts, in this article I want to discuss with you the most frequently asked questions when creating a layout of railway tracks and transport.
In the second issue of ModelMen magazine, I published an article and several photographs from the website of one experienced modeler, he builds model railroads and participates in exhibitions with his creations. Even by looking at the photographs of the layout, you can already determine for yourself the amount of work, make a list of tools and materials. I will not give the entire list of what is needed at once because it may not be complete, let’s better figure out together what is made of what.
Base
The model railway track must stand on something, so at the very beginning it is necessary to construct a base (table) for the model. The base can be solid or collapsible. It’s easier to make a solid base, but then you need to decide in advance on the room for the layout; it should be a spacious room in case of expanding the scale.
For the base you will need legs; you can take them from old school desks or make them yourself. The entire structure can be easily made from plywood and wooden blocks. For fastening you will need screws and metal corners. To make a collapsible model, you will have to rack your brains over the design of the base and methods of its transportation.
Tool
To work you will need many different tools:
Hammer
- screwdrivers
- wire cutters and pliers
- chisels
- files
- spatulas
- scissors
- knives
- tassels
- soldering iron
- etc.
Railway track
In order for the trains to move in the right direction, we need rails; they can be purchased ready-made in specialized stores for modellers. If you, like me, do not have such stores in your city, then you can buy them through online stores or go buy them yourself. In extreme cases, you will have to make the rails yourself.
The simplest construction option is to use ready-made rails; they are glued or nailed with small nails to the base; the joints can be soldered and cleaned with a file.
If there are no ready-made rails, then you need to think about how to make them yourself; you can take the dimensions of the rails that are sold in stores and make the same ones of your own. For sleepers you will need to cut a lot of thin blocks, this can be done on small machine. The rail itself must conduct current, so it is advisable to make it from thick copper wire, which can be rolled on manual machine to rectangular section. You can attach the rail to the sleepers using good glue or solder to nails driven into the sleepers, this can be done after 3-4 sleepers.
Electrical equipment
For the movement of the train there is a pipe electric current, unless of course you are making a steam locomotive. Factory and homemade blocks power supply (see diagrams, radio engineering), the output voltage should not be dangerous, usually a power supply up to 16 volts is used, for small models 6 - 9 volts is enough.
The train moves with the help of an electric motor; it can be taken from broken toys or purchased at a radio store. Electricity is supplied to the engine from two rails, the voltage from them is removed using two or more counters or from the metal wheels of the train itself.
To distribute electricity along the layout (base), you will need copper wires and connectors.
In addition to the trains themselves, the layout may contain traffic lights, barriers, lamps and other elements that require electricity. Before routing the wires, carefully consider every detail; after installation it will be too late to wire the wires, you will have to cut the layout.
Landscape
An integral part of a good layout is the design of the landscape, this is worth paying attention to special attention. To be similar to reality, you need to work hard on simulating hills, vegetation, buildings, people, vehicles, etc.
Many parts can be used in finished form, i.e. take toy cars, figurines of people, you can also buy figurines of animals, trees in children's stores...
To imitate hills, mountains, etc. you will need plywood, building plaster, papier-mâché, fiberglass, acrylic paints and other finishing materials.
Buildings
Models of buildings can also be purchased at toy stores or you can make them yourself from wood, cardboard, papier-mâché, plywood, etc.
Often modelers take real train stations as a model, photograph them and turn them into miniatures on the table.
On the site I will periodically publish my developments and those sent by you, you are probably interested in information on how to make a model train, traffic lights, trees, bridges and other elements for the railway. I will also publish electrical diagrams, photographs and drawings of old and new trains.
Toy railroads are integrally associated with childhood. Many of us at a young age once owned a plastic or iron model railroad. And those who could boast of a foreign-made model were considered lucky.
Nowadays, the hobby of toy railroads has grown into a large modeling industry. Moreover, this business is already more focused on an adult audience than on children.
To the main attributes - a track and a locomotive with trailers - trees, houses, roads, cars, and relief surroundings were added. And a table with a full-fledged model of a railway, with many details and little things, is already real art.
Abroad, similar products cost from 2 thousand dollars, but in this article I will tell you how to make a full-fledged model of a toy railroad with your own hands.
Table
You will need space for the layout. Ideally, this should be a separate table, but you can get by with a small table, or simply a fenced-off area on any suitable surface. It all depends on your desire and scope. I recommend starting with a small place - for example, part of a table, and then, if you are inspired, make a larger layout. It’s better to start small than to immediately take on a large amount of work and quit halfway.
Starter set
The thing without which it will not be possible to make a model railway is the railway itself. Or rather, a set of rails, a train and a power system for it. Here, alas, there are no alternatives - everything needs to be bought. It’s good that these days there is so much to choose from on the market.
Sketch
To know where you are heading, you need to have a goal in front of your eyes. Make a rough sketch on paper - where everything should be and what it will be like general view your layout. Browse the Internet, look at numerous railroad models and take note of what you like - bridges, crossings, houses, stations. You can make a model of a stop station in the Wild West, or you can make a model of a station in the center of a modern city. But be sure to decide before you get to work. And make markings on the table so that you don’t suddenly discover that the track goes beyond the boundaries of the table, or that the barrier will cling to a passing train.
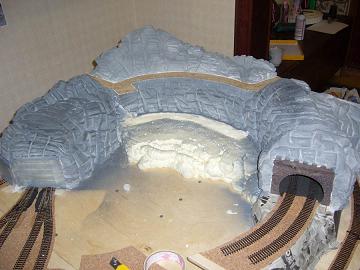
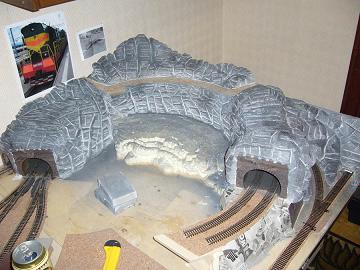
Mountains
The presence of a mountain with a tunnel through which the train will pass will decorate the layout. To create a small mountain you will need polyurethane foam, plywood, knife, alabaster and sandpaper.
First, think over and, if possible, draw a sketch of the future mountain. Then knock down a small box of plywood or other material over the rails. suitable material. Make sure that the size of the box will allow your train to pass freely through the tunnel. Then start applying foam around the box, with pauses of one and a half to two hours, to allow the layers to dry and not sag under their own weight. After you apply the required volume of foam, leave it to dry for at least a day.
After a day, pick up a knife (a stationery knife is more convenient) and start picking at the mountain - cut off the excess pieces, giving it the shape you intended. Cut out hollows, crevices, try to make it as natural as possible.

Next you will need alabaster. Dilute it with water and thin layer up to 3mm cover the entire mountain. It dries quickly, so use small amounts of it. Then wait again for several hours until everything hardens - it is better not to use a hairdryer.
Now we need to paint over the mountain gray. To do this, buy a can of primer at any auto store, matching the color of the gray stone, and you can paint your mountain. Just test the paint on something else first to make sure the color suits you.
Next, use sandpaper and rub the mountain in places to remove layers of primer here and there. This will make the mountain more naturalistic, so that it is not a uniform color, but a shade from light to dark gray. You can repeat painting and sanding several times until you get something you're happy with. You can also paint individual pieces of the mountain white or black to make it more realistic.
Finally, take green paint and tint the pieces of the mountain also in the color of green - this way it will be even more naturalistic. Only the paint should be a believable, “moss” color.

Your mountain (or slide) is ready. Congratulations, you've already done quite a bit of work. Next in line are the remaining details of the relief.
Here everything depends on your imagination, size free space And suitable parts that you have. Fill an unoccupied table surface - for example, with fake grass, which is sold in stores. Toy houses, figures of people, transport, a railway crossing, a train station with a station, a bridge, trees - these are all the details that will decorate your layout. Many of them can be found in Lego sets, or simply individually in toy stores. Companies that sell products for railway modeling also sell excellent kits, but in this case, be prepared to spend a lot of money.
You can make a model on a large table, with lots of details, relief terrain, electric running and a real miniature town. But you can also make a small model - a battery-powered train, with small area landscape and several decorative elements.
Whatever option you choose, the model you make will be a decoration for any home and will be of interest to any company - both children and adults.
Construction of a model railway is one of the most exciting and beautiful views hobbies that are widespread abroad. Garden trains are a favorite pastime not only for children, but also for pensioners, to which the latter devote all their time.
In the USA and Western Europe You can often see how elderly people, together with their grandchildren, watch with admiration and delight the light electric locomotives that leave the depot and run merrily around their summer cottage.
In Russia, this entertainment has not yet received due popularity, but interest in garden railways is growing every day. After all, she can become original decoration landscape: it is arranged taking into account flower beds, ponds and bridges. The track that runs under awnings, through gazebos, sheds, other buildings or even rooms in the house looks especially impressive.
How they do it
To build a garden railway, special starter kits of various scales are usually purchased (the most common is G): with a locomotive and cars, rails, switches, transformer, etc. High-quality “toys” are intended for outdoor use, and therefore are resistant to high and low temperatures and precipitation.

First, the roadbed is prepared - by analogy with the present one, but taking into account the scale, type of soil and local vegetation. The soil is taken out onto the floor with the bayonet of a shovel. To avoid problems with grass, from the drainage synthetic material They make a lining under the body of the ballast prism, pour sand and crushed stone.
For a ballast prism, the so-called berry crushed stone with a fraction of 3–7 mm is best suited.
Rails and sleepers are laid directly on the crushed stone, without fastening: the track lies securely on the ballast under the weight of its own weight.
The garden railway needs maintenance: the rails are cleaned every three to four days, the grass is regularly weeded and mowed, and leaves and tree fruits are removed.
Fruits falling on the rails can damage them by causing oxidation. When used outdoors, the surface of the rails becomes dirty, which leads to poor contact.
To the delight of the children and to help yourself
Chudotxt, a member of the “House and Dacha” forum, is one of the few daredevils who dared not only to buy a garden train, but to build it with their own.
To make his dream come true, the owner, who has been interested in model railroading since childhood, sacrificed his country barn. On the vacated territory of 12 acres, Alexey built a collapsible narrow-gauge railway with a length of 120 m and a gauge of 300 mm. I ordered the rails to be made from a rectangular profile 50x25 mm.

A forum member recreated the model of the railway on a scale of 1:2. The inventor did not intend to copy real cars, he main task was - to enjoy trips, reviving the impressions experienced in distant childhood. In addition, it was planned to test our own models at the railway, provide an interesting pastime for the family on weekends, communicate with like-minded people and receive a small income from the enterprise.
Pondering technical specifications future motor vehicle and having coordinated them with his financial capabilities, chudotxt decided to make the car small but spacious. He built the locomotive himself.

The machine is driven by a 50 cc four-stroke engine with an automatic transmission, taken from a children's ATV. The maximum speed of the car is 10 km/h. To make it possible to change the direction of movement, Alexey installed a reverse gearbox. To make it even more chic, the forum member equipped the motor vehicle with lighting devices and a signal, the sound of which brings the neighborhood kids running.
In order not only to ride himself, but also to please his guests, the forum member made a passenger trailer-banquette. I ordered a cart, made a car frame, and made a roof out of boards. The outside of the car was covered with percale and everything was painted. The length of the passenger car was 2.4 meters.

Chudotxt proved that this is not just an idle game by attaching a special trolley to a motor locomotive for transporting sand and other materials. Over time, the rolling stock was replenished with an electric trolley, made from a children's car.

On the site of the dismantled and burned barn, a bathhouse was built, stylized as a station building. Later, a pointer machine found under a slope took its place, and a “schedule” and a platform clock appeared.

Even a child can drive the locomotive: in the cabin there is only a gas handle and a brake. The train can carry three adults and three children at a time.
Based on materials from participants of the forum "House and Dacha"
The text of the work is posted without images and formulas.
Full version work is available in the "Work Files" tab in PDF format
Introduction 3
Chapter 1. General information about railway modeling 5
Chapter 2. Construction of a railway model 6
2.2 My experience in creating a railway model at home 7
2.3 Sociological survey “Railway modeling” 8
Conclusion 9
List of sources and literature 10
Applications 11
Introduction
Do you like to meet and see off trains? Perhaps you are delighted and admired by a train passing by, or amazed by the power and strength of the locomotive, which pulls loaded cars behind it. However, you do not yet have the opportunity to connect your profession and life with the railway. Then you will be interested to know that there is such a hobby that will allow you to have your own train with cars, stations, rails and the surrounding world. This is railway modelling.
Railway model making is not such a simple hobby as it might seem at first glance. In order for the result from practicing railway modeling to be pleasing, it is necessary to have sufficient knowledge in general issues of railway technology, strive to acquire new knowledge in this area, apply various techniques and technology, choose material for creating mock-up or model objects, be able to use the tool correctly and, of course, do not forget about safety precautions.
In our work, we want to collect such information and offer our own version of the railway layout.
We believe that our research will help arouse interest in technology, will contribute to the development of imagination and fantasy in children, and perhaps will help someone decide on the choice of a future profession.
Research problem: find out how to organize the work of creating a railroad model at home.
Object of study: model of the railway.
Subject of research: conditions and technologies for creating elements of a railway layout.
Purpose of the study: describe creating a model railroad at home.
Research objectives: study literature on this topic; research modern methods and technologies for constructing a railway model; describe a model of a railway created at home.
Research hypothesis: it is assumed that if certain conditions are met when creating a railway model, this will make the model as realistic as possible.
Theoretical significance We see the work in the fact that the research conducted will contribute to the development of students’ interest in technology in general and in railway modeling in particular.
Practical significance of this work is that collected materials can be used by teachers and students in additional classes on the surrounding world and technology. Also, the research materials may be of interest to those who want to get into railway modeling.
Research methods: study of specialized literature; generalization and systematization of material; observation and recording of results, photographing.
Brief overview of the literature and sources used. A huge number of practical and theoretical manuals, catalogues, reference books and periodicals are devoted to the topic of railway modeling. We have a selection at our disposal periodical"The Miniature Railroad", which details instructions for creating layout objects. A lot of general information about railway modeling (history, development, modern achievements, the most famous models and technology for making models) is collected in a three-volume publication “The Art of Railway Modeling”. “Models of Railways” edited by Barkovskova B.V. is one of the first domestic publications about railway modeling, this book is very popular in our country, it is not without reason that it is called the “Bible of Modeling”. Here you can find general information about this hobby, its types, production technology and storage of layouts and models. This topic is also widely discussed in Internet communities and forums.
Chapter 1. General information about railway modeling
“Modelism” is the making of a model that reproduces the geometric forms of nature, linearly reduced in all planes and repeating the texture of the outer surfaces of the original. The word “model” itself is French and means the likeness of some object in a reduced form. Thus, modeling is usually called a large-scale reproduction of an existing or pre-existing object.
Today no one can confidently say what happened in the beginning: a real locomotive or its model. According to some reports, the English engineer Richard Trevithick, before building his first locomotive, tested a smaller copy of it. In any case, it remains certain historical fact that at the beginning of the nineteenth century the railway model came to our world almost in parallel with the real railway.
The development of railway transport in Russia contributed to the development of railway modeling in the world. The construction of the Trans-Siberian Railway at the beginning of the 20th century became a worldwide phenomenon. At an exhibition in Paris in 1900, the Siberian Express model, which is a classic example of a large-scale model, received a gold medal.
Today the model railroad occupies important place one of the most popular hobbies all over the world. People different ages and professions are keen on creating copies of rolling stock and entire railway complexes - models.
In the first half of the 20th century, three development paths for railway modeling emerged. The first of them is large-scale, includes high-class museum and exhibition models made by professional layout designers; the second is student's, which is popular in our country and has a large educational value; the third way is small-scale amateur.
Student model making introduces students to railway technology. This type of modeling does not aim at strict large-scale reproduction of rolling stock and other elements of the railway. Its main distinguishing features are large selection scale of models and their arbitrary shape.
Amateur small-scale modeling includes the construction of miniature replica models of railway rolling stock, as well as the construction of model complexes for these models, reproducing, as it were, the railway as a whole. This type of modeling can be home or club, i.e. individual or collective.
Chapter 2. Construction of a railway layout 2.1 General recommendations to create a railway model
A railway model is a model that recreates railway objects in miniature. The layout may contain a model of a railway station, parts of a stage, access roads, a locomotive or carriage depot, urban infrastructure with railway tracks, natural objects along which the railway line runs.
The first thing we must decide on when deciding to create a model railroad is scale. In railway modeling, the concept of scale is closely related to standard size. The standard size is characterized by a scale reduction and model track width. There are several main standard sizes of model railways; you can get acquainted with the main ones in the appendix (Appendix 1).
Having studied in the literature various instructions on creating model railways, we have compiled an approximate sequence of work for making a model railway at home.
Make a sub-layout, a platform on which all the elements of the layout are attached and placed rail track. For a simple layout, you can get by with a plywood sheet of the required size.
Mark paths, roads, locations of buildings, etc.
Place substrates to simulate a ballast prism.
Lay the rails. Before this, you need to buy a sufficient amount of rail material.
Develop electrical diagram and mount it on the breadboard.
Dump the ballast. Imitation of ballast is a mandatory element of the layout. Ballast can be selected according to size from aquarium soils or other household bulk materials of a similar type.
Create a relief (hills, mountains, river valleys, etc.).
Paint the bases to match various landscape elements (grass, sand, forest soil).
Label roads.
Fabricate and install buildings.
Apply grass cover and other vegetation.
Place figures of people and vehicles on the layout.
Having decided to create our own model railroad, my dad and I subscribed to the magazine “Railroad in Miniature” (Appendix 2).
Since we decided to create a simple layout, we settled on wall version. For the baseboard we used strips of plywood 30 cm wide. Using wooden blocks, we attached them to the wall with self-tapping screws.
My dad and I bought rails and switches from an online store. They were nailed to the model with small nails (Appendix 3).
To simulate ballast dumping, sifted river sand was used. Dad applied glue, and I poured sand (Appendix 4).
We made grass from sawdust painted with green gouache and glued it to the model (Appendix 5).
The station building is flat - dad cut it out of a piece of plywood, and I painted it and drew the windows (Appendix 6).
The station building is voluminous. I worked as a burner, a screwdriver, a chisel, a hammer and stationery knife. The walls, floor and ceiling are plywood pieces held together with toothpicks. To make it look more realistic, the roof was covered with black paper (Appendix 7).
We also bought traffic lights and glued them onto the layout. Dad connected the wires, we placed locomotives with cars on the model, and I checked how it all worked (Appendix 8, 9).
The layout is ready, but this does not mean that nothing else will change in it. We are planning a lot of all sorts of improvements and improvements. So there is a lot of work ahead! (Appendix 10)
2.3 Sociological survey “Railway modeling”
I was wondering if my classmates, friends and acquaintances were familiar with this activity? Do they want to get interested in railway modeling and will they be interested in my work? I conducted a survey (Appendix 11) and received the following results:
Conclusions: Interviewing boys and girls aged 6 to 9 years, I found that:
A lot of people (74%) like trains.
Few have present moment railway (31%), but the majority want to have their own railway (58%).
Few people are familiar with the concept of “modeling” (21%).
Respondents want to know how to create their own model railway (63%).
Consequently, the research topic is really interesting and relevant for most of my classmates, friends and acquaintances. I will definitely introduce them to my research and share practical recommendations.
Conclusion
In our research work We formulated the problem - to figure out how to organize the work of creating a railroad model at home. During the research process, we examined general issues, principles, possibilities and methods for building model railways at home.
Our observations helped us verify the correctness of the hypothesis put forward: if certain conditions are met when creating a railway model, this will make it possible to make the model as realistic as possible. Our layout is small world railway.
The sociological survey conducted helped to verify the necessity and relevance of the topic presented in the study. We hope that our recommendations will help you create your first model railway, and you will feel the magic and wonder of the world of small model railways.
List of sources and literature
Barkovskov B.V., Prokhazka K.I., Ragozin L.N. Models of railways / Ed. Barkovskova B.V., - M.: Transport, 1989
The railway in miniature - M.: Eaglemoss Editions LLC, a selection of magazines for 2014-2016.
Moskalev L.M. The art of railway model making. [In 3 vols. T. 1]: History. Initial skills / Moskalev L.M., Myasnikov A.G., Ragozin L.N. - M.: Zheleznodorozhnoe delo, 2011. - 256 p.
www.railmodel.ru/-site about creating a home railway.
APPENDIX 1
|
Symbol standard size |
Main scale |
Scale meter size, mm |
Width gauge, mm |
APPENDIX 2
APPENDIX 3
APPENDIX 4
APPENDIX 5
APPENDIX 6
APPENDIX 7
APPENDIX 8
APPENDIX 9
APPENDIX 10
APPENDIX 11
Research paper questionnaire
Maksimenko Dima
How old are you? ______________
Do you like trains? Not really.
Do you have a toy train? Not really.
Do you know what “Modelism” is? Not really.
Do you want to have your own railway with small trains, stations, houses, trees, tunnels, cars, tractors, people? Not really.
Do you want to learn how to make a model railway with your own hands? Not really.