DIY flower shelf ideas. DIY floor shelves for flowers made of wood
What housewife doesn’t want to transform the look of her room with the bright colors of blooming violets, begonias or geraniums? It's aesthetically pleasing, a little refreshing, and overall beautiful. But it is inevitably necessary to decide where to place these flowers in pots? Not on the floor. Need shelves. You can’t always find what you need in the store, and you want to save money. There is only one way out - to do it yourself, so that all this colored aesthetics, as they say, is sorted into shelves.
In this article we will tell you how to make shelves for flowers with your own hands from wood and chipboard, consider options for wall and floor shelves, and also demonstrate photo and video instructions.
What material can shelves be made from? It can be plywood, chipboard, wood, metal, glass, drywall, etc. If you have wooden planks lying around your household, and you have not yet found a proper use for them, make a flower shelf out of wood.
Let's start assembling the wooden structure

It will be very good if you have about 6 of these wooden planks, at least two meters high and measuring 35x5 mm at the end. You will also need two 20x20 mm bars, also 2 meters high.
Arm yourself with a pencil, a screwdriver (Phillips) or a screwdriver, a tape measure, a saw and a jigsaw, as well as 25 and 40 mm self-tapping screws. Also, you cannot do without an assistant who will simply support the structure when mounting the shelves to the racks. Now you can start manufacturing.
- Wooden planks for shelves are cut into 60 cm (12 pcs.) and 64 cm (6 pcs.) and, in general, we get 18 small planks - these are future shelves.
- The bars are cut into 70 cm lengths and you get 4 pieces - these will be the side posts.
- From the remains of the bars we cut out six more small bars: four 23 cm each and two 19 cm each. This is the future mount for the shelves.
- On the bars that will serve as racks, we use a pencil to make markings for the two lower shelves. The marking is done by calculating the height of the flowers themselves in the pots that we plan to place on them.
- Using four bars (23 cm) we make two shelves. The bars are attached to both ends of the planks with 25 mm self-tapping screws, which in turn connect the planks to each other.
- Using 70 mm self-tapping screws, we attach the shelves to the vertical posts.
- Using the same screws, we attach internal bars measuring 19 cm to the upper parts of the rack between each pair of vertical posts.
- The third shelf is made locally by attaching each strip to the top of the product with 25 mm self-tapping screws.
This is how a small floor shelf or flower rack turned out.
From chipboard

If you prefer a chipboard shelf, then you probably have experience working with this material. Here you will have to tinker not so much with the manufacture of the structure itself, but with preparatory work before assembly. You will need:
- Chipboard: blanks measuring 140×200 mm (the best is to waste pieces from one sheet, although this is not essential)
- Fasteners (confirmations, self-tapping screws - 2 pcs. by 45 mm and 6 pcs. by 16 mm).
- Confirmation drill and regular drill.
- Hanging slats or awnings.
- Edge.
- Wooden dowels (dowels).
- PVA glue.
From the tools:
- Iron.
- Hammer.
- A device for gluing with edges (a regular block with a groove slightly larger than 16 mm).
- Wooden block wrapped sandpaper.
- Clamp.
As you can see, the list is quite large, and all this is necessary to prepare for assembly.
First of all, we decide which ends of the parts will be visible, after which we begin to paste over them with an edge. For this we use a regular household iron and a shoe knife to trim off the excess edge. Special device We smooth the glued melamine edge tightly and sand the end corners with an emery block. Those places that will be joined to each other should not be pasted over.

Elements of the back base for future shelves that we did not cover paper edge, we prepare for docking with each other. We drill two shallow holes and pour glue into them. We hammer the pins (dowels) into the holes, and in the joining part of the adjacent element we also drill two holes and fill them with glue.

To ensure that the chopsticks coincide with the holes of the adjacent element, use special “conductors” or furniture taps for dowels. “Conductors” are put on dowels and pressed against the mating part; sharp taps will inevitably leave small indentations. Drill there.

We connect the parts together and press firmly. For this, a clamp will be an indispensable tool for us. Press the parts tightly with a clamp and leave until completely dry.

The back of the shelves is done. Now our task is to secure the shelves. To do this, we first make markings for confirmations.

We drill holes with a special confirmation drill, after which we proceed to attach the shelves, alternating them on the right and left.
It is best to attach hanging strips at the top and bottom so that the shelf hangs strictly vertically on the wall, even if someone accidentally touches it.
All that remains is to arrange the flowers beautifully and you can enjoy the work of your own hands.
You can get creative and make the shelves colorful. Or another option: round the free corners of the shelves and upholster them with a T-shaped plastic edge. It will be much more beautiful.
Corner

Now is the time to talk about corner flower shelves.
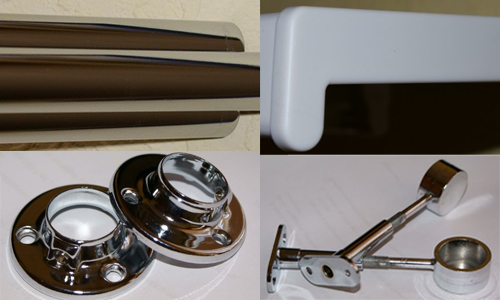
Sometimes the place for flowers is only in the corner, therefore we need a corner shelf. This can be either a bookcase or hanging shelf. Everything is simple here, as mentioned above, the main thing is to prepare everything correctly. For example, if we want to make a corner shelf from chipboard with elements of chrome pipes, then we will need:
- 4 squares particle board, the size we need.
- T-shaped edge (can be matched to the color of the product, although this is not so important).
- Chromed pipe Ø 25 mm (usually three-meter ones are on sale, so it will be better and cheaper to get leftovers somewhere), 18 flanges for pipes.
- Three plastic, chrome-plated legs.
- Melamine edge.
From the tool:
- Drill with attachment.
- Iron.
- Shoe knife.
- Device for gluing edges.
- Grinding machine.
- Jigsaw.
- Router with cutter.
- Pipe cutter
- Rubber hammer.
- Wood screws (4×16) up to 70 pieces.
- Screwdriver.

We pre-prepare the shelves, making them radius. We can do this using a jigsaw and grinder. We cut off the excess with a jigsaw, and sand the cut area with a grinder. It is worth noting that a tool such as a jigsaw mercilessly chips the laminate when cutting. After sanding, these chips are practically removed. The next stage is gluing the even ends of the shelves with melamine edge. Then we’ll take care of the radius areas of future shelves. We will need a router and a cutter, which is at the end chipboard sheet cuts a small groove where we later need to hammer rubber mallet T-shaped profile. Next, we make marks with a marker and drill 3 holes in the chipboard for the 25th pipe.
There are no holes drilled in the top and bottom shelves at all.
Using a special pipe cutter, we cut the parts of the chrome pipe we need to size. We screw the legs to the bottom of the shelf in advance. Then we screw flanges onto the holes of the two shelves on both sides (it is better to do this before installing the shelves in the product) and thread the tubes. We fix them with special screws on the flanges and, one might say, the bookcase is ready. This corner piece with flowers will be a wonderful decoration for your corner.
Hanging

Now it’s worth talking about light-loving plants that need to be installed closer to the window or even on the window. Naturally, we will not talk about flowers, but about window shelves for flowers. Of course, your desire to place flowers on the window may be caused not only by the light-loving nature of the plant, but also by the growth structure of its shoots. They can be, for example, flowing or curly. In this case, it would be better to think about how to place these flowers higher. How to make shelves for flowers in this case? For this you can use different materials.

You can also arrange for hanging potted plants on the window. All we need for this is some 8x60 hook anchors.
- Drill a hole in the upper part of the window with a hammer drill.
- Insert the anchor hook and screw it clockwise until it stops.
- We tie the strings to the pots. It is better if it is an ordinary fishing line. It is not so visible and quite durable. However, there is no limit to imagination.

The anchor mechanism is designed in such a way that when screwed in, its spacer part expands and, thus, sits quite firmly in the concrete.
Glass shelf on the window

And if we talk about literal window shelves, then the next option is especially acceptable for those who want to do everything, firstly, quickly, secondly, reliably and, thirdly, beautifully. It is clear that we are not talking about placement flower pots on the windowsill. It is cumbersome, inconvenient, and in some cases not particularly beautiful.
These shelves can be mounted provided that the window itself is wooden.
 In any furniture store where accessories are sold, you buy a chrome-plated bracket for shelves (it’s called an arched, concave bracket). At the hardware market you can buy a one and a half meter strip about 3.5 cm wide and about 1.5 cm thick. As a rule, there is a glass store next to the market and if you know the exact dimensions of your future shelf, then order glass 3 thick along the way. mm with circular grinding. For beauty, you can choose any tint, and if you have children, it will be important that the glass be tempered. When such glass falls to the ground, it shatters into small pieces with non-sharp ends, and your child will not be injured by them.
Next, measure the depth of the shelf holder and cut small strips according to these dimensions. We screw these strips to the brackets from below using small self-tapping screws. tree in in this case will serve as a lining material between glass and iron. Just be sure to make sure that the screws do not come out on the other side. Therefore, your fasteners must be of appropriate sizes. All that's left to do is attach the brackets to the window frame. After this, you can put the shelves on top and make sure that we have done everything correctly and the plane is strictly horizontal (use for this building level). The shelves are not attached to the brackets, but will be pressed against flower pots. The convenience is that this entire glass structure can be easily dismantled in case spring cleaning when you need to wash your windows.

As you noticed, there are quite a lot of variations on the theme of flower shelves. Which one you prefer depends on your taste and your capabilities. The main thing is different: beautiful flowers will decorate your home, and beautiful original shelves, made with your own hands will say a lot about the owner and mistress of this house. Therefore, let there be many flowers in your home.
Video
This video is about making a shelf for flowers on a window sill from chipboard and pipes:
Learn how to make a multi-level wooden flower rack:
Photo


Flowers in the house are beautiful and aesthetically pleasing. Living plants bring beneficial energy into the room, and sometimes even help cope with various kinds negative. But arranging flowers on window sills is not as pleasant as arranging a special “living” corner for them with interesting, neat shelves. You can make such flower shelves yourself, and in this article we will share some ideas with you.
A flower shelf can be made from metal slats and wooden beams. Metal racks connected by jumpers will act as a frame, while wooden boards will become stands for pots. Let's look at the work process step by step:
- If the shelves are supposed to be mounted on the wall, then you need to select metal rods with a cross-section of 1 cm for them. If the structure is to be placed on the floor, then the corners must be secured at the installation sites. You can determine the dimensions of the shelves yourself, based on your wishes and availability. free space in the room.
- Metal racks are welded together with jumpers. For example, if you take racks with dimensions of 90x20 cm, you can make a rack of 4 shelves, the distance between which will be 30 cm. On such shelves you can place small pots with compact plants, and taller crops can be placed on the top shelf.
- Flower stands are connected to each other with rods to make the structure more stable and strong. This strapping is done on all 4 floors of the rack. After this, the structure is painted with paint of the selected shade.
- Wooden planks measuring 25x15 mm are divided into fragments of 60 cm, which corresponds to the length of the shelves. These parts are laid parallel to each other and fastened with 20-centimeter bars.
- The structure is attached to the wall surface with self-tapping screws, making a step of 50 cm between fasteners. During the work, the evenness of the frame must be checked using a building level.
- Wooden parts are painted in suitable color, dried and placed on the frame. After this, the shelves are ready to place pots of flowers on them.
Mobile flower shelf
The mobile shelf can be made of wood or other suitable material. The advantage of the design is that it can be moved to the most convenient place. To make such a rack, you will need the following:
- plywood sheets, wooden spikes and beams; metal profiles can be used instead of beams;
- wheels for future construction, as well as legs for them;
- fastening elements - self-tapping screws;
- racks and cross members;
- tools for work; glue, paint brushes, jigsaw and drill.
As an example, we will look at creating a three-level rack of any size; you can choose the dimensions at your discretion. So, flower shelves are made in this way:
- Before creating a structure, you should draw a drawing of it on paper indicating the dimensions.
- Sheets of plywood are laid out on the floor and the corresponding lines are drawn on them along which the parts will be cut.
- From wooden beam They make a frame by fastening the individual parts with tenons and screws. If there are no beams, they can be replaced with a metal profile.
- From sheets of plywood, according to the drawn markings, the necessary parts are cut out, in which grooves are made. The frame posts will be inserted into these grooves.
- Having chosen the paint of the desired shade, the plywood parts are painted and left to dry. In the meantime, wheels are attached to the frame. After their installation, the frame is also painted with a composition of a suitable color.
- When all the elements of the rack are dry, shelves for flowers are fixed to the frame, where pots with plants are subsequently placed.
Such a rack can be made of any height, although one must understand that a structure that is too high, more than 5 floors, will be too heavy and massive.
Plastic flower rack
A cheap option made from scrap materials is a plant rack made from a simple plastic window sill. As a basis, we will take a window sill 3.9 m long, as well as additional materials:
- galvanized or nickel-plated pipes – 3 pcs.;
- flange mountings – 9 pcs.;
- brackets – 2 pcs.
Let's get started:
- We cut the plastic window sill into fragments 1.3 m long. There should be 3 such pieces. These details will become shelves for flowers.
- To install the shelves on the frame, we make 3 holes in the plastic. We arrange them so that they form vertices isosceles triangle. There should be 2 holes near the ends, near the back side, and the third should be placed in the middle closer to the front edge.
- Now we prepare 3 pieces of pipe, keeping the same length. We fix the parts of the structure using tightening flange fasteners.
- The rack is attached to the floor with the same fasteners. The structure is attached to the wall with brackets from above.

Simple Wall Flower Shelf Design
There are also very simple options for making flower shelves, which require a minimum of effort and materials. Despite the ease of implementation and the small number of available tools, the interior detail turns out to be very original and interesting. We will make it from wide board, leather belts and fastening elements. Instead of belts, you can use something else: grosgrain ribbon, twine, etc. We will describe the work process step by step:
- We take a board of the width we need and divide it into several suitable fragments of the same size. We sand the ends with sandpaper.
- Now we paint the future shelf in any way we like. For example, you can cover it with stain and then colorless varnish, or you can simply apply colored paint.
- We leave the shelves to dry and prepare the fastening. We divide the belt into 2 pieces 50-60 cm long. Fold the pieces in half, step back 4 cm from the edge and drill holes.
- Having measured the parameters of the shelves, we apply the appropriate markings to the wall. We make holes in the wall where the dowels are attached. We make loops from the belt and fix them through pre-drilled holes on the wall surface.
- We install wooden shelves on these hinges, which have already dried by that time.
Now we arrange the pots with live plants. To make these shelves more aesthetically pleasing, you can hang several of these shelves in a room, and as their color, you can choose a shade that matches the interior of the room.

Corner shelves on the wall
Let's consider another rack option - corner shelves. This solution is optimal for small cramped apartments. To make shelves, we will need:
- galvanized or nickel-plated pipes;
- flanges and screws.
We make shelves in the following way:
- From a sheet of chipboard we cut out elements of the size and shape we need. The main thing is that they match each other in size.
- On these blanks we draw marks in which we will make holes for fastenings. There should be 3 such holes on each shelf.
- We assemble the rack using fasteners: flanges and screws.
- We install the shelves on the wall using brackets pre-mounted into the surface.
- We paint the finished structure in the shade you like and dry it.

DIY glass shelves for flowers
Glass shelves in the interior look impressive, especially if they are made of glass of different colors and equipped with lighting. This detail will fit into almost any interior, regardless of style. Let's try to make a similar design ourselves, using 6 pre-prepared glass shelves and two wooden slats. Let's describe the process step by step:
- For work, it is better to take tempered glass with a thickness of at least 5 mm.
- We make grooves in the wooden planks that correspond to the thickness of the glass sheets, as well as the cross-section of the planks. The fragility of the material should be taken into account and the grooves should be made as reliable and stable as possible.
- Glass shelves are inserted into these grooves. For greater strength, the wood at the attachment points can be lubricated with a suitable adhesive.
- The rack is then installed in a suitable location.
Glass shelves with flowers can be placed on the floor or on a windowsill, or you can also make a smaller structure and place souvenirs and figurines on it.

DIY flower shelves. Video
Shelves on the window: ideas for indoor flowers, dishes and small itemsThis method of window decoration - original solution in the case when you have windows that fundamentally cannot be opened due to the specific design of the frame. However, such windows can only open partially. You can “play up” such windows with the help of shelves, which can be decorated to your taste - with indoor plants, dishes or compositions of small decor.
In addition to the decorative effect, such a solution can have a rather practical meaning: to hide an unsightly view from the window or “disguise” the room from prying eyes if you live on the ground floor.
If there are a lot of indoor flowers in your house, such a window can be turned into a real one. winter garden, where the plants will be very comfortable.
If there are such windows in the kitchen or dining room, you can hang shelves for dishes on them. Particularly impressive with vintage pieces or if you like to admire smooth white porcelain.
However, do not forget: if such a window is the only one in a given room, do not overload the shelves with contents so that natural light arrived in sufficient quantities.
window shelves for indoor plants:
Gardening expert Kevin Lee Jacobs, on his flower and landscape blog, shows in detail what these window shelves might look like and how the composition changes depending on the season:
1.
2.
3.
4.
5.
6.
glass shelves for plants on the window:
The “lightest” (due to the transparency of the glass) and for this reason the most popular solution. These shelves are for indoor plants can be fixed in window opening using conventional “toucans” (shelf holders for glass) or - on remote brackets that are suitable for glass shelves.
The best option for safety is a collection of small plants. If blind window has a width of more than 60-70 cm, it is preferable to choose a different shelf material, also for safety reasons.
7.
8.
9.
10.
11.
12.
13.
14.
15.
chipboard and wooden shelves:
Any brackets will fit here, and there are many more ways to place them: in the opening, on the walls around the window, at the ends wall cabinets(if we are talking about the kitchen) or even to the window frame if it is wooden. The heaviness of the pots and the width of the window no longer matter as much as in the case of glass shelves.
16.
17.
18.
19.
20.
21.
metal shelves:
Such shelves can be found in the “kitchen” or “bathroom” departments. The only requirement is that they must be resistant to moisture, since excess water in the tray when watering is inevitable.
22.
23.
24.
shelves on the window for dishes and assorted displays:
This idea, as a rule, appeals to those who are fascinated by 2 solutions: (1) open shelves+ (2) tableware in plain sight. If you have blind windows in your kitchen, feel free to implement this non-standard move.
25.
26.
27.
28.
29.
30.
31.
32.
33.
34.
35.
36.
displays for beautiful things:
If you don’t want to be limited to just dishes or just plants, create interesting composition on shelves suspended from a blind window.
37.
38.
39.
40.
41.
42.
43.
44.
45.
several windows in one line:
If there are several windows “in a row” on one wall, try installing long shelves or combining several into a single structure.
46.
47.
48.
other creative ideas for shelves on the window:
The winter garden will be more impressive if you use a window sill. On the “remote” window structure you can create something like a greenhouse. If there are enough other windows in the room, a winter garden can be arranged on the widest of them. To prevent pots from falling due to the cat's curiosity, stretch a rope or fishing line along the shelf.
If you prefer blinds, they can be attached to the slope, and the shelves can be “tied” to the wall. If you definitely want curtains, attach a curtain rod to the underside of the shelf. Two adjacent blind windows can be decorated with a single composition of shelves.
If you are looking for super-original solutions, pay attention to the last 2 photos in this section: from mounted kitchen cabinets The back walls have been removed. and then the cabinets are hung above the window. As a result, an interesting “aquarium effect” is born: you can see not only the dishes on the glass shelves, but also the landscape outside the window, while all this is perfectly protected from dust. And if you add interior cabinet lighting, the spectacle will be incredible!
49.
50.
51.
52.
53.
54.
55.
56.
57.
suspended shelves:
And the shelves (or shelf module) can be hung on a rope - to the upper slope or on remote brackets attached to the wall - similar to those used for flower baskets on the terrace.
58.
59.
60.
in detail:
And another implementation in detail - shelves on the window for small items + a way to hang curtains.
61.
62.
63.
It is no secret that many gardeners, and simply plant lovers, want to create a magnificent greenhouse at home. Of course, there is not enough home space for this. However, it is quite possible to create a flower rack yourself.
As a rule, the following materials can be used to make a rack:
- glass;
- tree;
- metals;
- plastic;
- drywall.
The appearance of the glass shelving is simply excellent. This option takes into account the thickness of the glass and the factor of skill in handling it. You will have to cut it out with your own hands, change shapes and sizes. If you are unable to do this task, then turn to professionals in glass workshops.
In practice, household flower racks are made not specifically from one material, but from combinations of materials. Usually whatever is at hand comes into play. The key factor here is what tools the “creator” of the rack has available and what materials were chosen for this.
Plywood rack
If you have a sheet of plywood at your disposal, then you have the opportunity to build an inexpensive, but practical option rack. Plywood is a material of good strength and does not require large expenses. And working with him is not particularly difficult. It may take only a few hours to work with it, about 5-7. During this time you will be able to create an original flower shelf. An excellent assistant in this task will be electric jigsaw. It is logical that you should be able to handle him well. Because we have to cut smooth lines on the working material.
In addition to one sheet of plywood and the specified jigsaw, you will need:
- two pipes treated with nickel,
- 4 fastening elements (pair per shelf),
- tool for attaching fasteners,
- high-quality varnish or paint,
- electric drill,
- fine-grained sandpaper,
- roulette.
In your work you should adhere to a certain technology and algorithm:
- Decide on the parameters of the shelves. Study the dimensions of the area where the shelves will be placed.
- Based on these parameters, you create an image of the planned shelves on a plywood sheet. You can give them a simple configuration. These are the versions rectangular shape and having rounded corners. You can create all kinds of waves of varying depths. The number and depth of waves depends on your skill.
- Having made the necessary markings and images, you can start cutting.
- The panels are laid on top of each other, the distance where the hole for the specified pipe is concentrated is fixed. It is imperative to achieve complete coincidence of the points.
- The working material is carefully sanded with sandpaper. Here special attention must be given to the end sides.
- Create on the shelves varnish coating. Several layers are recommended. You choose the colors and tones yourself, depending on your design ideas.
- A pipe should be threaded through the holes created. It is attached to each shelf. The key point at this stage is maintaining strict parallelism of the shelves in relation to each other and their perpendicularity to these pipes.
- The shelves are mounted to the wall. This operation can be carried out using special staples. They join back side shelves below and above and to the wall. Here you need to make markings on the wall without errors. A drill is used to create holes. Next, self-tapping screws will be inserted into the holes. The dimensions and strength of the fastening tool determine the stability of the shelf. After all, it will soon be filled with heavy flower pots.

Sample shelving design.

Metal racks were used - a fairly lightweight interior option.

The same rack, side view.
Wooden version
The width of the intended rack is as follows: 22 centimeters, length - from sixty or more, height - 70 cm. Only three shelves will be arranged here.
List of required materials:
- long two-meter wooden planks, their parameters: 3.5 x 0.5 cm, their required quantity is 6 pieces,
- two wooden planks of similar length, but with parameters 2 x2,
- nails 25 and 40.
Can't do without:
- saws,
- hammer,
- roulettes.
You need to create the shelves themselves from thinner planks. Other pieces of planks will be used to create shelf racks.
In your work, adhere to the following scheme:
- On thin material, segments of 60 centimeters are marked. They are sawed off. As a result, 18 slats are formed.
- Similar operations are performed with other strips. Only the segments there will be 70 cm long. They should also be cut. Four racks are formed.
- From the remnants of thicker planks you need to cut two beams. Their specified length is 23 cm.
- Two racks are laid on the floor. Their positions are parallel. The racks indicate the intended installation locations for the shelves. Scrupulousness is needed here. The distance between each shelf is determined by the height of the flowers that are planned to be placed in the future.
- Styling follows thin board, take 6 pieces. Mount them “collectively” at the end sides. This involves timber (23-24 cm in length) and fasteners. Three shelves should form. The end sections are carefully processed with sandpaper.
- The entire structure is assembled. It's better to work as a duet here. For example, you hold racks with shelves, and an assistant holds the entire rack using 40 nails.
- The created rack is varnished or painted.
- An approximate result in the photo below:

Wooden shelving options:

Floor ladder stand made of quality lumber.

A simple, but light and spacious rack with sections for things.

Solid mobile structure for seedlings.

Easy to make rack.

In the photo they are normal mobile racks for warehouses, but this design is perfect for flowers.

The rack can be successfully used as a source of material for old furniture, for example, a chest of drawers with the doors removed.

Ambitious in form, but simple in the materials used. The lumber for such a rack does not have to be “fresh”.

Rack in the form window frame, in this case suspended.

Another simple planting rack, with hanging lights that are mounted so they can be easily removed.

A shelving unit with inclined shelves-steps - this option has its advantages: from the possibility of creating a green wall to saving space. Suitable for insufficiently well-lit areas.

Pallet rack. It is enough to take a ready-made pallet, treat its surface and secure the shelves in any convenient location, because the side posts and base are already there. Important point- such a rack will not be stable enough; you will have to solve the problem of attaching it to the wall or ceiling.

Green room, with shelves along the entire length of the “walls”.

The original rack is not made of lumber, but of unrounded logs.

The light rack shown in the title photo from a different angle.

Honeycomb rack made from old furniture.
Large wooden rack
The stands are made of planed timber 5*5, the sides are made of aspen, the shelves are made of 18 mm plywood. The rack is designed for different things (there is space for a wardrobe), but the value of this video is that the author talks about design and mistakes during the work - it can be useful when creating your own flower rack from lumber and plywood.
Metal version
This option will be characterized for a long time service, since its racks are metal. The structure is wall-mounted. To weld it, they use metal rods. Their diameter is 7-10 mm. Instead, you can use a corner. The second layout will be useful if the structure is placed on the floor. Design parameters are determined by personal wishes and the availability of shelf space. If the parameters of the bases on the sides are 90 x 20 cm, then you can arrange four shelves in the rack. Their distance is 30 cm. This will allow you to place flowers of different heights. Suitable for concentrating tall flowers upper part rack.
During welding, the following are created:
- fastening on the upper sections of the inner edge of this structure,
- crossbars for positioning each shelf.
Next, strips (5-6 mm in length) are cut out of the bars (their dimensions are 25 x 15 mm). There should be 20 slats. They lie face down. Their location to each other is parallel. They are knocked down with other slats (20 cm).
The welded structure is then attached to the wall. If the wall is solid (concrete, brick, etc.), standard screws become fasteners. Here you need to correctly determine the installation points of the bases for the shelves being created. Their correct plane is parallel. Otherwise, the shelves will not be placed evenly on the crossbars. Distance between fasteners: 50 – 55 cm. Shelves are placed on the arranged supports. The entire structure is covered with paint. These shelves can be varnished and the metal components can be painted.
Example. Feature - the shelves are made from pieces of wooden boards:


Purchased metal rack.

Another option for an industrial rack that you can make yourself, if you have the skills to work with metal.

A lightweight rack with rings for flowerpots can replace a full-fledged rack if there is not a lot of space in the apartment.


Any rack for things can be adapted for flowers.

Window rack, metal gutters are used as shelves. A fairly lightweight design, convenient for growing plants that love high humidity.
Affordable - from plastic window sills
Enough known variant rack. Here the necessary components in the work are as follows:
- plastic window sills, length – 390 cm,
- 3 pipes, nickel plated,
- 6 flanges,
- 2 brackets.
Operation plan:
- The designated window sill is sawn into 130 cm sections.
- Three holes are created in these segments at equal distances. Two are obtained on the flanks at the back, and one is obtained at the front, strictly in the center.
- The pipe of the required height is cut. The structure is mounted with flanges and screws.
- The lower flank of the pipe is connected to the floor with the same flanges at three points. Brackets must be placed on the upper flank of the two wall pipes. Method of their installation: to the wall with screws.
Example:

Rack made of panels for a window sill
Window sill options
It is convenient to mount shelves of various designs in the window opening:


Backlit
Lighting and its installation is a broad topic, so we will consider it separately. Below are sample options that are easy to make with your own hands at home.

Spot directional light.

Adjustable pendant lighting. Convenient for accompanying full cycle plant growth, from seedlings to adults.

Classic wooden shelving unit with lighting.

Lightweight wooden structure with comfortable pendant lamps.
Glass version
This design is convenient because you can install lighting on top. This way the light will reach all the shelves. To work you will need:
- glass: 6 pieces,
- wooden slats: 2 pieces.
The glass must be tempered. Its minimum thickness is 5 mm. The thickness of the vertical slats determines the groove parameter for mounting glass. This also affects the strength of the installation. If the shelves reach a thickness of 20 cm, then the grooves should be 10 cm, and the minimum thickness of the slats should be 20 cm.
Since the mass of flowerpots turns out to be impressive, there is a lot of pressure on the entire rack. Therefore, it is possible to castling: one glass shelf leaves the rack, and its wooden counterpart takes its place.


Plasterboard version
When working with plasterboard, you can create niches in the wall and create regular shelves. In both scenarios, a frame is created. He finishes with this material. The result is a good design, but weak in terms of operation.
Such material deteriorates from moisture. And it is difficult to prevent water from getting on it. After all, flowers are often watered. They need moisture. And here there is a compromise - glass shelves are attached to the frame.
This design can be used for lighting. The result will be impressive.
If you intend to place the rack on the balcony, then the indicators of this room are important: humidity, temperature, illumination, etc. Based on them, the material for the rack is selected. For example, if the loggia has poor insulation, Chipboard shelving cannot be installed there. This material will begin to deform and the rack may fall apart. And if the balcony is characterized high humidity, all elements of the rack must be coated with protective paint. The optimal solution for making a balcony rack is metal. This is a good solution if you want to place a lot of different flowers on the rack, and therefore heavy pots. If there are flowers and containers for them, it will be a little difficult to build a structure with chipboard.
After choosing the working material, make a drawing. Decide on the amount of material. Organize the following tools and materials:
- wooden beams, section: 50 x 50,
- level,
- drill,
- fasteners: self-tapping screws (length no greater than the thickness of the slab), dowels, metal corners(4-8 pieces per shelf)
- hinges when the rack is made closed,
- shelf material
You can use plywood. Its thickness is determined by the masses of objects that will end up on such a shelf.
Work process.
- Marking the area on the balcony. If the rack fills the entire wall, beams are mounted on the ceiling and floor. The fasteners here are dowels. The bars are identical to the parameters of the planned shelves (depth and width). The arrangement of the bars to each other is parallel. Highest load turns out to be on the middle shelf. Therefore, this shelf must have strong stability.
- Slabs of material (chipboard, plywood) for the shelf are cut out. Their size is as in the project.
- They are screwed to the shelving frame. This is where a jigsaw comes in handy.
- During installation, constant checking of the positions of the plates is necessary. Need a level.
- The fasteners are screwed until they are immovable.
If you intend to make all the elements of the rack from metal. Then the following structures are suitable for assembly: frames, traverses, lintels and metal shelves. All components are secured with anchor bolts.
From scrap materials
The rack does not have to be monolithic. It is quite possible to assemble it from individual elements without a single fastening, like a designer and can be disassembled at any time. In the photo below, the rack is arranged between the walls, which serve as a support; the racks are construction ones, quite heavy and therefore stable. Shelves can be made from any material. The only type of work in this case is adjusting the shelves to the length of the wall. But if the length is sufficient, cutting the material may not even be necessary.


Hollow expanded clay concrete blocks.
Simple hanging design
Video on English, but everything is quite clear and simple.
What lovers of indoor flowers can come up with in order to place their favorites more comfortably at home - capricious violets, spreading monsteras and variegated dieffenbachias. After all, if there are a lot of flowers, then placing them so that they do not block the light from each other can sometimes be problematic. Before you make a flower rack, decide on the place where it will be placed: against the wall, in the corner or on the windowsill itself.
Racks for indoor flowers

A flower rack can be made of wood, metal, plastic, or plasterboard. The glass flower rack looks very good. But in this case, you need to take into account the thickness of the glass and whether you can cut the glass yourself or is it better to contact a glass workshop. Often they use everything that is at hand, combining different types materials. It all depends on what tools the master owns and what materials the mistress of the flower kingdom has chosen.
Flower rack made of plywood in 6 hours

Let's say you have a sheet of plywood on hand. Quite durable and not too expensive material, which in just a few hours can turn into an elegant flower shelf if you have a jigsaw and know how to use it to cut smooth lines on wood.
What do you need? Materials: plywood - 1 sheet, nickel-plated pipe - 2 pcs., shelf fastenings - 2 for each shelf, varnish or paint, fastening tool. Tools: jigsaw, drill, sandpaper, tape measure.
Manufacturing technology:

1. We think over the dimensions of the shelves: we measure the place for which it is intended.
2. According to the measurements, we draw future shelves on a sheet of plywood. Moreover, their configuration can be either the simplest (rectangular shelves with rounded corners) or with all kinds of waves, the number and depth of which depends on you.
3. After marking, the shelves are cut out of plywood.
4. Stack the blanks on top of each other and mark the distance where the hole for the pipe will be located. It is important that this point coincides exactly on all workpieces.
5. In two places on each workpiece, make a hole for a nickel-plated pipe.
6. The workpieces are sanded with sandpaper (especially the ends).
7. We coat the shelves with furniture varnish, preferably several times.
8. We pass a nickel-plated pipe through the holes, securing it near each shelf. It is important to ensure that the shelves are placed parallel to each other and perpendicular to the tubes.
9. The next stage is mounting to the wall. These can be special brackets that are attached to the back of the top and bottom shelves and to the wall. Here it is important to correctly mark the wall and use a drill to drill holes into which the screws will be screwed. The size and strength of the fastening tool determines whether the shelf will not fall under the weight of flower pots.
DIY wooden flower rack in 3 hours

Dimensions of the proposed rack: 23 cm wide, 60 cm long and 70 cm high. Total - 3 shelves.
Materials: wooden planks (dimensions 3.5x0.5 cm, length - 2m) - 6 pieces, planks, dimensions 2x2 cm, length - 2m - 2 pieces, nails (sizes 25 and 40).
Tools: tape measure, regular hammer, wood saw.
The thin strips will be used to make the shelves themselves, and the 2x2 strips will be used to make the racks for the shelf.
Manufacturing technology:
1. We mark thin planks into pieces 60 cm long, and then saw them. We get 18 planks.
2. Mark the 2x2 cm strips by 70 cm and cut them. We get 4 racks.
3. From the remains of the 2x2 cm planks, we cut out 2 bars of 23 cm each.
4. We take 2 racks, lay them parallel to each other on the floor and mark the places for future fastening of the shelves. They must be measured accurately. The distance between the shelves depends on the height of the flowers you plan to place on the inner shelves.
6. You will need help to assemble the entire structure. One holds the racks with shelves, the other fixes the structure with nails (size 40).
7. Finished product varnished or painted.
Rack-shelf for flowers made of metal and wooden slats
This shelf will serve as a durable wall structure. After all, its racks are welded from metal.
To do this, take metal rods with a diameter of 7-10 mm or a corner (if the rack will be on the floor) and weld a similar structure, the dimensions of which depend on the wishes and availability of space for the shelf. If the side bases are 90x20 cm, then this will allow you to place 4 shelves at a distance of 30 cm from each other. This is very convenient for placing both low-growing and hanging flowers. Tall flowers can be placed on the top shelf.
During the welding process, both fastenings are provided on the upper inner edge of the structure and crossbars for placing shelves. There will be 4 of them in total. Then, when the structure is ready, it can be painted.
In parallel, strips 0.50-0.60 cm long are cut out of 2.5x1.5 cm bars. You will need 20 planks. Then lay them out parallel to each other front side down and knock down with the same strips, but short - 20 cm each.
The next step is to place metal structure on the wall. To do this, use molly if the wall is made of plasterboard, and ordinary self-tapping screws for other types of walls. It is important to correctly measure the attachment points of the bases for the shelves. They must be in a parallel plane. Otherwise, the shelves will not lie flat on the crossbars. So, the distance between the fasteners is 50-55 cm. On the placed metal supports stack the shelves. The entire wooden-metal structure can be coated with paint, or wooden shelves varnish, and metal ones - paint to match the rest of the room.

Window sill flower shelf
To do this, you will need a plastic window sill 3.90 m long, nickel-plated pipes (3 pcs.), fastenings (flange) - 3 for each shelf, brackets - 2 pcs.

Manufacturing technology:
1. An ordinary window sill is cut into 1.3 m pieces.
2. In the resulting blanks, 3 holes are made at the same distance: 2 along the edges at the back wall and 1 in the center at the front.
3. The pipes are cut to the required height. The entire structure is held together using flanges and screws.
4. The lower edge of the pipes is attached to the floor using the same flanges in 3 places. Brackets are placed on the upper edge of two pipes located near the wall and are also attached to the wall using screws.

Corner flower rack
This design is most easily made from chipboard and the same nickel-plated pipes. You will only need 3 pipes of the length you need, several identical shelves cut with a jigsaw according to a pattern (triangular shape) and the number of flanges and screws corresponding to the number of shelves. Everything is assembled using the technologies mentioned above. Measure seven times and cut once. At the top, the shelf is attached to the walls using brackets. To fix it, just place the brackets on the two outer corners.
Glass flower rack

This device is convenient because if you place a backlight on top, the light will penetrate all the shelves. Make one like this glass shelf possible using two wooden slats and 6 glasses. Of course, the material of the shelves is tempered glass with a thickness of at least 5 mm. Vertical slats can be made of wood. The size of the groove that is made for fastening the glass, and, accordingly, the strength of their fastening depends on their thickness. For shelves about 20 cm thick, the grooves should be about 10 cm. This means that the thickness of the slats should be no less than 20 cm. There may be other proportions, but they are more suitable for placing souvenirs and various small items on such shelves. Flower pots weigh a lot, and if there are several of them, pressure is created on the entire structure. In the design described above, one of the shelves below can be replaced with a wooden one.

Plasterboard shelves for flowers
Many shelving and shelving options are available in plasterboard. These can be either niches in the wall or regular shelves. In both the first and second cases, a frame is built, which is covered with plasterboard. From a decorative point of view, such a design is very advantageous, but from a practical point of view, it is not. Flowers are water and it is impossible to guarantee 100% that moisture will not get on the material, which will deteriorate from it. Therefore, one option is to attach glass shelves to the plasterboard frame. This design It will look very advantageous with backlighting.
As you can see, there are so many options for flower racks. The photos clearly demonstrate that there are no limits to human imagination. Whatever material the master gets his hands on, it can make durable and beautiful flower racks.