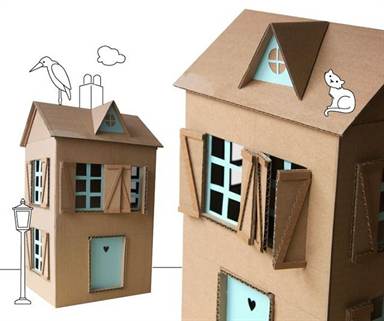
How to make a house out of cardboard with your own hands. Cardboard house - master class with a detailed description of decoration options (110 photos)
Every little girl dreams of the biggest and most beautiful dollhouse for Barbie. And every domestic cat dreams of his own house made of cardboard, where he can retire without getting in the way of his owners. By learning how to make cardboard houses with your own hands, you can not only please your children and pets, but also decorate the interior in an original way. This article shows the most requested do-it-yourself cardboard house plans with MK.

Required materials
No materials or tools required additional costs, everything you need can be found in the household of any family:
- cardboard boxes different sizes;
— glue gun or super glue;
- knife and scissors;
- pencils, felt-tip pens, markers;
- watercolor paints, gouache;
- sparkles and other decorations.

Helpful Tips:
— when creating a box, it is better to use corrugated cardboard;
— only adults should cut cardboard;
- for the stability of the product it is better to take cardboard tubes;
— in a house for children, it is advisable to make a door that opens outward. This will provide more space for games;
- do not throw away small cardboard boxes.
Shelter for a cat
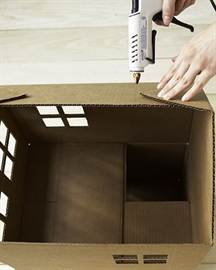
Cardboard house for cats can be built by the whole family in a very short amount of time. The first thing to do is to draw doors and windows using templates.
Start assembling the bottom of the box. Bend the opposite flaps, apply glue to them and fold the remaining flaps on top. Press them together until the glue dries. At the top end of the box, cut off two wide flaps. Next, cut half of the remaining sash and bend it. Do the same thing from the second whole sash. Secure them with glue in this position.

The next stage is creating the roof. On the top of the second box, on the small flap, draw lines from the center of the top to the bottom corners. Do the same with the second flap. Then cut out one large flap. Cut the edge along the first drawn line and fold the second one. Repeat the same steps with the second leaf.

At the bottom of the second box, cut off the wide flaps, and from the first smaller one, cut off exactly half so that when gluing the two boxes there is a hole. Glue the boxes together. Then take the first wide cut flap and glue it to the bottom of the second tier to strengthen it.
The second box will be used to make the roof. To do this, cut a piece measuring 45 by 115 centimeters. Fold it in half along the long side. Apply glue to the triangles of the small flaps on the top of the second box and glue them to the wide flap. Apply glue on top and glue only the first side of the roof so that the cat can look out from under it.
The house is ready!

doll house
This wonderful gift for children you can make it yourself from ordinary cardboard boxes.
The house will consist of two floors and two rooms. First, connect the boxes together. Glue another sheet of thick cardboard to the bottom, side and sides. Strengthen the structure of the house with tape and let the glue dry.

To make the structure more durable, strengthen the walls with thin cardboard.
The next stage is decorating the rooms and appearance house. Decorate the walls with colored paper applications, add mirrors, window curtains, and toy furniture. In order for the dolls to “climb” to the second floor, the house will need a staircase, which will consist of two parts.
Cut steps from thin paper for the end of the stairwell. Make the same cut out of cardboard. Select the desired width and height of the steps.

Cut out a couple more pieces from a thick sheet of cardboard. You will need a couple of rectangles for the steps and the bottom.

Glue the side parts of the ladder together and press them together with your hands to make them more dense.
Quick navigation through the article
We are convinced that the only thing better than a purchased dollhouse is a homemade one. After all, “building” and decorating it to your liking is very interesting for both parents and children. Moreover, anyone can make a doll house with their own hands; all you need is a few tools, simple materials and creative inspiration.
Master class 1. How to build a house in half an hour from a cardboard box
Cardboard doll house IR good because it is done quickly and from scrap materials. It can be decorated very beautifully and periodically expanded - adding new rooms, floors and entire buildings.

Materials and tools:
- A large cardboard box that will accommodate one to three floors for dolls 25-30 cm tall (Barbie, Monster High, Bratz, Winx, etc.).
- Scissors and cutter.
- Adhesive tape in a contrasting color (does not require painting) or masking tape(if you want to paint the house in the future). In this master class, bright green tape is used, and the house itself is not painted.
- White paint.
- Materials for decoration (if desired): scraps of wallpaper, wrapping paper, paint, brushes, etc.
Step 1: First, cut the box in half and cut off the top flaps from both halves.


Step 2. We put the resulting pieces of cardboard to work: we cut out a triangular roof gable from one part, and make a small hole in the other - this will be the second floor with access to the stairs. Next, glue the parts into place using tape and/or glue.

Step 3. From the unnecessary part of the box, cut out the slopes for the roof and another floor for the attic, and then glue the parts with tape. Don't forget to cut a hole in the attic for the stairs.

Step 4. Now cut it out stationery knife windows and front door on the first floor, having previously drawn the markings. Then we cut out the stairs from the leftover cardboard and glue them to the floors.

Step 5. Hurray! The frame of the house is ready, now you can start “finishing”. In this master class, all the details from the tiles on the roof to the steps of the stairs were drawn with a white marker.

As soon as the “repairs” in the house are completed, you can begin creating furniture.


You can come up with your own own design at home - paint the house and the roof outside, paint window frames, cover the walls with “wallpaper” made of fabric or scrapbooking paper, and finish the floor with linoleum or laminate. In the following selection of photos you can get ideas for decorating a dollhouse miniature of a house and furniture made of cardboard.


And here is an example of a cardboard house for dolls, upholstered with fabric, or rather with scraps of old dresses and pillowcases.

And finally, we suggest watching a video review of a dollhouse for Monster High dolls, made with your own hands from several large boxes.
Master class 2. How to make a doll house from a bookshelf or rack
Want to make a stronger house without fussing with plans and a jigsaw? Then use a small shelving unit or, say, an old bookcase as a base. With the simplest steps you can turn an ordinary piece of furniture into a wonderful home for dolls.

- The best option for “construction” is a cabinet with a depth (25-30 cm) that has a back wall. For example, this master class uses a Billy shelving unit from Ikea with a depth of 30 cm and a height of 106 cm (pictured on the right). In such a house you can arrange three floors, quite suitable for a 25-centimeter Barbie or Monster High. The price of Billy's rack is 2000 rubles.


Materials and tools for remaking the frame:
- Cabinet, chest of drawers or shelving;
- Plywood, MDF or boards 25 mm thick, 30 cm wide and at least 120 cm long (these are the dimensions for Billy's cabinet, but you can take boards of shorter or longer length/width depending on the size of your cabinet);
- Hardboard sheet, wall panel PVC or MDF (for making/replacing the back wall and making partitions in rooms);
- 5x5x20cm block (the pipe will be made from it);
- Several small photo frames that will become platbands for windows;
- Decorative molding of small width (can be polyurethane);
- Screws and screwdriver;
- Wood glue or liquid nails;
- Drill and drill bit.
Decoration materials:
- Wood putty (not necessary, but recommended for masking fasteners and joints);
- Primer (not necessary, but recommended for better paint durability);
- Acrylic paints in desired colors;
- Masking tape;
- Brushes and/or spray gun;
- Scissors;
- Materials for cladding the walls of rooms (paper for scrapbooking is best);
- Popsicle sticks for creating a lattice fence;
- Material for making roof tiles.
Step 1. Painting the rack
This step is optional if you are happy with the color of the selected shelving or cabinet. For example, white or plain colored furniture will look great without painting.
- If the cabinet is old or has a too “furniture” look, then it definitely needs to be repainted. To do this, we proceed according to the following scheme: sanding and sanding - primer (until drying) - a layer of paint (until drying) - a second layer of paint (until drying) - a layer of matte varnish.
In this master class, the dollhouse will not only be painted, but also decorated with brickwork. If you like this decor idea, then prepare the following additional accessories:
- Cellulose sponge;
- Gray paint;
- Acrylic paint (our instructions use a mixture of two paints - the color of red brick and chocolate).
So, first we paint the entire rack with gray paint. As soon as the last layer of paint has dried, we begin to create brickwork. To do this, cut out a rectangle from a sponge measuring approximately 3.5 x 8 cm, which will become a template for painting.

Pour paint into a container, soak a sponge in it and, starting from the bottom of the cabinet, print bricks - first one row, then the second row in checkerboard pattern. Remember to maintain approximately 5 mm gaps between bricks. Paint about 1/3 of the house this way.
Step 2. Making windows
This step is also optional, but if you want to create a realistic miniature of a house, then it is better not to skip it. In order to cut out windows, you first need to measure the window “frames” (if you have them) and draw markings on the outside of the cabinet walls.
Once the markings of all the windows are ready, you can start cutting. To do this, use a drill to make holes in the corners of the markings inside the border to create a starting point for the jigsaw blade. To make the window edges look neater from the inside, with inside The cabinet should be glued with masking tape along the contour of the marking. In the photo below you can see the work process.

To give your windows a more finished look, caulk and paint the “window niches,” remove the tape, and glue the frames to the outside of the house.
Step 3. Installation and roof decoration
In order to make a roof, you need to cut 2 boards 30 cm wide from plywood (or other lumber), but different lengths- 61 cm and 59 cm.

Now we join the end of the shorter board at right angles to the edge of the 61-centimeter board and drill holes again, but only at the end of the short board, passing the drill through the previously made three holes in the edge of the long board. This stage is clearly shown in the following photo.

Glue the two boards together, then secure with screws. If desired, the joint can be sealed with putty.

Next we proceed to finishing the roof. It can either be painted in 2 layers, or covered with “tiles” made from scrap materials, for example, cardboard or cork sheets. And finally, at the ends with front side We glue 2 parts of the roof molding.

Step 4. Creation and installation of a pipe, installation of a roof
It's time to turn wooden block size 5x5x20 cm into the chimney. To do this, simply saw off one of its corners (45 degrees) and paint according to the principle described in Step No. 1. When the paint has dried, we attach the chimney to the roof using screws.

Well, that's all, the roof is ready, all that remains is to screw it to the cabinet in internal corners as shown in the photo.

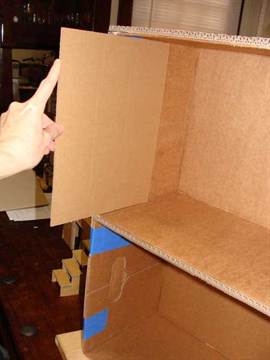
Step 5: Replacing or installing the back wall
The next step involves equipping the rack with a wall, if there is none, replacing the existing wall with a nicer one (for example, under white lining) or simply installing the missing wall for attic floor. We carry out the following actions: we take the necessary measurements, cut out a blank from hardboard/wall panel and fasten it with reverse side for nails/screws/glue.

Step 6. Install partitions to create rooms
Cut from any material (hardboard, wood, MDF, plywood) interior partitions, then cut doorways into them and install using glue or screws. Woo-ala! The dollhouse is built, you can begin the most exciting part of the work - decorating and filling the rooms with furniture.


If you add wheels to the rack, the house will turn out to be mobile
And here is an example of equipping a dollhouse with lighting, which can not only create coziness in it, but also play the role of a night light.

Master class 3. How to make a dollhouse from plywood
Making a dollhouse from plywood or wood is somewhat more difficult, but it will look better and will last so long that in the future it can even be passed on by inheritance. To create such a house you do not need to have special skills. It is enough to have the tools, strictly follow the drawing and the following video instructions, from which you will learn how to make a dollhouse with your own hands for 25-centimeter Barbie and other dolls 25-26 cm tall.
A large and impressive craft, but what can’t you do for your beloved children!
Materials:
- cardboard,
- glue “Moment crystal”,
- acrylic paints,
- acrylic varnish,
- padding polyester,
- pieces of fabric,
- braid,
- beads,
- wooden sticks,
- tassels,
- modeling mass,
- scissors,
- wire,
- beads,
- mirror,
- bead pendants,
- pieces of wallpaper,
- pencil,
- ruler,
- disposable containers,
- fantasy.
Operating procedure:
It so happened that one of my daughters got chickenpox, and I needed to keep them busy at home. We decided to make everything together house for our dolls. They made it according to the principle: I made it out of what I had. We didn’t have a ready-made box, but we did have a fairly large piece of cardboard and many small pieces of varying thickness and texture. I thought that our house would be a small one consisting of two rooms, but that was not the case: 2 young designers had their own thoughts about our house.
As a result, we began to do dollhouse 3 floors with 5 rooms(later the upper floor was divided into 2 parts and there were 6 rooms).
Layout
I cut out 1 piece from a large piece of cardboard - this is the back wall of our house and 2 side ones (see photo 1).

Next I bent 2 side walls and began gluing the floor and ceiling (photo 2).

The house has dimensions: height - 74 cm, width - 50 cm, depth - 30 cm.
I covered the blank of our house with pieces of wallpaper and suitable paper (see photo 3).

The outside of the house is covered with wallpaper, the roof is strips of cardboard measuring 3 cm by 31 cm, glued overlapping.
The frames are glued together from strips of cardboard.

Our house needed a variety of puppet, which we tried to make with our own hands from scrap materials. I glued everything by eye without preliminary drawings or patterns. I simply cut a cardboard rectangle and glued the necessary pieces to it. All furniture is painted acrylic paint and covered acrylic varnish.
Bedroom
So, room No. 1 - bedroom. There is a lot of furniture in it, and the first thing we’ll start with is this. It is quite easy to glue it together, just look at photo 4.

I covered the cardboard blank with acrylic paint, after the paint had dried, varnished it, glued a soft mattress, added a few soft pillows and a blanket.
The next pieces of furniture are a chest of drawers and a nightstand (photos 5 and 6).


The principle of their manufacture is the same - a small cardboard box to which false drawers are glued. There was also a place in the bedroom for a comfortable rocking chair (photo 7).

A large and spacious closet also found its place (photo 8).
In photo 9 the whole room is in color.

You can also watch how to make a bed for dolls (and other furniture) on the “Homemade” channel:
Common room
Room number 2 - common room to watch TV. The TV in our house is flat - a large cardboard rectangle was covered with black acrylic paint, after drying, a suitable picture was glued and the whole thing was covered with acrylic varnish.
The main place in this room is occupied by a spacious one, which houses a large family of dolls.
The base of the sofa is a cardboard blank (photo 10).

The back and armrests are covered with paint and varnish, and the base is glued with padding polyester and fabric. My daughters already had a table - it was a wooden construction set, onto which we glued a piece of cardboard and painted it all together.
We see room No. 2 in photo 11.

Video on how to make a cabinet:
On the second floor of our house there is a music room and a kitchen.
Living room
IN music room there is a fireplace (photo 12).

It, unlike all our furniture, is covered with cracks. At the beginning it was covered with white acrylic paint. After it dries, a layer of craquelure medium is applied. After this layer has dried, a layer of black acrylic paint is applied. After drying, the entire product is coated with matte acrylic varnish.
Since our living room is musical, then from 6 matchboxes the piano was glued together (photo 13). It was immediately covered with colored paper, but the paper turned out to be of poor quality, and later it was painted, like all the furniture in the house. In addition, I glued 2 square beads to it - these are pedals.

The piano stool (photo 14) is glued together from cardboard, painted and decorated with a velvet cushion.

Sofa (photo 15) and armchair (photo 16). I glued them together from cardboard and decided not to cover them with fabric, but simply paint them with paint; my daughters were happy to help me with this. After applying varnish, they are very similar to leather.
The entire music room after painting the furniture (photo 17).

Kitchen
Room No. 4 is the kitchen, it is small but roomy. Kitchen set- this is a large cabinet in the shape of the letter L (photo 18).

The sink is a small plastic jam container, the faucet is made from modeling clay, and there is a small hanging cabinet:

The stove is electric with 4 burners (photo 20), its door opens.

In the kitchen we have 2 chairs (photo 21) and a table (photo 22).


Dishes were also made from small items (photo 23).

Photo 24 shows our kitchen after applying paint and varnish.

On the top floor we accommodated children's and toilet room.
Children's room
IN children's The main place is occupied by a bunk bed (photo 25).

She has soft mattresses and pillows. In the room there is a small table (photo 26) and a chair (photo 27).


There is also a cabinet for toys (photo 28).

In this room I did not cut a window, but simply glued a cardboard one to the side wall. The room is decorated with a colorful alphabet (cut from paper packaging from a children's toy). Photo 29 shows a children's room in color.

Almost all the chandeliers in our house are glued together from disposable containers, beads, cockerel sticks and braid.
Only one, which is in the music room, is made of beads, wire and bead fittings.
I also glued a ladder to the house, but we have it attached for now, because I am afraid that if it is glued, it will interfere with two children playing at the same time.
Bathroom and toilet
For toilet room we needed a toilet, sink and bathtub. They needed to be made quickly and easily.
And I decided to just sculpt them from modeling material. Which is what we subsequently did with our daughters (photo 30).

They may not be ideal, but they were made together.
Our works took about a day to dry. Next, we painted them with white acrylic paint and coated them with glossy acrylic varnish. After drying, the tank turned out to be quite heavy, then I replaced it with a lighter one (cut it out of cork and painted it). To keep the sink stable on the wall, I glued a nightstand underneath it. The bedside table was painted like all the furniture in the house. Next, I glued the bedside table to the wall and floor of the house, and then glued the sink. A tap (made from modeling clay) and beads are glued to the sink. There was no ready-made mirror, and ours is also made of cardboard.
The toilet is made of several parts - the base, cockerel sticks, a tank (made of cork), chains and beads.
This entire structure is complemented by a seat - cut out of cardboard and covered with plain fabric.
In photo 32 the entire toilet room is in color.

So quickly and cheerfully, together with our daughters, we built from scrap materials our dollhouse. Such crafts always bring joy to children.
It may be quite simple for now, but my daughters are quite happy with it and enjoy playing together.
And another video on how to make a house for dolls with your own hands from plywood:
Did you like the product and want to order the same from the author? Write to us.
More interesting:
See also:
Toy Fixik Papus (crochet)
Kubyshkina Tatyana from the city of Zaporozhye sent us an absolutely unique master class on crochet...
Fabric octopus - a simple do-it-yourself toy
New master class from Irina Kalinina - how to do it a simple toy with your own hands. Which adult...
Knitted rattles for baby
In modern stores, the selection of toys for newborns is incredibly large. Meanwhile, it's so nice to...
Knitted lap dog
In this master class from Anna we will teach you how to crochet a lap dog. Knitted dog...
Brownie Kuzya (sewing)
Many of us remember the restless and mischievous Brownie Kuzya from the cartoon of the same name. What if...
Fabric snail
The master class was completed by: Serdinova Irina Sergeevna. A gift for your beloved sister on March 8th. Easy to...
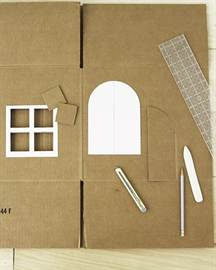
Children's crafts not only delight the eye with their brightness and beauty, the process of creating them is a special pleasure for a child, because it is so nice to give an original thing to someone close to you! And when mom joins in the creativity, things get doubly fun. If your child has already learned to work with scissors, invite him to make a “real” paper house together: printable templates, step by step instructions And interesting ideas in our article.
Working with Templates
To make a paper house, use ready-made templates for printing: this is much easier than drawing out the required dimensions manually. If possible, print out a color template for the first time; it will be easier to assemble:
- Print your favorite house model;
- Carefully cut out the parts (or the entire diagram);
- Fold the paper along the marked lines using a ruler;
- Using a small brush, apply glue to the joints of the elements, press them to glue them.
Your first paper house is ready. Now you can complicate the task by choosing a black and white template for printing. Prepare brushes, paints, sheets of cardboard or whatman paper in advance. For coloring a paper house by texture, gouache or acrylic is best.
So let's get started:


In general, it is better to think through the design in advance, based on the purpose of the house. If it becomes a decoration for the Christmas tree, use traditional New Year's colors- red with gold, blue with silver, white. If you are planning to create an entire city out of paper, choose more restrained shades.
Practice shows that no matter how simple the template for printing, there is always a risk of ruining the craft. Little tricks will help you avoid incidents when creating a paper house:

- Not all children preschool age are able to cope with cutting out small parts from thick paper - at best, the edge of the element will turn out uneven, at worst, you will have to re-print the template, and the child’s mood will be ruined. Therefore, cut the workpiece yourself;
- When creating fold lines, do not forget about the doors and shutters on the windows; they need to be bent in advance, before gluing. When the craft is completely assembled, it is difficult to bend these parts evenly, much less carefully cut through them;
- Using paper with a pattern (wallpaper) for the base, it is important to make sure that after gluing on all parts of the house the pattern will be on the wrong side;
- The last element of assembling a paper house is always the roof; after gluing it together, it is almost impossible to correct the flaws;
- Sometimes when the glue dries, the edges of the paper move apart. The fault is one of two things: there was not enough glue or the template parts need to be pressed down better. For better fixation, connect the elements with paper clips and leave them until the adhesive has completely dried.
Paper house - application ideas
With a little imagination, you can expand the scope of application of paper houses. Here are three popular simple ideas:

Surely your child has already come up with a lot of ideas for using and decorating paper houses: let our printable templates help him realize his creative desires.
In the house where the cat lives, reigns special atmosphere. Pets may have different character, however, they all bring variety to the former measured life.
Often cats become attached to one place, spending a lot of time there. Accordingly, they leave scraps of fur, sharpen their claws, and play. In such cases, the question arises of creating a separate sleeping place, own house.
This can be bought at a pet store. In this case you will have to spend money. Or you can make your own cat house from cardboard box.
Types of cat houses
Here is a gallery of ideas from home craftsmen:
You can explore the range cat houses, presented on the market, and choose the optimal design for your pet.
Most often, cat owners choose the following models:
- Various beds. Suitable for calm animals that spend most of their time observing.
- Booth house. Suitable for pets who like to spend time in solitude. It's easy to make from a cardboard box.
- Hammock bed. Can be located in any free place - under a chair, stairs, etc.
- Game complexes. Suitable for families with two or more cats. They may consist of several houses, passages, scratching posts and hammocks. Their parameters and content depend on the desires and capabilities of the owner.

We create a house for a cat. What do you need to know?
Dimensions. Cardboard houses must correspond to the parameters of the animals. For a pet with average parameters, a cubic design will be suitable, the width of which will be about 40 centimeters. A hole 15–20 centimeters wide is sufficient for entry. If the entrance is very wide, the animal will feel unprotected. The basic rule is that the pet must fit freely in the house, lying on its side.
Important! Siamese and Bengal cats love to sit on their hind legs. It is better for them to make a cardboard house with their own hands in the form of a wigwam. Its height should be at least 60 - 70 centimeters.
Benefits of a self-made cardboard house:
- Saving money.
- A self-created product will be in harmony with the interior of the room.
- An additional reason to please your pet.
- Minimum investment of time and effort.
- There is no need to throw away empty boxes.

- We cut out rectangles from a cardboard box measuring 50 x 40 centimeters. For Siamese and Bengal cats, cut out pieces measuring 50 x 60 cm. A total of three rectangles are needed. This will be the base and two side parts.
- We cover the rectangles inside and outside with upholstery fabric.
- We connect the two parts to each other at an angle of 60 degrees. We attach the third part to them. We fasten the entire structure with PVA glue. We get a house in the form of a triangular prism.
- We cover the bottom of the house with padding polyester or other soft bedding.
- We install the house near the radiator to make the cat warm and cozy.
We decorate self-made homes for pets like this:
- We cover it with fabric, which we select in accordance with general style interior
- Cover with paper white. Then we decorate it to our liking.
- We wallpaper it to match the walls of the apartment.
- We decorate the house with soft toys in the form of mice, birds, other animals and insects.

You can install a scratching post next to the house so that your pet can sharpen its claws. This way you will protect your furniture from damage.
Precautions:
- It is prohibited to use a stapler as a fixing material. Cats sometimes chew cardboard. A pet may accidentally swallow a stapler or injure its mucous membrane.
- Do not use adhesives with a strong odor. PVA glue is optimal. It does not emit strong odors and dries quickly.
- It is forbidden to use boxes found on the street. Stray cats and dogs could live in them. There is no guarantee that they were healthy.
- Tight boxes should not be used. The cat will want to stay awake in a place where it is uncomfortable.
- It is forbidden to hang a cardboard cat house. The product may fall and the animal may be injured.
A self-built cardboard house for a cat will save money family budget and the nerves of the owners. After all, a pet will not look for a place to lie in the wrong place.