DIY brick fence, building a brick fence. Brick post for a fence: calculations and masonry technology How to lay a brick fence
Many people have suburban summer cottages where they can take a break from the bustle of the city and put themselves in order. But the rest should be comfortable and, first of all, safe. To achieve this result, you need to enclose your area with a fence. And the best option in this situation is the installation of a fence with brick pillars.
The idea
Before starting such a large and ambitious project, you should familiarize yourself in more detail with all the proposals that companies can offer for the construction of these structures.

In order to find them, it is not necessary to go to every store and clarify all the details. Using the world wide web, you can find information and photos of a brick fence, and any other information regarding this product.

The main thing is to correctly analyze the market and choose the product that suits the most.


The foundation
Before starting laying a brick fence, a person needs to select the material that will be used in the construction of this structure. After all, we can say with confidence that a fence is not only a method of protection. It can also be used as an element of external decor.

Thanks to its presentable appearance, he will be able to make up a whole design ensemble together with other objects at his summer cottage.

Therefore, for this, there is a large number of different types of bricks. Here is some of them:
Facing brick
A very popular material on the market. Thanks to its versatile properties, it has the ability to add unique lines and original design solutions during the masonry process. This brick can take the form of any material, and it also does not need final processing. The color palette is huge and varied.

Chipped brick
Brick, the main purpose of which is decor. Quite an expensive model, so most often it can be found on the buildings of wealthy people. Possesses good strength characteristics. Due to its shape, it can give the fence an unusual look.

Ceramic bricks
It differs from a conventional product by the presence of roughness on the surface. It is produced in various color tones, which allows you to give the structure a unique and inimitable look.

Silicate brick
The classic is sand-lime brick. An economically viable option, in terms of strength and power, not inferior to the richer "brothers".

Of course, in appearance, it does not reach the level of expensive models, but if you decorate it beautifully, you can get an effect that will in no way be inferior to fences from expensive estates.

Clinker brick
Expensive, but at the same time one of the most trending materials in our time. Most often they attract people with their appearance and great installation possibilities. Clinker bricks are made using special clay and are not inferior in strength to other types.

Due to the absence of internal voids, it can last for decades, but due to the complexity of manufacturing it is quite expensive.

Hyper pressed brick
Well, a completely new trend is a protective structure made of hyper-pressed bricks. The main differences are - resistant to environmental changes, durable, environmentally friendly. The material is made in various colors.

Pros of brick
Before pouring the foundation under a brick fence, you need to understand if it has any advantages! Or it may be worthwhile to wait and weigh your decision more carefully. But if a person has already decided on the construction of this particular structure, then he will certainly not fail with his choice.


A brick fence has a number of important advantages that distinguish it favorably from other analogues. These include:

Reliability. A fence made of such material will serve as an excellent protection from "accidental" guests and the glances of curious neighbors.

Long service life (at least 10 years). With proper use, such a fence will stand for a long time and will serve not only those who built it, but also their children.

Thanks to the brickwork, such a structure will easily withstand any natural disaster (of course, within natural limits) and will not envy changes in the temperature environment.

Attractive look. A fence can be built not only for the sake of protection, but also for the sake of decorating the square, because a large number of different ideas can be embodied on it. For example, add small arched arcs or weighty columns to the structure.

If we consider a brick fence as an investment, then this is the smartest move that a person can perform.


DIY fence installation
If a person has a number of specific skills, then he can easily make a brick fence with his own hands. To do this, he will need patience and an auxiliary construction tool:
- trough for solution preparation;
- mixing shovel;
- hammer;
- Bulgarian;
- rope;
- cement;
- fittings;
- sand;
- putty knife;
- crushed stone;
- water;
- buckets.

Do-it-yourself fence installation can be divided into several stages:
- stage one - collection of construction tools;
- stage two - the choice of material;
- stage three - review of recommendations related to general design;
- stage four - marking the site;
- this fifth is foundation pouring;
- stage six - brick laying;
- the seventh stage - the final cleaning of defects.

The price of the issue
The price of a brick fence can be very different, because each company sets its own conditions. On average, the price of a fence starts at 500 rubles per m / n. More expensive options start at 5,000 rubles per m / n.

Photo of a brick fence


Many owners of private houses, when erecting a fence that protects their property from unwanted prying eyes, choose brickwork as a support for the fence. The laying of brick posts for the fence is simple - you can easily build it yourself.
In addition, such a fence with brick pillars will have many advantages. The main ones are:
- Increased security level of the fenced area. Brick supports are very strong and stable, they have an increased service life. The installation option for such a design will determine the safety level of the fence and its aesthetic appeal. During installation, you can use a rigid foundation or forged elements equipped with sharp tips. Such a forged fence on brick pillars not only protects private property, but also performs decorative functions.
- Creativity of design. Professionally executed masonry will be able to decorate the house and the adjacent territory. In addition, caps on brick fence posts can be used as a decor.
- Affordable pricing policy. Materials for the construction of a fence of this type are much cheaper, so its cost compares favorably with stone fences.
- Durability due to the use of reinforcement in the foundation of the fence and reinforcing elements in the brick pillars.
- Possibility of choosing a decor - numerous cladding options allow you to beautifully design a fence. At the top of such a support, you can install, for example, lanterns that will illuminate the courtyard or unusually beautiful covers on brick fence posts. In addition, it is possible to put any climbing ornamental plant on such a pillar, which will serve as an element of landscape design and an additional decoration.
Varieties of brick fences
Before starting the process of erecting a fence, you should decide on the most suitable type of structure. This will help in calculating its parameters, as well as in identifying the maximum load on the foundation. The main role in this is assigned to the material from which the fence sections will be made. The most common options for a brick fence are:

Required materials and inventory
In order to bring to life the project of a fence with brick pillars, you will need the following materials:
- Clay brick of standard sizes - solid for the first rows of pillars, and hollow - for laying the main structure.
- Reinforcing steel rods - so that the mortar of each subsequent row falls evenly on the previous one.
- Steel pipe - to reinforce the column in a vertical position.
- Crushed stone - for filling the empty space that forms between the masonry and the reinforcement.
- Cement and clay sand - for creating masonry mortar.
- Board and timber - to form the basis for the foundation and other auxiliary needs in the construction process.
- Bars for foundation reinforcement.

If you decide to independently organize brick posts for the fence - photos with the installation process can help with this. Before embarking on a project, it is important to select the tools. Most of the tools that are used in the construction of a fence with brick pillars are most often owned by every owner. They can also be borrowed from neighbors or rented. Such materials include:
- Trowel;
- Bayonet and shovels;
- A trough or other bulk container for mixing the solution;
- Several buckets;
- Garden hose;
- Scaffolding made of wood.
The main stages of the construction of pillars for a brick fence
If you decide to build a fence that will rest on brick pillars, this is the right decision, because the cost of a brick pillar for a fence is acceptable, and you can also build it on your own, thereby saving on additional specialists. But in order for your fence to be the standard of reliability, you should adhere to the specified sequence of stages and technology:
Stage 1: Calculation of the number of brick pillars
Before you go shopping for building materials, you should accurately calculate their quantity. It is important to calculate how many brick pillars will need to be erected around the perimeter of the enclosed area. The most common length for one fence element is 2.5 or 3 meters, it is advisable to adhere to such standards. The most practical and convenient in construction is the width of one brick pillar - 0.38 m. Other important dimensions are shown in the photo.
Important ! Masonry is most often made in one and a half bricks - this is quite strong and the most economical thickness.

In order to separate the adjacent territory from the carriageway, at least 4 sections of the fence should be installed, adding to them the width of the gate and wicket. To accurately calculate the number of required columns, you should measure the length of the fence around the entire perimeter of the territory, you should measure the length of the perimeter of the fenced area. Next, calculations are performed for each span of the fence, taking into account the width of each post.
Practice shows that 110 bricks will be needed for one standard-width pillar with a height of about 2 meters. It should not be forgotten that the first three rows of brickwork are made of solid clay bricks, which makes the structure more durable. Next, you should multiply the resulting number of bricks by the number of columns, then add a small stock to the resulting amount. Then you can go to a specialized store for everything you need.

Of no small importance is the type of support material that will keep the pillar structure upright, preventing premature failure. Of course, choosing high-quality material, the cost of a fence made of a profiled sheet with brick pillars will be higher, however, the service life will increase several times.
Attention ! For fence elements located near the gates and wickets, the support pipe should be selected taking into account the additional load, therefore, the strength should be higher than usual.
Thanks to the correct selection of material, not only individual elements of the fence, but also the entire structure will be stable and durable.
Stage 2: Pouring the foundation
The foundation is poured and the support pillars are installed based on the planned load on it. If you are installing a wooden fence with brick pillars or a corrugated board structure with brick supports, then it is most convenient to use a strip-type foundation. The construction process is not complicated, so it can be done independently. To do this, you should dig a trench around the entire perimeter of the fenced area. Next, you should dig shallow holes in the locations of the brick pillars, install supports in them, and fix them with rubble. The verticality of the arrangement should be checked by level.

After that, sand should be poured onto the bottom of the trenches, and formwork should be assembled at the edges. Then you need to put a reinforcing mesh in the trench and fill the full depth of the trench with a pre-prepared concrete mixture.
Stage 3: Bricklaying process and installation of protective caps.
It is not difficult to lay bricks on your own, the main thing is to be careful and follow the technological process. The usual step when arranging supports is 1.5 bricks.
Attention ! The first three rows should be made of solid bricks, the rest of the rows - at the owner's choice. You can make them from solid bricks, for the convenience of work, it is better to use a more liquid solution. If the brick is hollow, then it is more convenient to work with a thicker mortar.
For the same thickness of joints between rows of bricks, it is convenient to use special twigs, which should be laid along the entire perimeter of the brickwork from the outside. After a layer of brick is laid on them, the twigs should be carefully pulled out and wiped off the excess mortar. Thus, the entire height of the post fits.
During the masonry process, the inside of the brick pillar is poured with a working solution, and in order for the structure to be more durable, small reinforcement or masonry mesh can be laid. The lags, as well as the filler to the posts, begin to be attached 3 weeks later, after the filler has been infused. Special covers for brick fence posts, which also perform a decorative function, also help to create maximum protection for the supports.
After all these tips, it will not be difficult to make a brick post for the fence, and even a novice amateur can cope with such an activity. And if anyone has any questions, you can review the first-class video about laying brick fence posts
Brick fences are strong and durable. It is this advantage of them that contributes to the popularity of this type of fencing. This design can withstand heavy impacts. Several layers of bricks are sometimes used to strengthen it.
If the fence is made in accordance with all technical requirements, it can last 50 years or more. Not every material can boast of such performance characteristics.
Pros and cons of fencing
The main advantages include the following:
- does not require maintenance;
- does not need painting;
- there is no need to clean it;
- fits well into the countryside;
- hides the site from the prying glances of passers-by;
- provides security.
However, the brick fence has its drawbacks. These include:
- the appearance of efflorescence (white bloom that forms on the surface of the brick). This plaque is the result of salt crystallization on the surface of the material and is difficult to remove;
- the need for careful selection of bricks. If low-quality material is used, in bad weather conditions (rain, snow), it can begin to crumble after a few years. Installing an additional canopy over the fence can solve the problem, but this will lead to high costs;
- high price and laborious work on the construction of such a fence.
The structure can be built independently. This requires certain skills in the field of construction and knowledge of all stages of this type of work.
Varieties of brick for a fence
Before starting the construction of the enclosing structure, you need to decide on the type of material for it. Best fit brick used for cladding(for example, red clinker). Such material is somewhat more expensive, but it is not only durable and reliable, it also gives the fence a more aesthetic appearance.
When constructing a structure, you can use ceramic brick... It differs in that it has a rough surface. And the ability to choose from several shades will give the fence a unique look. As for the pillars, they are also often made of bricks. Moreover, you can use the same type as for the fence.
To save money, they sometimes use silicate brick... Outwardly, the design will noticeably lose to the fences made of the above-described material, but in terms of reliability it is in no way inferior to its more expensive "competitors". In addition, such a fence can subsequently be veneered.
Preparation for construction
The preparatory phase begins with drawing preparation and measurements... This will allow you to calculate the amount of costs, as well as the optimal pitch of the fence posts, which will bear the main load (along with the foundation). The distance between them is usually two to three meters.
Next step - cleaning the territory, on which the structure will be erected. First of all, the grass is harvested. This can be done either with a sidecut, or with a lawn mower or trimmer. It is also necessary to clear the area of bushes, trees and debris (it is important to remember that when cutting trees, roots must also be removed, otherwise they can interfere with construction).
Tool selection
Before you start erecting a brick fence, you need to prepare the appropriate tool:
- You will need a trough to mix the solution. A simpler option is to rent a concrete mixer.
- For transporting mixtures and materials, it is advisable to prepare several buckets and a wheelbarrow.
- When preparing the foundation, you cannot do without a shovel.
- In the process of laying bricks, a trowel is useful for leveling the mortar.
- At the marking stage, a tape measure is used, as well as a square.
- To control the horizontal and vertical planes, you will need a plumb line or a building level.
- Using the rule, the front part of the masonry is checked.
- Rows are marked using ordering.
Read more about how brick fence posts are laid here.
If you are wondering how and what to make a beautiful fence with your own hands, check out this article.
This material provides detailed information about polycarbonate fences for summer cottages.
The foundation for the fence
Then you can start building the foundation. Marking is done using pegs, on which a thin rope or fishing line is wound around the entire perimeter of the future structure. It is important to pay attention to the fact that the corners must be right. At the same stage, it is necessary to determine the location of the wicket and gate. The places where the pillars will be located are marked.
For a brick fence, a strip foundation is usually created, the depth of which should be at least 60 centimeters (ideally, the depth of the trench should be about 1 meter).
As for its width, this aspect depends on the type of masonry, as well as the estimated height of the entire structure (usually the fence is built in half a brick, and its height does not exceed two meters). Where pillars are supposed, additionally drive in metal pipes to strengthen the structure.
The foundation trench is covered with gravel (from time to time it must be watered with water to achieve shrinkage). The formwork is mounted along the entire length of the future structure.
It is recommended to immediately prepare all materials for pouring, as it should be carried out on the same day (to avoid joints). To strengthen the base, you can use reinforcement; for this purpose, it is laid along the entire perimeter.
The foundation dries for seven days, then it should be covered with a compound that will protect it from moisture absorption.
Erection of pillars
Supports for such a fence are of several types:
- one and a half, their thickness is one and a half bricks;
- double, their thickness is two bricks.
It should be noted that the pillars may have other sizes, but this will be the exception rather than the rule. When building them, it is important to build on what function they will perform (support for the span, gate or wicket).
Masonry work is carried out evenly, in compliance with all the rules, as well as strapping, so that the structure is more durable. For this purpose, you can use fittings.
Places between the pipe and the brick must be laid with mortar and tamped well. To save concrete, you can use broken brick or stones.
In the process of erecting pillars, it is necessary to constantly measure the verticality using a plumb line or level.
After the masonry work is completed, the supports must stand for two weeks.
After that, they can be treated with an impregnation, which will prevent the appearance of white spots (if red brick was used as a material).
In order to subsequently prevent moisture from entering the upper part of the structure and not accumulating there, it is recommended to provide a special cap (made of metal, ceramics, concrete or wood).
Fence masonry
For masonry, a cement solution (water, sand and cement) is used. When erecting spans, one row is usually made. However, if a tall structure is planned, it is better to do two rows... Multi-colored bricks can be used to create a unique design, but this must be planned in advance, at the stage of project preparation.
For DIY construction, follow these instructions:
- In the process of work, you should constantly monitor the level. For this, it is recommended to use a tensioned twine (a pre-prepared board frame is also suitable for this purpose). The volume of solution between the rows should be the same. Excess is removed even before it dries.
- Professional builders recommend using orders (they are mounted in the corners with nails). It is necessary to apply the mortar to the brick with a trowel. With the same tool, you need to remove the excess. And in order for the materials to have better adhesion, the brick is pre-soaked in water.
- After laying, the seams are processed. For this, either a regular solution is used, or compounds that can be purchased at hardware stores. An important point is the waterproofing of the fence fabric (the same principle applies as for the protection of poles).
- The top of the fence is laid with roofing felt and fixed with nails. After that, liquid glass is added to the solution, while constantly stirring. As soon as the disappearance of moisture becomes noticeable, the resulting material is laid out on the surface of the roofing material in the form of a gable roof.
If there is no desire to carry out these works, it is recommended to install special skates made of ceramics, metal or wood. The material of the ridge of the span should be in harmony with the material of the cap on the posts (this also applies to the color). - The final stage in the construction of the fence is the jointing (if desired). This technique is performed using special spatulas with various notches. The tool is passed along the joints in the brickwork to give them a more noble look. As a result, quite interesting solutions are obtained.
Major mistakes during construction
When building this type of fence, there may be some shortcomings that can significantly affect the appearance and functionality. These include:
- Incorrect determination of the distance between the posts (usually too great a distance). The supporting elements of the fence are designed for certain loads. Even a small excess of them can lead to very negative consequences, up to destruction.
- Before starting the construction of the foundation, it is necessary to correctly determine the depth of the trench. In general recommendations, this parameter can reach from 50 centimeters to one meter. Nevertheless, in each specific case it is necessary to proceed from the depth of soil freezing. Another important point is the size of the foundation itself.
- A typical mistake is concreting pillars in clay soil. The result of such an oversight may be the bulging of some of the supporting elements in the spring. This happens because during the thaw period in winter, the soil thaws unevenly and is unevenly saturated with water. With the onset of frost, soil that is unevenly saturated will react differently to frost. It is better to concreted on sandy soil, as it permeates moisture well and does not contribute to the extrusion of the pillars.
- When laying, it is not recommended to use bricks signed at the factory with chalk. Such labels are not deleted. The material should be made using one technology and preferably one batch.
- You shouldn't masonry without a special template. Otherwise, there is a risk of incomplete filling of the joints or the ingress of mortar on the front of the brick. As a result, this element will have to be changed, since it is impossible to scrub its surfaces with strong acids - this can lead to a loss of color.
How can you veneer a brick fence?
If, for example, silicate brick is used as the main material, its not quite specious appearance can be hidden behind the cladding. Natural stone, besser, crushed granite, sandstone and so on are used as the material. The very principle of work is as follows:
- Before starting work, it is necessary to attach a special mesh or welded mesh to the surface (in the second case, the thickness of the wire should not exceed one and a half millimeters).
- After that, the wall is plastered (this stage is mandatory in order to avoid the appearance of voids between the brickwork and the facing material). In addition to plaster, a special coarse-grained filler is applied to the fence to roughen the surface (layer thickness no more than 30 millimeters).
- After the plaster is dry, you can start the cladding. Before applying the stone to the surface, it must be rinsed so that there is no dirt, clay or sand on its surface (they can interfere with adhesion). The mortar is prepared from sand and cement in a ratio of 2 to 1. It is possible to add glue for outdoor use. The resulting mixture must be diluted with water.
An important feature of this type of work is that the solution is applied not to the fence, but to the stone... The size of the seam between individual tiles should not exceed one and a half centimeters. After the work is over, the stones are washed with a special solution to remove dirt and covered with a compound that will protect them from the effects of climatic conditions.
What can you combine such a fence with?
A brick fence can be combined with almost any building material. For example, it could be wood... In this case, the pillars are made of bricks according to the method described above, and the span is made of wood.
At the same time, today quite often you can find a combination of a brick fence and corrugated board.
Unlike wood, the metal profile is more durable, although it is somewhat inferior to it in aesthetic parameters.
A more noble, but at the same time more expensive material is metal picket fence... It also pairs quite well with bricks.
Finally, there are fences where brick is combined with forging... Unlike previous options, this one is not suitable for everyone, since such fences completely open the entire interior space.
fence construction material
The video clearly shows the process of laying the fence:
Photo gallery of brick fences
The photo shows various options for such designs:
Source: //vamzabor.net/kirpichny-zabor/svoimi-rukami-iz-kirpicha.html
DIY brick fence
The most fundamental and solid are brick fences. In combination with metal bars and gates, they create an impression of the social status of their owner. Some samples capture the entire flight of the designers' imagination. You cannot pass by such fences without admiring them. Other designs are simpler, but no less reliable and of high quality.
Varieties of bricks and fences made of it
Brick is one of the most ancient building materials on earth. Its production technology has been known since time immemorial. Brick buildings were found in Egypt, which are more than 5000 years old.
Modern brick is very different from the old one. It has smoother edges and smoother edges. The dyes added to the solution allow you to create products of various colors, which has a positive effect on the demand for this material.
There are 4 main types of bricks:
- Adobe bricks are made from special clay with a filler.
- Ceramic is made from clay fired at a high temperature.
- Silicate bricks contain ordinary sand and lime.
- Hyper-pressed is obtained by pressing limestone with the addition of cement and water.
According to their quality and scope of application, brick is divided into masonry and facing. The first is used for laying walls and partitions. It is subsequently to be finished, since it does not have a flat and smooth surface.
Facing brick itself is a finishing material and is used for decorative design of building facades, the construction of columns and fences.
Human imagination is able to translate any ideas into ready-made creations, so there are no limits to the variety of brick fences built today. However, all of them can be divided into just a few main types:
- Combined fences made of brick, bent metal and sheet steel.
- Lattice fences with brick posts.
- Fences made of corrugated board with brick posts.
- Completely brick fences.
Combined fences made of bricks, bent metal and sheet steel are most popular with sufficient material resources. Luxurious brick columns, crowned with small architectural forms, are interconnected by a forged lattice with patterns. At the rear, it can be covered with sheet steel, coated with hammer paint, giving the effect of antiquity and reliability.
The embossed brick-framed metal fence looks amazing.
Lattice fences with brick posts look no less attractive than the previous ones.
This type of fence is not intended to hide the space behind it, but on the contrary exposes the interior of the courtyard.
The vintage design of wrought iron grates, combined with the original masonry, allows for the creation of inimitable fencing patterns, behind which are landscaped spaces.
A lattice fence designed to highlight the beauty of the natural features behind it.
The simplest fence using bricks is a corrugated board fence. This is a fairly budget option, since it does not require the use of expensive forged products.
Brick posts are connected by metal veins from a profile pipe, on which sheets of corrugated board are fixed. Such a fence looks quite attractive, although it does not require significant capital investments.
In addition, it is a capital structure, like all brick buildings.
The simplest type of brick fences using a profiled sheet.
Finally, completely brick fences. These are truly monumental structures that protect the mansions of wealthy citizens. They are designed to play not only a decorative function, with which they cope perfectly well, but also a protective one.
Most often, such fences have a great height up to 3 - 4 m. They can be a solid wall of brickwork, or they can be lattice. In this case, the brickwork is done in such a way that through gaps remain.
Completely brick fence, reminiscent of a fortress wall, is designed to protect the owner's "estate" from prying eyes.
Separately, it must be said about the columns. They also come in different types. The simplest option is a column with 4 bricks masonry without embossed niches. Masonry can be made in 6 bricks or more. The surface of the post can have various niches and porticos.
Sometimes you can even find round brick pillars. On top of most of the posts, a wiring is made, on which a visor made of metal, concrete or ceramics is mounted. There are differences in the type of outer surface of the brick. Most often it is smooth, but it can also have a raised texture.
The most expensive models resemble broken natural stone.
To create a fence that resembles a work of art requires the work of not a single master: a bricklayer, a blacksmith, a welder. It is much easier and cheaper to make an ordinary fence, consisting of brick posts and spans of corrugated board between them. This type of brick fence can be made with your own hands.
Step-by-step instructions for building a fence made of brick and corrugated board
Consider the option of building a budget fence and calculate the approximate need for materials for it. To carry out the entire complex of construction work, we will need the following materials:
- Cladding ceramic or silicate bricks to choose from. To create an original design, we will take two color options: brown and pink. For reference: in accordance with Russian standards, brick sizes are divided into single (250x120x65 mm), one and a half (250x120x88 mm) and double (250x120x140 mm). The working, largest surface is called the bed, the middle edge is the spoon, and the smallest end is the poke.
- Cement, crushed stone, fine-grained sand, water and reinforcement with a diameter of 10 mm. This kit is required for the construction of the foundation.
- Round or square steel posts. Can be used. Casing pipes that are used in wells are best suited for these purposes. They have thick walls and are not easily corroded. For simple posts, pipes with a diameter of 75 mm are suitable, and for posts on which the gate will be hung, it is better to take pipes of 100 - 120 mm. The length of the pipes depends on the height of the posts. Most often, it does not exceed 3 m, taking into account the deepening into the ground.
- Profile steel pipe with square or rectangular cross-section. Its dimensions may not exceed 40x25 mm. Needed for the construction of veins. The standard length of such a pipe is 6 m. Therefore, when choosing the distance between the posts, this circumstance should be taken into account in order to avoid waste of material. With a fence height of up to 1.6 m, two veins per span will be enough. If the fence is higher, then they take already three.
- The corrugated board must be ordered in such a color that it is in harmony with the color of the purchased brick. Warm colors are most suitable for brick posts. For conventional fences, fence corrugated board is used, which has a smaller thickness and profile height than roofing. The standard width of the sheets is 1200 mm, therefore, for the construction of 3 meter spans, the sheets will have to be cut along the wave.
- Canopies for posts made of metal, painted in the same color as the corrugated board. Their sizes must match the sizes of the posts. Finishing strips for corrugated board. They will cover the sheets on top.
- Ebb tides on the basement are necessary to prevent the gradual destruction of the masonry on the basement and foundation under the influence of cycles of freezing and melting of water. Welding electrodes. Roofing screws of the required color with rubber washers.
From the tool we will need: shovel and bayonet shovels for digging trenches, a special hammer used by bricklayers, a rubber mallet, a metal rod with a cross section of 8-10 mm for leveling the joints between bricks, a trowel, a concrete mixer, if possible, a long rope, liquid and ordinary building levels , screwdriver or drill, grinder with a disc for cutting stone.
Construction of the foundation for a brick fence
The simplest solution is to build a columnar foundation under each pillar. However, such fences look too simple and cheap and are suitable, perhaps, for fencing a site from the back side.
Sheets of corrugated board on it will play only a decorative function, and the fence itself can rightfully be called brick.
Suppose we need a brick fence 25 m long. In order for the material consumption to be optimal, we need to arrange the posts every 3 m along the axes. At the same time, in one of the aisles it is required to arrange a gate for transport to enter the courtyard. We will order them later, ready-made from sheet steel. We should have a fence similar to the one shown in the picture below.
We will calculate the need for materials and describe the stages of construction of such a fence.
We mark the perimeter of the foundation with a rope. It can be deepened by 30 - 40 cm, depending on the depth of the hard ground. It is enough to raise it 10 cm above the ground.
Its width will be 15 cm between the posts. In the places where the columns will be, they make platforms 60x60 cm. There will be 8 such platforms according to the number of columns. Accordingly, there will be 7 spans.
We will minus one, since it is not needed at the gate.
Thus, the volume of the foundation will be equal to the sum of the volumes of the sites and spans. The platforms are 8 * 0.6 * 0.6 * 0.5 = 1.44 m3, and the spans are 7 * 3 * 0.15 * 0.5 = 0.5 m3. Summing up these figures, we get that we need about 2 m3 of concrete. We need reinforcement at least 100 m.
We will not describe the process of pouring the foundation, since it is no different from the standard one. The only thing to do is install steel pipes where the posts will be. To do this, they are driven into the ground with a sledgehammer and placed vertically. Later, in the process of concrete hardening, you need to make sure that they do not tilt.
We should get a monolithic tape with 8 pads for the posts, with pipes sticking out of them.
Strip foundation for a brick fence.
Brickwork and installation of corrugated board
The most difficult process is masonry. First, lay out part of the first column. This can be done in various ways. We will choose the simplest version of 1.5 bricks. This means that we need 4 bricks for each row.
1.5 brick masonry around a steel post.
We lay the first row, as shown in the figure, leaving the seams no more than 1 cm. We align them using a device made from a square rod. We overlap the second row with the first, shifting the pattern by 90 degrees.
Having made several rows, we begin to lay out the base until the next column. The level of the first row should completely coincide with the first row of columns. The thickness of the base will be equal to the width of the brick. Usually the base is made for 2 - 3 bricks, but you can raise it as much as you like.
We will make calculations of the need for brick for 3 rows of the basement.
Having made the laying of all the posts to the level of the base, you can continue to lay the posts one at a time to the very top. During the laying process, the cavity inside the pillar is filled with mortar. In two places, the veins of the fence are welded to each pipe. They should all be on the same level.
To pass them through the masonry, a grinder is used to cut bricks. The jointing is done very carefully, observing the dimensions and depth of the grooves. An ebb is attached to the base from above. In the end, the skeleton of the future fence should be obtained. A visor is attached to each column.
Sheets of corrugated board are fixed on the veins with self-tapping screws in each wave.
Brick base of the future fence.
If the height of our fence is 2 m, and we make the base in 3 rows, then we can count the number of bricks in two ways: by rows and by volume. The first method is more accurate, but also more cumbersome, so we will use the second. The volume of one column is 2 * 0.37 * 0.37 = 0.27 m3. Multiplying by the number of posts, we get 2.2 m3. The base will take 18 * 0.12 * 0.065 * 3 = 0.4 m3.
In total, we need 2.6 m3 of bricks. Due to the fact that such a calculation is not very accurate and does not take into account the thickness of the seams, then you need to purchase 10% more. The surplus can always be returned to the store, but buying just such a brick may not work. It is not difficult to calculate the amount of corrugated board. It is enough to divide 18 m by 1.2 m. We get 18 sheets.
You will need to buy 19, since they are overlapped, and you will also have to cut them.
As you can see, the construction of a brick fence, even with spans of corrugated board, requires serious time, labor and financial costs. However, it's worth it. Such a fence will last for several decades.
Source: //StroyVopros.net/zabor/zabor-iz-kirpicha-svoimi-rukami.html
A brick fence is one of the most reliable and durable. It protects the territory not only from penetration inside, but also protects it from the wind, while preventing strangers from even looking at the site. That is why the question of how to build a brick fence is very popular among owners of private houses and novice builders.
Ready brick fence
Step by step installation
The entire construction process is divided into several stages, each of which is of great importance and the correctness of its execution will subsequently be reflected on the entire structure.
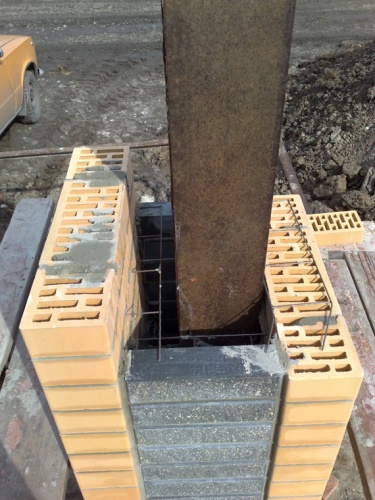
Trench prepared for concreting with reinforcement, pillars and formwork
Foundation
The standard construction of brick fences involves the manufacture of a strong foundation (also learn how to make a foundation for a fence). Moreover, its depth and width depends not only on the structure that it has to carry, but also on the type of soil.
This guide will use a typical design excluding moving beds and sand.
- First of all, you need to dig a trench, the width of which should be 10 cm more than the estimated thickness of the fence.
- Its depth is usually about 100 cm, but in this case you can save a little and reduce it to 60 cm.
- Next, mark the location of the pillars. At the same time, instructions on how to build a brick fence with your own hands are advised not to make the distance between them more than 300 cm, and to separate the openings for doors and gates on both sides with columns.
- After the places are marked, additional indentations are made in the trench for the piles. To do this, use a drill, which is deepened by 40 cm.
- Piles or a pipe with a diameter of about 60 mm are inserted into the resulting recesses, concreting them flush with the bottom of the trench.
Foundation concreting
- Then a wooden formwork is made, raising it 10-15 cm above the ground. It is at this height that the laying of a brick fence will begin.
- Next, you need to place metal reinforcement in the trench, creating a frame for concreting. In this case, it is better to tie all the elements with wire so that the connection does not break during shrinkage.
- At the next stage, pour concrete. It must be tamped tightly with a stick. You can also organize drain holes in the foundation by placing a pipe in the solution at an angle towards the street.
- Then you need to wait a few days until the base is completely dry.
Advice! It is best to use plastic drain pipes. They are less likely to clog up and do not rot.
Detailed project for the installation of a brick fence, with a typical foundation and an indication of the required dimensions
Masonry
Usually, instructions on how to make a brick fence do not mention that moisture negatively affects masonry. However, this fact should not be forgotten and measures must be taken to protect it.
Therefore, before proceeding with the laying, it is necessary to put waterproofing from a film or roofing material on the foundation.
- After the moisture protection is done, you need to pull a long thread along the entire length of the fence. It will serve as a guide for each row of the masonry, being its edge.
- Next, we build a brick fence, placing it in the middle of the foundation. In this case, we control the horizontal with a thread, and the vertical with a level. It should be noted that the brick of the upper row should overlap the joint of the lower one.
Brick laying technology
- If facing material is used for work, then you should not heavily stain the surface with mortar. It is necessary to work very carefully using a small rubber spatula and a damp sponge.
- The pillars are made by placing the masonry around the pipe, mucking it inside.
- If it becomes necessary to install additional elements in the form of forged gratings or other materials, they must be tied in the masonry for at least two rows.
Laying bricks requiring subsequent cladding
- Also, the construction of a brick fence requires a little reinforcement. To do this, after 3-4 rows along the entire length of the structure, a metal wire is mutated. It will serve as a kind of link in the material.
Advice! After 5-6 rows have been erected, you need to pull the rope from the bottom corner of one edge of the fence to the top corner of the other side. It will show defects in work that can be corrected with a hammer with a plastic or rubber tip.
Working with level and thread to check the quality of the masonry
Finishing works
Considering the question of how to make a brick fence, it is necessary to pay attention to protecting the entire structure from moisture. To do this, you can use special caps that are put on the posts (see also the article Caps on the fence posts: purpose and installation). You can also apply similar protection to the entire structure.
If there is no desire to install such elements or their price is beyond the budget, then you can make a kind of waterproofing yourself.
Installing hoods on the fence to protect against moisture
- To do this, lay the entire plane of the top of the masonry with roofing material, which is fixed with nails.
- Next, liquid glass is added to the cement mortar, stirring it thoroughly.
- When clearly visible moisture disappears in the mixture, it is necessary to put it on top of the structure, creating a kind of gable roof.
- When such a top is made with their own hands, then to increase protection against thieves, fragments of broken glass are inserted into it, points up. However, such a solution significantly impairs the appearance.
Options for jointing in masonry
- It is worth noting that the jointing can be attributed to the final stage. In the photos provided, you can see various options for this technique. To do this, use special spatulas with a certain notch, which are carried out along the joints of the masonry, forming a beautiful protrusion or depression.
Advice! When laying, some craftsmen use a small amount of mortar so that it does not leak out. Then they add dye to the cement mixture and use it to seal the seams. This creates a very beautiful combination of brick and colored jointing.
Colored jointing using a special tool
Output
After watching the proposed video, it becomes clear that the construction of a fence made of brick or stone is a rather laborious and responsible process.
During its execution, it is necessary to constantly measure in order to avoid the occurrence of defects in the form of distortion, bulges or depressions.
However, with strict adherence to the installation instructions, this work can be done even by a novice builder.
Brick fences: a view from the side
Perhaps there is no other such type of fence, which would be compared with a brick in terms of strength, beauty and durability. Therefore, the desire of many owners of personal plots to build a brick fence with their own hands is so great. Let's take a close look at the process of erecting such a fence, compare all its disadvantages and advantages.
Advantages and disadvantages of a brick fence
Like any other building material, bricks have their pros and cons. Learn more about each of them.
Advantages of a brick fence:
- Reliable protection against penetration of unauthorized persons into the territory.
- Resistant to any external influences (wind, snow loads, precipitation, mechanical stress, etc.).
- Attractive appearance.
- Long lasting.
- Does not require special maintenance during its operation.
- It is prestigious, indirectly indicating the wealth of its owner.
Among the disadvantages are the following:
- A large amount of land work during the construction.
- Large consumption of material (brick), its high cost.
- A large expenditure of time and effort for the construction of such a fence, the complexity of the construction scheme itself.
- Difficulties with transportation and its relatively high cost.
As you can easily see from the above, you will have to choose between the expenditure of effort, time and money and the subsequent quality.
Basic principles of building a brick fence
A brick fence consists of two main parts - support pillars located at a certain estimated distance from each other and the walls (spans) between these pillars.
Pillars and walls are usually erected on a strip reinforced foundation, under which a trench is dug. Pits are dug under the secure fixation of the pillars. After the foundation is built, first the pillars are built, and then the walls.
What materials will be required
To build a brick fence with your own hands, you will need the following materials:
Brick
You can use both ordinary ceramic and facing, figured, etc. If you use ordinary brick, then most likely you will have to spend money on plastering after the fence is erected to obtain a more aesthetic look. The sizes of bricks can also be very different. 
Single bricks are usually used. When buying, it should also be remembered that approximately 5% of the brick will have to be bought in excess of the calculation due to a possible brick break.
Steel tubes
Pipes of square or round cross-section with a diameter of about 60 mm for reinforcement of supporting brick pillars. The length of the pipes depends on the depth of their immersion in the ground and on the height of the pillars. The usual height of the posts is about 2-3 m, excluding the height of the caps. Then the length of the pipes will be approximately 3-3.5 m. 
Common grades used are M200-300 (grades B15-22.5). Required for the construction of a monolithic foundation, as well as for pouring into the inside of the pillars. Concrete can be purchased ready-made, or you can prepare it yourself right at the construction site from cement, sand and crushed stone or gravel. 
Materials for the construction of formwork.
Various boards, their parts and pieces, new or used. Required for the construction of the foundation. You can rent ready-made formwork, if finances allow. 
Armature
for the construction of the foundation reinforcement cage, knitting wire. Required for foundation reinforcement. It includes smooth reinforcement (for vertical and transverse reinforcement) with a usual diameter of about 6-8 mm, as well as ribbed, main reinforcement for longitudinal reinforcement with a diameter of 10-12 mm. The exact diameters depend on the calculation based on the dimensions of the projected fence. 
Sand
It will be required for the manufacture of masonry mortar, as well as for the construction of a sand cushion under the sole of the foundation. Fine quarry yellow sand is not suitable for all these purposes. River sand or any other coarse or medium-grained sand that does not contain clay is suitable. 
Cement
It will be required for the manufacture of masonry mortar. Portland cement is commonly used. You can do without cement by purchasing a ready-made masonry mixture in the store in advance, although it will cost, of course, more expensive than making it yourself. This article assumes that the masonry mix will be purchased by the owner ready-made. 
Crushed stone
It may be needed if a crushed stone bedding is planned under the foundation of the fence. 
Tool for work
- Shovel- for digging trenches. In some cases, for example, if the length of the fence and the depth of the foundation are large, you can use an excavator.
- Hand drill- for drilling holes for the installation of support pillars. If there is no drill, then you can use an ordinary shovel, although it is not so easy to dig a relatively narrow hole with more or less vertical walls with a depth of 1 meter or more.
- Welding machine- required if the pillars will be additionally welded to the reinforcement cage, as well as if it is decided to connect the reinforcement rods by welding.
- Measuring instruments- construction plumb line, level, theodolite to control the evenness of the construction site, verticality and horizontal position of the support pillars and fence walls.
- Bricklaying tools- this includes a trowel (trowel), a hammer, a wooden batten and a tool for pointing seams.
- Waterproofing compounds or roofing material- required for waterproofing the foundation. Bitumen or bitumen mastics can be used instead.
Calculation (example) of the required amount of building materials for construction. Before starting the construction of the fence, you must first draw up a drawing of it, and then calculate the required amount of consumables.
Below is an example of the calculation of all basic materials. Today, such calculations can be done directly on construction sites on the Internet using various online calculators. Nevertheless, to check the correctness of the calculation, it will not be superfluous to manually estimate the consumption.
Fence parameters
- Plot: rectangular 20 x 30 = 600 m (6 ares).
- Gate: one piece 3 m long.
- Wicket: one piece 1 m long.
- Fence spans: 2 m.
- Fence spans masonry: 1 brick.
- Post masonry: 2 bricks.
- Used bricks for pillars: 250x120x65 mm.
- Bricks used for spans: 250x120x65 mm.
- Bricks used for the plinth: 250x120x65 mm.
- Seam thickness: 0.01 m.
- Height of pillars excluding caps: 2.2 m.
- Span length: 4 m.
- Trench depth: 0.7 m.
- Trench width: 0.5 m.
- Foundation height from the ground: 0.1 m.
- Sand cushion: 0.15 m.
- Crushed stone pillow: 0.2 m.
- The presence of the base: yes.
- Base / plinth height: 0.3 m.
- Base / plinth masonry: 2 bricks.
- Support pipe diameter: 0.06 m.
Payment
Let 0.25 * 2 = A (double the length of a single brick), 0.25 * 0.25 = B (the area occupied by two single bricks), 0.01 * 4 = C (quadruple the height of the masonry joint), 0.065 * 4 = D (quadrupled height of a single brick), 0.065 * 0.01 = E (thickness of the masonry end-to-end seam), 0.065 + 0.01 = F (brick height, taking into account the masonry seam).
Then we have the following.
- The total length of the fence will be 2 * 20 + 30 * 2 - 1 - 3 = 96 m.
- Number of sections: 96 / (4 + 0.01 + A) = 21.3 pcs.
- Number of posts: 22 pcs.
- Number of pipes for reinforcement of pillars: 22 pcs.
- The amount of sand for filling: 96 * 0.15 * 0.5 = 7.2 cubic meters. m.
- The amount of crushed stone for backfilling: 96 * 0.2 * 0.5 = 9.6 cubic meters. m.
- The length of the metal supports for the reinforcement of the pillars: 2.2 * 3/2 = 3.3 m.
- The depth of the pits for the installation of pillars: 3.3 - 2.2 = 1.1 m.
- The amount of concrete for the foundation: (0.7 - 0.15 - 0.2 + 0.1) * 0.5 * 96 = 21.6 cubic meters. m;
- The amount of concrete under the supports: (0.01 - 0.12 - 0.12 + A) * 2 = 0.54; 0.06 * 2 * 3.14 / 4 = 0.094; 0.54 - 0.094 = 0.446; 2.2 - 0.1 = 2.1; 0.446 * 2.1 * 22 = 20.6 cubic meters. m;
- Total amount of concrete: 21.6 + 20.6 = 42.2 cubic meters. m.
- Bricks for the basement (total): 96 * (D + C) * 394 * (A + 0.01) = 5787 pcs.
- Span bricks (total): (0.065 * B) + (0.01 * B) = 0.0040625 + 0.000625 = 0.0046875; 96 - 22 * 0.51 = 84.78; 84.78 * 0.25 * (2 - 0.3) = 36.0315; 2 * 36.0315 / 0.0046875 = 15373 pcs.
- Pillar bricks (total): (2.2 - 0.1) / F * 6 * 22 = 3696 pcs.
- Total bricks total: (15373 + 3696 + 5787) * 0.05 + (15373 + 3696 + 5787) = 26099 pcs.
- Plinth mortar: (C + D) * 96 * (0.01 + A) * 0.24 = 3.53 cbm m.
- Span masonry mortar: 0.01 * B + 0.25 * E = 0.000625 + 0.0001625 = 0.0007875; 15373/2 * 0.0007875 = 6.053 cubic meters. m.
- Masonry mortar for pillars: (0.12 * 6 * E) + (0.51 * 0.51 - B) * 0.01 = 0.000468 + (0.2601 - 0.0625) * 0.01 = 0 , 002444; (2.2 - 0.1) / F * 22 * 0.002444 = 1.51 cc m.
- Total masonry mortar: 6.053 + 1.51 + 3.53 = 11.1 cu. m.
Preliminary, earthworks and construction works
- All foreign objects and things should be removed in advance from the territory of the future development so that they do not interfere during the work.
- The territory is cleared of debris and leveled. Evenness can be controlled with a level, theodolite and similar instruments.
- Stakes are installed along the perimeter of the site in two rows. The distance between the rows should be equal to the width of the future foundation trench. A rope is pulled through the stakes.
- Further, also with the help of pegs, the places for the installation of support pillars are marked. Now you should dig a trench and pits for the pillars along the marked area.
- The holes can be dug both by hand with a shovel and with the help of an ordinary hand drill. You can use an excavator to dig a trench, especially if the fence is quite long. The depth of the pits is approximately 1 m, and the trenches are at least 0.5-0.6 m and depends on the height of the posts and spans, the type of masonry, the grade of bricks, the type of soil and other factors.
- Further, on the bottom of the pits and trenches, a small layer (0.1-0.15 m) of moist coarse-grained or medium-grained sand is laid as a sand cushion under the foundation and carefully compacted. You can lay a small layer of rubble or gravel on top of the sand layer to avoid stagnation and drain water from under the soles of the future foundation.
Formwork construction
- Next, shuttering boards are knocked down from the boards and then they are placed along both vertical walls of the trench along its entire length. Shields are always knocked down from the side that will be directed to the wall of the trench. It is important that the front side of the shuttering boards (the one that will be directed towards the inside of the trench) is flat.
- Large gaps in the formwork panels are unacceptable. They should be sealed with slats in advance. The height of the formwork should slightly exceed the upper limit of the future foundation.
- The shields installed in the trench are knocked down with transverse boards and propped up from the outside in order to fix them in a strictly vertical position along the trench before pouring concrete. So we get a high-quality brick fence.

Construction of a reinforced cage for the foundation and installation of pillars
Reinforcement cage is made of smooth and ribbed reinforcement by tying the intersections of longitudinal, transverse and vertical rods with knitting wire.
Instead of knitting, welding can be used - this is faster and more convenient, but less effective due to the lower strength of the reinforced cage obtained in the future (weak bending work under the action of vertical forces).
Longitudinal rods are arranged in two or three rows in each horizontal plane. The number of planes is two or three, depending on the height of the foundation and on the design load on it. The distance between the nodes should be approximately 200 mm.
Next, the made reinforcement cage is immersed inside the trench. Pillars are installed in the pits. Check their verticality in all directions: the pillars must have a strictly perpendicular orientation relative to the plane of the earth's surface. To fix the pillars in the desired position before pouring concrete, it will be good to temporarily support them with stones, sticks and other available materials. Another possible option is to tie or weld them to the reinforcement cage.
Pouring with concrete
Now the concrete mix should be poured into the trench and pits. Concrete can be used both purchased and prepared with your own hands. It is important to pour all the concrete in one go in order to obtain good strength for the entire foundation. It is known that concrete gains strength gradually, reaching 40% of its maximum strength on the 7th day.
During all these days, the monolith should be protected from possible atmospheric precipitation by wrapping it in a waterproof film. The resulting foundation must be waterproofed by any modern means, for example, penetrating waterproofing, bitumen, etc.
Laying of spans, pillars and basement
Brickwork begins with the construction of a basement, and if it is not provided for by the project, then, as a rule, from the pillars. The basement is made on the basis of a foundation tape of 1.5, 2 or 2.5 bricks. The main purpose of the fence base is a beautiful appearance.

The height of the plinth is usually about 300 mm, that is, 4 rows of single bricks, taking into account the masonry joints. Masonry for pillars is usually used in 1.5 or 2 bricks. The idea of laying pillars is as follows. Above the plinth, in marked places, pillars of brick are laid out with a height determined by the calculation. Metal pillars are lined with bricks on all sides. It turns out the following structure: a metal pillar inside and brickwork, which forms the outer sides of the pillars.

After the completion of the masonry, concrete is poured into the brick pillars, and on top of the pillar is covered with a special (usually metal) cap that prevents atmospheric precipitation from entering the pillar.
Caps can be made by yourself or you can buy ready-made caps of any colors and configurations. The spans are usually laid in 0.5, 1 or 1.5 bricks. The span is built directly on the plinth or on the foundation if there is no plinth. The height of the masonry fence of 1.5 ordinary bricks is usually limited to 2.2 m, therefore, for higher spans, the masonry should be made in 2 bricks. The height of the posts usually exceeds the height of the spans by about 10%. Above, if desired, the span, as well as the pillars, can be protected from precipitation by a cap.
General principles of masonry
The pre-wetted bricks are laid on the masonry mortar, previously applied with a trowel to the masonry base. It also removes excess mortar formed when laying bricks.
The horizontal and vertical position of the bricks is checked using a building level, which must be constantly applied to the bricks that have just been laid on the mortar.
If any brick deviates from the vertical, lies unevenly, then its position is corrected by tapping on it with a hammer with a plastic or rubber tip.
To correct the position of several adjacent bricks, a rail is usually used, on which it is tapped with such a hammer.
When building a span, it is most convenient to control the horizontality of the rows of bricks by stretching a rope (cord) between adjacent pillars at heights approximately every 5 vertical rows of bricks. All masonry is done with the obligatory dressing of the seams.
If facing brick is used, if additional finishing of the brick fence is not expected, then it is advisable to do the jointing during masonry. The embroidery always looks beautiful. Colored jointing, which is made by adding dyes to the masonry mortar, looks even more beautiful.
As you can see, a brick fence with your own hands is a rather complicated, painstaking and expensive process. Nevertheless, you can do all the work yourself without involving construction crews, but you need a very serious, careful attitude to business at all stages of construction and then you will get a fence that will serve you for many, many years.
Aesthetic and beautiful fencing gives the landscape of the site a finished and attractive look. In order for the structure of the fence to perform not only decorative functions, but also to protect the territory from unwanted visitors and illegal intrusions, the fence must be of high quality, durable and reliable.
All these requirements are met by such a structural material as a brick. And if there is no desire or opportunity to build a fence entirely of brick, a fence with brick pillars would be an excellent solution. They increase the durability of any type of fence, as well as give the landscape of the site an element of solidity.
It may seem that only a professional bricklayer can erect brick pillars for a fence with your own hands. However, this impression is wrong. Of course, an inexperienced home craftsman will spend more time installing brickwork than a craftsman with many years of experience. However, with careful observance of the technology, it is possible not only to build mine fence yourself, but also save you a significant amount of money.
The brick for the fence posts must be chosen carefully, and the choice must be approached responsibly, since the strength of the entire structure depends on it. Most often, the two most popular types of bricks are used, the features of each of which should be considered in more detail.
| Kind of brick | Dignity | disadvantages |
| Smooth facing brick | · affordable price; Aesthetic appearance |
· Low strength and wear resistance (after a few years, the cladding begins to lose particles of the front layer and crumble); · Poor resistance to negative environmental influences (temperature drops, wind and precipitation can significantly accelerate material wear). |
| Textured ("rock") is a decorative brick | · High wear resistance; · High level of strength; · Good resistance to aggressive environmental influences. |
· high price |
As a compromise option, a combination of two types of bricks is often used at once - this allows you to build reliable and beautiful brick pillars at no extra cost.
Having made the decision to equip a fence with brick pillars on your site, you also need to determine what material the sections will be made of. There are a number of common options, for example:

The choice of material for filling the sections directly depends both on the aesthetic preferences and financial capabilities of the owner, and on the style of decoration of buildings and structures on the fenced area.
Several important nuances in the manufacture of a fence with brick pillars
When constructing brick pillars with your own hands, you should take into account a number of important nuances:
Preparation of tools and accessories for work
In order to perform high-quality brickwork of fence posts, you will need a set of professional tools. You will definitely need:

10. Rubberized gloves. Without them, working with cement mortar is very harmful to the skin of the hands.
Erection of pillars from bricks - detailed instructions
How to lay a brick post without experience in such work? You should carefully read each of the stages of work. When erecting brick posts, in addition to the recommendations of this instruction, you should take into account the individual characteristics of the plan for installing the fence.
Terrain marking
- It is necessary to prepare a site plan - a "red line" should be marked on it (a fence will be installed along it).
- Determine the reference point (usually one of the corners of the future fence) and drive in a piece of reinforcement or a small peg there.
- Determine the required width of the trench for the foundation and drive in the second peg at the required distance from the first.
- At the opposite end of the future fence, you need to drive in two similar pegs.
- Stretch and fasten two twines between the anchor points (if the fence is planned to be installed not on one, but on several sides of the site, these steps will need to be repeated for each of them).

Trench preparation
- It is necessary to dig a trench in the strip that was determined during the process of marking the terrain. Its depth should be 350 - 450 mm.
- Drill holes for reinforcing bars or metal support pillars. The depth of each should be 50 - 70 cm, the width is calculated as the diameter of the support pillar plus 15 - 20 cm, the distance between the holes should be 2 - 2.5 m.
- Pour a mixture of sand and gravel on the bottom of the trench, compact it as much as possible. The thickness of this pillow should be between 10 and 15 cm.
- Sand should also be poured into the bottom of the holes - a layer 8 - 10 cm thick is enough. It also needs to be tamped.
![]()
- Place a layer of waterproofing material in the prepared holes.
- Fasten metal crossbars from the bottom to the sides of the rack (this can be done by welding several pieces of large diameter reinforcement, metal corners or pipes).
- Place the support vertically into the prepared hole (check the correctness of installation using a plumb line or a level) and fix it.
- Pour mortar into the hole around the rack - it will consist of a mixture of concrete and rubble.
- Tamp the solution to remove air voids from it.
- Allow the crushed stone-concrete mixture to harden around the supports.

Fence frame device


Strength set with concrete
- Concrete hardening and curing takes about a month. For this period, work with the foundation tape must be suspended.
- The next day after pouring the formwork, you need to water the foundation with water. Repeat the procedure every day for two weeks.
- The formwork can be removed after two weeks.
Jumper arrangement
These works can be carried out during the period when the foundation is gaining strength, but not earlier than 10 days after pouring.
- At a height of 35 - 40 cm from the top of the racks, fix the metal jumpers in a horizontal position.
- Perform a similar operation at a height of 35 - 40 cm from the level of the foundation.
- If the fence is planned to be of great height, you can arrange an additional row of jumpers in the middle.

Brick masonry for fence posts
These works are performed only after the end of the "maturation" of the foundation tape.
- Along the perimeter of the planned row of bricks, lay pieces of reinforcement on all four sides.
- Holding the segments, apply a layer of mortar to the foundation within the indicated perimeter and smooth over the thickness of the reinforcement.
- Lay the brick (the position can be checked with a level) to achieve the ideal result, it can be lightly tapped with a rubber mallet.
- Set the fifth segment at the level of the outer edge of the brick.
- Holding the reinforcement, grease the side of the brick with mortar.
- Lay the next brick next to the first one.
- Remove the vertical piece of reinforcement from the seam, move it to the edge of the second brick, grease this edge with mortar and install the next brick.
- Repeat the operation from clause 7 until the end of laying the horizontal row.
- Remove the reinforcement from the seams - the remaining empty space between the bricks will need to be filled with a mortar mixture and "jointing" the seams after four rows have been laid out.
- Lay out the reinforcement pieces on the finished row and apply a layer of mortar.
- Repeat steps 3 - 10 until the level of the brickwork reaches the planned height of the pillar.
- Close the hole at the top of the support post with a metal plate, apply a layer of cement mortar on top.
- Mount a protective cap on top of the post on the laid out post (metal must be fixed with dowels, and concrete must be fixed to a layer of mortar).
For clarity, we suggest watching a video on the construction of brick posts for a fence:
Brick fence posts are ready. You can start installing fence spans on previously mounted metal lintels.
*Note:
- brick laying is done around the support posts;
- the consistency of the masonry mortar must be homogeneous, it must be applied in a thin layer. To achieve this effect, the sand must be carefully sieved through a fine mesh sieve before being added to the masonry mortar.
If there is no experience in arranging brickwork at all, then you should not immediately start laying out the posts for the fence. You can practice a little - for example, lay out a small test brick wall or fold a post in an inconspicuous place. The acquired skills will help you make beautiful and neat brick posts.