We crochet a pillow pattern from squares. Crochet blankets and pillows
Home comfort consists of thousands of little things, most of which can be easily created with your own hands. Knitted pillows are that home accessory that no true needlewoman will deny herself the pleasure of knitting.
Firstly, knitting a pillow is considered one of the most simple ways master the basics of crocheting, so any novice craftswoman taking her first steps in the art of crocheting can do it.
Secondly, a knitted pillow will decorate any interior - both artsy classic and modern minimalist style. This means that such a pillow will find a place in the living room, children’s bedroom and even in a formal office.
And, thirdly, a knitted pillow does not mean the only way its use as a product for seating comfort. You can use it to decorate upholstered furniture and even create a certain style in the interior. The fantasy of a needlewoman coupled with knowledge various techniques crochet, will help you create pillows of various sizes (from tiny to massive) with all sorts of patterns and reliefs - from simple “bumps” and zigzags, to intricate floral openwork and even Irish lace. 
If you wish, you can link the most different pillows both in form and purpose. From under the hook come traditional rectangular pillows for decorating sofas, flat pillows for comfortable sitting on hard chairs, aromatic pillow sachets, pillows for wedding rings and even pillows in the shape of funny cartoon characters.
Square, round, oval, triangular, cylindrical, star-shaped or heart-shaped - any pillow can be crocheted! At the same time, it is most convenient to knit not the pillow itself (especially if it is openwork), but a cover (pillowcase) for it, which can always be removed and washed without damaging the stuffing material.
Knitting pillows is also great way Use leftover yarn from previous knitting projects. As a rule, from several colors of yarn (25-100 grams each) you can create a pillow of amazing beauty without spending a penny on its production!
Today's article is about knitting original pillows crochet - classic openwork, in the shape of a cylinder with colored splashes, as well as an oversized flower floor pillow, made in bright colors.
Round openwork pillow with an airy border-band

A pillow made in openwork motifs will look beautiful in the living room on the sofa, and can also serve as a soft backing for the seat of a chair. To create it, you need to knit an openwork pillowcase according to the pattern and description given below, and also sew the round pillow itself from improvised materials (unnecessary fabric and padding polyester or holofiber filling).
To knit a pillowcase for a pillow with a diameter of 35 cm, you need about 100 grams. any yarn (you can take leftovers) and hook No. 2.
Knitting pattern:

Knitting a pillowcase consists of two parts: the upper one, made with an openwork motif, and the lower one, knitted with single crochets.
Abbreviations used
- VP – air loop;
- Runway - air. lifting loop;
- SSN, art. s/n – double crochet;
- RLS, art. b/n – single crochet;
- PR – prev. row;
- n. - loop;
- c. - chain;
- A. – arch;
- SS – connection column.
Knitting sequence
Upper part:
We dial c. on 6 VP, close the SS in a circle.
Row No. 1: 4 VP (3 VP lift + 1 VP), then repeats in the amount of 12 pcs. “1 dc in the ring + 1 ch”, we get 12 a., we end the row with a ss.
Row No. 2: 4 VP (3 VP lift + 1 VP), 1 Dc in the first runway + 1 VP, then 12 repeats: “2 Dc in the PR column, one dc between them. loop + 1 VP above VP PR.” SS.
Row No. 3: 3 runways, 1 dc from air. PR loops, 1 dc in next. column PR, 1 VP, then 12 rapports: “1 DC in column PR, 1 DC in a. from the air point PR, 1 CCH in the next. column PR, 1 VP.” SS.
Row No. 4: 3 runways, 2 dc in next. column PR, 1 dc in the next row. CCH PR, 2 VP, then 12 rapports: “1 CCH in the next.” column PR, 2 dc in the next row. column PR, 1 dc in the next row. column PR, 2 VP.” SS.
Row No. 5: 3 runways, 1 dc in the next row. column PR, 2 dc in the next row. column PR, 1 dc in the next row. column PR, 3 VP, 12 rapports: “1 dc in the next. column PR, 1 dc in the next row. column, 2 dc in next. column PR, 1 dc in the next row. column PR, 3 VP.” SS.
Rows No. 6-16: we work according to the scheme, closing each of them with a SS.
Bottom:
We dial c. on 6 VP, close the SS into a ring.
Row No. 1: 1 runway, 11 sc in the resulting ring. SS.
Rows No. 2-25: 1 runway, knit in single stitches, systematically adding 6 sc in each row. SS.
Assembling the pillowcase:
We connect the two finished parts of the product from the inside out using a sc, leaving a hole (later you can sew on a button or insert a snake). Turn the pillowcase inside out. We tie it around the perimeter with an openwork border according to the binding pattern (5 rows). The pillowcase for the round pillow is ready!
Original cylindrical bolster pillow

At first glance, it may seem that knitting cylindrical pillow worth a titanic effort, however, this is not so. You can crochet such a bright beauty in two or three evenings watching TV, try it, you won’t regret it! 
Cylinder fabric knitting pattern:

Knitting pattern for the side of the pillow:

The roller is knitted with contrasting multi-colored yarn, we used a thick coal-black thread as a basis, and bright threads for decoration: blue, purple, light green, yellow, pink, orange and red. If the pillow is knitted from thick yarn, there is no need to worry about the inner pillowcase and filling; a thick knitted fabric will replace such a pillowcase; all that remains is to fill the cylinder with synthetic padding and securely sew the edges, or sew in a zipper to facilitate the process of stuffing and subsequent washing.
For a cylinder pillow, you need to knit two side circles and one rectangular fabric.
Knitting circle
We dial c. from 4 air. loop.
Each new row - change the color of the thread according to the diagram.
Row No. 1: 3 runways, 11 dc. SS.
Row No. 2: 3 runways, then - in each paragraph of PR - 2 Dcs. SS.
Row No. 3: 3 runways, knit with rapports: “1 dc in next. p. PR, 2 dc in the next. n. PR.” SS.
Row No. 4: 3 runways, knit with rapports: “1 dc in next. p. PR, 1 Dc in the next. p. PR, 2 dc in the next. n. PR.” SS.
Rows No. 5-7: knit according to the pattern.
Row No. 8: knit in s/n stitches without increases. SS.
Cylindrical part
Using a thread of the main color we collect c. from the desired amount of air. loops, focusing on the length of the future pillow.
The fabric is knitted in non-woven columns, with multi-colored “bumps” evenly knitted. The “bump” is knitted like this: 5 unfinished DCs are knitted from one warp stitch, there are 6 loops on the hook, which are knitted into one with a working thread.
The first two rows are worked with sc in each stitch of the warp. We start each row from the runway.
Third row - knit with the addition of one “bump” between every 5th sc (choose colors as desired or according to the pattern indicated above).
The next three rows are sc.
The seventh row is with knitting “bumps”. We repeat knitting rows until we obtain the desired width of the fabric.
Roller assembly:
We connect the rectangular fabric into a cylinder (from the inside we knit the two edges with non-woven stitches or joining stitches). Turn it inside out and attach the sides. We leave a hole on one side of the cylinder for filling with filler. We insert a zipper into it or sew it up.
Multi-colored flower floor pillow

Pillows are not only for sofas; a massive flower pillow that acts as a mini-chair is proof of this. Such a magnificent pillow can be used for decorative purposes, but it is also good as a seat - no one will mind lying on a bright, soft knitted flower!
The diameter of the pillow is as much as 85 centimeters, so it will require a lot of yarn to make it - almost 1 kg of yarn in the main color and 500 grams of threads in contrasting colors. We take hooks number 5 and 9. Don’t forget about the filler, you need at least a kilogram of it.
Despite the enormity of the work, it is performed in columns b/n and s/n. Each new row starts at 1 runway and ends with a connector. column.
Two sides are knitted: back and front.
Knitting the back
Using a thread of the main color (ours is blue), we cast on a c. from VP, we connect it with a SS into a ring, into which we perform 6 tbsp. b/n. We close the first and all subsequent rows with SS.
Row No. 2: 3 runways, 1 st. s/n in the same paragraph, 2 tbsp. s/n in RLS PR (we get 12 tbsp.).
Row No. 3: 3 runways, 1 st. s/n in the same paragraph, 2 tbsp. s/n in SSN PR (we get 24 st.).
Row No. 4: knitting with yarn yellow, 3 runways, 2 st. s/n in the same paragraph, 7 rapports: “3 tbsp. s/n in column s/n PR, next. We skip the PR column and move on to the next one. p. – 3 tbsp. s/n", 3 tbsp. s/n in next column PR, 1 tbsp. we skip s/n, in total we get 48 columns in a row.
Row No. 5: 1 VP, 8 rapports: “1 tbsp. b/n, 1 tbsp. s/n, 3 tbsp. s/n in one paragraph, 1 tbsp. s/n, 1 tbsp. b/n, 1 SS.”
Row No. 6: continue with thread orange color: 1 VP, 8 rapports: “1 tbsp. b/n, 1 tbsp. s/n, 2 tbsp. s/n in one paragraph, 3 tbsp. s/n in one paragraph, 2 tbsp. s/n in one paragraph, 1 tbsp. s/n, 1 tbsp. b/n, 1 SS.”
Row No. 7: 1 VP, 8 repeats (skipping one p., 3 tbsp. b/n, 2 tbsp. s/n, 2 tbsp. s/n in one p., 3 tbsp. s/n in one p. , 2 tbsp. s/n in one p., 1 tbsp. b/n, skipping one p., 1 SS.
Row No. 8: attach a raspberry thread, 1 VP, 8 repeats: “4 tbsp. b/n, 1 tbsp. s/n, 2 tbsp. s/n in next 3 p., 1 tbsp. s/n, 3 tbsp. b/n, skipping one p, 1 SS.”
Row No. 9: 1 VP, 8 rapports: “skip one p., 4 tbsp. b/n, 1 tbsp. s/n, 2 tbsp. s/n in next 3 p., 1 tbsp. s/n, 4 tbsp. b/n, skipping one p, 1 SS.”
Row No. 10: continue with blue thread: 1 VP, 8 repeats: “skip one p., 5 tbsp. b/n, 1 tbsp. s/n, 2 tbsp. s/n in next 3 p., 1 tbsp. s/n, 5 tbsp. b/n, skipping one point, 1 SS.”
Row No. 11: 1 VP, 8 rapports: “skip one p., 5 tbsp. b/n, 1 tbsp. s/n, 2 tbsp. s/n in 1 p., 3 tbsp. s/n in 1 p., 2 tbsp. s/n in 1 p., 1 tbsp. s/n, 5 tbsp. b/n, skipping one point, 1 SS.”
Row No. 12: 1 VP, 8 rapports: “skipping two stitches, 5 tbsp. b/n, 2 tbsp. s/n, 3 tbsp. s/n in 1 p., 2 tbsp. s/n, 5 tbsp. b/n, omission of two points, 1 SS.”
Row No. 13: attach yellow thread: 1 VP, 8 repeats: “skipping one stitch, 4 tbsp. b/n, 1 half st., 1 tbsp. s/n, 2 tbsp. s/n in each of the 3 next. p., 1 tbsp. s/n, 1 half st., 4 tbsp. b/n, skipping one point, 1 SS.”
Row No. 14: 1 VP, 8 rapports: “skipping one p., 5 tbsp. b/n, 1 half st., 1 tbsp. s/n, 2 tbsp. s/n in each of the 2 next. p., 1 tbsp. s/n, 1 half st., 4 tbsp. b/n, omission of two points, 1 SS.”
Row No. 15: 1 VP, 8 rapports: “skip one p., 4 tbsp. b/n, 1 half st., 1 tbsp. s/n, 2 tbsp. s/n in each of the 3 next. p., 1 tbsp. s/n, 1 half st., 4 tbsp. b/n, skipping one point, 1 SS.”
Row No. 16: continue with crimson yarn: 1 VP, 8 repeats: “skipping one stitch, 3 tbsp. b/n, 1 half st., 2 tbsp. s/n in one paragraph, 2 tbsp. s/n, 3 tbsp. s/n in one paragraph, 2 tbsp. s/n, 2 tbsp. s/n in one p., 1 half st., 4 tbsp. b/n, skipping one point, 1 SS.”
Row No. 17: 1 VP, 8 rapports: “6 tbsp. b/n, 1 half st., 2 tbsp. s/n in one paragraph, 4 tbsp. s/n, 2 tbsp. s/n in one p., 1 half st., 6 tbsp. b/n, 1 SS.”
Row No. 18: 1 VP, 8 rapports: “skipping one p., 5 tbsp. b/n, 2 half-st., 1 tbsp. s/n, 3 tbsp. s/n in one paragraph, 2 tbsp. s/n, 3 tbsp. s/n in one paragraph, 1 tbsp. s/n, 2 half-st., 5 tbsp. b/n, skipping one point, 1 SS.”
Row No. 19: knit with orange yarn: 1 VP, 8 repeats: “skip one p., 7 tbsp. b/n, 2 half-st., 1 tbsp. s/n, 2 tbsp. s/n in next two p., 1 tbsp. s/n, 2 half tbsp. next 2 p., 1 tbsp. s/n, 2 half st., 7 tbsp. b/n, skipping one point, 1 SS.”
Row No. 20: 1 VP, 8 rapports: “7 tbsp. b/n, 3 half-st., 1 tbsp. s/n, 3 tbsp. s/n in one paragraph, 1 tbsp. s/n, 3 half st., 7 tbsp. b/n, skipping one point, 1 SS.”
Row No. 21: 1 VP, 8 rapports: “7 tbsp. non-cash, 1 half tbsp., inside there is another combination 3 times: “2 tbsp. s/n in one paragraph, 2 tbsp. s/n", 2 tbsp. s/n in one p., 1 half st., 6 tbsp. b/n, 1 SS.”
Row No. 22: knit with the main color: 1 VP, 8 repeats: “skipping two stitches, 7 tbsp. b/n, 1 tbsp. s/n, 4 times next. knitted combination (2 tbsp. s/n in the next 2 p., 1 tbsp. s/n), 6 tbsp. b/n, skipping one point, 1 SS.”
Row No. 23: 1 VP, 8 rapports: “skipping two stitches, 8 tbsp. b/n, 4 semi-st., 1 tbsp. s/n, 2 tbsp. s/n in next 3 p., 1 tbsp. s/n, 4 half st., 9 tbsp. b/n, omission of two points, 1 SS.”
Row No. 24: 1 VP, 8 rapports: “skip one p., 9 tbsp. b/n, 1 half tbsp., 2 tbsp. s/n in next 2 p., 3 tbsp. s/n, 2 tbsp. s/n in one paragraph, 3 tbsp. s/n, 2 tbsp. s/n in next 2 p., 1 half st., 8 tbsp. b/n, omission of two points, 1 SS.”
Row No. 25: 1 VP, 8 rapports: “skip one p., 5 tbsp. b/n, 24 tbsp. s/n, 4 tbsp. b/n, skipping one point, 1 SS.”
The back of the flower pillow is ready.
Knitting the front part.
We perform rows No. 1-25 according to the steps of knitting the back part, at the end of the 25th row, in order to create an edge, we knit another 15 rows with non-woven stitches, taking into account the alternation of yarn colors. Ready.
Knitting decorative pillow elements
Flower:
We knit with yellow yarn.
We twist the “magic loop” and knit 6 tbsp into it. b/n and 1 SS.
Row No. 2: 1 VP, 2 tbsp. b/n in each st. PR, SS.
Row No. 3: 3 runways, 6 rapports: “3 tbsp. s/n in next Art. b/n + 1 VP for skipping the 1st column of PR.” SS.
Row No. 4: 1 VP, 6 rapports: “1 tbsp. b/n, 2 half-st. in middle school s/n PR, 1 tbsp. b/n, 1 VP.” SS.
Row No. 5: 1 VP, 6 rapports: “1 tbsp. b/n, 1 tbsp. s/n in a column b/n PR, 2 tbsp. s/n, 1 tbsp. s/n, 1 tbsp. b/n in a column s/n PR, 1 VP.” SS. The flower is ready.
Circular elements
Using a thread of the main color, twist a magic loop and knit 12 tbsp in it. s/n, close the row 1SS. The part is ready. There should be 8 laps in total.
Assembling the pillow.
Sew the knitted flower in the center of the front side. Circular details - in the area of 15-16 rows, in the center of each flower petal.
We connect both parts of the pillow from the wrong side, sew or knit st. b/n (SS is also possible). We stuff the pillow with filler, sew up the gap left for stuffing or insert a zipper into it.
The flower-shaped floor pillow is ready to use!
Good afternoon, dear friends!
I present to you my new pillow from motives. Original idea I saw it in my group on my classmates. That square motif pillow was made in white. She is so charming that I definitely wanted to knit.
But I still chose the yarn pink color, most suitable for my interior. Almost all of my pillows are pink and lilac.
Just last year I unraveled one blouse that became too big, and the yarn sat waiting for my inspiration and embodiment in new ideas.
Crochet pillows from square motifs
Crochet pillows made from square motifs can also be crocheted from thin cotton yarn. I knitted once, spent a lot of time on it, the result pleased me, but I don’t want to knit for so long anymore.
This time I used medium-weight wool blend yarn (wool blend, acrylic, polyester). I knitted the pillow in just three days.
My hook is number 2.7.
So, a pillow made from crocheted motifs is a master class.
Knitting pillow motif
The pillow consists of 18 very simple motifs, the knitting of which we will consider in detail.
We close 5 air loops into a ring.
1st row: 3VP, 15 C1H.

2nd row: 4VP, *1C1H, 1VP*.

3rd row: 3VP, 2С1Н under the chain loop of the previous row, 1С1Н in the column of the previous row.


4th row: 1 VP, * 10 VP, a column in the third column of the previous row, 3 VP, a column in the sixth column of the previous row, 5 VP, a column in the ninth column of the previous row, 3 VP, a column in the twelfth column of the previous row *.


5th row: 3VP, 4С1Н under an arch of 10 VP of the previous row, 3VP, 5С1Н under the same arch, a column under an arch of 3 air loops, 7С1Н under an arch from 5VP, a column under an arch of 3 air loops and so on we tie arches of 10 and 5 air loops.


6th row: 3VP, *5VP, a column under the arch from the VP corner of the motif, 3VP, a column under the same arch, 5VP, C1H in the connecting column of the previous row, 3VP, a column in a column above the arch of the previous row, 3VP, C1H in the connecting column of the previous row*.


7th row: we tie the arches of air loops with single crochets, in the corners between the columns there are three air loops.

8th row: we tie the motif with single crochets, in the corners between the columns there are three air loops.

In total you need to connect 9 motifs for front side pillows and 9 for purl.
It’s hard to say how much yarn I used, since I used leftovers.
Connection of motives
We connect the motifs together with a hook using single crochets or connecting stitches, inserting the hook under both walls of the loops of the motifs.

In order to be able to insert the pillow into this pillowcase, I left an unstitched area on the wrong side.

Assembling a pillow from motifs
I sewed the pillow itself from old t-shirt raspberry color, which became too small for me. Against this contrasting background, the pattern of motifs stands out clearly.
I filled the cover with holofiber from an old large pillow. (In general, all the work is made from scrap materials, whatever houses were found).
Crocheted pillows are not only attractive and individual, but also a lifesaver for already outdated and somewhat worn sofa pillows. If you are new to crochet, pillows are... best way studying technology. There is no need to make complex calculations here, since with a correctly selected knitting pattern there will be no problems with knitting. To show your imagination, you should present several options for pillows, each of which will appeal to both beginners and experienced knitters. The article will present in detail photos, diagrams and descriptions of several models.
We knit and care correctly
Since a crocheted pillow requires some care, points for further use should be discussed.
- Firstly, yarn for pillows should be chosen according to the concept of their purpose. For children's options, it is better to choose cotton or special children's yarn, which often includes bamboo. For sofa cushions in the living room, it is better to take acrylic - it is easier to wash. If pillows are knitted for comfort and to warm the lower back, of course, the choice is in favor of a mixture of wool.
- Secondly, knitted pillows, due to their “naturalness,” will have to be washed more often, so it is recommended to knit products with a zipper along the seam. It turns out that for such knitted pillow You will have to additionally sew a cover or bedspread where the filling will be placed.
- Thirdly, crocheted sofa cushions should become a decorative element, so the color and shape are selected accordingly.
 Craftswomen prefer knitted covers on pillows that can be used to “update” previous sofa elements. This can happen when changing the interior design, when the sofa does not change to a new one, but the color already “falls out” of the overall picture. This crocheted pillowcase can be easily removed and washed when dirty. To do this, just sew a zipper along the seam. Wash covers by hand or in washing machine on the delicate wash program. Dry by spreading on a towel.
Napkin pillows
 If you have sofa cushions round shape, you can use the patterns of standard round napkins. Here, two napkins are also knitted, and when sewing, an additional zipper is used. You can resort to a complete transformation and additionally sew a “lining” onto the pillow, which will be in a contrasting color, which will give the product individuality, because the openwork will stand out against a plain background.
Some particularly enterprising craftswomen completely replace outdated products with new ones. They simply rip out old sofa cushions and use the filling further. They also knit pillows in the form of a napkin, combine them with a plain background and shape them using the same filler.
Below is a selection of such products with detailed diagrams for self-knitting. 


Curvy pillows


 When standard shapes get boring, it is recommended to knit curvy analogues. In order not to waste a lot of time on complex variations, it is enough to simply resort to simple geometric shapes. For example, you can knit a star or a hexagon. If you want and need to knit the cover along the seams, it is better to make fasteners with buttons - this will greatly simplify the process of sewing a zipper into the figured edge.
The following is also a selection figured pillows with knitting patterns. Some of them will allow you to knit a denser fabric, through which the background lining will not be visible. Others, on the contrary, offer an openwork figure, which is advantageous and softly suitable for a certain interior.
Motif pillows
Pillows made from motifs and the use of different colors are attractive and very interesting. They reflect the brightness of the character of the owners of the house, as well as their positive attitude. This combination can be used for knitting children's items. Pillows made from motifs in the same range or color look no less attractive - they will complement the existing interior style.
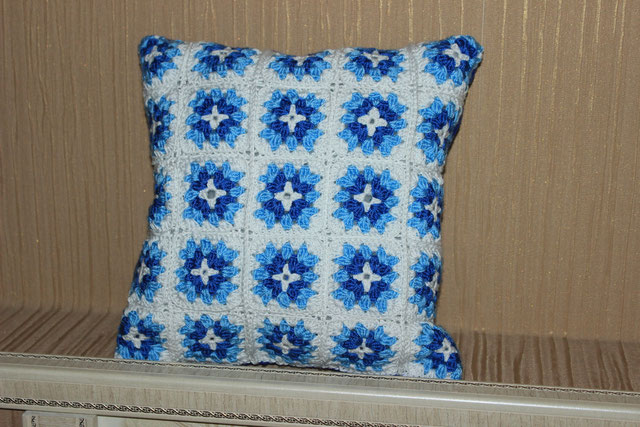
Granny square in pillows
 Crochet pillows from “Grandma’s Square” are an excellent alternative to the famous rugs or rugs. There is nothing complicated about knitting here, and the advantage is the ability to get rid of numerous remnants of yarn. To knit a square, a standard pattern is used, and colors can be combined as desired. The following is a selection of similar pillows, based on which you can come up with your own option, taking into account the existing interior.


African flowers in pillows
 There is an interesting pattern similar to a granny square African flower. This motif also allows you to quickly get rid of leftover yarn and knit a colorful cover for an existing outdated pillow. Below is a selection of crocheted items, as well as a diagram for making your own masterpiece of motifs.
If you do not want to crochet colorful pillows with all the leftover yarn, you can use models where the products are crocheted using only certain colors that match the existing interior design in the room. Often these are sofa cushions in minimalist or high-tech styles, where only a contrasting combination of several colors is used, but comfort is created by adding textiles to the interior.


Lovers pillows
Craftswomen who love to crochet love to present their loved ones with interesting souvenirs for anniversaries and just a Valentine's Day. A useful gift is a pillow that is not only beautiful and soft, but also themed. There are two options here - the heart and the sensational female breast.
Pillows for the sofa in the shape of hearts

Cushions in the shape of hearts - this is a simple, but very warm and important gift for your beloved. Hearts are also different - in in this case you will show that you put all the love and warmth from your heart into knitting the gift. In addition, knitted hearts are perfect for the interior of a children's room for girls. You can add various ribbons, rhinestones, beads and other girly charms to your work.


Crochet chest


As a gift to a man or best friend you can crochet the chest, for which it is suggested detailed master class.
- To begin, knit two pieces of light yarn in single crochets - this is the base of the pillow. The breasts will be knitted with the same yarn. Having knitted a base of a suitable size, sew it on three sides from the wrong side - you can use a needle or hook.


- Start knitting the chest. To begin, use a pink thread to pick up 3 air loops and close them into a ring.

- Knit the first row - knit 10 single crochets. Knit 2 more rows without increasing.
- Next, knit 3 more rows with single crochets, making increases in each previous stitch. Switch to a light thread.

- Using a light thread, continue knitting without increments for the next 2 rows. Next, knit 5 rows, making increases in them through each single crochet.

- Knit another 7 rows without any additions. Cut the thread so that it is long enough to sew the chest to the base. Tie the other breast in the same way.

Sew the breasts to the base, having previously filled them with cotton wool or padding polyester. For originality, you can knit a bra - this way the pillow looks less provocative, but at the same time very cute.


 It sounds surprising, but such pillows are in demand not only because of their originality. The pillows are comfortable - your head fits neatly and firmly between your breasts. And what? – Not a bad alternative for men!
Pillow toys 
From crocheted chest pillows you can smoothly move on to toy shapes. Crochet toy pillows attract children and adults like them because of their convenience - they are both a comfortable thing on which you can simply relax, and at the same time an interesting toy. The choice of knitting of a certain shape should be based on the age and preferences of the child. If you want to knit a pillow for the interior, be guided by the general design concept and color inclusions.
Simple toys


 If you look at crocheted toys, you can find very interesting detail- most of them are presented in the form of simple circles and oblong legs, the combination of which in the finished result gives a toy embodiment. The following is a similar selection, on the basis of which you can use simple circuits for knitting and please your child with a new “acquisition”.
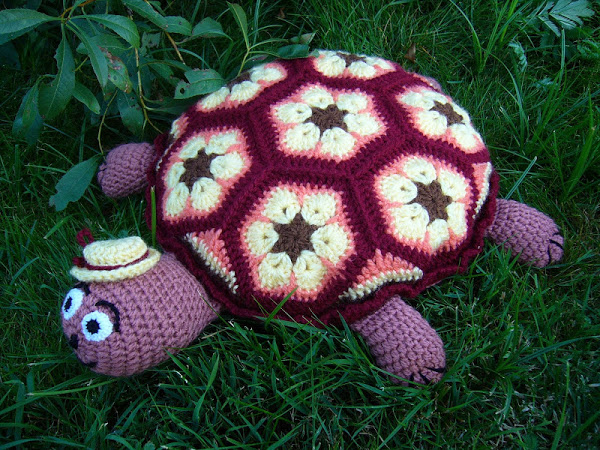
Turtle toy

Since crocheted toys are popular, we should present the simplest version of knitting, which is offered with a description and patterns - this is turtle knitting. Knitting a turtle yourself is carried out in the following sequence:

The following is a selection of crocheted turtles. Such products are convenient for further use for their intended purpose, so they are suitable for both children's rooms and sofa additions. 


snake pillow 
There is nothing better for children than a 2-in-1 product - both a toy and a pillow. One such innovative idea is crocheted snake pillow - easy to knit from leftover yarn. Also, a snake toy is suitable for expressing your own imagination, because the use of shades of threads or patterns allows you to complement the children's room favorably. Knitting such a pillow occurs in the following sequence:
- Close the ring with 5 air loops.
- Knit the first row with single crochets in the amount of 10 pieces.
- Then, in the next 10-20 rows, make equal additions of columns - this depends on the size of the future snake, so adjust the work yourself. The additions are made evenly - in each row you should add from 7 to 13 columns.
- Having reached the desired head size, knit from 2 to 5 rows without increments.
- Next, make decreases, similar to the additions made earlier. Subtract only half of the added loops.
- Continue knitting to the required length of the snake without a tail.
- Having reached the desired length of the snake without a tail, start decreasing - in each row, decrease 3-6 loops.
- Having knitted up to 4-5 single crochets, finish knitting.
Thus, you have a complete selection of knitted pillows with patterns and descriptions. Now you can choose more for yourself interesting option, and also come up with something original. Don’t be shy to show your imagination, because knitting is the best way to express your “I”.
Now let's see where it can be used!
The simplest and fastest product to make is a pillow! Crochet pillows began to be used a long time ago. Surely many people at home have inherited beautiful pillow covers and bedspreads crocheted from regular threads for sewing! Of course, we won’t take on such a big job now; we’ll start with something simpler, but we’ll also move on to the more complex! 🙂
So, first you need to decide what the purpose of the pillow is; its size will depend on this! The shape of our pillow is square.
Will it be crochet pillowcase or a full-fledged pillow - it's up to you. Will this pillow be a toy for a child or will it form part of the room decor? What functionality does it have? decorative pillow crochet or bedding. Let's answer these questions for ourselves.
After determining the purpose and dimensions, we proceed.
- Yarn of various colors according to your wishes, the main thing is that the yarn is of the same composition and thickness. I have this Semenovskaya Soufflé yarn in three colors;
- Hook of the required diameter, I have 2.5;
- Scissors;
- Needle with a wide eye;
- The inside of the pillow. I’m knitting a pillow for my daughter to play with (20 x 20 cm), I want to please the little one, and a large full-size pillow wouldn’t fit into the lesson (pictured)! 🙂
Now let's get to work!
1. We knit two identical squares for the size of the pillow, using the lesson ““. We remove all the ponytails using the lesson: .
The arrangement of colors for your pillow can be completely different, it all depends on your imagination, experiment :)


Harness


7. Single crochet through the next two loops of squares at the same time, i.e. We pass first through the next loop of one square, then through the loop of the other and knit a single crochet. Don't forget

8. We knit this way to the end of the side of the square, do not forget to hide the thread in the center of the column


11. If you are knitting a whole pillow, then we knit it to the end along the entire length of the sides of the square. If you are knitting a pillowcase, then decide for yourself how to fasten it, whether it will be a zipper or buttons. If you decide to sew a zipper, then we tie three sides, and the fourth we tie first one square at a time, and then the other, leaving a hole. If you decide to use either store-bought ones, then we tie the side of one square and the side of the other with regular tying. The side with the loops is on the front square

Pillows knitted with openwork squares will decorate your home and add coziness.

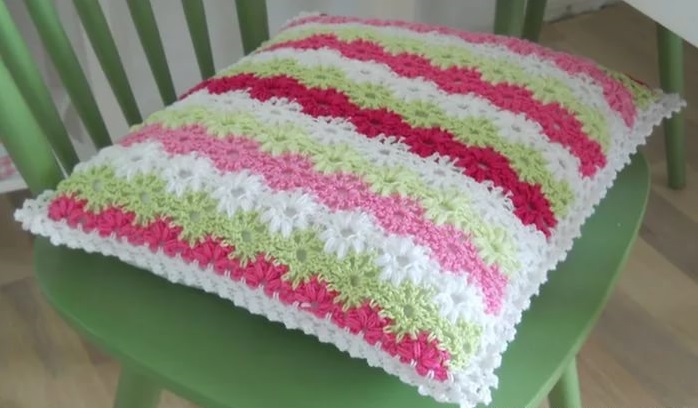
Roses in your hands will “bloom” quickly), as they are made from thick yarn with a thick hook according to a very simple pattern.

Operating procedure:
The final goal of the work is a rectangular pillow with small roses - size 40 x 60 cm. The upper part of the pillowcase consists of 42 fragments, made with crochet number 3 from the remains of wool yarn (white, yellow, green, blue and black). For each fragment you need 10-15 g of yarn, depending on its quality.
Knitting the fragment begins from the center, with a chain of 12 air loops. They are closed with a half-column - the 1st circle is obtained.

2nd circle - 4 chains of 4 air loops, secured with half-columns on a ring through 2 loops of the chain.
After the 7th round, green leaves are knitted, making 4 double crochets from the top point of the rose petal and 1 chain crochet between them and 2 single crochets between the petals (lower point). Along the entire circle from double crochet to single crochet, 2 chain stitches are knitted.
9th circle - double crochets made of black yarn.
To ensure that all fragments are the same size, the edges of the finished fragment are slightly moistened cold water and put it on the template. It is done like this: draw a square of the required size on a board and drive 8 small nails into the corners of the square and in the middle of each side. The wet fragment, rose side up, is placed on the nails and, after it has dried, removed. Next, use the template for the next fragment.

The finished fragments are connected to each other using single crochets of blue yarn: first, in strips of 6 fragments (the short side of the pillowcase) - a total of 7 strips, then they are connected to each other.
It is better to make the lower part of the pillowcase from blue or black wool fabric. Fill the pillow with filling and that's it, your job is done.
“CAMOMILE” AND “SUNFLOWERS” CROCHET PILLOWS

Knitting pattern for motifs with daisies and sunflowers

Knitting pattern for motifs with sunflowers

Openwork pillowcases will look more impressive if you put them on a satin pillow:


The “Daisies” pillow and the plain pillow are also knitted with squares:


Colored pillow motives


Beige openwork pillow


Motif pillow"clover"


pillow with flowers
