Modification of rowing pvc boats with your own hands. Tuning of motor boats, improvement of serial motor boats
Completing an inflatable boat requires material and physical costs from the owner, and usually additional devices are much more expensive than the vessel itself.
There is no limit to perfection, every year more new accessories are added to the boat and often fishermen are held back only by the lack of funds.
When purchasing a boat, sooner or later you will want to purchase the following equipment.
Compressor or pump
The first thing you will need is a compressor to inflate.
Boat owners know how long and tedious it is to pump up a boat before fishing. All serial inflatable boats are completed. The time for inflating a standard boat using a mechanical pump is from twenty minutes. In addition, the legs quickly get tired from monotonous movements.
A compressor will be an excellent solution to the problem. This device perfectly reduces the time of inflating the boat and saves the fisherman's energy. The following types of compressors are now available in stores:
Compressors with built-in accumulators;
Compressors connected to the accumulator;
Automotive compressors powered by a transport device network. Those car owners who have such a device can only buy a special adapter and hose, after which they can safely pump up or PVC boat.
The motor will help you move around the reservoir at a higher speed and will make it easier to maneuver the boat between thickets of reeds.
There are a large number of motors on the market, but a PVC boat can only be powered by an electric motor.
The motor is secured with special clamps that are included in its kit. The engine is fixed to the ship's transom with screws.
You can control the motor using a remote control or a special handle.
The electric motor is powered by rechargeable batteries, which can be charged from a regular outlet.
The running time of the motor is limited by the state of charge of the battery. 
Suspended transom
The purchased boat is not always equipped with an outboard necessary for installing the motor.
You will have to purchase it or do it yourself. 
Sitting
Very often fishermen try to improve the boat seats.
The basic configuration includes plywood seats, which are highly moisture resistant. It is very inconvenient to sit on them, especially fishing takes a long amount of time.
For comfort, you can use padded boat seat pads. The pads, in addition to the soft and comfortable base, are equipped with fixation elements on the base boat bench, thanks to which they will not slip and fall off. 
There are soft inflatable chairs or inflatable ottomans.
An irreplaceable accessory if you care about your health and do not want to overstrain when lowering the boat into the water or pulling it out of the water.
A fully equipped boat is quite heavy. If you add wheels to it, then launching the boat into the water will be much easier.
If there are transom wheels, it is enough to simply move the boat for short distances along the shore. In shops you can find wheels of various types and sizes. 
Designed for storing fishing tackle, food, ropes, anchors and other accessories.
It is located in the inner bow space of the boat, therefore it does not interfere in any way during fishing.
Sewing bags made of waterproof materials that are easy to mechanical cleaning. The bag is roomy and lasts a very long time. 
Additional mounts for oars and rods
They are placed along the boat on cylinders. Oars and spare rods in this case will be on the body of the cylinders, they will not interfere with the fisherman doing what he loves.
If you need to remove excess gear, you can quickly pull them out of the clips. Such devices are called universal fastening blocks. 
Excellent assistant to the fisherman. The sensor of the device is mounted on the ship's hull. The angler can watch the underwater objects on the monitor. makes the process of fishing as productive as possible. 
Anchor
In stores you can find anchors of different weights and sizes. You need to choose depending on the circumstances of the fishing.
If you are familiar with the reservoir, you are sure of the structure of the bottom, then choose an anchor that is specific in weight and shape.
If you also need to be guided by the weather conditions (windy or calm weather).
It is better to store the ropes to the anchor on spools or special reels, so they will not lie under your feet, interfere and get confused. 
Awning
In order for your boat to serve for a long time, you need to take care of it, take care of it.
The parking lot will help to shelter it from the influences of the external environment during transportation and in the parking lot.
A running awning, on the contrary, will protect you from bad weather or heat, and will not allow water to penetrate into the cockpit. 
Life vest
This personal rescue device must be present on your vessel, otherwise you will get into trouble during any inspection by the inspector.
Fishing equipment
It is also worth equipping the boat with a scoop, landing net and kukan. These fishing elements will always come in handy.
Popular omen: You can't spit over the side of the boat, trouble is bound to happen!
Having bought a PVC boat, sooner or later each owner thinks about improving the technical and functional characteristics of the floating facility. Tuning can be ordered from trusted craftsmen who, for a fee, are able to embody any client's wishes. However, the most interesting is the process of self-tuning, which will not only improve the characteristics of the boat, but also bring a lot of positive emotions.
Strengthening the boat structure
Tuning should start with strengthening the bottom surface. Despite the fact that manufacturers pay special attention to the materials for the bottom, it wears out over time. Actively using a swimming device or inadvertently jumping on stones, you can severely damage the bottom.
Gluing a PVC-based profile can help in this situation. However, when improving the bottom surface, it is worth remembering that the profile will increase the mass of the vessel. It is recommended to strengthen the bottom as much as possible only in cases of constant use of a floating device on fast rivers with a rocky bottom. If fishing is carried out on a quiet reservoir, then the strengthening of the bottom surface can be minimized.
What may be required to strengthen the bottom:
- PVC membrane or corresponding profile;
- adhesive base PVC "Vinikol" or "Uranus".
If desired, you can reinforce with a membrane without using an adhesive base.
Step by step process:
- The surface of the boat is washed from sand.
- Degrease the clean surface.
- After removing the valve, disconnect the transom wheels.
- On the swimming facility (inflated) paper is laid out and 2 patterns are cut, according to the dimensions of the bottom surface (the area between the location of the cylinders and the keel).
- According to the obtained patterns, we carefully cut out the elements from the membrane. The mass of one part is usually slightly less than 2 kg, and the thickness exceeds 1.5 cm.
- The cut material is laid out in an open area where the sun's rays fall until the desired shape of the product is fully assumed.
- Turn on the hair dryer, warm up all the details and squeeze while air is used with a roller.
- We are working on the extreme areas very well. The materials are glued together by heating the membrane material from the effects of high temperature conditions.
- We glue the PVC profile on the keel from both sides. This will protect the keelson.
- The boat is also strengthened by cylinders (by a quarter of their length).
- If you wish, you can also strengthen the boat along the transom.(it is covered only with a layer of the bottom woven base).
How to glue the fender yourself
Reinforcement with a bar can be done by hand according to the instructions below:
- We wash the surface of the bottom of the boat. Remove sandy deposits and dry.
- Degrease the dried surface with vodka, alcohol or gasoline.
- Using a brush, apply a thin layer of glue to the surface of the timber and the vessel.
- We leave it for 20 minutes, after which we apply the second layer in the same way.
- We are waiting for the material to dry completely (it should not stick to your hands).
- With the utmost precision, the applied timber is pressed tightly to the surface.
- To ensure the maximum degree of adhesion, the surface should be preheated with a hairdryer.
- Again we squeeze the place of gluing and roll a rounded weighty object over it.
Installation of redans
Redan is a kind of profile with a guide (mostly reminiscent of the shape of a triangle). By equipping the boat with redans, the level of stability of the boat on planing can be increased. It is possible to combine the placement of redans with the application of additional prophylaxis on the keel and cylinders. Short redans can be placed in the bow of the bottom (zone of intense splashing).
Installing stringers
Before starting the installation of stringers, markup should be done:
- By placing the set of floorboards on the floor, we ensure that the order is exactly copied. how they are placed in the cockpit.
- Stringer is applied to one side of the bottom, while observing the overlap with its length of three adjacent floorboards.
- It is not recommended to install stringers in the bow of the vessel. During planing, the main load falls on the floorboards of the third rear area of the PVC product hull. Based on this, it is more expedient to install the stringer on the outer floor from the transom of the boat.
- It is very important that the payolines do not protrude from the edges when installing stringers. To ensure this condition, the cutting depth should be marked, which will ensure that the stringer is put on the extreme area of the plywood.
- To carry out the markings, we apply a stringer and align it along the plane of the extreme parts of the floor. Observing the dimensions of the profile, we draw the contour for the cut (on both edges of the stringer).
- We connect the markup with one line and we get the desired maximum accurate marking of one side.
- When marking the cuts for the stringer, an allowance should be made for a length of about 4 cm(from each side). This will allow you to comfortably put on and take off the stringer if necessary.
- When marking, the middle payoline is slightly shifted to the opposite side from the marked area. After that, markings should be carried out on the second side of the floorboard.
- Having finished the markup and taking a jigsaw, we proceed to sawing along the markings of the pockets(for installing stringers). To prevent the appearance of chips on plywood, you can use nail files "for wood materials", which have small teeth. When working, you should take your time so as not to make mistakes.
- After completing all the steps, we slightly round off the extreme cuts of the payolin and process them with a water-repellent impregnation type. Pinotex Focus, which contains a sufficient amount of wax, is perfect in this case. If desired, the extreme sections can be treated with linseed oil (well heated) or yacht varnish (waterproof). Compliance with these recommendations will help prevent the swelling of the payolin.

By equipping the boat with redans, you can increase the level of stability of the boat on planing.
Hard floor
When making a hard floor, you cannot do without:
- plywood sheet (10 mm);
- loops - about 20 pcs.;
- bolts;
- nuts;
- yacht varnish;
- impregnation;
- washers.
Step by step process:
- First of all, we make a suitable size. bottom pattern from linoleum.
- Width indicators(taking into account the rectangular part of the bottom) must be larger by 1.5 cm in order to ensure normal clearances.
- Having cut out the linoleum, we will carry out the marking of the hard floor. It will be placed between the floor (rigid type) and the PVC-coated bottom, which will prevent the hardware from damaging the existing bottom.
- The pattern is folded in half and cut its symmetry is achieved.
- Putting a plywood sheet in front of you, carefully cut out six floorboards (80 cm wide).
- Remaining square after cutoffs can be used as a footrest if desired.
- Round off the long sides of the payolin with a file. We impregnate with a protective type of impregnation.
- We collect from payolin for the surface the bottom of the accordion on the loops.
- Be sure to use a bolt(hinge side) with countersunk head. Otherwise, the floor cannot be folded.
- The part of the bolts protruding from the back side is carefully cut off with a grinder. We grind the nuts. To ensure the maximum level of rigidity, 3-4 hinges should be placed on each connection.
- The resulting structure is covered from above with a piece of linoleum and outlined with a felt-tip pen.
- Cut off the excess parts with a jigsaw.
- Round the edges around the entire contour using a file.
- Taking sandpaper, we grind the entire surface, cover it with 3-4 layers of varnish (yacht look).
Boat anchor
There are many models of boating anchors. Most fishermen often use any iron device of suitable weight as an anchor. Some fishermen prefer to buy collapsible models.
When choosing an anchor, certain requirements should be taken into account:
- The mass must be at least 5-6 kg(depending on the strength of the wind gusts and the speed of the current, the sail of the vessel also has a great influence);
- Possibility of raising and lowering from the place of control of the swimming facility.
Boats, the length of which reaches 4 meters, must be equipped with an anchor eyelet and a roller (optional). This will ensure the safety of the cord in areas of friction against the metal.
Spinning Rod Holders
It is more expedient to make holders for spinning on the basis of plastic tubes. It is desirable to have 2 holders on each side.

Sounder transducer
The echo sounder sensor can be fixed with a suction cup, but in most cases on PVC boats it does not hold well. As a solution to the problem, you can purchase an aluminum tube with a square cross section. We drill holes (through holes) in the tube for the pin.
We make an eyeball egg and fix it with glue in the side upper area of the balloon. You can adjust the immersion depth of the sensor by gently moving the pin. We equip the lower part of the tube with a bracket for the sensor. By rotating it vertically, you can achieve the required level of inclination. Horizontal rotation is impossible due to the profile pipe.

Transom wheels
There are a lot of options for creating transom wheels. The main purpose of the wheels is considered to be the transportation of a laden watercraft from the trailer to the aquatic environment.
Step-by-step wheel manufacturing process:
- We prepare inflatable wheels with a diameter of 300-400 mm and a width of more than 100 mm. It is very important to select the largest possible diameters, which will prevent it from getting stuck in the ground.
- The wheel hub connects to it as tightly as possible.
- The chassis can be made on the basis of channels or pipes. The simplest attachment of the transom to the chassis will be a metal plate welded to a piece of pipe that will accommodate the upper area of the chassis without play.
- All chassis mounts must have at least 3-4 points and plates(clip type) located on the inside of the transom. They will provide the maximum level of fastening strength.
- The chassis is secured to the fasteners with bolts. On request, the wheels can be lifted along the cylinders.
Inflatable keel
Not every PVC boat is equipped with a keel. It is especially important for boats with a motor. Keel has the following features:
- can keep the vessel on course;
- prevents the separation of the bow of the boat from the surface of the water surface at the moments of movement with the engine turned on.
You can also make a keel with your own hands:
- A tube is glued from waterproof materials with a diameter of 100 mm with a valve.
- The required length of the tube is usually calculated by measuring the distance from the stern to the bow.
- We glue the tube to the bottom surface in the inner part of the ship at the keel using cross-section PVC strips.
- It is advisable to pre-pour a mustard solution into the pipe., which will provide the required level of tightness.
- Reaching shallow water from the keel the air must be let down.

The keel prevents separation of the bow area of the boat from the surface of the water surface during the moments of movement with the engine on
Seats
Most of the shop models of PVC boats are equipped with hard seats, which deprive the angler of comfort and do not allow him to sit comfortably for a long time. To ensure your own comfort while on board, you can install soft seats on board, previously upholstered with leatherette.
Alternatively, you can purchase inflatable chairs. If desired, the padded seat is complemented by a bag located underneath and serving as a storage for small parts. The size of the bag should be in proportion to the size of the chair.
Insurance for the engine
Unfortunately, it is impossible to predict what might happen to the boat after going out into the open water. Quite frequent troubles for fishermen are unexpected collisions with obstacles. In this case, a poor clamping of clamps can provoke a breakdown of the outboard motor from its location. Very often, he simply goes to the bottom of the reservoir.
To eliminate this kind of misunderstanding, you should start strengthening the motor. For this, a cable (synthetic or steel) is pulled on the transom bypassing the eye-rings that are located on the transom. In simple terms, the motor is securely tied up and it becomes impossible to lose it.
Awning
When tuning a boat, anglers often equip an awning on it. Awnings are available in a variety of varieties and can be tailored to specific boat models. For small boats, umbrella-tents are usually used, which shelter a person from rain and sun.
Boats equipped with a motor are often equipped with:
- The nose cone is made of PVC material. Some models are complemented by an overview window. The awnings are easily thrown onto a special arc, protecting people from splashes and preventing high waves from getting inside the boat. When gliding, the nose cone performs the function of a rear wing, which prevents the boat from jumping in the air during strong gusts of headwind. The presence of a small pocket allows you to store a copy of the side number.
- The transformer awning is attached to the board with aluminum arches. The design is able to shelter people from raindrops and gusts of wind. The windows, located on the awning product, make it possible to move under the motor (with a slight wind). The side parts of the PVC fabric are movable and can be zipped and lifted when fixed with slings. By changing the position of the side parts of the awning, you can comfortably spend the night on the water, fish in rainy weather or get out on land. Most models are equipped with ventilation devices.

Table and hiking bags
To store useful little things that can come in handy on fishing, bags are actively used. They can be placed in the bow of the boat or under the seat. To secure the bag, use the basic boat hardware. You can build a small comfortable table on the boat from a highchair (part of a plastic table).
Additional options
As an additional tuning, anglers attach the gas tank and equip the boat with an arc for spinning.
Fastening the gas tank is a very important procedure, which will allow you not to lose it during sharp turns or strong current. Usually, the tank is tied up using a strong rope passed through the half rings.
You can fix half rings in the following ways:
- by gluing to the bottom (in cases where the floor is inflatable);
- if the floor is hard, it is more expedient to screw the half-rings to the pajolin with screws.
The anglers call the arc for spinning among themselves a tarka. As a rule, it is performed on the basis of a pipe, attaching a glass securely to install the tackle. The tarka is installed in the transom of the vessel or in the middle.
- When gluing the accessories to the inflatable boat, it is necessary to use a high quality adhesive base (specialized).
- Before starting bonding, be sure to degrease both surfaces.
- Each of the layers of glue is applied after 15-20 minutes, which is necessary for the glue to polymerize.
Such a thing as "tuning" means the improvement, revision or modernization of a product. In this case, the modification of the PVC boat. Large-scale "tuning" of such boats costs a lot of money, especially since it involves the improvement of the design or individual structural elements of the PVC boat.
Various factors can serve as the reason for the modernization of a floating vehicle. The first factor includes its imperfect appearance associated with the purchase in "ancient" times, when few people thought about the perfection of the product. The second factor is very serious and related to the financial side of the matter. People buy inexpensive things with the hope that they will improve them without spending a lot of money. In addition, upgrades can be carried out incrementally without immediate costs. At the same time, it should be remembered that in the process of revision it is better to install only the necessary and useful elements that improve the characteristics of the product. Although, everyone has the right to decide which innovations are suitable for a floating vehicle.
Many items can be purchased and installed on the boat. It is not necessary to make them yourself, especially since this process can be delayed in time.
PVC fabric, which serves as the bottom of the boat, is quite durable, but it is inconvenient to move on it. Since the bottom is not rigid, every angler experiences a number of inconveniences. Therefore, strengthening the bottom is the first task. In the future, the reinforcement will have to be repaired, but not the bottom of the boat. It will cost less, and it will be easier to replace the amplification with a new one or to repair it. You can make both full and partial reinforcement of the bottom of the boat.

Bottom reinforcement is made by gluing a special PVC tape called "fenders". The fender bar can have a thickness of 1.2-3 mm and a width of 60-235 mm. It is attached with a 2-component glue. This will make the bottom harder and more protected from various underwater surprises.
Keel reinforcement
The operation is reduced to the fact that PVC tape (fender) is glued over the factory tape. A similar enhancement applies to keelsons.
Strengthening the cylinders
Strengthening is performed based on the need. The cylinders are also subject to constant wear and tear.
Transom reinforcement

For this element of the boat, reinforcement is simply necessary, since the transom is protected by only one layer of PVC fabric.
In order not to suffer with individual elements, the bottom of the boat can be sealed completely by using a fender. If you are careful and careful, as well as choose the right glue, you can do the operation yourself. This approach will solve many of the problems associated with the deterioration of the boat's performance.
Installing stringers
If the boat has a hard floor, then you will have to install duralumin profiles. Since the boat deforms during movement, the rigid floorboards touch the inflatable parts of the boat and friction occurs. This can lead to abrasion of the fabric, which is undesirable and can lead to a violation of the strength of the boat. In the bow, where the boat has a curved profile, stringers are not installed.

Self-attachment of the fender bar

Self-reinforcement of a PVC boat consists of the following operations:
- The boat is washed out, after which all impurities are removed. After that, the boat is dried as thoroughly as possible. It should be remembered that the slightest residual moisture will not allow the boat elements to be glued together properly.
- The surfaces to be glued are degreased with gasoline or acetone. Degreasing is carried out carefully so as not to break the fabric.
- Using a brush, a layer of glue is applied to the surface. Usually the glue is applied to the boat and fender. After 15 minutes, a second layer of glue is applied. The layers dry out until the glue stops sticking to the hands.
- The bar is applied to the surface and pressed against.
- In order for the surfaces to stick reliably, it is better to heat them with a hair dryer. Heating is done very carefully so that the plastic does not start to melt.
- After that, the surfaces to be glued are pressed again with maximum force.
Redans by boat

These elements make the boat more stable. Redans are PVC elements with various shapes.
Anchor

An anchor for a PVC boat is an indispensable element that allows installation at any point in the water area. It is especially effective in the presence of a current, when the boat can leave the intended place.
Spinning Rod Holders
A very useful accessory. Special mounts can be purchased at the store. The best option for one - 2 mounts, for two - 3 mounts. Extra bindings can be a hindrance. It is not desirable to be ready for a large number of spinning rods. If necessary, they can be pulled out of the tube at any time.
Alternatively, the rod holders can be made from PVC tubes yourself. They can be easily purchased at hardware stores.
Transom
A transom is required under the motor. When buying a boat, the transom may or may not be included in the package. It is advisable to install an echo sounder on the transom.
Anchor eye

It is installed at the stern of the boat and facilitates the process of lowering and raising the anchor. The roller is placed slightly lower so that there is no abrasion of the fender.
Transom wheels

Whether to install them or not depends on the nature of the reservoir. Most bodies of water, especially wild ones, do not have conditions for a normal boat launch. In such conditions, you have to lower the boat on your hands. This means that there can be no talk of any transom wheels.
Inflatable keel

As a rule, simple boats are not equipped with a keel, which does not allow it to stay on course. Installing an inflatable keel on it will help solve the problem of boat stability, especially in the presence of waves.
The keel size depends on the length of the boat. If you install the keel on a boat that is less than 3 meters long, it will cause the bow of the boat to rise. This element is attached using special tapes that are included in the package.
Seats
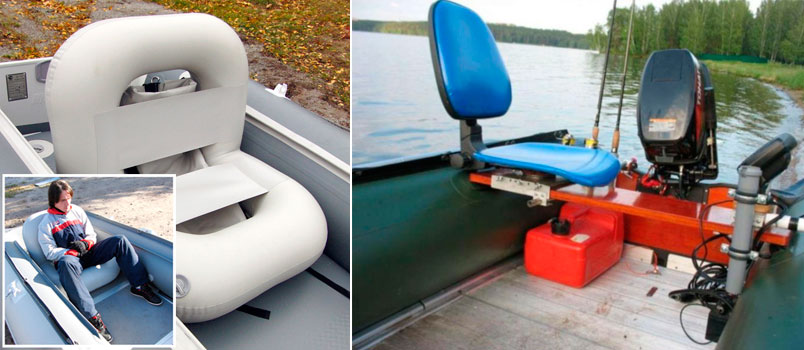
Almost all models of such boats are equipped with hard seats, which is not very convenient, since you have to sit a lot in one place. To make fishing a joy, it is better to replace the seats with soft ones or modify the old ones. Most boat owners make ice fishing-style seats with a storage box under the seat.
Alternatively, you can design a movable seat that can be installed at any point.
Bag installation
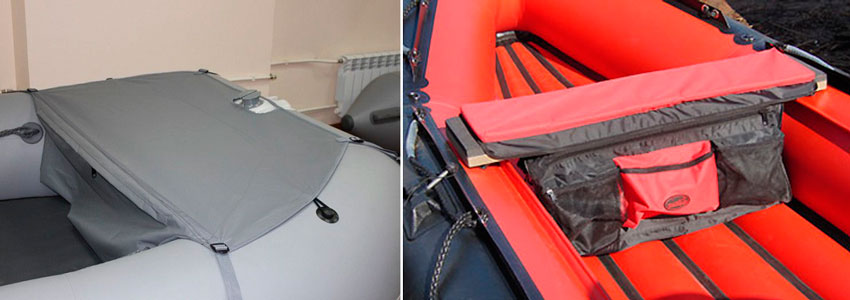
The bag can be fitted under the seat or in the bow of the boat.
Outboard motor insurance

Fishing is fun, but also dangerous. Sometimes it is difficult to predict what will happen on a fishing trip. Quite often, when abnormal situations intervene in the fishing process, the motor breaks down. As a result, the motor simply goes under water. To prevent this from happening, the motor is insured with a steel or artificial cable. It is attached to the transom through 2 eye rings. In other words, the motor simply binds.
Fastening the gas tank

Elements such as an additional gas canister require mandatory fastening. This is necessary so that during movement or sharp turns the canister cannot change its location. Fastening is carried out by means of a rope and half rings attached to the boat. They are attached to the boat as follows:
- half rings are glued to the bottom if it is made of PVC fabric;
- screwed to the floorboards if the floor is hard.
Fasteners
All additional elements are attached to the PVC boat using two-component glue. There are several models of universal fastening systems. If you install it, then any elements can be adapted to it.
We buy our boats with motors, sometimes guided by a variety of purposes. So, for someone, this is a means of transportation from point A to point B, and during this movement, one observes the pictures of nature replacing each other.
And at the same time it does not matter at all with what speed this movement will be, we swim for ourselves and we swim. We go on a "speedboat" - and great, more and not needed. Having bought a boat and put a motor on it, we are content with what happened, without straining at all and not puzzling how to add speed or economy. How to try to move a larger load at a planing speed.
But there are those among us who always want more. Having traveled for some time on a stock kit from the store, they begin to try to improve something in the design, to change the settings so that the vessel more closely meets the ever-growing requirements. On the pages of the magazine, we have already considered, perhaps, all aspects of such an upgrade, but have not yet touched directly on boats - motors - propellers.
Let's start with the boats, because some models may require some intervention, however, without the use of scissors and glue. The fact is that, unfortunately, not all manufacturers pay due attention to the outlines of their boats; we are talking about ships with a rigid floorboard. A short keelson glued into the boat, or vice versa long, can give a dip in front of the transom, or, accordingly, a hump. All this negatively affects handling, speed and economy.
If it is not possible to contact the manufacturer directly with such a defect, then a rigid plastic insert (for example, foamed PVC or fiberglass sheet), placed between the keelson and the bottom, can completely or significantly improve the lines of the vessel. This work can be done in the kitchen with the simplest set of tools at hand.
The next stage of working with the body will require a highly qualified gluer with sufficient experience in working with PVC materials. Here I mean the sticker of the longitudinal steps. The event as a whole is not ordinary, but for those who strive for high speeds, it is necessary, since it reduces the wetted and washed surfaces for certain modes.
Such an improvement is advisable if the boat has a minimum load. In this case, it is quite possible to achieve a speed increase of 2-3 km / h. But it is better to entrust this work to specialists who, first of all, know the boat well, its behavior on the water and will be able to glue the PVC profile exactly in place. But at the same time, it should be borne in mind that such an installation will win only with a minimum or average load. Redans with a large load can slow down, for the same 2-3 km. Although with a powerful motor, 15 hp or more, this braking threshold in high-speed mode is likely to move away and be hardly noticeable.
A huge plus in equipping the boat with redans is that they increase stability on the course. The ship goes with them as if on rails, which will certainly be appreciated by those who prefer to fish by trolling or by track. When folding the boat, glued redans add insignificant volume.

The next in the package of measures is the selection of the screw. The procedure is rather complicated, especially in our conditions. The fact is that it will require additional equipment, namely a GPS navigator for measuring speed and a tachometer for correctly measuring the engine speed.
But that's not all. Unfortunately, not all of the commercially available screws meet the stated parameters. That is, the numbers of the step are indicated alone, and when checking on the "step slide", a deviation is found, sometimes very significant. And worst of all, if the step from the root to the edge of the blade decreases. That is, one part of the propeller tries to accelerate the ship, while at the same time the other part of the propeller works as a brake.
Of the screw models currently on the shelves, Solas can be trusted. At least in the power range from 10 to 100 hp. all screws tested on the stepping slide corresponded to the declared parameters. This means that relying only on the inscriptions on the propeller, you can choose something optimal for your load-carrying set for your boat-motor kit.
The selection of a propeller usually begins with checking the geometry and quality of the propeller and only after that they switch to water to measure the speed and the maximum revolutions developed by the motor with the standard propeller. Moreover, it should not have visible and even barely perceptible micro burrs on the blades.
If, with the selected load, the tachometer shows an excess of the maximum speed declared by the manufacturer, or a "cut-off" is triggered on the motor, then the screw is conditionally light for this load. It is naturally possible to use such a propeller, but it should be borne in mind that driving the motor in excess of the declared speed does not greatly extend the life of the motor. Although, having obtained this result on a boat with a minimum load, it is worth trying this propeller and loading the boat to the maximum, as it is usually used on fishing trips. If in this case the motor "twists", then it is worth changing the screw to an analogue in shape, but in increments of 1 inch more. Unfortunately, screws with fractional pitch values have not taken root in our country, although fractional diameter values are quite common. But, having put a propeller with a larger pitch, you should not expect an increase in speed, especially on a loaded case. On the light lung, most likely, an increase will appear, although this depends on many values that it makes sense to talk about within the framework of a special article, provided that there is an available opportunity in a workshop to change the pitch of the screw, and the diameter of the screw, and the disc ratio. the shape of the blades. Now we are talking about several limited possibilities, how to use what is on the shelves, without rework.
The practice of using different screws shows that by replacing screws of similar shape with different pitch values, we can add or subtract maximum revolutions. The calculation is roughly the following: each added inch removes an average of 200 to 350 rpm. in the line of one manufacturer.
But again, I repeat that replacing the propeller does not always lead to an increase in speed. But by installing a new propeller and choosing the economical running mode, you can start saving quite decently on fuel. As recently as last year, on the boat of a friend on a four-stroke Yamaha 60 engine, there was originally a propeller with a pitch of 13 ', and under it lightly the boat accelerated to 55 km / h, while the engine rotated to a maximum of 5200 - when the crew climbed aboard and took fishing equipment, the speed decreased noticeably and the engine speed did not rise above 4800. After changing the wine to Solas 11 'light, the boat reached the same 55 km / h, but already at 5900 rpm. But when the crew got on board and set off on a long voyage, choosing the economy mode of about 4800-5000 rpm, it was possible to save more than 25% of fuel.
This is a relatively large building, for small ones the savings will be a little less, but if someone goes on some kind of long autonomous hike, then all this will be relevant.
Several people appeared in St. Petersburg who started out as restorers of damaged screws, and then gradually mastered other operations with screws, including changing the pitch, disc ratio, diameter, and shape of the blades. Using their services, provided that there is a complete understanding of what kind of screw is needed, you can choose a screw very precisely corresponding to any given task.
But, having completed the selection of the propeller, speed lovers usually do not stop there. And the next step in setting up the kit is choosing the optimal motor suspension height on the transom. This is a simple matter on the whole, but some physical features of the process should be kept in mind. The motor manufacturer's recommendation is to install so that the ACP (anti-cavitation plate) is between 0 and 50 mm below the keel line. They primarily concern hulls with deep "V" lines. If the deadweight is less, then the recommendations should be approached with caution. The majority of PVC boats have lines that are close to flat-bottomed, when the deadlift on the transom does not exceed 5-7 degrees. Therefore, you should not raise the motor very high in order to avoid air leaks and entrapments when the screw spins sharply and begins to work almost in foam. This phenomenon is quite harmful for the gearbox.

The next step in setting up the kit is choosing the optimal motor suspension height on the transom.
Raising the motor on the transom and rolling the boat lightly, you should not abuse the lift, and, having received the first pass in the turn, it is worth lowering the motor by 5–10 mm and fixing it in this position.
I want to especially note that those who will independently raise the motor should keep in mind that in the upper position it must be especially carefully fixed, using all the same transom pads, both the outer one made of plywood and the inner one made of plastic (metal) ...
Poseidon, which has recently installed such transoms in stock on almost all of its boats, has been a good help for this setup. Lift adjustment with powerful propellers and its precise fixation on the boat transom also with powerful propellers make this useful model especially attractive for those who are tuning their kit.
The graduation on the side allows all adjustments to be made with the utmost precision.
And one more tuning node, which at the end can slightly raise the top speed. I mean varying the angle of the motor. Usually, given that all boat transoms are installed in a very small range of angles, the motor is operated at the second, maximum at the third "hole". If the whole range of settings for the motor suspension and propeller selection has been performed, then by throwing the motor back one more "hole", you can get a very pleasant addition to the speed. But this additive will appear only under one condition - ideal body hydrodynamics.
It so happens that not all boats currently being produced meet these requirements 100%, but by putting hands and head, you can noticeably improve their speed characteristics.
Not every fisherman can afford to buy an improved model of a fishing boat, stuffed with various "novorots", since the price of such a product will be extremely high, and tuning a PVC boat for fishing with your own hands will become a real salvation in such a situation. As practice shows, PVC boats are the most common means of transportation among fishermen, since they are considered the most affordable and at the same time reliable. But, despite the fact that only high-quality materials are used for the manufacture of such boats, the manufacturers decided to save on comfort and functionality. Tuning a PVC boat for fishing with your own hands will help to correct the situation, if the revision is done correctly, the fisherman will receive an excellent vehicle.
The market value of a product largely depends on how long it takes to inflate it. Experienced anglers know that inflating the watercraft every time before fishing is quite tedious, since most often PVC models come with a regular foot pump. Of course, with the help of such a product it is quite possible to pump up the boat, but this will take at least 15 minutes.
That is why one of the ways to upgrade is to buy a compressor. This attachment will not only reduce pumping time to a minimum, but it will also save the fisherman's energy.
The following types of compressors can be found in stores today:- With built-in rechargeable battery.
- Battery rechargeable.
- Machine. This type of compressor works only after being connected to the vehicle network. If people go fishing most often by car, this type of compressor is optimal.
Despite the fact that many anglers do not consider the purchase of such equipment as tuning, the compressor will still significantly facilitate the pumping process, due to which there will be more time for fishing.
Such a device will be especially relevant if movement around the reservoir is carried out with the help of oars.

If finances allow the angler, it will be necessary to install a motor on a PVC boat, even if it is with a minimum power. Such a product will give fishing a completely different character, since it will be possible to move around the reservoir at a much higher speed, in addition, the angler will be able to use such an effective fishing method as trolling.
Before buying a motor, it is extremely important to remember this point. Despite the fact that today there are different types of motors on sale in the assortment, only an electric type can be installed on a PVC boat.
Features of the electric motor:- it is fixed with special clamps, which are always included in the kit. The motor itself is attached to the boat's transom with screws;
- the product can be controlled with a special handle or with a remote control;
- the functioning of the electric motor is carried out by a battery, which will need to be recharged from a home outlet;
- the duration of the motor depends on how powerful the battery is built into it.
The cost of the motor varies from 4000 to 8000 rubles, depending on the city and brand.

Despite the fact that modern boats are made of high-quality and reliable materials, it is still impossible to prevent wear of the bottom, especially if the boat often comes into contact with a rocky bottom. One of the simplest but most effective methods is membrane reinforcement without the use of glue.
To equip and strengthen the boat with this method, you need to adhere to the following algorithm of actions:- After fishing, the surface of the boat must be thoroughly cleaned and thoroughly degreased.
- After that, the valve and transom wheels are carefully removed from the craft.
- While the boat is not lowered yet, it is necessary to make 2 patterns, which will fully correspond to the dimensions of the bottom. They can be made from cardboard or paper. According to the size of the obtained patterns, it is necessary to cut out membranes from polyvinyl chloride. For the bottom to be protective, the thickness of the fabric should not be less than 1.5 cm.
- In order for the fabric to be leveled, it must be placed in a warm room, leveled on the floor and left for 2-4 days.
- After that, the part must be warmed up with a hairdryer and smoothed with a roller of the edges (to remove air). Now the membrane must be applied to the bottom of the boat and further leveled with a roller. The gluing of the elements will occur from exposure to temperatures, you do not need to use glue.
Such work will extend the "life" of the boat for a couple of years, provided that it is carefully operated.
Every angler knows that during long fishing trips it becomes very uncomfortable to sit in a boat. In order to make the seats more comfortable, special inflatable pads can be purchased, but, according to most fishermen, they are not very comfortable and practical.
To build a truly comfortable seat, you will need 2 boards (corresponding to the width of the boat between the cylinders) 15 cm wide, window fittings and passenger belts from the car.
Algorithm of actions:- using window fittings, you need to fasten 2 boards together;
- then the seat belts are fixed on 2 sides of the seat. It is best to do this with screws;
- the seat itself needs to be adjusted on the boat. The belts must go through the bottom;
- in the end, foam rubber of the required thickness is applied to the seats and everything is covered with sewn covers (it is desirable that they be made of tarpaulin). It is better to use Velcro as a fastener.
The equipment of the PVC boat can be very different, it all depends on the preferences of the owner himself. In any case, tuning the boat yourself is much easier and more profitable than purchasing one of the modern models.