Beautiful panel for the kitchen with your own hands. Panels for the kitchen - options for beautiful design and design (80 photos)
The panel is a picture created from three-dimensional components using various techniques. Wall panel for the kitchen small size should not be very large. It is also inappropriate to use miniature paintings in large kitchen. Ideal option – small size such an element of interior decor.

photos
When using several panels, it is important that they correspond to a single theme.

Varieties
Glass
An option that is available to many and can radically change the interior of the kitchen is to apply a pattern to glass surface. In this case, you can choose a ready-made panel or it will be made to order according to the provided sketch.

The most budget ways decorate your kitchen with a glass panel – vinyl film or UV printing. These two methods differ in that the film is glued to the back side, and the print is applied to the front. UV printing looks more saturated and bright.

You can place this decor between the top and bottom rows kitchen cabinets. Different themes can significantly change your kitchen. Appetizing citrus fruits will give you a sunny mood orange kitchen. If there is black and orange, then a tropical theme with black palm trees on a red and yellow sunset background will look quite stylish.

Ceramic
Panel from ceramic tiles performs not only an aesthetic function. It perfectly masks imperfections and flaws in repairs on the walls. Plus, depending on the design, it can visually change the kitchen space.

IN present moment you can find tiles with a wide variety of patterns: flowers, imitation of mosaic or antique canvas, reproductions of paintings by famous artists. Some options are reminiscent of antique tapestries.

Tiles with tulips will add coziness and comfort to any kitchen.

They look very impressive various types paintings. To do this, use a special paint designed specifically for ceramic surfaces. Designers create amazingly beautiful decor: flowers, abstractions, patterns.

Tiles are a fairly durable material. It won't spoil it high humidity and temperature changes. Regular detergents Clean the surface easily and quickly. Ease of maintenance makes tiles indispensable in the kitchen.
But the most important advantage is safety, since the tiles are made of clay. Even if the surface is exposed to heat, no chemical harmful substances it will not highlight.

Modular
Currently, modular paintings are at the peak of popularity. They are photo panels on various topics. In this case, one large picture is divided into several, often different in size, often without a frame. It could even be part of the image. This decor looks unusual and very stylish.

Panoramic modular panel - ideal for a small kitchen. At the same time, the most suitable themes would be fruits, still lifes, and plants. The predominance of green color will bring a note of calm and fill the kitchen with positive emotions. But dark colors and massive frames are completely unacceptable for the kitchen. They will only make its design heavier.

The advantage of modular paintings is obvious:
- No restrictions in choosing a topic. Indeed, you can choose whatever your heart desires and even offer your own option to companies that produce such panels.
- Durability and easy maintenance due to laminated coating.
- Affordable price.

Modular painting can radically change a kitchen, especially one devoid of bright colors. A bright still life will become the necessary accent, the highlight of the room.

A coffee-themed panorama looks very stylish.

Creation options
You can make the panel yourself. There are techniques in which you do not need to have any special skills to create an original and unique decorative element.

Depending on the material used wall panel made with your own hands can be:
- Made from fabric. The most common technique is patchwork or patchwork. In order to create such an amazing picture with your own hands, you will need leftover fabric of different colors, both plain and with prints. Patchwork will fit perfectly into the interior rustic style.

- From cereals and seeds. Cereals are suitable not only for cooking porridge. You can make a wonderful panel from it yourself with minimal financial costs, while receiving an exclusive and interesting thing. There are many manufacturing options: from simple ones (use only two types of grains in contrasting colors) to complex ones that look like real canvases.

You can lay out a separate object on thick paper, plywood, or create a picture by completely filling the background with this material. It is easiest and fastest to work with large particles. With small ones you will have to tinker longer. To secure the grain particles, PVA glue is used. To ensure that there are no voids left unfilled with grains, the picture should be turned over. Then the poorly secured particles will fall out, and the product can be modified.

In order to facilitate the process of caring for such decor, the painting is coated with a special varnish.
- From coffee. Coffee beans allow you to create amazingly beautiful kitchen panels. The product is voluminous, stylish and will perfectly complement the kitchen interior. The technology for making it is somewhat different from creating paintings from cereals, where glue is applied to the base. For a coffee painting, you will have to treat each grain separately with glue. Otherwise it will fall off.
You can use burlap as a base. This decor is well complemented by cinnamon sticks and dried citrus fruits.


It is not necessary to take coffee beans for the panel. Incredibly stylish things are created using ground coffee. To do this you need a stencil, glue and coffee. Cover with glue required areas, and then coffee spills over them. Minimum costs and maximum output. This method is especially good for those who have difficulty drawing.


- From salt dough. Salt dough- a material from which voluminous and very beautiful paintings are obtained.


In order to make dough suitable for modeling, you will need the following ingredients: fine salt - a glass, flour - 2 glasses, water - 125 g (maybe more, use your guide as you go), dry wallpaper glue - 1 tbsp. spoon. If you add different spices to the dough (cinnamon, cumin, nutmeg), then it will become fragrant.
Working with salt dough is like modeling from plasticine. You can use toothpicks, a garlic press, cookie cutters, buttons (for prints). To connect the parts you do not need glue; just moisten them with water and press them together.
Sooner or later, we all want to add something new, fresh, and interesting to the interior.
One option in this case would be to decorate the wall with a decorative panel.

A decorative panel for the kitchen is exactly that bright and extraordinary interior detail that will highlight your mood and create additional comfort.

Types of panels for the kitchen
The size and shape, as well as the material and method of manufacturing the panels can be different:
- Fabric - the use of all kinds of appliqués, embroideries on fabric or tapestries;
- Wooden - carvings from various tree species;
- Ceramic - these kitchen panels are made from pieces of tiles;
- Graphic - various reproductions of paintings;
- Sculptural - small sculptures made of plaster or metal.

A special option is a kitchen panel made with your own hands from scrap materials: cereals, clay, beads or shells. In addition, the kitchen panel can be made from salt dough.

It is important to remember that all objects in the kitchen constantly interact with high temperatures, moisture, odors.

Therefore, you should carefully consider the choice of materials that will be easy to clean and clean.

Placing panels in the kitchen
Let's look at a few photos of panels in the kitchen to form a complete picture of how and where this decorative element can be used.

When choosing a panel, you should be sure to observe the proportions of the size of the kitchen and the dimensions of the panel: in a small room, the placement of a large panel will be unsuccessful, as it will visually reduce the room.

This option would look more appropriate in big room, while the panel can even occupy a significant part of the wall. You can focus attention on it with the help of additional lighting.


The golden rule of any interior is that all accessories and details should complement it correctly. The panel is no exception.
Pay attention! Walls in the kitchen - how to decorate them? Review of popular options + design photos

Each style requires its own panel options. For example, a wall panel for a kitchen in classic style can depict vegetables or fruits, bright landscapes.

Panels made of wood or ceramics are perfect for a rustic-style kitchen. In addition, dried flowers or fruits can be used.

Shell kitchen panel
Methods are increasingly used today artificial aging objects or surfaces. This can be achieved using special varnish or paints.

At home, you can achieve the crackle effect using ordinary eggshells.

We invite you to consider one of the options on how you can make a panel for the kitchen at home.


First of all, pick two wooden blanks, napkins, a file, several egg shells, decoupage glue, PVA, primer (acrylic) and paints (also acrylic).

Egg shells can be taken in absolutely any shade. To create a panel, it must be cleaned and dried.

Apply primer to the workpiece and let it dry. Then start posting eggshells, starting from the center and moving to the edges, filling the entire surface.

The convex side of the shell should face outward. Next, press on the shell so that it forms cracks and takes the shape of the surface of the workpiece.

Over the next 6-8 hours, the workpiece will have to dry, after which it can be re-coated with primer and dried again. You can decoupage the panel using special napkins or rice paper. You can also print any image.


To ensure that the napkin lies evenly on the surface of the workpiece, carefully remove top part napkin on which the image is applied, place it face down on the file, and then carefully turn it over, place it on a dry surface, straighten it and carefully remove the file.

When the napkin is dry, you can slightly highlight some elements of the image using acrylic paints.

When choosing a kitchen backsplash panel, remember that it should match the color scheme and mood with the overall interior.

But, at the same time, don’t be afraid to be creative, because by doing something with your own hands, you put your soul into the interior!

Photo of the panel in the kitchen


Oddly enough, most people pay little attention to decorating the walls in the kitchen - as a rule, everything is limited to wallpaper. This is understandable, since most rooms of this type can't boast at all large sizes. But if the kitchen is spacious, as is often the case in private homes and modern apartments, then there are huge possibilities in terms of decoration various surfaces. One of these opportunities will be discussed in this article, in which, together with the website, we will talk about how to make a panel for the kitchen with your own hands.
Decorative panel for the kitchen photo
DIY kitchen panel: how to frame the picture
What is a panel? By and large, this is this frame on the wall into which a hand-made picture is glued. Two elements – two stages of work related to independent creation panel Both of them involve a creative process in which you will have to use all your imagination. Let's start in order - from the first stage, which involves making the frame. For this purpose you can use various materials, and the only thing that can be said about this is that they fully influence the manufacturing technology. A simple example is a standard polyurethane foam baguette and twisted decorative rope. In the first case, the frame is created first and only then the picture is made, but in the second it’s the other way around. In the same way, the technology for making kitchen panels is influenced by the method of making the picture and, naturally, the materials that will be used. By the way, about materials - you can make a panel for the kitchen with your own hands, or rather, a frame for it, not from such large quantity materials.

For one of the options for making a decorative panel for the kitchen with your own hands, watch this video.
You should always remember that a frame is not just a frame or a limitation of the panel in size, but also a part of the picture that should fit harmoniously into its general view. And one more thing - a panel on the wall for the kitchen, or rather the framing and choice of material for it, fully depends on the place where the picture will be made - the frame should be combined not only with the picture itself, but also with the surrounding decorations, that is, with wallpaper , floor or .
Decorative panel for the kitchen: base and materials for it
If in the case of panels made of wallpaper and baguettes glued to the wall, everything is more or less clear (the basis for creating the picture in this case is the wall itself), then with mobile, portable panels, or rather with their basis, it is necessary to understand in more detail. You can’t just hang a picture in a frame - for this you need at least some kind of base, which at the same time serves as the general background of the panel. This base, as well as the frame itself, can be made from a fairly large number of different materials.

In principle, there are other materials that can be used as a base for a panel. There are many of them, and if you don’t set any restrictions for yourself, then you can use anything, including old rug and even unnecessary rags that can be dissolved into shreds and weaved from them into the base of a panel.
How to make a panel in the kitchen: finishing touches
To conclude the topic, I will say a few words about some of the nuances that allow you to emphasize, highlight or attract a person’s attention to the panel. In this regard, when creating a painting, there are some points to consider.

In general, what and how to do is entirely up to you. There is no need to impose your opinion or take advantage ready-made ideas from the Internet, you just need to take all this as a principle and create it yourself. This is the only way to make a beautiful and unique panel for the kitchen with your own hands.
The kitchen is the most visited room in the home. Cooking takes place in it, the whole family sits down to eat common table for a meal. When guests come, there is a feast or simple tea parties with friends while looking at photos. Therefore, you want this particular room to look wonderful, be cozy and contain a wonderful zest.


You don’t have to go shopping and spend crazy amounts of money to achieve results - just browse the Internet and find great options that you can make yourself. For example: decorative panel It won’t be difficult to make one for the kitchen, it won’t take much time, and it requires a minimum of funds.
Where to start creating a decorative panel for the kitchen?
Before you rush to do something, you should try on the size, application and placement, i.e.:
- Location of the craft in the kitchen: on the table, wall or door.
- What material will it be made from?
- Purpose of manufacture: aesthetic value or practical application.
- Choosing the direction and technique of execution.
- Product size. A homemade panel for the kitchen should not get lost in large space and not stand out too much if the room is small.
- Options for decorative panels for kitchens made of fabric
The easiest thing to make is a patchwork panel. Various pieces of fabric come together for the job. You can find them at home or go to a studio - there are a lot of them left there, they are usually thrown away, so you can get them for free.

To make an abstract craft, you need to cut out various shapes from scraps and sew them together. The joints can be draped with braid. Finished product fits in a frame and takes its place on the walls in the kitchen.

A felt landscape panel will be a wonderful accent. How to make such a decoration for a room? Very simple. First you need to make a sketch of the future painting. Then cut out the component parts from felt. Each part is glued into place, according to the drawing. After this, the craft is placed in a photo frame.

Ideas for making decorative panels for the kitchen from various materials
After the holidays there is usually a sufficient amount left wine corks, and drinks from plastic bottles, their lids can also be suitable for a wonderful panel. Such a panel can become the basis for a craft or an accent for the place where a flowerpot with a flowerpot is placed. Also, such a product can be used as a hot stand or placed on the table as an addition to it.

A DIY kitchen panel made from dishes is a wonderful option for decorating a room. It is suitable for a dacha, a house where a family lives permanently, as well as for an apartment.

This composition will be especially relevant for a kitchen in the Provence style. The plates can be placed on the wall itself or you can make a wooden base where the dishes will subsequently be placed.
A small master class on making decoupage panels.
To work you will need a small amount of materials:
- Large napkin with colorful patterns.
- PVA glue.
- Sanding materials.
- Base (glass, wood or plastic).
- Scissors.
- Thread and ribbon with needle.
- Several brushes.
- Since the panel is made for the kitchen, it is better to choose a regular wooden cutting board.
The first step is to drill a hole so that the craft can be placed on the wall.

To make the surface smooth, it must be sanded using sandpaper. You should choose based on the surface.

After this, the napkin is laid out on top of the sanded side. Then it needs to be glued using PVA. The glue should be applied with a brush or sponge using gentle movements.

After the napkin sticks, the work is varnished.
A braid is made from tape, which is threaded through a hole in the board.
You can hang a finished panel on the wall, made with your own hands, and admire your work.

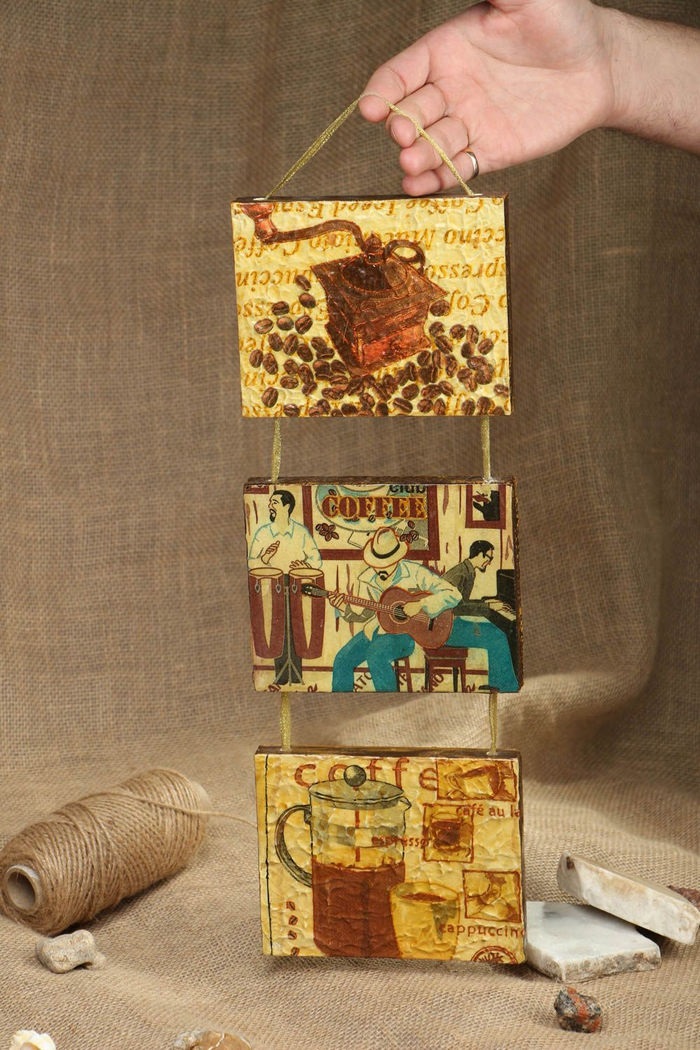
A wonderful decorative panel for the kitchen made from products and photos
A variety of cereals, pasta, coffee, and beans are in this room. All the cabinets are occupied by some kind of utensils, food or small items. You can also use them to create your own kitchen masterpiece.


For example: white and black beans will make a wonderful black and white photography, which depicts cats admiring the sunset. Can create charming designs from coffee beans and spices. Dried fruits and shells from walnut. They can be an addition to a photo frame.

If one of their walls is very wide, its accent will be a beautiful panel of their photos, which are hung in the form of an apron or a new fashionable style in the decor - butterflies.
I really want the interior of the house to be cozy and attractive, to have unique decor. It’s great if your warmth and personality are felt in this. Original panels made from scrap materials will decorate a bedroom, children's room, or kitchen. Making them won’t be difficult if you arm yourself with decorating ideas and master the technology.
How to make a panel with your own hands from scrap materials
Those who want to make their apartment unique should make wall panels with their own hands. You will get a lot of pleasure from the process, and the result will exceed your expectations. An exclusive decoration will delight not only family members, but will also arouse the admiration of friends and acquaintances. To realize your fantasies in the creative process, the following will be useful:
- tree;
- photos;
- paper napkins;
- wallpaper;
- threads;
- shells;
- natural stones;
- plastic;
- bottle caps;
- scraps of fabric, leather;
- gypsum putty;
- beads.
Use all your imagination by making panels on the walls of your apartment with your own hands. The following materials will help you with this:
- pasta different shapes– kitchen decoration;
- artificial flowers and fruits - voluminous compositions;
- polymer clay – everyday scenes, bouquets;
- matches - mosaic canvases;
- plant seeds – kitchen panels;
- coins;
- sackcloth.
Photopanel on the wall
You don't have to wonder how to decorate a wall in a room with your own hands if you have a lot of photographs in family album. Travel reports will come in handy. They can decorate the living room, children's room, corridor. A panel made like a photo collage in the shape of a heart will look original in the bedroom. For it you will need:
- a piece of white thick cardboard;
- pencil;
- PVA glue;
- stationery knife;
- set of photographs.

A simple manufacturing method will help you create a unique panel reminiscent of the wonderful moments of life. To do it:
- take a piece of cardboard;
- draw the outline of the future collage;
- cut;
- Pre-arrange the photos in the desired order;
- First glue the elements along the contour with a slight overlap;
- fill the interior space of the panel with photographs.
Decorative panel on the wall
It’s easy to do original wall decoration with your own hands using newspapers. You need a little patience to make the tubes - the basis for making the panels. Decide in advance how many circles and what diameter you will need, select color scheme. Materials and tools you will need:
- stationery knife;
- ruler;
- PVA glue;
- strong twine;
- acrylic paints.

We begin to make panels in the following sequence:
- take a newspaper;
- cut into 4 parts according to height;
- apply glue diagonally to the sheet;
- twist each strip into a tube;
- fix the end with glue;
- paint the tubes in the required color;
- twist tightly in a spiral from the center, coating well with glue;
- We alternate colors according to your imagination;
- make circles of the required size, required quantity;
- We fasten them together with twine.
You can make a very beautiful and original triptych with your own hands from a piece of elegant fabric. It will decorate the wall of the living room or bedroom, creating an atmosphere of comfort and peace. You will need 3 stretchers of different shapes and a piece of fabric. The material should be cut so that the overall composition is obtained. It is necessary to stretch the fabric over each element of the panel and secure it on the reverse side.
Kitchen – special place in an apartment where a cozy atmosphere is especially valuable. A decoration made with your own hands from what the hostess has in her closets will help create it. An exclusive composition will decorate the wall and delight the household. Take it to make it wooden frame. Decorate the base with colored paper or burlap. Stick it using your imagination:
- cookie;
- bay leaf;
- dried fruits;
- seeds;
- pasta different types;
- cereals;
- used corks;
- coffee beans;
- whatever is in the boxes.
After repairs, small pieces of wallpaper often remain. Housewives put them aside just in case, which never comes. Meanwhile, beautiful bright pieces can form the basis of a wall panel. Made with your own hands, it will add a unique flavor to the room. To complete this you will need:
- foam baguette;
- stationery knife;
- glue for foam plastic and wallpaper;
- acrylic paint;
- ruler;
- pencil;
- level;
- plumb line

Determine the location, and then, using a level and plumb line, draw the outline of the future panel on the wall according to the dimensions. Produce in this order:
- cut the length of the baguette pieces for the frame with a knife;
- make a 45 degree angle along the edges for joining;
- paint the baguette;
- carefully stick to the wall according to the markings;
- measure a piece of wallpaper along the inner contour of the frame;
- stick.
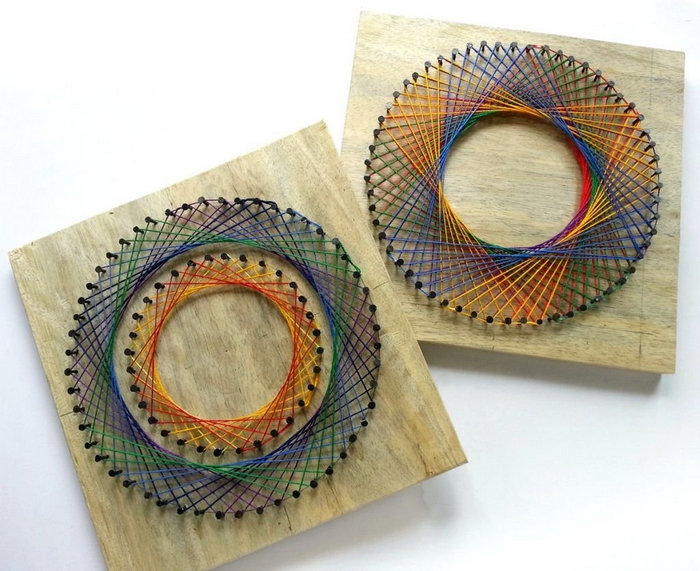
Panel made of nails and threads
A heart-shaped panel can decorate a young girl’s room. You can make it using nails and threads. The base can be made of cork, wood, plywood or foam. To make a wall panel with your own hands, you will need:
- thin nails or pins with a beautiful head;
- hammer;
- pliers;
- acrylic paint;
- glue;
- threads (any quality - wool, floss, iris);
- pencil;
- scissors;
- paper.

The process begins with choosing a base and determining the size of the future panel. The plane is covered with paint, lighter than the tone of the threads. Next steps:
- on a piece of paper, draw the outline of a heart in proportion to the size of the picture;
- cut;
- attach the template to the base, circle;
- drive the nails evenly along the contour using smaller step, the better;
- tie a thread to one knot;
- stretch it to the nail with opposite side;
- circle around it;
- continue wrapping in any order;
- glue beads and decorative elements onto the base.
Made of wood
To do original panel on the wall with your own hands made of wood, no base is required. The openwork structure is secured with driven nails; its dimensions are approximately half a meter per meter. To implement the idea you must have:
- hacksaw;
- cardboard;
- hot glue gun;
- skin;
- wooden rods with a diameter of 0.6 cm, total length 5 meters;
- gold paint;
- skewers 30 cm long – 100 pieces;
- matte black spray paint;
When making panels, follow the following sequence:
- decide on the dimensions of the product;
- cut rods of arbitrary length;
- sand the ends;
- glue the rods together - the more connections, the stronger the structure;
- cut out circles with a diameter of 3 cm (flower blanks) from cardboard, one at a time on a wooden end;
- cut the skewers different lengths 20 pieces per flower, trim the ends;
- stick on cardboard;
- fix the flowers on the rods using a heat gun;
- paint the entire structure black;
- After drying, highlight the centers of the flowers with gold.

From photographs
Original compositions can be created from framed photographs. When creating such panels, it is necessary to take into account important points:
- use only high quality photos;
- place large frames in the center of the composition;
- apply different sizes photo;
- frames must match the style of photographs in shape and color;
- the design material must be the same.
To create a panel from photographs with your own hands you need:
- determine the location and dimensions of the design;
- think over the composition;
- select photographs;
- buy frames;
- make preliminary markings on a piece of old wallpaper;
- cut out the outlines of the frames on them;
- attach the wallpaper to the wall, fix it masking tape;
- move the frame position markings;
- hang a photo.
There are so many things you can do using photographs. various options wall decoration. For the base, it is good to use boards or plastic panels. You can hang photographs in frames using ropes and original devices. To make such a panel you will need to secure:
- a metal tube on the wall;
- photographs framed with fixing elements;
- the entire composition onto the tube.
