Do-it-yourself fabric stretch ceiling. Ceiling drapery with fabric is a stylish solution for a cozy room that you can do yourself
Textile design is at the peak of its popularity. This type of decor will help in the shortest possible time to make aesthetic changes to the interior of any home. Do-it-yourself high-quality drapery of the ceiling with a fabric is not at all a complicated process. All work is quite within the power of even a beginner, so knowledge on how to bring comfort to your own interior will not be superfluous at all.
Drapery with fabric is a kind of redecorating the ceiling:
- preliminary preparation of the ceiling - not required;
- installation work is fast;
- all defects of the old ceiling will be completely eliminated or hidden.
- the fabric has a high quality texture and a variety of patterns.
- material retains heat.
- the fabric is quite elastic, and is also protected from mechanical influences.
- the fabric will harmoniously draw attention to the design.
- cosmetic defects of the ceiling will be hidden.
- the design of the ceiling is original and romantic, which makes it possible to compare the combination with a cozy oasis in a noisy city center.
- do-it-yourself ceiling drapery will allow you to realize all your taste fantasies.
Drapery: what is the best fabric to drape?
The ideal material for drapery is silk.

However, today, with the development of new technologies in design, you can find a variety of high-quality fabrics with improved properties:
- they are distinguished by their density, and the fabric does not tear during installation or operation;
- high quality drawing, which does not change its tone and does not fade under the influence of sunlight;
- excellent elasticity, no sagging due to excess moisture.
Fabric range
Today you can make a choice based on a large number of options:

Gourmet Drapery
- Today, drapery with leather, tapestries or curtain fabrics is increasingly being chosen.
- Special fabrics have soundproofing properties.
- Drapery fabrics - do not allow the accumulation of dust and provide comfortable care for the ceiling.
- Waterproof fabrics - are not afraid of high humidity in the premises.

Draperies and their color
Fabrics of one tone and light appearance visually increase the height of the ceiling, and fabrics with ornaments will aesthetically emphasize the comfort of some rooms, such as a bedroom or a nursery. Spectacular plot fabrics - magically transform ordinary standard rooms into the category of majestic palaces.
Do-it-yourself ceiling drapery
Seamless way
The seamless method is used with the same width of fabric and room. The fabric is carefully wound on one rod, and the canvas is rolled out with the other rod. Then, trying on, the roll is unwound around the perimeter of the ceiling. The material is attached only at the edges, aligning it only at the attachment points. Ultimately, you will definitely have a seam. It must be placed in the darkest place, of course, away from the center of the ceiling. In this case, the integrity of the pattern should not be violated.

Important: When buying, take a fabric with a margin - at least 1 meter. This is necessary in order not to run around the store again if the roll is not enough.
Drapery of fabric and methods of its fastening
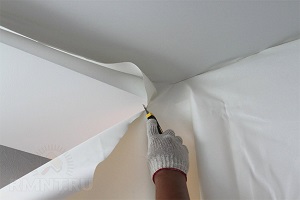
To attach the fabric to the ceiling, we use slats, clips, Velcro glue or a tablet. Reiki are plastic or wooden. They are mounted on the ceiling, and fabric is attached to them with metal staples using a pneumatic stapler. Plastic clips firmly fix the fabric. Further, its edge is placed in the hole with a special spatula. A wooden framed tablet will require fabric to be stretched over its bases. This design can be easily removed for cleaning or inserting new fabric into the slots.

Attention: Glue should be applied only to the ceiling. After the adhesive has set, attach the fabric and iron with a cotton napkin, moving from the center of the fabric to its edges.
Velcro - are the most convenient ways of fastening. One tape is fixed on the ceiling, and the other on the back of the fabric. In the future, removing the fabric from the ceiling is not difficult. After washing or cleaning the material, you can stick it back to its original place. Today, trends are emerging for dividing a room into zones of combined fabrics. So, shiny and matte fabrics complement each other, reflecting light in different ways, thereby creating a magical play of highlights.
Fabric ceiling, see an example in the video:
In the process of planning a home interior, great importance is attached to textile design. Usually this concerns the design of window openings with curtains, the choice of bedding or upholstery for upholstered furniture. With the successful use of the color and texture variety of matter, it is possible to decorate the ceiling covering, besides, this is a kind of disguise for the shortcomings of the repair or a variant of successful styling. Home drapery of the ceiling with fabric is a great solution for people who are brave and ready to experiment.
What fabric do you prefer
In order to choose the right material for drapery, we first ask ourselves the question: for what purpose did we decide to stay not on plastic or drywall constructions, but on fabric ceilings? Unusual, but very interesting design move.
We immediately get rid of two main problems:
- we hide repair defects, uneven plates, inaccurately sealed seams under the ceiling fabric;
- we quickly turn an ordinary ceiling into an original, exclusive work of art.
Using a thin light fabric, you can create a ceiling covering in the form of identical waves.
We choose textiles taking into account the general design trend, when color, pattern, and even weaving of threads play an important role. We use thin canvases in the assembly, thick ones can be stretched. The stronger the threads and the denser the weave, the more decoration options you can apply. For example, an elastic waterproof fabric can be safely stretched, and thin silk requires a careful attitude.
The type of fabric for the ceiling in the apartment should be chosen in advance, you also need to take care of the availability of the required quantity in the store. Please note that some types are exhibited as a sample, you need to place an order to purchase, and this is usually 2-3 weeks for delivery.

Leather, satin and crystal pendants - a beautiful example of an art deco ceiling
Determine which fabric on the ceiling is right for your interior:
- durable canvas;
- traditional curtain "herringbone" or "jacquard";
- noble velvet;
- delicate silk;
- luxurious satin;
- eco-friendly linen.

Greek marine style: freshness, lightness, all shades of blue
Of course, we also take into account the place of decoration. For example, it is better to use natural fibers for a nursery, elegant and noble cuts for a living room, and a bedroom is considered the best place to experiment, because in a purely personal relaxation area you can safely fantasize with various types of textiles.
Do-it-yourself ceiling drapery
Consider the three ways of attaching fabric below, and make sure that draping a ceiling with fabric with your own hands requires only a little skill and a great desire to change up a boring environment.
Creating a wooden frame
First, we mount a frame of arbitrary shape from wooden or plastic slats. It can run around the perimeter of the room, create a lattice or even two tiers. Then you should fix the fabric on the ceiling with your own hands: we fix the textiles either with a construction stapler (for a long time), or with special removable clips (for frequent changes). With the help of the frame, it is easy to change the overall appearance of the room by creating a kind of steps, a light canopy or a translucent dome in the upper part of the room.

Photo printing technique made fabric ceilings even more sophisticated
Seamless coating
This method is ideal for rooms of small length and width. To decorate the ceiling with a cloth, you will need one roll of fabric, preferably strong, not afraid of tension. To facilitate the work, we wind a piece of material that matches the area of \u200b\u200bthe room on a long wooden rod (you can use a bar). We fix the free end to the entire width of the room and slowly unwind the roll, fixing the edges of the fabric along the walls.
The tension should be such that the material does not sag. In large rooms, additional fasteners in the form of rails or special decorative elements will be required.

Options for removable ceiling drapery in a wooden house: simple and harmonious
Removable draperies on limes
"Limes" or "Velcro" allow you to periodically remove the draperies for cleaning or washing. The installation process itself is quite simple and is suitable for decorating the ceiling with a do-it-yourself fabric: we glue the first halves of the Velcro to the plates in several places, and sew the second halves to one or more textile sheets. We fasten the material in one step, simply connecting the halves. Remember that textiles in this case should be as light as possible.
Descor fabric ceiling installation video
Using textile draperies is a great way to create an original fabric ceiling with your own hands. Tired of color or pattern? Just change the material.
Now textile design is at the peak of popularity: only it will quickly and exclusively cleanly change the interior, bringing incomparable comfort to our home. High-quality drapery of the ceiling with a cloth on its own is quite real even for beginners, and the lack of experience is more than compensated by the sincere diligence and conscientiousness of the owner.
Drapery with fabric is the best option for redecorating the ceiling:
- no preliminary preparation of the ceiling is required;
- its quick installation;
- the ability to perfectly hide the visible defects of the old ceiling.
- The fabric is aesthetically perfect both in pattern and texture.
- It perfectly retains heat.
- The material is elastic, therefore it is immune to any mechanical influences.
- Successfully matched in color and texture, the fabric effectively emphasizes the design.
- All cosmetic defects of the ceiling are impeccably hidden.
- Such decoration luxuriously and romantically creates the illusion of a cozy oasis even in a noisy city center.
- Ceiling fabric drapery is the widest scope for our imagination, taste and individual style.
The advantages of such ceilings
How do we drape
Silk is considered the ideal material for such drapery.
But the latest technology has provided other high-quality fabrics with improved properties on the market:
- they have a high density, and the fabric will not tear during installation or operation;
- the quality of the drawing has been improved: it does not change its color from the sun's rays;
- moderate elasticity does not allow such a fabric to sag from excess moisture in the air.
Range

The choice of fabrics for drapery is huge:
- a traditional Christmas tree will suit any style;
- cute matting is indispensable for country style;
- linen fabric made from compressed thread is beautiful and durable;
- jacquard will bring respectable comfort to the apartment;
- worthy velvet delights with luxury;
- thin elegant silk will give exquisite solemnity;
- cozy cotton will create a mood of calm and carelessness;
- reliable canvas carries a feeling of unshakable well-being;
- exotic jute awakens the imagination.
Advice! It is better to drape the ceiling with fabrics made from natural materials: only they will give the room natural beauty and, being environmentally friendly, will not provoke allergies, besides, they will retain heat and reduce noise levels.
Special types of drapery
- Drapery with leather, tapestries, curtain fabrics will become exclusive.
- Noise-insulating fabrics (see) will protect against annoying extraneous sounds.
- Drapery fabrics that repel dust will make it easier for us to care for the new ceiling.
- Waterproof fabrics will retain their spectacular appearance even with high humidity in the room.
Drapery color

Light-colored fabrics visually significantly increase the height of the ceiling, and with ornaments they comfortably frame our nest, for example, a bedroom or a nursery.
Spectacular plot fabrics can turn an ordinary standard room into a majestic palace.
DIY drapery
Fabric is much easier than other modern finishing materials.
Seamless way

A seamless method is possible if the width of the fabric is equal to the width of the room - this is ideal.
- First, we carefully wind the fabric on one rod, and with the other rod we will carefully roll out the canvas.
- Then the roll, trying on, unwinds along the ceiling.
- We fix the material only at the edges, aligning it only at the attachment points.
- We will place the inevitable seam in a dark place, away from the center of the ceiling, and masterfully preserve the integrity of the pattern.
Important! We buy fabric with a margin of at least 1 meter.
Do-it-yourself fastening methods
We fasten the fabric to the ceiling with rails, clips, glue, Velcro or using a tablet.
- Rails plastic or wood we mount it on the ceiling, and already we attach the fabric to them with metal staples with a pneumatic stapler.
- Plastic clips securely fix the fabric, and we push its edge into the gap with a special spatula, as with.
- Wooden frame tablet and the fabric stretched over it is easily fixed on the ceiling. Such a tablet is subsequently quickly removed for cleaning or reupholstering with a new cloth.
- With a framework you can make any architectural changes: arrange a dome, a tent, steps, ledges, and so on.
- Glue(special!) We use for light delicate silk, carefully ironed in advance. We glue the fabric in the usual way - like wallpaper, strictly butt-to-butt, so that the joints are invisible. After applying the glue, stretch the canvas, then press it to the ceiling.
Note! We apply glue only to the ceiling and, when the glue grabs a little, we simply apply the canvas and iron it with a cotton napkin, moving from the center of the fabric to its edge.
- Velcro- the most convenient way of fastening: we fix one tape on the ceiling, the other - from the inside of the fabric. Now we can easily and quickly remove the fabric from the ceiling for washing or cleaning at any time and stick it back to its original place.
- It is very fashionable when dividing a room into zones by combining fabrics.: glossy and matte, which reflect light in different ways, creating a magical play of highlights.
Fabric ceiling design

Ceiling drapery with a dome-shaped fabric will give the room a unique exotic flavor and grace.
Attention! The straightness of the pattern can annoyingly emphasize the unevenness of the ceiling.
- Enchanting effects are given by rich velvet - a feeling of security, comfort and luxury, and weightless, ephemeral tulle will give a sophisticated, refined glamour.

- Drapery in the form of a tent will bring the spirit of romanticism.
- A large pattern on the fabric will create the effect of a wide free space.
As you can see, draping the ceiling with fabric on your own is an easy job, and its successful result will exceed all our expectations, making us sincere adherents of such a simple and wonderful way of repair.
The arrangement of the ceiling zone is a rather extensive topic, which is part of the concept of repair. Today, the development of technology pleases millions of people with the availability of original ideas that allow them to solve individual design problems on their own. And at the same time, by the way, save money, and at the same time get moral satisfaction from the creative process.
Few people will have to dispute the fact that it is high time to refuse whitewashing-painting (at least if we are not talking about closets, house entrances or outbuildings). This means that new ways should come to replace the "grandmother's" methods. And they are. These are stretch ceiling structures.
At about the same time, stretch ceilings made of PVC and ceilings made of fabric impregnated with a polyurethane composition came to the market. What are their fundamental differences, pros and cons, advantages and disadvantages? Let's compare.
The elasticity of PVC film is definitely a plus. Some users have already encountered the legendary water bubble, which is formed in case of flooding of the room from above (a team on call arrives and releases the accumulated water, after which the ceiling returns to its previous shape). Fabric ceilings do not have such dignity.

But on the other hand, unlike PVC, fabric stretch ceilings can be repeatedly repainted with water-based paint. The polyester thread is weaved in such a way that layer upon layer painting is carried out without any visible flaws: the ceiling fabric looks like new.
There is another important advantage of fabric ceilings. For their installation, it is not necessary to heat the room with heat guns to a temperature of +60 ... +70 ° C. This means that your decoration (decor and wallpaper), furniture, and other household items will not be affected. Agree, an important "detail", especially when you consider that in some apartments and offices quite a lot of money was spent on furniture and finishing materials.

The fabric ceiling structure can easily be placed in rooms where there is little or no heating at all. Polyvinyl chloride clearly does not agree to such conditions - give it a temperature of + 18 ... + 20 ° C, not lower! In a cool atmosphere, it simply deforms and deteriorates irreversibly. As for fabric ceilings, they calmly endure the temperature range of -40 ... + 80 ° C without compromising their performance.
Fabric ceilings are durable, they are practical, have high fire safety, and are functional. In addition, manufacturers offer a fairly wide choice of design (color, pattern). In stores, ceiling fabric is sold in rolls 5 m wide. It is easy to calculate the required footage and buy as much as you need without waste.
And, finally, the most important advantage: a fabric stretch ceiling is easy to install on your own, without resorting to the services of a professional team. This, if you work with two or three, will take a maximum of 2-3 hours.
Video - Installing a fabric ceiling
Work order
There is a simple order of steps that you need to follow one after the other, without looking ahead and without mixing one with the other. If you want to get a high-quality result as soon as possible, follow the recommendations.
We prepare a baguette, self-tapping screws, a decorative plug in advance
A baguette is a mounting profile for mounting a frame around the perimeter of a room. The ceiling fabric will just hold onto the frame. Material: wooden plank, metal corner or plastic rail. Both a purchased version and a home-made product will do (many men are fond of carpentry work, so they often have everything they need at their disposal). The optimal dimensions are 40x50 or 50x50 cm.

A decorative cap plays the role of an edging that is visible from the outside. It is stuffed after stretching the fabric at the place where it joins with the walls. The function is the same as that of the plinth covering the edge of the pasted wallpaper strips at the bottom of the walls.
Self-tapping screws or screws are needed in order to provide point attachment of the fabric to the walls. Holes are pre-drilled with a drill, where factory-made plastic bushings or home-made wooden plugs are placed. It is easy to drive self-tapping screws into them using a screwdriver. With a large area, of course, it is better to use a self-tapping screw, and in a 5-meter "Khrushchev" kitchen, you can do it manually, using an ordinary screwdriver.
We calculate the area of the canvas
As mentioned above, special tricks for stretching fabric ceilings are not required. Thermal heating is also not needed to stretch the canvas. All you need to know is how to correctly calculate the area. We offer a simple, time-tested formula: (room width + 15 cm) x (room length + 15 cm) = fabric area in square meters.
It is easiest to work when the ceiling has a strictly square or rectangular shape. But sometimes there are ledges on the ceilings, the room may have bay windows, columns, decorative niches, ceiling embrasures, windows and other “non-format”. Also remember to cut small holes in the places where the wiring of pendant lights and chandeliers will be.
In these areas, you need to carefully make measurements and cut the fabric accordingly. If you succeed, it will go without a hitch. However, on large areas, sometimes you have to mount complex seam structures - this is not a problem, only you will need a little more time and more attention so as not to make a mistake with the cut.
Video - Complex installation of a fabric ceiling
Don't forget about lights
In places where lighting devices are removed from the ceiling, it is necessary to install a thermally insulating gasket. It has a round slot through which the electrical wire will pass. The gasket provides fire safety.

Plastic inserts are installed before the tension of the common web begins.
Checking the set of tools for work
Once again, carefully check the list of necessary tools:
- water or laser level;
- impact electric drill or hammer drill;
- screwdriver (screwdriver);
- hammer;
- scissors;
- roulette;
- grinder or hacksaw (for metal or wood - depending on the baguette material);
- construction knife.
And now we act

Step 1. With the help of the level, we outline the line for attaching the baguette. The appearance of the future ceiling in a stretched form will depend on the accuracy at this stage. Determine the height in such a way that the fabric is as close as possible to the “native” building ceiling, unless you want to visually underestimate the height of the room for some reason. Although this happens (in the case of complex structures consisting of several levels).
Step 2 Stuff a baguette around the perimeter of the room.
Step 3. Temporarily remove chandeliers and fixtures.
Step 4 Stretch the pre-cut ceiling fabric.
Step 5. Through the holes in the heat-insulating rings, pull out the electrical wires from the ceiling lights. Install chandeliers and lamps in their places, carefully fix.
Step 6. Carefully nail a decorative cap on the entire frame.
Step 7. Install a decorative cap in the places of bay windows, ceiling embrasures, windows, etc. (If there are any). Sometimes on the sloping ceilings of private houses or summer cottages there are windows that have special frames - they need to be removed before stretching the fabric ceiling, and then put back after the work is completed.

Stretch fabric ceilings do not require special care. They are unpretentious, and at the same time ready to please you for many years. By production the technology of knitted weaving is used. This means that the elasticity is sufficient for the fabric to “breathe”. But painting in a different color is quite real. Use water based paint. It fits well, no cracks or sagging remain on the surface.
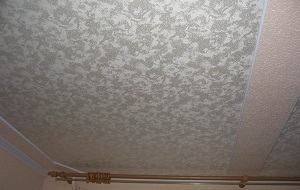
Ceilings trimmed with fabric look stylish and rich. The choice of textures and colors of canvases suitable for decorating the ceiling is huge, so fabric trim is increasingly used in modern renovation. There are several ways to finish the ceiling with fabric, we will talk about them in this article.
Fabric ceilings - what are they?
Among them the most popular are:
- stretch ceilings made of fabric;
- draped fabrics;
- covering the ceiling with silk.

Fabric stretch ceilings
They are made of a special fabric based on synthetic fabric impregnated with polyurethane. Mounted on special baguettes with a clip, mounted on the walls around the perimeter of the room.

Advantages of stretch fabric ceilings:
- do not require the preparation of a draft ceiling;
- have a flat surface;
- strong and durable;
- fireproof;
- allow you to create a flat and smooth ceiling.
Disadvantages:
- the color palette of the paintings is not too large and includes only basic colors and shades;
- drawing a picture on a stretch ceiling is possible only after its fastening;
- work requires the skill of installing tension systems;
- after dismantling, a blade replacement is required, re-installation is not possible.
Stretch fabric ceilings are an excellent choice for finishing rooms in a classic style. They gently and unobtrusively emphasize the decor of walls and interior items, without distracting attention. They are used in the living room, study, as well as in other rooms where strict lines and muted colors are appropriate.

It is not recommended to use fabric stretch ceilings in rooms with high humidity: the material will collect condensate and dust, it will quickly become dirty. It is also undesirable to install them in the kitchen - the porous structure of the canvas absorbs odors, soot and grease, so the ceiling will quickly lose its freshness.
Prices for fabric stretch ceiling
fabric stretch ceiling
Note! Stretch ceilings can also be made from natural fabrics. It is important to choose a canvas of such a width in order to avoid unnecessary seams. As a rule, curtain fabrics are used for this purpose.

Draped fabric ceilings
This type of finish allows the use of any fabric, from smooth silk to translucent chiffon and organza. Through the use of different textures, you can create different effects, give the ceiling any shape and bend.
Two-layer designs are also popular, when a skillful drapery of a translucent shimmering material is laid over a smooth stretched canvas of dense fabric. Drapery can decorate the entire surface of the ceiling or its individual fragments.

Draped ceilings can be fixed:
- staples or small carnations to wooden guides;
- on adhesive tape;
- on a wooden frame, which is later attached to the ceiling.
Advantages of draped fabric ceilings:
- they do not require expensive preparation of a draft ceiling;
- easy to assemble with your own hands;
- the canvas can be easily removed for cleaning or replacement;
- drapery is resistant to mechanical damage;
- a huge selection of colors, including patterns, and textures allows you to create a unique finish;
- finally, it is an inexpensive, but very effective way of finishing.

Disadvantages:
- draperies quite strongly lower the level of the ceiling, they should not be used in apartments with its base height of less than 2.7 meters;
- fabric is a fire hazardous material, so special attention should be paid to the choice of fixtures and electrical wiring;
- the material absorbs odors, it is not recommended to mount it in the kitchen or in rooms with strong odors.

Drapery can be pulled up in rooms where comfort and homely atmosphere is appropriate: in the bedroom or nursery, living room or dining room, as well as on an open veranda or terrace - there it can be mounted for the summer period and removed for the winter.
Draped ceilings fit perfectly into the oriental or empire style, and the smooth stretched fabric will decorate the rooms in the style of country or Provence. In the nursery, with the help of fabric, you can create a fabulous atmosphere by choosing textiles with magical motifs.
Prices for satin stretch ceiling
satin stretch ceiling
Note! Almost any fabric is suitable for draperies, the main requirement is resistance to sunlight and the ability to retain shape for a long time without sagging.

For this finishing method, mainly silk fabrics or satin are used. The canvases are glued to the prepared surface in strips end-to-end, like wallpaper. It is important to use a special glue that does not leave streaks and does not change the structure of the fabric.
Silk for pasting the ceiling can be either plain or printed with a bright pattern. Light colors visually raise the ceilings and expand the room, give it a soft glow, especially in combination with directional or spot light. Bright colored fabrics allow you to achieve originality and attract attention.

Advantages of pasting the ceiling with a cloth:
- this finish looks stylish and rich;
- environmentally friendly material, does not emit harmful substances and does not interfere with air exchange;
- does not fade over time;
- does not lower the ceiling level;
- easy to mount on your own.
Disadvantages:
- it is necessary to level the draft ceiling;
- the fabric cannot be removed for washing and cleaning;
- careful choice of material is required.
Pasting with fabric can be used in almost any room, from the office to the bedroom, it is only important to choose the right shade and pattern. Designers often use the technique of silk finishing in ceiling niches in combination with wooden beams. Often combined with wall decoration, columns or decorative inserts.

Note! When choosing colored silk, it is important to consider the size and overall style of the room. A large and bright pattern visually expands the room, and a small printed pattern gives it comfort. With low ceilings, it is better to use light pastel colors.
Fabric ceiling technology
First you need to draw a sketch and decide on the method of fastening the fabric, since both the preparatory work and the finishing technology itself depend on this. After choosing the design of the ceiling, you can proceed to the calculation of the material and the choice of fabric, as well as the purchase of linen and related materials.
Technology for fastening stretch fabric ceilings
A textile ceiling can be ordered from a specialized company, and if you have the tools and skills, you can install it yourself. This work is not so difficult, it is only important to follow the stretching technology and be careful.
Ceiling profile prices
ceiling profile

Required materials and tools:
- canvas made of polyester or other suitable fabric;
- guide baguettes with a clip;
- perforator or drill, depending on the material of the walls;
- measuring tool, scissors and knife;
- laser or bubble level;
- a special spatula to fill the canvas in a baguette;
- painting tool for removing old finishes and preparing the ceiling.
The stages of work and installation technology are described in the table.
Table 1. Installation of a fabric stretch ceiling.
| Steps, illustrations | Description of actions |
|---|---|
| Under fabric ceilings, there is no need to level the surface, it is enough to remove the old peeling coating or finish. Whitewash or paint is removed with a spatula or a special wash. The wallpaper is removed and the remaining glue is washed off. Cracks, seams and cavities are sealed with alabaster or cement putty. Suspended structures are completely dismantled, the holes from the fastening of the frame are sealed with putty. If this is not done, the sound insulation of the ceiling will deteriorate. |
| In order for the ceiling to be even and strictly horizontal, careful leveling is necessary. It is more convenient to use a laser level, but you can get by with a bubble level. The markup starts from the lowest corner. Recede from the ceiling at least 5 cm and draw horizontal lines with a pencil or marker using a level on both adjacent walls. Spend to the corners, put a mark in them. Lines are drawn from it in a similar way to the last corner, ideally they should converge at one point. |
| As guides, it is most convenient to use special baguettes for stretch ceilings made of plastic or aluminum. They are equipped with special clips - clips, under which the canvas is filled with a spatula or spatula. The guides are fixed according to the previously applied markings using dowels and self-tapping screws. Holes in the wall are made with a drill or puncher after 30-40 cm. |
| Mounting platforms or special fittings are installed for fixtures. |
| The fabric for the stretch ceiling must be cut to fit the room with allowances of at least 20 cm on each side. The fabric, unlike PVC fabric, does not have good elasticity; it cannot be stretched. Therefore, it is important to correctly calculate the required width and cut the fabric. Canvases from a specialized material are usually selected according to the width of the room, and the length is rolled out in place directly from the roll. |
| The fabric is straightened and leveled so that the same fabric allowances remain on all sides. Having retreated from the corner of at least half a meter, the canvas is temporarily fixed in a baguette in increments of 0.5-0.7 m without a strong stretch around the perimeter of the room. The fastening of fabric ceilings starts from the middle of the short walls, then the long ones are fixed, the corners are tucked into baguettes last. The fabric is tucked into the baguette using a rounded spatula. |
| Gradually pulling the canvas, it is leveled and stretched to an elastic state. The excess is cut off with a mounting knife or scissors. When cutting, it is convenient to substitute a wide metal spatula under the knife - it will protect the canvas and baguette from damage. The remains of the canvas after trimming with a spatula are filled into a baguette. |
| The gap between the baguette and the wall after finishing the ceiling and walls is closed with a decorative plinth. |
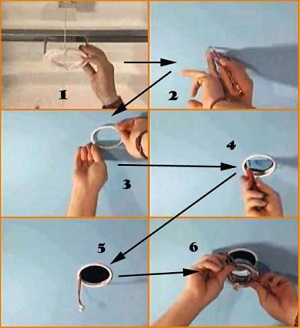
| Fixtures are installed, for which holes of the desired size are cut in the canvas. Glue is applied to the mounting ring, it is glued to the canvas in place of the lamp so that the centers of the ring and the lamp coincide. After the ring has bonded to the fabric, the material inside the ring is carefully cut out. The height of the lamp is adjusted so that it is at the level of the ceiling panel, after which the lamp is screwed in. It is advisable to use conventional lamps with a power of not more than 60 W or halogen lamps up to 35 W in order to avoid strong local heating and deformation of the panel in the luminaire area. |


Video - Installation of stretch ceilings
Fabric stretch ceilings can also be mounted on wooden bars installed around the perimeter of the room. In this case, the fabric is fixed on the rails with a construction stapler, and later the attachment points are covered with a plinth or a decorative polyurethane baguette.
Draped ceiling installation technology
Unlike smooth ceilings, draped fabrics do not have to be stretched tightly, they can form waves, folds, and if you collect the fabric in the center of the room - a cozy tent. You can also pre-mount the frame on the ceiling and give the ceiling a relief and bends in the right places.
The photo shows various forms of draperies.

For work you will need:
- wooden block 20x40 or 40x40 mm, depending on the density and weight of the fabric, as well as the size of the room;
- drill and hardware for attaching the bar to the walls;
- jigsaw;
- measuring tool and level,
- fabric of one or more types;
- an elastic band or tape for curtains, which allows you to make even folds;
- construction stapler;
- polyurethane decorative baguette and small nails for its fastening.
Calculating the size of fabric for drapery is a rather difficult task, which depends on the shape of the drapery. In order not to be mistaken, it is better to draw a sketch of the ceiling on a scale, then cut out the intended canvases from soft paper on the same scale, fold them like an accordion and lay them out on top of the ceiling drawing. The larger the folds, the denser the drapery will be. You also need to leave fabric allowances for attaching to the guides.

Ceiling preparation before installation of draped fabric is carried out similarly to stretch ceilings. If the fabric is translucent, and the ceiling has a non-uniform dark color, then it is better to pre-paint or putty it with a light composition. The marking of the walls for the guide bars is also performed according to the above technology.
Mount the draped ceiling according to the instructions below.
Table 2. Installation technology for draped ceilings
| Steps, illustrations | Description of actions |
|---|---|
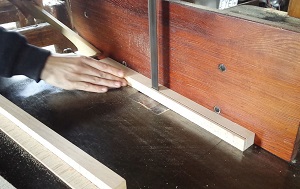
| Cut the bars of the desired size with a hacksaw or jigsaw. Small holes are drilled in them and in increments of 40-50 cm, a wall is marked through them, attaching the bar with the lower edge to the pre-drawn line. |
| According to the marking, holes are drilled in the wall, dowels are hammered into them, after which the bars are fixed to the wall with self-tapping screws. If it is necessary to create a complex-shaped ceiling, a frame of the desired design is made from a bar. |
| Perform cutting of the selected fabric. To make a simple longitudinal drapery, linen elastic or curtain tape is sewn on two opposite sides of the fabric. With its help, you can gather the fabric into even folds. For a tent-shaped ceiling, several strips of material of the same width are cut out. You can use canvases of different shades, this will give the tent an additional charm. One side of the strip is collected, and the second is evenly distributed across the width of the sector. |
| Grab the corners of the fabric to the bar with a stapler and evenly distribute the folds. Fix the canvas around the perimeter. For dense fabric, you can use a stapler, it is better to press a thin one to the bar with a wooden plank and nail it with small carnations. |
| A polyurethane baguette is attached to the bar using studs or self-tapping screws. It is impossible to attach it to glue using conventional technology - it will not hold on to the folds of the fabric. A plinth or a baguette can be given any desired shade by covering it with paint. The baguette is dyed and dried before being put in place so as not to stain the fabric. After installation, the nail heads are carefully tinted. |


In the case of a multilayer ceiling, the first layer of dense fabric is stretched without draperies, the second, made of transparent material, is draped and fastened directly on top of the first. Such a ceiling acquires depth and soft shimmer, especially when arranging lighting from an LED strip.
Prices for ceiling lights
ceiling lamp
Fabric pasting technology
Pasting with a cloth is not much different from decorating the ceiling with wallpaper. Surface preparation must be more thorough, otherwise the fabric will not stick to the ceiling. The fabric for pasting the ceiling must be strong enough and not deform under tension, otherwise the strips will warp and stick them end-to-end will not work. For this reason, natural or artificial silk is often chosen.

Required materials and tools:
- silk or satin durable fabric;
- glue or mastic suitable for gluing fabric;
- painting tool for puttying and leveling the ceiling;
- foam rubber roller for applying glue and a hard roller for leveling;
- scissors and measuring tool.
Table 3. Pasting the ceiling with a cloth.
| Steps, illustrations | Description of actions |
|---|---|
| The fabric glued to the ceiling will reveal all the bumps and defects, so it requires careful preparation. First you need to carefully remove the old coating, and then close up all the cracks and seams. The ceiling is then leveled with putty. Dry and apply a primer of a suitable composition. |
| The selected fabric must be checked for shrinkage. To do this, a small piece of fabric is measured, soaked and dried in room conditions. Re-measure and calculate the shrinkage. If it is more than 5%, the finishing fabric will first have to be wetted and dried or ironed with steam. Otherwise, it may shrink when applied and fall off. |
| Cutting the fabric into strips is carried out only after checking the shrinkage, leaving allowances of 10 cm. If a large pattern is applied to the fabric, it is necessary to adjust it in advance and cut the fabric with this in mind. It is better to roll the strips of fabric into rolls, the latter are put on the rod and gradually rolled out when gluing. It is more convenient to do it together. |
| For gluing the fabric, you can use casein glue, special mastic or furniture hot melt glue that hardens during thermal exposure. In this case, the fabric will have to be heated with a building hair dryer. Prepare the glue according to the instructions. Apply it to the ceiling with a roller, apply a strip of fabric and level it with a roller. The next strip is glued end-to-end and the seam is carefully rolled with a roller. Cut off the remnants of the fabric from the walls. Dry the glue or mastic according to the instructions. The joints of the ceiling and walls are trimmed with a decorative plinth or baguette, fixing it with a special glue. |


The fabric can not finish the entire ceiling, but only certain sections. This technique can be used in zoning rooms.
Note! When heated and in bright light, the fabric may fade and change color. When choosing fixtures, it is better to give preference to LEDs or chandeliers, in which incandescent lamps will be located at a sufficient distance from the fabric trim.
The ceiling, trimmed with fabric using any of the above technologies, looks quite impressive. It will decorate any room of your home and will create a unique comfort in it.