Homemade jigsaw machine from an electric jigsaw drawings. How to make a jigsaw and a jigsaw machine with your own hands
Any creative work, in any industry, requires certain knowledge and skills. If an author wants to create something of real value, his technique must be honed to the appropriate level. Such activities can be safely attributed to the work of a manual jigsaw. In skillful hands, this seemingly simple device can create real works of art. Fortunately, it takes quite a bit of time to master the shape sawing. All you need is a desire, and we will gladly provide a detailed guide to action.
What material is best to work with
The most suitable material for figured sawing is plywood, 3-10 mm thick. The strength and ease of sawing make it the best option for creating decorative elements with complex patterns. The average price of a sheet of plywood (1500x1500x6) is about 300 rubles, and you can find it in the nearest building materials store. Accessibility, aesthetics and ease of processing are the main qualities that the material used for figured cutting should have.
For cutting thin patterns, it is better to use thin, sanded plywood, 3-5 mm thick. Sawing such material is much easier, even for those who do not know how to use a manual jigsaw on wood, and the chance of spoiling the product is much lower.
Another interesting material suitable for sawing with a manual jigsaw is polystyrene sheet (not to be confused with polystyrene foam). In fact, it is a durable plastic that can be of all colors and sizes. In order not to complicate manual sawing, it is better to work with sheets up to 5 mm thick. The beauty of polystyrene crafts is accompanied by a high price of the material (from 700 rubles per sq / m) and limited availability. If you are confident in your cutting skills and ready to create an original glossy craft, you can start your search from local construction markets.

How to apply a drawing to a workpiece
Not everyone, even a creative person, can boast of brilliant artistic skills. For some, cutting with a manual jigsaw is a much simpler task than drawing the outline of a future craft. Fortunately, drawing a pattern on a surface can be done in several elementary ways that are accessible to almost everyone.Transfer the outline of the model using carbon paper. You can find this in stationery, at an average price of 150 rubles for a pack of 50 sheets, which is enough for several hundred crafts.

Stick the paper with the pattern on double-sided tape or glue. In the second case, after cutting out, the glued paper will have to be removed with sandpaper. Double-sided tape, can be carefully peeled off.
How to assemble a manual jigsaw
When the material is selected, and the contour to be cut is applied, you can proceed with the assembly of the working tool. First of all, we tighten the file in the lower mount (at the handle), after which we thread the free end into the opposite groove and, slightly squeezing the frame, fix it in it. Be sure to remember that the teeth of the saw blade should always look at the handle of the tool.When squeezing, do not apply strong pressure on the frame, trying to bend the metal arc. It is enough that the fasteners come closer to each other by about 1 cm. You can squeeze the metal frame in your hand, or by resting the tool with a handle on your chest. For devices with tubular arcs, there are special fixtures with grooves. If you can’t tighten the lambs with your bare hand hard enough, we use pliers.
If the saw blade is installed correctly, it does not dangle, and during operation, a high-pitched sound of teeth biting into the material is heard. It is better to understand how to properly assemble a jigsaw from the very beginning, since thin files tend to burst. The easier it is for you to assemble the device, the more pleasant it will be to work.
How to cut correctly
Before moving on to the sawing technique, a few words should be said about the workplace. Of course, you can work simply by pressing the plywood against the edge of the table or knee, but it will be more efficient to use a simple device called a dovetail (not to be confused with the type of connection). It is an ordinary rectangular surface with a wedge-shaped cutout, where a round hole is located in place of an acute angle. You can easily make such a platform yourself or ask at the store where the jigsaw was purchased. The device is attached to the table with a clamp and at times facilitates sawing with a manual jigsaw.
There are several main rules that will help you make a quality cut, while causing minimal damage to the saw blade:
- Make only vertical movements. Make sure that the jigsaw is straight and moves only up and down, but not at an angle. Otherwise, the files will break very quickly.
- To make the cutting line as accurate as possible, do not exert much effort during work. Since “biting” into the material occurs during the downward movement, try to ensure that at this moment the jigsaw falls almost under the weight of its own weight and light pressure from your side.
- The jigsaw should rise completely freely, with minimal friction on the material.
- During work, one hand wields a jigsaw, and the other turns the workpiece depending on the outline of the pattern. Rotating the tool is not recommended.
- Position the saw blade on the edge of the cut line, not in the center. Even the smallest file has a certain width. This rule will be useful when sawing out the exact details of puzzles and composite models.
During shape sawing, you will often encounter the same types of shapes. Despite the fact that the technology of sawing with a manual jigsaw is quite simple, it will be useful to know a few nuances:
- Sharp corners in an ideal performance are obtained by bringing together 2 lines at one point.
- Obtuse and right angles are made during the idle movement of the jigsaw, when the second hand smoothly turns the workpiece.
- To obtain curls, the course of the jigsaw is significantly accelerated, along with this, the speed of rotation of the workpiece also increases.
- To cut internal holes, a hole is drilled in the workpiece, where the saw blade is threaded and fixed in the jigsaw (as usual).
- As a practice, we recommend that you practice your skill by cutting out the following patterns. After a couple of workouts, you will be able to cut patterns with better quality, without compromising your future crafts.

Safety
Despite the simplicity and harmlessness of the sawing process, it can cause unpleasant injuries if certain rules are ignored. The following safety precautions when working with a manual jigsaw will save you from unintentional abrasions.- First of all, make sure that the handle of the tool is firmly fixed and does not dangle. If during operation it jumps off the fixation point, the brush may, due to inertia, run into a metal pin, which can lead to serious cuts (up to the bone).
- When using a special dovetail table, make sure it is securely attached to the table (workbench).
- The distance from the saw blade to the eyes must be at least 40 cm.
- The file must be stretched and firmly fixed in the attachment points.
Save this page to your social media. network and return to it at a convenient time.
The jigsaw is one of the most common hand-held electric tools. They can process a variety of materials: wood, plastic, ceramics, metal, etc. However, the main material that most jigsaw masters work with is plywood.
Using a narrow file, this tool allows you to make not only a straight cut, but also to make intricate patterns. And in this article we will look at some tips from experts working with a jigsaw.

Features of working with a jigsaw
A jigsaw for sawing plywood in appearance is a very simple tool and almost every beginner can make an even cut with it. However, if we talk about beautiful curly patterns, then here it is necessary not only to have certain skills, but also to choose the right files.
Main nuances
When cutting plywood with an electric jigsaw with your own hands, you should know the following:
- The main condition for obtaining an even cut is the correct choice of saw blade for the tool.. In order for the cut to be free of burrs on the front side, it is necessary to use a thin file, the teeth of which are directed downwards.
- The workpiece needs to be firmly fixed otherwise you won't get a straight cut.

- A few words about files. For electric jigsaws, a large number of saws are produced, which differ from each other, both in thickness and in design features.
Depending on this, there are:
- Saw or side divorce. The teeth are bent to the right and left in turn, like a hand saw. In this way, files with relatively large teeth are made. They are used for fast straight cutting. The cut is obtained with rough edges, so it should be processed with sandpaper.
- Fabric with undercut. In this case, the teeth do not have a divorce at all. Such files allow you to make very thin and clean cuts. Naturally, the speed of work decreases. If such a file has a small divorce, then the work will go a little faster. However, in this case, the main emphasis is not on speed, but on the quality of the cut.
- Wave divorce. In order for very small and narrow files to be able to make wider cuts, the cutting edge of the blade is made wavy. For the most part, these files are used when working with metal, but are often used when working with plywood to get a narrow and clean cut in a fairly short time.

Sawing patterns with an electric jigsaw
Advice!
You can use patterns from embroidery, knitting or paper-cutting magazines in your work.
In order to transfer the drawing to plywood, you need to do the following:
- We transfer the pattern to thick paper.
- Using a sharp clerical knife or scalpel, cut out the stencil.
- We apply the stencil to the surface of the material, circling it with a simple pencil.
- Now you can start cutting out the pattern.

Unlike the implementation of a direct cut, sawing out of plywood with an electric jigsaw has its own characteristics.
This manual will help you understand all the intricacies of the work:
- For cutting along a curve, use a saw blade with a narrow blade.
- For it is necessary to use a special nozzle - circle cutter. The circle cutter is fixed in the center of the circle, after which you can get to work.

- If you need to choose grooves in a wooden blank, then a rasp can be used instead of a saw. It is also used for cleaning uneven cuts.
- In order to carry out a perfectly accurate and even cut, you should use a parallel stop. It must be attached to the jigsaw with screws.
A special guide ruler can be installed on the “ski”, thanks to which the cut is parallel to the straight edge. Before starting work, you must make sure that the ruler is firmly fixed and aligned with the canvas. Otherwise, the movement of the file will be incorrect, and it may break or “burn” the material being processed.

- If you need to make a straight long cut, you can use the auxiliary guide. In this case, the jigsaw will move along a firmly fixed bar.
- With this tool, you can make cuts at an angle of up to 45 degrees. The angle of inclination is set on a scale.

- Cutting a hole. Very often, when cutting out ornaments, the master needs to make a hole in plywood.
There are two options for this:
- The first option is the simplest. You need to drill a hole with a drill, after which you insert a file into it and continue to cut out the desired pattern.
- The second option involves the use of plunge or plunge sawing technology. Drilling the starting hole should not be done. To do this, you need to put the tool on the leading edge of the "ski", without touching the workpiece with the blade.
Advice!
Plunge sawing should always start at the waste end of the material.
The saw should enter the plywood not too close to the cutting line, so as not to spoil the material.
- In the event that you need to cut a board of great thickness and the length of the file is not enough for this, you must use a file with a pointed end. First, we saw through the workpiece with it on one side, then turn it and saw through it on the other.
- To cut out a curly part, you can fix the tool from the bottom of the desktop. In the case of a uniform and smooth feed of the workpiece, you can get a cut with clean, even edges.
 In the photo - a tool attached to the bottom of the desktop.
 Conclusion
In this article, you learned how to cut plywood with a jigsaw. Here, the basic principles of working with this tool were considered, which will help you in the implementation of various construction and design decisions.
In the presented video in this article you will find additional information on this topic.
Similar content


Fretwork, hand saw, has more than 450 years of existence. The first mention of this instrument appeared in 1870 in a book about ornaments. For the past few centuries, with the help of this wonderful jigsaw, all kinds of decorative items have been made: picture frames, various furniture inserts, stylish caskets and boxes.
Much has changed since that time. The jigsaw has also undergone changes - now it has become electromechanical. And this is not surprising. The need for this tool has not gone away, just like in the old days, people are engaged in creativity, some for the sake of pleasure, and some for the sake of profit.
Tool for making decorative and openwork crafts
 Sawing with a jigsaw is a type of creative activity that most people have been familiar with since childhood, from school time. At least it wasn't that long ago. When labor lessons began at school and girls learned to sew and needlework, boys were introduced to such a tool as jigsaw.
It is not difficult to use it, and crafts with a plywood jigsaw carry not only artistic value, but also practical application. Manufactured products can act as souvenirs: various caskets and toys, as well as have practical applications in everyday life. Decorated elements of the porch of the house, windows, stylish benches with carved legs, beautiful kitchen furniture and many other useful wood products can be made using this wonderful tool.
Ideal hobby tool
Manual jigsaw - a tool for figured cutting out of plywood or some other material, for example, plastic. Its manual version is budgetary - its cost does not exceed several hundred rubles, and the scope is very wide. Figured sawing with a manual jigsaw is an interesting activity. This is not only a pleasant pastime, but also practical benefits, not only financial, but also moral.
The design of this tool is very simple:

Electromechanical jigsaws
The electric manual jigsaw has become an indispensable tool in the household. With it, you can cut various materials: plywood, wood, plastic, metal, ceramics, etc.
 This tool is powered by a 220 W electrical network and is a plastic case with working elements, equipped with a control knob. Its main component is the saw blade., which is mounted on a rod located in front of the device.
The rod is driven by an electric motor. The movement of the cutting blade is reciprocating. For some samples of this tool, to speed up the sawing process, the principle of a pendulum stroke is implemented, that is, the file goes not only up and down, but also back and forth.
Cutting blades - consumables and need to be changed from time to time. They are functionally different from each other - there are nozzles for wood, metal, ceramics. There are thicker blades, with greater or lesser rigidity, with larger or finer teeth. An important characteristic of saw blades is their shank. The most common at present are files with U-shaped and T-shaped shanks. It is with such files that you need to purchase a jigsaw - then there will be no shortage of consumables.
 An electric tool differs in many respects, but in this article we will pay attention to only one important factor - this is saw blade play. This characteristic affects the withdrawal towards the cutting blade during figured sawing. Jigsaws of many brands cannot cope with the task of a perpendicular cut, this is especially sensitive when cutting thick wood - the error can be up to 5 mm.
The experiments carried out on the figured sawing of a tree showed that the best jigsaw was a tool from the company Festool. Popular firm Makita in this competition, it showed itself not from the best side - the error of the perpendicular-shaped cut turned out to be quite large (up to 5 mm), and the jigsaw of this brand also enters the tree with large chips.
 - this is a professional equipment for sawing. Its design is more complex than the equipment discussed above. The principle of its operation can be compared with a sewing machine, which has a jigsaw blade instead of a needle. The quality of the products obtained with the help of this unit is incomparably better. The error of a perpendicular cut with a large workpiece thickness is zero.
The only disadvantage of this electromechanical apparatus is its high price. But this is offset by the comfort of working on it and high productivity with the highest quality of the products obtained.
Manufacturing technology of decorative and openwork products

To work you will need the following:
- Plywood or wood blank.
- Template, drawing or drawing of a future product.
- Manual or electric jigsaw.
- Files and needle files of various configurations.
- Wooden square and ruler.
- Skin of various grain sizes.
Cutting drawings
To start work, you need to determine what should happen at the end of the work. To do this, you need a drawing or a template for the future product. You can invent and draw it yourself, or use ready-made solutions. There are many collections containing drawings and craft diagrams. The Internet is also replete with a variety of interesting ideas. And for almost everyone there is a curious scheme or drawing.
Usually, schemes for small crafts are removed on A4 paper. To create drawings of decorative and stylish furniture or other large-sized household items, whatman paper is used in sizes A0 and A1, however, other paper and cardboard media can also serve this purpose, for example, pieces of unnecessary wallpaper glued together.
After the drawing is selected, it must be transferred to the material from which the craft will be made. There are several ways to do this:

Technology
After applying the drawing to the workpiece, from which the future craft will be made, they begin to cut it out. Sawing starts from the internal elements of the workpiece and only then cut out the outer contour. This procedure is more convenient - it is much easier to hold the workpiece.

The holes for the jigsaw blade are drilled in sharp places of the inner contour, which also facilitates the work. You need to drill holes carefully, as chips can form on the back side.
To avoid this, you need to follow a simple rule - do not drill holes completely. For example, if the thickness of the plywood is 3 mm, then the depth of the hole to be drilled must also be set to 3 mm. This is easy to do if you limit the depth of entry of the drill into the plywood with electrical tape - wrap the drill with it, leaving only the tip 3 mm long without tape. After drilling, turn the workpiece over and pierce the holes with an awl.
After the workpiece has been sawn, it must be process and polish. If the outer contour is not difficult to process, then grinding the internal elements is sometimes difficult, especially in sharp corners. Such places are difficult to grind with a file or needle file. Therefore, ingenuity can come to the rescue. You need to cut off a thin strip of sandpaper and insert it instead of a jigsaw file and then it will be much easier to process hard-to-reach places.
The principles of sawing with a manual or electromechanical jigsaw are similar, but there are differences.
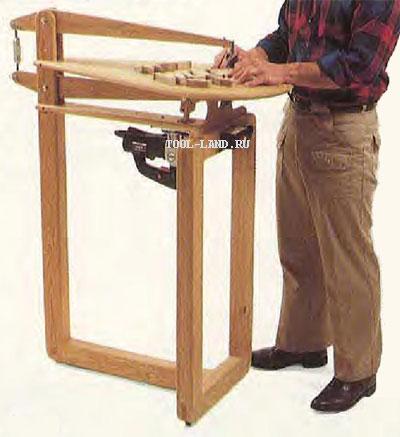
Work with a manual jigsaw
 When working with this tool, an additional device is required - sawing machine. It must be equipped with a clamp for attaching to a workbench or table. This device serves as the base on which the workpiece is sawn. This addition can either be purchased at the store, or you can make yourself from a piece of thick plywood.
When working, the workpiece should be fixed at chest level - this will make the work more comfortable and maintain posture.
When working with a manual jigsaw, accuracy and patience are needed.. The files of this tool are quite fragile, so you need to avoid sudden movements and distortions of the blade, and also during operation, do not let the file overheat, for this you need to stop working every 10 seconds and let the cutting blade cool down.
When sawing, the jigsaw should remain in one place, that is, it does not move forward or backward, the movement of the manual jigsaw is vertical, reciprocating. Only the workpiece is moved, turning it smoothly, without stopping the translational movements of the manual jigsaw.
Sawing with an electromechanical tool
The principle of operation is very similar to a hand tool. The difference lies in the fact that a manual electric jigsaw does not require additional equipment (machines with a clamp). And also when sawing out, the figured movement is carried out not by the workpiece, but directly by the tool itself. The wooden blank is firmly pressed or attached to the workbench, and all curly movements are made directly with a jigsaw.
 Electric jigsaw has an advantage over manual- this is the thickness that he can figuratively cut out. A 50 mm thick wooden blank is not available for processing with a conventional, non-electric tool. So, if you need to decorate the elements of the porch or furniture, then you can’t do without a jigsaw.
The choice of a power tool must be approached very carefully, since not all tools allow high-quality figured sawing of great depth.
Safety
Basic safety precautions are required for all types of physical work.

Recently, I have been very interested in cutting out with a jigsaw, I don’t even know why it would be. It all started with the fact that I needed to cut a few gears out of plywood...
And off we go. At first I sawed the gears by hand, then I thought, pumping a muscle with a manual jigsaw is certainly good, but if you automate the process, it will be much faster!
So, for starters, get acquainted, this is a manual jigsaw for artistic sawing.
(all photos in this article were found on the Internet)
To cut, you need files, they are thin like wire, with sharp teeth. Previously, such files were sold in a pack of 50 pieces. Recently I went to the store, so these "bimesmen" began to sell them individually. During the evening, you can break a couple of pieces of such files.
For sawing, we also need a special table, it can be a board with a conical slot, screwed to the table with screws or a clamp.

For the convenience of attaching files to the machine, it is better to use a special device that will compress the contour of the jigsaw, so you can easily change the file without effort. With the help of a wooden eccentric, compression occurs.

And now about automation. In the next photo you see a factory-type desktop jigsaw; on the Internet you can find a sea of various modifications. This thing is not very expensive, but even if I really want it in my city, I can’t find it, and in principle, there’s nothing to it. 
Industrial machines are certainly good, but I will probably use them for a couple of months and abandon this occupation, and in general, such a machine, as I found out, can be easily assembled by myself from plywood and wooden bars.


The next photo uses an industrial manual jigsaw and a spring to return the file.

So, we can easily assemble a desktop jigsaw with our own hands at home. I personally did this, but I have a special design, there are no photos of me in this article, but I will definitely post it, as well as a video in work.
This article will focus on the design of a home-made machine from a household electric jigsaw. Below are step-by-step instructions, photos, videos, as well as drawings and diagrams.
Introduction
There are a lot of design options - from the simplest, where it just sticks out of the countertop, to rather complex structures with guides, the possibility of sawing at an angle, when it is possible to set not only 90 degrees to the base, but change the angle (well, within reason, of course) . There are devices (machines) for, that is, making a straight and even cut.
Such devices are increasingly being used because of their versatility and functionality. In fact, they are similar in parameters and purpose to stationary machines and have a strictly defined practical application in every workshop.
Purpose
| Plywood thickness, mm | Layers of plywood, not less than | Sanded plywood | Rough plywood | ||
| Maximum deviation, mm | Different-thickness | Deviation, mm | Different-thickness | ||
| 3 mm | 3 | +0,3/-0,4 | 0,6 | +0,4/-0,3 | 0,6 |
| 4 mm | 3 | +0,3/-0,5 | +0,8/-0,4 | 1,0 | |
| 6 mm | 5 | +0,4/-0,5 | +0,9/-0,4 | ||
| 9 mm | 7 | +0,4/-0,6 | +1,0/-0,5 | ||
| 12 mm | 9 | +0,5/-0,7 | +1,1/-0,6 | ||
| 15 mm | 11 | +0,6/-0,8 | +1,2/-0,7 | 1,5 | |
| 18 mm | 13 | +0,7/-0,9 | +1,3/-0,8 | ||
| 21 mm | 15 | +0,8/-1,0 | +1,4/-0,9 | ||
| 24 mm | 17 | +0,9/-1,1 | +1,5/-1,0 | ||
| 27 mm | 19 | +1,0/-1,2 | 1,0 | +1,6/-1,1 | 2,0 |
| 30 mm | 21 | +1,1/-1,3 | +1,7/-1,2 | ||
Preparatory stage
- draw up sketches and make a drawing of the future product,
- make paper patterns of future elements and details
- stick templates on the blanks of future parts.
There are two ways to make templates - take a tracing paper and draw on it the kennels of the future workpiece. This has been done since ancient times, since nothing is needed for this, except for a ruler and a pencil. However, if you have a computer and a printer, it would be nice, of course, in A3 format, but A4 is also suitable (you just have to print several sheets and then glue them together), then the process of drawing with a pencil and a ruler can be replaced by drawing the outlines of blanks on a computer.

Then cut out with a clerical blade or just a sharp knife.

After that Once the template is ready, it must be glued to the workpiece.
Tip: You don’t need to glue it tightly, since in the future you will have to remove the template, and this will be difficult if you glue it “tightly”. Accordingly, you can stick, for example, on stationery glue, use glue stick or, as in our example, glue in the form of a spray.

Create blanks
At this stage, you need to do:
- Cut blanks exactly according to the template,
- Process workpieces - align the ends, remove burrs
- Drill the necessary holes;
- Make grooves with a file;
- Drill seats for bearings;
- Select grooves with a milling cutter for the cover and seat;


We install the bracket. It should be noted that the mounting of the bracket must be done without excessive tightening of the nut - there must be free play. To do this, use a self-locking nut and only slightly tighten it.

Installing the spring shouldn't be difficult. You need to do as shown in the photo below.

For the future fastening of the file, you need to make a simple clip in the form of a plate with two holes. It must also be installed on the bracket using a self-locking nut. Moreover, the backlash of the plate in the seat is very important because the bracket moves, and the clamped plate will hamper its movement.

Below is a sketch of the design of the upper attachment of the file.

Then it is necessary to make technological holes for the controls of the jigsaw, so that it is convenient to change the engine speed, you can access the start button and its lock. There is another solution that allows you to make it more convenient to turn on the tool - this is to place an outlet and a switch in an easily accessible place on the machine body, which would turn the power on and off in the outlet. We plug the cord of the jigsaw into the outlet, and it turns out that we will turn it on and off using a switch installed in a place convenient for us. However, this is a matter of taste.
So, below is the manufacture of technological holes on the body.

Here are the controls that are now available.

Now you need to make clips for the file itself. The principle is simple - we take a bolt and make a cut at the base of the cap, but not completely. In the future, the file itself will be inserted into this cut. The principle is shown in the photo below.

This is how the upper assembly of the saw blade is mounted and assembled.

The lower node is almost the same as the upper one, except that it is not a plate that is used, but a standard file is taken (it can be “BU”), almost the entire cutting part is sawn off with a grinder (angle grinder) and the shank is left. In the remaining cutting part, a hole is made with a similar bolt with a slot at the base of the cap, which will also include a file. The principle is shown below.

After the file is fixed, we install the jigsaw itself. We fasten it with the help of bolts with countersunk hats so that they do not stick out on the tabletop of the machine.


Now you need to adjust the perpendicularity of the file, relative to the table of our machine. To do this, you can use a square, or, as in our case, just a bar that is exactly trimmed. We make the adjustment as follows. To adjust the file to the left / right, the adjustment of the upper plate is used - its displacement on the axis - respectively in the desired direction.

And to adjust the file position forward / backward, the displacement of the file attachment itself forward or backward is used.

The machine is almost ready, it remains to make and install a plate that surrounds the jigsaw file. It can be made from textolite or any piece of sheet plastic.

This completes the manufacture of the jigsaw machine.
We hope that the presented material was useful to you.
Conclusion
dimensions
Here is a table with overall dimensions:
General assembly scheme
Let's attach a complete assembly scheme, which in a sense can be a 3B drawing for making a do-it-yourself jigsaw machine.

Video
The video on which this material was made.