DIY stand for souvenir plates. DIY stand for decorative plate
Any housewife wants to arrange kitchen area to your liking. But the kitchen will look cozier and more modern if it is complemented with creative accessories. We are used to the dish stand looking very simple - metal structure. Here are a few interesting ideas for decorating a stylish kitchen.
Pencils to work
To create such a holder you will need a wooden tray, leftover pencils and a drill. You need to adjust all the pencils to the same size; this idea will appeal to those who draw a lot or draw real drawings by hand. Holes are made evenly in a wooden tray, after which pencils are inserted into them. It is advisable that the pencils sit tightly in the holes; you can use glue for a more thorough fixation.
Stand made of wooden hangers
You need to prepare seven hangers. The metal loops are removed with pliers, and the hangers themselves are attached with screws. such a design can be placed in country house or at the dacha. Guests will definitely appreciate the creative plate stand you made yourself.

Dish stand "home"
To make such a stand for plates you will need imagination and design skills. First from wood plywood a low house is being made. Don’t forget about windows and doors, such details turn ordinary things into designer ones. Next, you need to make a roof out of slats. The stand looks like a house not covered with roofing material.
Decorative plates can decorate any home. They are often brought back from long trips as souvenirs. Usually such products are small works of art or folk art, preserving traditions different countries. After the trip, I want to display the souvenirs I brought in a prominent place so that they remind the owner of the pleasant time spent on vacation. But in order to display such a souvenir on a shelf or under glass in a closet, you need reliable support.
In this article we will look at how to make a stand for a decorative plate with your own hands. It can be created from various materials. These are wire and plywood, pieces of wood and corrugated cardboard. For small specimens, you can use cardboard napkin rolls or even an old plastic bank card. This is not difficult to do; just draw a sketch separately and transfer it to the selected material using a template.
Textured paper stand
This is one of the most simple ways making a stand for a decorative plate with your own hands. It has a beautiful structure, can be in a variety of colors and have all sorts of designs. Select material that matches color scheme the plate itself. As a last resort, you can make the product neutral colors- black or white.
Usually, do-it-yourself stands for decorative plates are made according to a standard drawing. The bottom edge is left flat or with small legs. Supports for the souvenir are raised in front, which keep the plate from falling. The craft has a bias towards reverse side. This also contributes to the strength of the installation.
So, let's start making. Fold thick printed paper or a plain version of the material in half. Separately, make a template of the shape described above on cardboard and transfer its contours to paper. Then use scissors to cut out the finished stand. The fold line must be carefully smoothed with your fingers so that the stand does not unfold.
Stand for decorative plate made of cardboard
It’s easy to make a support for a souvenir with your own hands from corrugated cardboard. In any home there is an old box from equipment or a postal parcel. We will need a very small piece of cardboard for work.
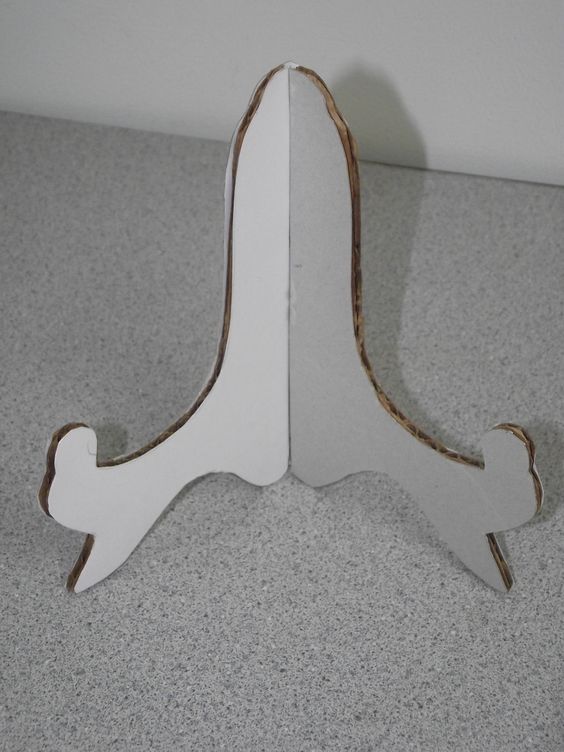
Take a close look at the carved shape of the craft in the photo above. You can vary it in every possible way and come up with the most exquisite openwork forms. The main thing is that the stand stands level on the table surface. It is also important to maintain the angle of inclination for the stability of the product.
Such a stand for decorative plate You can do it yourself in two ways:
- Simply bend the cardboard rectangle in half and smooth the fold line well.
- Cut out two identical halves of the craft, and then make slits with opposite sides on smooth edges at the back. One part is inserted into another by pressing the hand from above.
Wooden support
To make such a high-quality stand for a decorative plate with your own hands, you will need to purchase wood, as well as have tools for the work - an electric jigsaw, a jointer and sandpaper. Draw a template for two parts. Their main difference is in the place where the elements of the stand are connected to each other. At the joint you need to cut a hole up to half of the piece of wood, on one piece it is in the front, and on the other it is in the back.

Plane the block with a jointer until flat surface and use the template to cut out the required shape electric jigsaw. All that remains is to thoroughly clean everything with sandpaper several times and cover the craft acrylic varnish.
Craft for a small plate
Bend a plastic bank card in half, but so that it does not break. Then big scissors cut out the shape according to the template.

Treat sharp edges or burrs sandpaper. It can be pasted over beautiful paper or self-adhesive to hide the inscriptions.
Try to make your favorite version yourself!
After finishing the renovation and arranging the furniture, there is always a need to add wall accessories to the interior. Most often you want to close a void on the wall in the kitchen or living room. One way is to decorate with decorative plates. They can add zest to any setting. Especially if you decorate plates for walls or stands with your own hands.
Large bright plates on the wall will perfectly complement the interior

You can hang several decorative plates in the bedroom

Even simple white plates will decorate your design
Creation unique decor for a kitchen or dining room with your own hands is not only a way to save money, but also an opportunity to get designer items exactly in the style and color scheme of the overall decor of the room. There are many techniques that can be used to accomplish creative work.
- Decoupage with napkins, photos, fabric.
- Quilling.
- Stained glass covering.
- Decoration with satin ribbons.
- Artistic painting.

Plates can be placed anywhere and however you want

You can write words in English on the plates
Decoupage
Decoupage is one of the most interesting ways decorating plates. For decoration, you can use special napkins, magazine clippings, photos and even fabric, with which you can really create original draperies. For work you will need the following materials:
- PVA glue;
- scissors;
- brushes;
- acrylic paints;
- water container (for example, a deep dish);
- ring from tin can if the product will be hung on the wall;
- acrylic varnish;
- napkins for decoupage (or other selected material);
- plate.

It is not necessary to decorate the plates; simply hanging them on the wall can decorate the interior

Decorative plates on the wall will perfectly complement the interior of the room

A wall completely decorated with decorative plates will look very unusual.
After all the materials and tools are prepared, you can begin decorating the plate using the decoupage technique. The main stages of work are shown in the table:
|
Actions |
Materials |
|
|
Preparation of the product includes coating the surface with acrylic varnish. In this case, at least 5 layers are required. Each of them must be allowed to dry thoroughly. |
Acrylic varnish, brush. |
|
|
If a photo or varnished picture is used, then they are placed in water for 10-15 minutes, after which the image layer is separated from the main part of the paper |
Capacity with warm water, photos, magazine clippings. |
|
|
Cutting out an image. Better prepare round shape according to the size of the decorative plate. Or you can use individual elements compositions. |
Scissors, pictures. |
|
|
Using PVA glue and a soft brush, the images are attached to the product. Smooth out bubbles and wrinkles from the center. |
Brushes, glue. |
|
|
After drying, the dish is once again coated with an acrylic fixative. |
||
|
A ring is attached to the back surface of the product. It will help you hang the plate on the wall. It is better to completely connect with the entire lid on which it is placed. |
Tin can, quick glue. |
If necessary, you can acrylic paints Use a thin brush to draw some details of the drawing. This way the result will look much brighter. This is done after the base layer has dried before coating with varnish. For wall mounting, in addition to the described method, you can use various hooks or loops.

You can use plates of different sizes in the interior

Plates of different colors will look very nice
Quilling
Quilling is a technique based on twisting thin strips of paper. The method is relatively new and very exciting. So, to create a unique dish you will need:
- plate (it is better to use a plastic or foam product);
- a set of quilling paper (sold in craft supply stores, you can buy a set of the most suitable color scheme);
- tools for twisting paper ribbons (sometimes come complete with strips), they can be replaced with an awl;
- toothpicks;
- ruler;
- a simple pencil;
- PVA glue;
- image.
Designing a product using the quilling technique includes several stages:
- You need to divide the decorative plate into 4 equal parts, marking its center. You also need to use a pencil to mark the location of the drawing.
- Making curls from paper. Using ribbons, you can create entire compositions of flowers, birds, and various patterns. Each element is coated with glue using a toothpick and attached to the plate.
Don’t be afraid to come up with new elements and compositions from paper ribbons. The main thing is to choose the right one color scheme, which will fit perfectly into the interior of the kitchen or dining room. Also, do not forget about hooks for attaching plates to the wall.

Painting plates in Japanese style

The plates can be decorated as you like

Decorative plates against a white wall look very beautiful
Stained glass covering
Stained glass always looks stylish on any piece of furniture. To decorate in this way, you can choose a transparent glass plate so that the stained glass effect is noticeable.
For decoration you will need:
- glass plate;
- stained glass or acrylic paints;
- circuit;
- you can use various beads if desired;
- degreaser;
- brushes
Before you begin decorating a piece with stained glass, the plate must be thoroughly washed and degreased so that the paint adheres and dries evenly. After this, you can outline the contours of the image with a pencil, or you can start working with paints without them if you want to improvise.

You can make a collage like this out of plates, and place a plate with a clock in the middle

Decorative plate with painting
First of all, a contour is applied to the plate and dried for several hours (the exact time for each type of paint is indicated on the packaging). Dry in a well-ventilated area. It is recommended to apply it in two layers so that the line is convex. Then you can paint the colored areas.
If you want to add additional decorations, it is recommended to do this when the paint begins to dry. You need to lay out the elements with tweezers and lightly press them into the layer. All actions must be clear and accurate so as not to spoil general view products.

You can decorate the plate with artificial flowers

Example of using decorative plates on the wall

You can use plates to create a collage on the wall
Decoration with satin ribbons
Satin ribbons are increasingly being used for interior decoration. And, of course, with their help you can quickly and originally decorate plates. First of all, it is worth considering how to create decorative elements from the atlas:
- Weaving in different ways from several ribbons. The result is a strip of the desired length with a pattern.
- Sewing. It is carried out using thread and needle. A whole composition in the form of a panel is assembled from different pieces.
- Kanzashi - flowers made of satin ribbons.
The elements necessary for decoration are simply attached to the product with glue. Most of the time is spent on preparing parts of the overall composition.

Decorative plates for the kitchen will perfectly complement the interior

You can decorate the plates yourself
Artistic painting
Painting plates is a rather difficult but exciting activity. Any drawn plot is allowed, it all depends on the overall interior of the house. Landscapes, ornaments, fairy-tale or mythical scenes, flower arrangements, animals and birds, Gzhel or Khokhloma paintings look great on decorative plates.
For decoration you will need:
- white plate;
- degreaser;
- pencil;
- acrylic paints;
- brushes
First, the plate is washed and wiped with a degreaser. Then the drawing is drawn with a pencil, after which they begin to paint the product. When the paints are dry, you can varnish them.
Don't be upset if the artist's talent is completely absent. In this case, a stencil can always come to the rescue. The drawing with it will turn out no less beautiful. You can purchase it at construction stores or places that sell craft supplies.

Instead of paintings, you can hang decorative plates on the wall

In the kitchen, decorative plates will perfectly complement the interior

An example of the use of decorative plates in the interior
Using plates in decoration
When choosing a method for creating decorative plates, first of all you need to remember general style interior and color scheme. You can place them on a table, chest of drawers, or mantelpiece. In such cases, you will still need to find or make a special stand yourself. Or you can actually hang the products on the wall. Let's look at a few classic schemes:
- In a row. This way you can highlight a certain area in the interior. For example, above a fireplace or sofa.
- Symmetry. In such a case, the plates should be placed exactly in relation to the pieces of furniture and at the same distance from each other.
- Geometry. This way you can fill the void on the wall in an original way by hanging dishes in the shape of a square, diamond, or triangle.
- Wave. To implement this method, you will need to mark a curved line on the surface of the wall and hang plates along it. It would be better if they were of different sizes.
- Arch. This type of decor placement is ideal for the area around round mirrors or just above pieces of furniture, for example, in the bedroom above the bed.
- Patterns. More the hard way- creating some kind of ornament or pattern from decorative plates. In this case, it is recommended to use objects of various shapes and sizes. You can, for example, decorate an unnecessary set of dishes using any of the proposed techniques and hang it on the wall in the kitchen.
- Arrangement by size - from smaller to larger diameter or vice versa. IN in this case It is very important that all the plates in the interior are the same shape.
- Plot. This method suitable if the dishes have a certain storyline. Then they should be located nearby.
- Arbitrary arrangement of decorative plates on the wall. This method gives a lot to the imagination.

A plate with a flower pattern will look very beautiful

You can depict anything on the plates
When choosing a method for arranging decorative items, you must follow a few simple rules:
- Completeness of the composition.
- Symmetry in the interior.
- Compliance with color and shape.
- Accounting for the sizes of decorative plates.
Plates of any shape will look most advantageous on the wall in the kitchen or living room. The main thing is to choose the right color and style. Exclusive decor will always delight you with its beauty.
Video: How to creatively decorate walls with decorative plates