Sketch of a cardboard house. Interesting craft: DIY cardboard house
Children's crafts not only delight the eye with their brightness and beauty, the process of creating them is a special pleasure for a child, because it is so nice to give an original thing to someone close to you! And when mom joins in the creativity, things get doubly fun. If your child has already learned to work with scissors, invite him to make a “real” paper house together: printable templates, step by step instructions And interesting ideas in our article.
Working with Templates
To make a paper house, use ready-made templates for printing: this is much easier than drawing out the required dimensions manually. If possible, print out a color template for the first time; it will be easier to assemble:
- Print your favorite house model;
- Carefully cut out the parts (or the entire diagram);
- Fold the paper along the marked lines using a ruler;
- Using a small brush, apply glue to the joints of the elements, press them to glue them.
Your first paper house is ready. Now you can complicate the task by choosing a black and white template for printing. Prepare brushes, paints, sheets of cardboard or whatman paper in advance. For coloring a paper house by texture, gouache or acrylic is best.
So let's get started:


In general, it is better to think through the design in advance, based on the purpose of the house. If it becomes a decoration for the Christmas tree, use traditional New Year's colors- red with gold, blue with silver, white. If you are planning to create an entire city out of paper, choose more restrained shades.
Practice shows that no matter how simple the template for printing, there is always a risk of ruining the craft. Little tricks will help you avoid incidents when creating a paper house:

- Not all children preschool age are able to cope with cutting out small parts from thick paper - at best, the edge of the element will turn out uneven, at worst, you will have to re-print the template, and the child’s mood will be ruined. Therefore, cut the workpiece yourself;
- When creating fold lines, do not forget about the doors and shutters on the windows; they need to be bent in advance, before gluing. When the craft is completely assembled, it is difficult to bend these parts evenly, much less carefully cut through them;
- Using paper with a pattern (wallpaper) for the base, it is important to make sure that after gluing on all parts of the house the pattern will be on the wrong side;
- The last element of assembling a paper house is always the roof; after gluing it together, it is almost impossible to correct the flaws;
- Sometimes when the glue dries, the edges of the paper move apart. The fault is one of two things: there was not enough glue or the template parts need to be pressed down better. For better fixation, connect the elements with paper clips and leave them until the adhesive has completely dried.
Paper house - application ideas
With a little imagination, you can expand the scope of application of paper houses. Here are three popular simple ideas:

Surely your child has already come up with a lot of ideas for using and decorating paper houses: let our printable templates help him realize his creative desires.
Every little girl dreams of the biggest and most beautiful dollhouse for Barbie. And every domestic cat dreams of his own house made of cardboard, where he can retire without getting in the way of his owners. By learning how to make cardboard houses with your own hands, you can not only please your children and pets, but also decorate the interior in an original way. This article shows the most requested do-it-yourself cardboard house plans with MK.


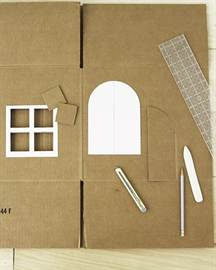
Required materials
No materials or tools required additional costs, everything you need can be found in the household of any family:
- cardboard boxes different sizes;
— glue gun or super glue;
- knife and scissors;
- pencils, felt-tip pens, markers;
- watercolor paints, gouache;
- sparkles and other decorations.

Helpful Tips:
— when creating a box, it is better to use corrugated cardboard;
— only adults should cut cardboard;
- for the stability of the product it is better to take cardboard tubes;
— in a house for children, it is advisable to make a door that opens outward. This will provide more space for games;
- do not throw away small cardboard boxes.
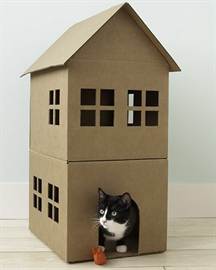
Shelter for a cat
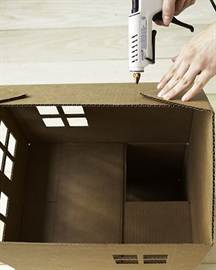
A cardboard house for cats can be built by the whole family in a very short amount of time. The first thing to do is to draw doors and windows using templates.
Start assembling the bottom of the box. Bend the opposite flaps, apply glue to them and fold the remaining flaps on top. Press them together until the glue dries. At the top end of the box, cut off two wide flaps. Next, cut half of the remaining sash and bend it. Do the same with the second whole sash. Secure them with glue in this position.

The next stage is creating the roof. On the top of the second box, on the small flap, draw lines from the center of the top to the bottom corners. Do the same with the second flap. Then cut out one large flap. Cut the edge along the first drawn line and fold the second one. Repeat the same steps with the second leaf.

At the bottom of the second box, cut off the wide flaps, and from the first smaller one, cut off exactly half so that when gluing the two boxes there is a hole. Glue the boxes together. Then take the first wide cut flap and glue it to the bottom of the second tier to strengthen it.
The second box will be used to make the roof. To do this, cut a piece measuring 45 by 115 centimeters. Fold it in half along the long side. Apply glue to the triangles of the small flaps on the top of the second box and glue them to the wide flap. Apply glue on top and glue only the first side of the roof so that the cat can look out from under it.
The house is ready!
doll house
This wonderful gift for children you can make it yourself from ordinary cardboard boxes.
The house will consist of two floors and two rooms. First, connect the boxes together. Glue another sheet of thick cardboard to the bottom, side and sides. Strengthen the structure of the house with tape and let the glue dry.

To make the structure more durable, strengthen the walls with thin cardboard.
The next stage is decorating the rooms and appearance house. Decorate the walls with colored paper applications, add mirrors, window curtains, and toy furniture. In order for the dolls to “climb” to the second floor, the house will need a staircase, which will consist of two parts.
Cut steps from thin paper for the end of the stairwell. Make the same cut out of cardboard. Select the desired width and height of the steps.

Cut out a couple more pieces from a thick sheet of cardboard. You will need a couple of rectangles for the steps and the bottom.

Glue the side parts of the ladder together and press them together with your hands to make them more dense.
Children love playhouses, and are ready to build them themselves from anything - tables, chairs, pillows, cardboard boxes... Boys are more attracted to the process of building a house with their own hands, and girls will be delighted ready-made house for dolls where you can leisurely play real life. We'll tell you how to make an original house out of a cardboard box with your own hands - any child will be happy to live in this!
Mill house out of a box
The large box itself is already a house, but if you work on it a little, a lot of delight is guaranteed! I offer you a version of a cardboard house made from a box with windows, a door, a pipe and even a screw that can be turned.
You will need:
- Big carton
- Screw stick
- Screw
- Rope
- Scotch
- Double sided tape
- Acrylic paints
- Use two large box flaps to form an acute-angled roof of the house and glue them together with tape. Cut out a pediment for the roof from small flaps and glue it with tape.

- Cut skylights in the roof.

- Cut a door at one of the ends. To make the door open and close easily, first cut the part where it will be attached to the wall of the house, and immediately seal the cut with tape. Then cut out the door on the other three sides, open it wide and tape the fold in the open position.
- You can make shutters for skylights in the same way.
- Cut the pipe as shown in the photo. To mark the correct bevel of the pipe, use the corners that remained after cutting out the pediment. Glue the pipe with tape.

- Attach the pipe to the roof and trace it around. Cut a hole for the pipe and tape it to the roof.
- Cut out the windows at the end.
- For the propeller, cut two rectangular blades. Glue a circle into the center of the screw on both sides for strength. Place a small stick under the roof of the house and tie it with a rope, as in the photo. Screw a screw with a washer into the end of the stick and place the screw on it.

- Paint the mill house: first cover it with primer acrylic and let it dry, then paint the bricks on the walls, tiles on the roof, paint the screw and pipe.

Decorate the inside of your cardboard house: you can paint pictures and furniture on the walls, hang a lamp from the ceiling, curtains on the windows, and lay a rug on the floor. Safe, cool garlands will add coziness.

Idea as a gift
Anastasia Shukevich made a dollhouse “Little Red Riding Hood’s House” with charming details: folding doors and red voluminous tiles on the roof! The house is made from a box from dishwasher, painted water-based paint, tiles and window frames- made of cardboard painted with children's gouache. The gouache layer is fixed with hairspray so that the paint does not get dirty. The walls inside are covered with gift wrapping paper.
Comment on the article "Box plus fantasy: children's playhouse with your own hands"
Box plus fantasy: do-it-yourself children's house. We'll tell you how to make an original house out of a cardboard box with your Smotrina, or How to avoid getting into trouble when giving a gift. Discussion. Gift wrapping: how to do it New Year's box with your own hands.
Box plus fantasy: do-it-yourself children's house. We sew a simple house for a cat with our own hands! In order to sew a cat house Parisian house from cardboard cubes for a baby. DIY toy house. You are great! Stunning, how beautiful!
House for dolls made of cardboard: [link-1] I made a house and furniture. How to make a children's house from a cardboard box: photos and diagrams. Boys are more attracted to the process of building a house with their own hands, while girls will be happy with a ready-made doll house where they can...
Box plus fantasy: do-it-yourself children's house. Look through the eyes of children at the Cardboard House. Making toys for children “Dymkovo toys with your own hands” I work in a kindergarten and really love making toys for children with my own hands.
Section: Adoption (do-it-yourself house made of cardboard under a log). And I will brag. “Four hands” with her mother, Katya glued the logs onto the adhesive surface of the film. IN window openings Instead of logs, a second layer of film was placed - very similar to glass.
BUT! Since I propose not just to embroider houses, but to build them, then let our houses carry some kind of functional load. See other discussions: Box plus fantasy: DIY children's house. Look through the eyes of children at the Cardboard House.
house - box. I continue to delight my friends with crafts on the theme of houses. DIY toys: a cardboard house with an attic and a cat. For example, you can decorate a children's house with your child's drawings, paint it with paints, paste wallpaper and even...
Box plus fantasy: do-it-yourself children's house. Knitting patterns for beginners with descriptions. Patterns, techniques, photos, diagrams Mom and Katya cut out and glued together the frame of the house and a rug for the floor from cardboard boxes. How to make a doll house and doll furniture...
The base is a piece of thick rubber with cardboard (rubber, cardboard, rubber) everything will stick into it well and the cardboard will not let it fall out. The grass and stadium surface are simply made of colored paper. The fence can also be made of cardboard, opaque, and draw a lattice on it.
Something is constantly being altered in the house, my little brother was born, and from time to time something breaks there, so I have to finish it. This is the embodiment of her childhood dream) doll house And doll furniture do it yourself: master class with photos on how to make a doll house.
From a cardboard box and plastic bottles. Well, they adapted bells and matches. So we made towers from juice and milk cartons, and the walls from cardboard, then painted them and cut out the teeth on top.
Box plus fantasy: do-it-yourself children's house. Children love playhouses, and are ready to build them themselves from anything - tables, chairs, pillows, cardboard boxes... Socks for orphanage. This is the ad I read in the handicraft community.
children's houses: for the article. - gatherings. Child from 3 to 7. Education, nutrition, daily routine, visits kindergarten and relationships with teachers, illness and Dear mothers! I really need your help. I'm a journalist, I wrote an article about children's toy houses.
Box plus fantasy: do-it-yourself children's house. Well, let’s say, I can make a house and a toy for a child myself, what’s the big deal? Birthday in the cartoon studio - 15% discount. Birthday in the Kitchen of Homemade Animation All children love cartoons!
House. Toys and games. Child from 3 to 7. Education, nutrition, daily routine, visiting the nursery. I made a house for my beautiful daughter out of a box from a new refrigerator. And there's a lot more you can do wonderful crafts from TV boxes, washing. cars and...
My son Sena is just over 3 years old. He has a clear penchant for music; his favorite pastime is conducting recorded orchestral works with a brush in his hands. The staff there is large, covering the entire A4 sheet. A few months later we were building houses from LEGO.
House for Barbie. Toys and games. Child from 3 to 7. Education, nutrition, daily routine. My eldest daughter, almost 8 years old, has been dreaming about a house for Barbie for 2 years, but buying that junk is in books (" Fun games"or "With Your Own Hands", Rosman) there is "your doll's apartment" from cards...
Box plus fantasy: do-it-yourself children's house. Children love playhouses, and are ready to build them themselves from anything - tables, chairs, pillows, cardboard boxes... About the children's playhouse. I wanted to buy my daughter a Casabella playhouse...
Would you buy your child a large cardboard house that looks like a real one inside and out? With a removable roof, windows and a pocket approximately 13x15. Box plus fantasy: do-it-yourself children's house. How to make a cardboard house with your own...
In childhood everything seems a little different and big, beautiful, modern house doesn't seem cozy. The baby will appreciate any decorations hung in the children's room, but not in the way you would like. It's all about the usual desire to have your own island: small house, where a child can hide from “big” problems, play with dolls or read a book. To provide the little person with the desired home, we suggest making a house out of cardboard for children with your own hands. The templates for such a house are too large for publication, so we will offer smaller copies of children's mansions.
Tools and materials
What kind of cardboard house can we talk about if you haven’t prepared tools and consumables ? Of course, nothing. So stock up on the following items:
- Large cardboard box from household appliances. Used packaging from a refrigerator, washing machine or dishwasher, several plasma TVs, cabinets.
- Stationery knife
- Tape measure and large ruler or staff (draw straight lines)
- Old wallpaper or whatman paper if you are planning an individual design
- Wallpaper glue
- Hot glue and glue gun for parts
- Regular and double-sided tape
- Pencil or marker
- Roof blanket
- A carrier and a light bulb to provide light in the house
- Roof rafters made of plastic tubes covered with foam rubber
If everything is ready, we take the baby in our arms, good mood and let's go on a good journey - to chic cardboard house for children!
The process of creating a cardboard house
First of all, decide with the size of the house: optimally, if the walls are at least 1–1.5 meters. This will allow the child to feel comfortable inside. If you have a ready-made box of the given dimensions, preparation for construction will be significantly reduced. If big box no, connect them together equal along the height of pieces of cardboard using tape and create the desired area of the future mansion.
 Make sure the top lids remain on the box. Cover them and place a double-sized piece of cardboard on top to reinforce the roof structure. Secure the rafters, which are two crossed plastic tubes. Place a support in the center of the crossing: it can be a book or other object that can create the familiar outlines of a real roof. Cover the resulting structure with a light blanket.


 Cut in the roof round hole
6–10 cm in diameter, insert a light bulb connected to the carrier there. Secure it with wire to the ceiling. It is advisable that the light bulb is not installed in the center, so the child will not touch it with his head and avoid injury. Make it a rule every day check lamp condition to protect the child from possible problems.
Cut in the roof round hole
6–10 cm in diameter, insert a light bulb connected to the carrier there. Secure it with wire to the ceiling. It is advisable that the light bulb is not installed in the center, so the child will not touch it with his head and avoid injury. Make it a rule every day check lamp condition to protect the child from possible problems.
 Stick on the walls of the house old wallpaper or whatman paper. It is better to glue wallpaper with special glue, and whatman paper with regular PVA. It is not recommended to glue thick paper with double-sided tape, as it can come off at the most inopportune moment. If you decorated the walls of your house with whatman paper, then best idea for registration will be bricks drawn with marker or paint.
Arm yourself with a pencil and make markings for windows and doors:
- If you are planning closing door, measure 70–90 cm from the floor. Next, from the top point, draw a perpendicular, straight line 40–50 cm to the right or left. Cut the door along two lines, bend it at the end of the horizontal line. To provide your child with an intimate space, attach a hook made of regular wire to the door. Be sure to put a tip on it so that your baby doesn't get scratched.
- Another door option - cutting a monolithic rectangle from a cardboard wall. In this case, the door will be completely through. To give your child some privacy, offer to decorate the door with a light blanket.
 Cut the window into a single square of cardboard or make 4 small squares to imitate window sections. Don't forget about the decor: stock up on curtains for new apartment baby. It is better if you attach them yourself using double sided tape or hang the fabric on wire stretched along the windows.
 At this point the house can be considered complete, although perhaps there is one more detail left: hang a sign with the house number and street name. This is another surprise for the baby, because he can live at any address: why not settle, for example, on Baker Street?
Furniture for a cardboard house
Be sure to furnish your baby's new home. Very important provide comfort at the initial stage of settlement. Furniture can be purchased at Ikea or made by yourself. On our website, for example, you can learn how to make one, which is simply necessary for any girl. It is recommended to use the following items for decoration:
- Books
You can make a mini-table or cabinet out of them. - Pillows
Perfect for homemade sofa or cribs. - Artificial flowers in pots
Small neat pots will decorate your baby’s house. By the way, here you can learn how to create one in the shape of a cat with your own hands. - Terry bath mat
Such a bedding will become a real Persian carpet in the cramped conditions of a baby house. - Figurines
Give your child the right to choose: he will probably independently arrange his favorite items on the stylized furniture of his cozy corner.
 Templates
Unfortunately, imagine templates such big house impossible. Therefore, we are publishing smaller diagrams-copies of cardboard houses that can be easily made on one's own.
Gallery of cardboard houses
Be sure to look at cardboard houses, which the children made together with their parents. Perhaps this is where you will find your dream home.


 We're willing to bet that as a child, you would have sacrificed your last piece of gum to live in a homemade, luxurious cardboard structure for just a day. We hope you enjoyed joint creativity with a child and made an amazing residence for the baby. Happy Creating with Fun Learning! We are waiting for you again!
A paper house is great idea for crafts. Do you want to organize miniature housing for your toys, make decorations for school project or just for fun, you don't need anything special other than paper and water to make a little paper house. So don’t hesitate and get to work soon!
Steps
Preparing to create a paper house
- For an origami-style house, you only need one sheet of plain paper, scissors, and a marker or pen.
- The dollhouse will be a little more difficult to make, but not much. It will require 10-11 sheets of paper, a pen or pencil, tape and scissors.
- If you want to make a fairy house, then you will need paper, a small bowl, water, a tray or plate.
-
Decide what kind of house you will make. The smallest house will be an origami style house, and the largest will be a doll house. Think about how you intend to use the cabin and base your decision on that.
Organize yourself a clean workspace. You will find it difficult to work if your workbench is cluttered, as you will need to make neat folds on papers and make straight cuts. Therefore, for this job, your table must be clean.
Make additional folds on the paper. Fold the square in half, bringing the left side towards the right. Then unfold it back. Next, fold the square in half, pulling the top side towards the bottom. Wrinkle the fold well and unfold the paper again. Two new folds should appear on the square, forming a plus.
Fold the paper into a smaller square. First, fold the top side of the square towards the horizontal fold in the center that was created in the previous step. Then repeat this action with the bottom side and fold it up towards the middle.
- Next, turn the paper over to the other side. Do not unroll the folds you have made before.
- Now fold the left and right sides of the square towards the center. They should meet in the center at the vertical fold line.
-
Straighten the roof of the house. To get the roof of the house, you need to open the flaps of the upper corners of the paper. Lift them, pull them to the side, and then press down so that the corners of the roof extend beyond the sides of the house. After this operation, the paper folds should form isosceles triangles. An isosceles triangle has two sides of equal length.
Complete the decoration of the house. Turn the paper over to the other side. Draw a door, window and other details that you want on the house. Everything is ready!
Gather everything you need. Depending on what type of house you decide to make, you will need a different set of materials. However, in any case, all materials will be easily accessible.
Making a dollhouse from paper
Tape two sheets of paper together. You need to glue two sheets of paper with the short sides. Start by folding these two sheets in half (“sandwich”). Be sure to press the folds well. Then lay out the sheets and glue them together with tape. You must glue those sides that run parallel to the folds you made earlier. Label the glued sheets with the letter A and set them aside.
Glue two more sheets together. Now you need to glue the two sheets together with the long sides. Label the resulting part with the letter B.
Draw a line on part B. The line should be 7.5 cm from the tape. Cut the sheet along this line. Try to cut the paper as straight as possible. This will be the front side of the house.
Add a door. Place part B so that the tape strip is at the top. At the bottom, larger part of part B, draw a door. You can also paint some windows and flower pots or any other design details for the front of the house.
Connect the front of the house to the floor. Use folded piece A for the floor and side walls. Tape the bottom side of Sheet B (which you just drew on) to the side of Sheet A halfway between the folds. Before gluing the parts, make sure that the side edges of the front sheet line up with the fold lines on sheet A (the sheet with the floor). If this does not happen, remake sheet A again according to the instructions above, or simply make a new fold on the old sheet in the required place.
Raise the walls of the house. Raise the side walls of the house and connect them to the sides of the front wall. Tape the walls together. Don't worry if the side walls are too short. You'll fix it soon.
Measure the height of the walls. Measure the empty space above the side walls to get an idea of how much paper you will need to make them larger. Then cut out two rectangles of the appropriate size from paper. If you want, you can also paint (or stick) windows and other home decoration details on the side walls.
Tape rectangles to the side walls of the house to increase their height. Also be sure to glue them to the front wall of the house to increase the strength of the house.
Cut out the door. Cut the door on the facade so that it remains attached to the house on one side. Then crease the fold at this point so that the door can be opened and closed as desired.
Draw two large isosceles triangles on a separate sheet of paper. U isosceles triangle the two sides are the same length. Then cut out these triangles. They will become the sides of the roof. If you want, also draw or stick on the attic windows.
Measure the width of the front of the house to create the roof slopes. Cut two rectangles with a height the length of the side of the above triangles and the same width as the width of the front of the house. To create a more realistic roof, decorate the rectangles with a tile pattern.
Glue the rectangular roof slopes to the triangles. First, glue the rectangular and triangular roof parts together with their sides. Then glue the top sides of the rectangles (the roof ridge). You should get a large volumetric prism.
Glue the roof prism to the walls of the house. The house itself is already ready! Now you can complete the decoration by arranging the toy furniture, after which your dolls will have a great home!
Making a paper fairy house
Prepare 10-12 sheets of paper. If you don't have separate sheets, you can tear the sheets out of your notebook. Take one piece of paper and place it in water. It should get thoroughly wet.
Slowly crumple the leaf and squeeze out the water. You don't want to squeeze the sheet until it forms a hard ball, but rather a soft, pliable ball. In other words, the wet paper should have the consistency of Play-Doh. Therefore, additionally wet the sheet or squeeze water out of it until it reaches the desired consistency.
Form a stick out of a paper ball. It will look a little like a sausage. Before performing this operation, you need to wait until the paper becomes like plasticine.