Airbrush painting. Painting the first scale model with an airbrush
Airbrush for models - a professional and semi-professional device for applying various types paints on hard surface. Depending on the type of airbrush, the complexity of the drawings and the quality of painting are determined. Model artists use airbrushes to create original and accurate images on cars, motorcycles, safety helmets and other items.
The airbrush works according to the following principle:
- pressure is created in the air valve of the device;
- the injected air passes through a narrow opening and enters the near-jet zone;
- Paint is also supplied there, which, when mixed with air, is sprayed through a nozzle.
For injection, a compressor is used to constantly fill the container with the required amount of air.
Types of airbrushes
Popular airbrush models differ from each other in their operating principles:
- External paint mixing: The most common option for airbrushes. Such models are used to create background patterns, large blocks, and blurry images. Such a device will not be able to form an accurate picture. Sometimes external type sprayers have an extended needle added to control the amount of paint.
- Internal paint mixing: an option suitable for painting at home.
- Single action: in such devices you can only control the level of incoming air, but the paint is supplied in the same amount. The type of mixing can be any.
- Fixed action: this type airbrushes for models are equipped with a special trigger device that regulates the amount of incoming paint by pulling the needle inward. Air is always supplied in the same volume. Fixed action airbrushes are professional sprayers for the most complex painting jobs.
- Double independent action: a convenient device in which the control of paint and air supply is separated. Here you can also set the mixing option and the paint supply method (gravity and siphon).
Popular airbrush models
Many years have passed since the invention of the first airbrush, but there have been no significant changes in the operating principle.
“Many models of sprayers have become improved and more modern. Nowadays, double-action airbrushes are in demand.”
These devices are suitable for precision work in any environment. The artist can independently regulate the supply of paint and air, thereby making his work easier.

Popular models include the following:
Double action:
- "Iwata Model HP-Q" has a separate compartment with a diameter of 7 cm and a narrow nozzle of 0.3 mm;
- “HansaModel 381” – similar parameters;
- "Hansa Aero" - similar parameters;
- “FisherModelGI-83” has a narrower nozzle of 0.2 mm, paint supply type is siphon, tank diameter is 15 cm;
- "Elbe Model C-1" has a siphon type of paint supply, tank diameter - 6 cm, nozzle - 0.3 mm;
- "Aziek Model 3000-S" has additional nozzles of various thicknesses;
- "Chameleon" with additional barrels of paint makes it possible to mix colors and create new original shades. This model has an additional compartment designed for solvent.
Single action:
- The Badger Model 250 has a narrow nozzle of 0.2 mm.
Compressor types
Compressor – necessary element for airbrush operation. It develops and maintains optimal air pressure for the best paint distribution.
If you need to choose a compressor with individual parameters, you need to know the performance indicators (measured in cubic meters / min.) and pressure (kgf / sq. cm.). The last parameter is necessary for spraying the paint, the first is for uniformity. There are 3 types of compressors:
Piston: the basic principle of operation is to move the piston(s) and compress the air. There are 2 types of piston compressor:
- Single-stage ones require a voltage of 220V, so they are easy to use at home. The piston rises up, and the air begins to be compressed, and then fed into the receiver - a vessel for accumulating air. This device easily distributes primer and varnish onto small surfaces.
- Two-stage ones consist of several pistons. This device has an intercooler that passes compressed air into the receiver. It is best to use a two-stage compressor with a smaller volume than a single-stage one with a larger volume.
Diaphragm: air is pumped due to vibrations of the membrane, so this compressor is suitable for short painting jobs.
How to use an airbrush for models
Airbrush paintingminiature products require special care and precision. It is important to adjust the paint supply level so that smudges and dust do not form on the object being painted.
If the airbrush provides the ability to change the nozzle and needle, then control over the size of the spray remains with the model artist. Even homemade airbrush can evenly distribute paint over a small area.

At first, you can use the most inexpensive devices, copies of brands. After your hand is full, you can safely move on to professional models. But how to choose the right airbrush?
Choosing an airbrush
You need to choose a sprayer for specific purposes. For a beginner, a cheap, simple airbrush is suitable, which will allow you to evenly paint a variety of models. A professional will focus on the parameters of the device itself and the compressor separately. A good option for both cases there will be a sprayer with the ability to adjust air and paint.
Depending on the work to be done, you need to choose the size of the nozzle and the capacity of the paint barrel. A 0.2 mm nozzle will allow you to draw fine lines and complex technical images.
To determine which airbrush to choose for your models, just read the specifications in the instructions. If the parameters meet your personal requirements and the price is right, you can purchase an airbrush.
Compressor selection
All compressor models differ in type of design, power and other characteristics. When choosing a compressor, you need to focus on its size, since the power of the equipment depends on it.
If an airbrush is needed for painting, do not large areas, miniature products, inscriptions, etc., then it is better not to purchase a large compressor, since it will require a lot of voltage.
Plus, such compressors are quite expensive. Airbrushes and compressors for models can be made with your own hands using simple materials at hand. Popular compressors include Fengda AS-16-1 and Fengda AS-16-18. These devices are light in weight, size and low power, therefore ideal for airbrushes.
Correct painting of the model with an airbrush
Even miniature models should be painted with high-quality bright compositions. The airbrush painting process is not much different from traditional auto repair work.
An important condition is compliance with safety precautions, namely protection from chemical vapors. In the case of processing models, you don’t need to use special suits, but gloves and a respirator are a must.
Before painting on the product itself, it is better to test the capabilities of the airbrush on any other metal sheets. There you also need to practice drawing exactly thin smooth lines, choosing optimal thickness layer, try not to form paint smudges.
Airbrush painting of models acrylic paints much more effective compared to other formulations. Acrylic is resistant to moisture, temperature changes, and mechanical stress. Bright, rich colors fit well on any hard surface.
When painting with an airbrush, you need to follow a number of rules that will give a good result:
- Before all work, the surface of the model must be thoroughly washed and dried, without leaving even the slightest dirt stain. Here you need to check the absence of any defects.
- Ideally, the surface of the product will be treated abrasive material or sandpaper.
- After this, the product must be degreased and dried.
- If the entire model is being painted, then only the wheels, windows, mirrors and headlights need to be covered with tape. If a separate area, then all the remaining areas.
- Complex designs are best designed using stencils. Each layer of paint requires a new stencil.
The nail industry never ceases to amaze and delight manicure lovers. The latest innovation is an airbrush for manicure. This is a miniature pneumatic sprayer, almost the same as that used for airbrushing cars.
Airbrush – creating small masterpieces. A nail art master is not limited in any way in his ability to create compositions.
Compared to an art brush, working with an airbrush takes less time; in addition, it allows you to have a wide palette of paints in your arsenal and draw the smallest details, obtaining the desired effect.
To create, you don’t have to be an artist, it’s important to master techniques and techniques. Airbrush designs on nails They turn out to be deep and voluminous.
Any, even a simple design, acquires the effect of movement on the nails, becomes “alive”, which attracts attention to the image of the owner.
In nail art, the airbrush is an indispensable device. The tool allows you to create halftones and smooth, airy transitions - no other brush can give this effect.
The airbrush operation scheme is as follows:
- Pour the paint into the “cup” on the tool (a few drops are enough to work on nails). Don't forget to close the container with a lid so as not to accidentally spill the coloring composition.
- Before creating a design, check the operation of the tool on a piece of paper to see if there is any remaining old paint. Try to hold the sprayer at an angle of 45 degrees - this is the most optimal inclination For quality work(you can navigate by the location of the “cup” lid - position in the air parallel to the table surface).
- Pull the trigger of the airbrush and circulate air through the system.
- Continuing to press, move the hook towards you - this action is responsible for the intensity of the paint supply. The less trigger drawn out, the less color density.
- For high-quality application, the airbrush must be constantly in motion. As soon as the master’s hand hangs in place, the effect of a wet spot will be obtained.
- For more fine lines The airbrush should be closer to the surface. The further the sprayer is located from the nails, the softer and more transparent the transitions are, and accordingly the width of the spray also increases. To make the color more intense, slow down your movements a little.
The scheme of work is quite simple, you just need to practice a little on paper and tips. Once you get the hang of it, you can master marigolds.
When using a nail airbrush, you can not only control the amount of dye sprayed, but also the air. It is convenient because by only slightly moving the pedal of the device, you can create a design with filigree precision.
Saturation and color depth can be adjusted. Variable: clarity, thickness of lines and contours. If necessary, they can always be changed.
To change the color and to ensure that the airbrush serves the shaft for a long time, it is necessary to wash it after each use. For this it is necessary special remedy- airbrush paint thinner.
The device flushing scheme is simple:
- We drain the remaining paint from the “cup”.
- Fill the container with a special solvent - about half full.
- Take a large napkin or piece of fabric, place it tightly against the airbrush nozzle (where the paint comes out) and press the air supply - bubbles will appear in the solvent. Now you can move the airbrush away from the cloth and rinse the equipment by pressing the trigger towards yourself (as when working with spray paint) until the “cup” is empty. The quality of the wash can be seen by the transparency of the solvent sprayed onto the napkin - if it becomes transparent, it means the wash was successful (if there was a lot of paint in the airbrush, two or three washes may be needed).
If the airbrush is used frequently, more thorough cleaning will be required. To do this, you need to unscrew the rotating part of the spray gun - where the needle is located. The unscrewed part of the nozzle must also be washed.
Subtleties of painting with an airbrush:
- We do standard nail treatment, cover with primer and base.
- We apply gel polish according to the standard scheme. We remove stickiness from nails for future design.
- We firmly apply the stencil with the design to the nail and spray the paint with the required intensity. For example, you can create an ombre effect. Start spraying with a light density of color and increase to complete coloring.
- Upon completion, the nail is covered with a finishing layer.
Airbrush design on nails - colorful dust
An exquisite nail plate design takes no more than 30 minutes in the hands of an experienced nail technician.
An airbrush will help:
- apply a geometric print;
- get strict and clear straight contours;
- achieve unusual color combinations with the effect of a moving image;
- get new tones and color transitions.
The simplest, but airbrushed and new-sounding design is airbrush gradient on nails.
The ombre trend, which is fashionable today, can be easily played with a device in a couple of minutes. Achieving such deep tones and visual volume through standard application is almost impossible.
The two most common types of design are painting and haloing.
- In the first case, nail stencils are used; painting with an airbrush can be dense, ombre or an airy haze.
- In the second version, the drawing itself remains unpainted, and the spraying comes from its contours.
Having mastered the tool, a nail artist will be able to create complex compositions, combine the ability to apply paint and play with layers and color.
Some skilled craftsmen, having mastered the device, create paintings on their nails no worse than those in art galleries. Painting nails with an airbrush It’s only complicated at first glance, but over time you’ll get used to it and experience will take its toll.
VIDEO INSTRUCTIONS
How to choose an airbrush for nails
How to navigate the range of devices and components for them?
If everything is more or less clear regarding stencils - the more choice a master has, the wider his audience, and you need to focus your choice not only on your taste, but also on fashion trends, then buying the airbrush itself raises many questions.
A standard airbrush kit consists of a compressor, a hose and an airbrush.
Sometimes the kit may include paints, tips and stencils, but this is not such an important component - consumables can always be purchased separately, choosing the ones you need for yourself.
Airbrush models differ in a number of important factors:
- Type of action: 1.Simple (the flow of paint is not adjustable, the amount exactly corresponds to what is needed to cover one nail); 2. Double (the design provides for adjustment of the paint supply, that is, it is possible to independently adjust the thickness of the lines) this is the device that should be preferred for high-quality work.
- By type of spraying: external (air and paint are mixed outside the device); internal (mixing is provided inside the airbrush, that is, it is possible to achieve a line of any desired length).
- The location of the container for the coloring composition: on the side, top or bottom does not matter. The result of the work does not depend in any way on the location - nail artists prefer a “side” of paint on top.
- compressor - responsible for air pressure, for this purpose the operation of the sprayer is checked (a good airbrush has a uniform jet, and the resulting spot has the correct shape);
- torch adjustment (a miniature device designed to change the pressure in an airbrush);
- degree of paint supply (needle stroke to reduce or increase paint supply);
- how softly and smoothly the control lever operates;
- nozzle and needles (after the paint has finished flowing, they should remain clean and free of drips).
- Small nozzle - 0.2 mm;
- Paint container with a volume of 2 ml;
- Equipped with a small, low-noise compressor. It is worth noting that inexpensive models do not have an air flow stabilizer, as a result of which they can spit paint.
- a compressor with low power (it is also selected based on weight, noise indicators and performance, as well as the class of the gun) is gas pump, pressurized dye;
- automatic gun with a micro nozzle, which is equipped with a reservoir for acrylic paint;
- coloring emulsion of base tones;
- several rubber hoses to connect the gun and compressor;
- tips (not always available, but for beginners it is better to purchase them for training);
- special liquid for washing the device.
- Volume of the dye tank. It is best if it is from 2 ml;
- Sealing the needle and nozzle – drawing will be more comfortable if the seals are made of Teflon;
- The nozzle diameter in high-quality airbrushes should be at least 2 mm;
- The device should be easy to replace the main components, such as the reservoir, trigger and nozzle;
- Protection of seals from the effects of used reagents;
- Possibility of adjusting pressure and paint supply.
- Polyurethane. Such airbrush compositions must be water-based. They allow you to apply a durable, quick-drying pattern that can withstand different temperatures. There is no need to use protective equipment when painting with this mixture; the work can be done both outside and inside the room.
- Water soluble acrylic. Such mixtures in the form of a liquid allow you to work on any surface. Airbrush painting will help you decorate the walls inside a building, or draw patterns on a facade or car. Acrylic paints are suitable for beginner artists, as they are easy to use, dry quickly, are environmentally friendly and correct use allow you to create a good work.
- Acrylic solvent. How to airbrush with this mixture? Before use, the composition will need to be diluted with a special solvent, which is usually included in the kit. When using this type of paint, be sure to wear protective clothing, as the mixture is toxic. It is not recommended for beginners to paint with an airbrush with a solvent solution; as a rule, this type of composition is used in professional workshops.
- Select a sketch. You need to think about how to draw the pattern and what the final result should be. Sketches are created on papers and the desired option is selected from all the drawings.
- Surface preparation. The area that will be painted must be cleaned of dirt, dust and rust. If you plan to create a pattern on the car body, then you cannot do without the degreasing procedure; to do this, use alcohol, white spirit or a universal degreaser.
- Selection of materials. The coloring solution that will be used in the work must be suitable for application to a specific surface.
- Tool setup. Before setting up the airbrush, read the instructions in the instructions that come with the kit. The settings can vary quite a lot, depending on the type of device.
- When working with an airbrush, it is better to start painting on a test area. In some cases, if workers have not adjusted the device correctly, it can shoot out clumps of paint, and this will ruin the composition. Therefore, it will be better if the procedure starts on cardboard or paper.
- The spray of paint should be applied with gentle, even movements, this will avoid the formation of drips or other defects during painting.
- It is not recommended to hold the tool too close to the surface, as the paint layer will lie unevenly, which will lead to the formation of drips.
- After completing the work, the tool must be washed off the dye, the needle and nozzle must also be cleaned with a solvent. It is selected based on the composition of the paint used.
- When we paint, it is better to hold the tool perpendicular to the surface being treated. In order for the dye to be distributed evenly, the angle of application of the dye must be greater than 45°, the optimal one being 90°.
- The intensity of the applied tone, the thickness of the layer and the overall result depend on the distance between the tool and the coating being processed. When a worker draws, he can change this distance, but this should be done carefully and smoothly.
- When we draw, small drips may form, but it is not necessary to remove them immediately. The drawings need to be given time to dry, after which the excess is carefully sanded off with sandpaper.
- To speed up the drawing process, you need an additional paint tank with a different color, then changing the palette will not take much time. There is no need to clean the container; just rinse the tool and attach another container with dye to it.
- Paint mixing - internally - takes place in the airbrush body, making it possible to draw small elements. Externalization occurs outside of the tool that is used to create large objects
- Action - the single type has only a button for adjusting the air supply, and the paint is supplied in the proportions established by the manufacturer. Such tools are usually used by beginners. The double type includes airbrushes for modelers with the ability to regulate the supply of air and paint with one button. This is a professional's tool
- Pigment supply - paint flows out of the tank located on top under the influence of gravity. The tool is considered optimal for the modeler, but this airbrush is more difficult to clean. allows you to quickly change paint, but it requires increased... You can choose an airbrush for modeling with side paint supply - the tool allows you to paint in any position without fear that the paint will spill out, and you won’t be able to change it often
- The brand is recognized leaders Iwata, H&S, Hansa. Many instruments cost several times less, yet look like high-quality Japanese or German instruments. Inexpensive airbrushes are manufactured under license, but the quality of materials and workmanship is far from the best. Among them are Inked and Fengda, which are of better quality than Jas and Sumake. An intermediate position between amateur and professional devices is occupied by the Taiwanese airbrush for the Sparmax and AeroPro models
- The presence of a repair kit is very important criterion selection, check availability in advance
- The goal is to have a clear understanding of what types of work the airbrush will be used for.
- Membrane - suitable for short-term painting, as they cannot retain air pressure well - 20 minutes of quiet work with such a compressor is guaranteed
- Piston - with one piston it is connected to a regular outlet and is quite suitable for home use. The work of two pistons ensures best result painting even with an air volume less than that of a single-stage model
- The index finger is held on the trigger, and the rest are slightly extended forward - can be compared to the way the hand holds a pencil
- The airbrush has no right to hang in one place, otherwise a smudge will immediately form
- To paint models with a double-action airbrush, you need to learn how to turn it on and off correctly - first the air is supplied, then the paint. Switching off occurs in the reverse order - first the paint is blocked, then the air. Failure to follow this rule will result in a greasy drop of paint falling from the needle onto the model.
- Adjusting the pressure and concentration of paint - an even layer indicates that everything is normal. Small droplets that appear when painting plastic models mean insufficient pressure or instrument contamination. If even special airbrush paint for models spreads on the surface like spider legs, then the pressure is too great
- Wash and dry the model
- Check the surface for defects
- Rub the surface with sandpaper or abrasive paste - the model paint will adhere better
- Degrease the product
- Cover with tape the parts that will not be painted.
- Wear protective equipment - mask, gloves
- Paint the model, following the rules for working with the tool - do not forget about smooth movements, not hanging in one place, and an adjusted supply of paint and air. Application of subsequent layers of pigment is possible only after the lower layers have dried.
- Allow the model to dry to apply protective varnish.
As an example, let’s look at an inexpensive airbrush model of Chinese origin, which is very popular among nail artists - nail airbrush Jas.
It meets the optimal parameters:
Separately, you need to purchase a hose 1.5-3 meters long.
For those who want to do airbrushing professionally, you should purchase complete set equipment, including:
What you need for an airbrush
Airbrush paints for nails are used diluted acrylic on water based. The consistency of the coloring composition should resemble milk, otherwise it will clog the nozzle.
Among popular brands, experienced craftsmen note that AirNails paints have an increased concentration of pigment and have good hiding power. It dries quickly and does not crack. Another popular brand is SP-NAIL COLOR, it is ready to use, non-toxic, the colors mix well, allowing you to create bright or muted designs.
The second most important tool for a master is a stencil; it helps create an image on the nail plate. Airbrush stencils for nails are sold in ready-made sets, or one at a time.
They can be reusable or disposable. Disposable ones are made of adhesive-based paper; they can be replaced with paper tape or real lace.
There are disposable vinyl stencils on sale; they fit tightly and paint does not bleed under them. The downside is that they cannot be reused, which means you have to spend money again.
For airbrushing, stencils are produced in the form geometric shapes, ribbons, zigzags, floral motifs, depicting animals, lace.
For painting and creating small designs on various surfaces, simple brushes are usually used, but airbrush processing in most cases allows you to achieve a much better result. A correctly configured tool will help you paint walls, decorate a facade, a fence or a car body. But not many beginners know how to use an airbrush. First you need to understand its characteristics and operating principles.
An airbrush is a device that works on the principle of spraying paint in a kind of “torch” formed by air in a solution with small particles of a substance. The airbrush device regulates the flow of this solution, which allows it to be applied thin layer on the treated coating.
A high-quality tool, when used correctly, sprays the dye in a narrow stream of up to 2 mm, so you do not need to wear a mask during processing.

There are two main types of airbrush - single and double action. The first, when used, controls only air, the second controls the supply of air and paint. Single action tools are easy to use, inexpensive and have no large number elements that are easy to clean. But with their help you cannot apply small spots or stripes, and they are also difficult to adjust.
Working with a double-action airbrush allows for more precise work, but such a device is expensive and contains a large number of components that require careful maintenance. Cleaning these parts is quite a labor-intensive procedure.

On video: types of airbrush control.
Selection criteria
The choice of tool depends on what types of airbrushing will be performed. Typically, inexpensive airbrushes with a thin nozzle and needle are used. Even beginners can work with such a device. But those who want to engage in airbrushing at a professional level should consider the following points when choosing:


Purchasing a tool taking into account all the criteria will allow you to perform high-quality and beautiful painting any surface.
What paint should I use?
What do you need for airbrushing? Special paints are used for painting on surfaces, which make airbrushing a comfortable and simple task. When choosing them, it is necessary to take into account the type of surface and the pressure with which they will be applied. The most popular types of paints are:


On video: how to dissolve acrylic paints under an airbrush.
Preparation for painting
Before starting the creative process, it is necessary to complete a number of preparatory activities:

Rules for working with an airbrush
Even inexperienced craftsmen use an airbrush because it is easy to work with. Of course, first you should study the principle of operation of the airbrush and its features, but this will not take much time. How to use such a tool correctly? To achieve a good result when drawing, you will need to follow the following rules:

Once you figure out how the tool works, you can decorate it beautifully. various surfaces. The following recommendations will make using an airbrush easier for beginners:

As you can see, airbrushing is not very complicated, but it allows you to create amazing paintings. Professionals who have been working with such a tool for many years can create 3D images. But a beginner who has recently mastered the principle of airbrush painting will also be able to decorate a facade, fence, car and other surfaces without any problems.
How and what you can draw on (23 photos)


Scale modeling is a special area creative life, in which exact copies of existing ones are created big world objects. Every feature of the miniature tank, ship, plane or car is exactly the same as the original. There are many skills a modeler needs to master. created models – the most important stage on the way to creating a smaller copy. The result of the work directly depends on the quality of the tool used. An airbrush with a compressor and the paints used determine the success of the business.
Thanks to this airbrush you can apply an even and high-quality image
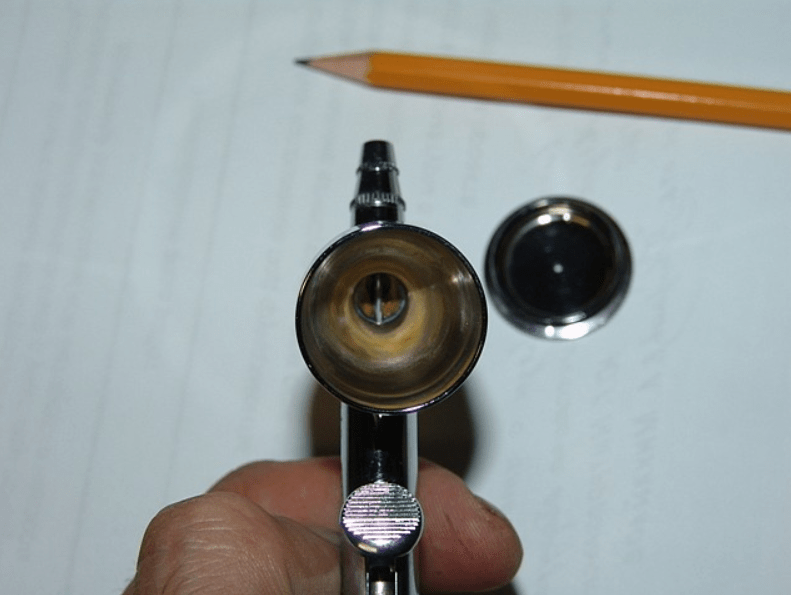
Airbrush device and its types
The device belongs to air type sprayers. A good tool is highly polished and looks like a fountain pen with a paint container. Under the influence of air, the paint is ejected from the nozzle and lies in an even layer on the surface.
The nozzle is small hole at the tip of the apparatus, which is done different sizes. The smaller the nozzle diameter, the thinner the line. Painting models with an airbrush is a very painstaking job involving painting many small details. For objects produced at a scale of 1:48 or 1:32, a nozzle with a diameter of 0.3 mm or larger is suitable. But for drawing small lines on camouflage or the body, a nozzle of less than 0.3 mm is selected.
Airbrushes for modelers are determined by the following parameters:
Choosing an airbrush model: purpose and brand
The essence of the device has not changed over many decades, while technically the airbrush for modeling is becoming more and more accurate and convenient tool. When choosing a model, pay attention to the following points:
“Before purchasing, be sure to hold the airbrush in your hands - the list of potential purchases will immediately be significantly reduced”
Among high-quality double-action airbrushes, we can recommend Iwata HP-Q or 381, Hansa Aero, Chameleon with the ability to mix colors and the presence of additional paint containers. The Badger single action airbrush is suitable for painting large areas and for beginning modelers.
Compressor selection
The heart of a model artist's toolbox is the airbrush compressor. It fills the air brush with life and the quality of painting of models largely depends on its work.
Compressors are available in two types:
If you choose an airbrush with a lower reservoir, then you will purchase more powerful compressor. Companies that make air brushes also make air blowers. takes place using a homemade unit made from a refrigerator compressor.
Purchasing a set of tools will help make your life easier. It includes a compressor, a hose, an airbrush for modeling with a stand and brushes for cleaning.
What paints are used for modeling?
Scale models of cars, airplanes, ships are covered with nitro paints, acrylic and water-based compositions. The last two paints have virtually no odor, but they are more difficult to work with than nitro enamel. Nitro paint is toxic, so it should not be used if there is a child in the room. At the same time, it is excellent for drawing small details. Painting plastic models with nitro paints is done very carefully - the composition can burn the surface. Paints can be purchased separately or a special set for airbrushing can be purchased.
 Nitro paints that produce excellent drawings
 After each use coloring materials the device is thoroughly washed with a suitable solvent.
Using an airbrush to paint models
An airbrush is a painstaking task that requires clear coordination in the actions of the artist and the work of the instrument. It is important to learn how to hold the device correctly, control hand movements, air and paint supply.
Job with an airbrush when painting models requires precise movements of the master - to achieve good results training on drawing lines and geometric shapes will help
How to use an airbrush:
How to properly paint an assembled model
In order for miniature car models to take pride of place in a home museum or exhibition, they need to be painted correctly. This concept includes color selection, surface preparation, and enamel application. Models should be painted according to a certain algorithm:
Repeats the steps of painting a real car. Model artists are constantly accumulating and developing their skills - without good tool can't get by here. An airbrush and compressor, paints with solvents are purchased depending on personal preferences.
WATCH VIDEO INSTRUCTIONS
By purchasing an airbrush kit, a novice artist will immediately receive the tools and consumables necessary for the job.
Oddly enough, there are still weirdos who paint their models with a regular brush, but one can easily argue that painting with an airbrush in 99% of cases (not for figures and some other specifics) will give an incomparably better result when painting. Tuned airbrush in in capable hands works wonders, allowing you to bring the model's appearance as close as possible to the copied original.
A lot has been written about working with an airbrush, but I would like to clarify some points (for example, working with acrylic paints), and let’s just say so. it's time...
But - first things first. The most basic information.
An airbrush is a tool that sprays paint in a kind of “torch” formed by an air flow mixed with tiny droplets of paint.
The airbrush allows you to dose the supply of this mixture and apply it in the form of a thin film on the surface to be painted. A good airbrush, when used correctly, “can” create spots or stripes with a diameter (width) of 1.5-2 mm, and therefore sometimes it is possible, and even necessary, to do without masks when applying, for example, camouflage on Luftwaffe aircraft.
There are two main types of airbrushes: the so-called single And double actions.
For the former, when adjusted with a key (or button), only air supply is controlled, for the latter, both air and paint are controlled simultaneously. The former are simpler, cheaper, have fewer parts, which are also more convenient to clean. But they “don’t know how” to make small spots and stripes and are more roughly regulated. The second ones are correspondingly more accurate in operation, but more expensive, contain more details(which “tolerate” rough or careless handling less well), their cleaning is a more delicate and ore process. Of course, this is the most general assessment.

If it is possible to take an imported one, see with your own eyes (which is very desirable somewhere in the outback, far from specialized “shops”) of its capabilities, consult with the “grandfathers from the stand” and make a decision.
Of course, one airbrush is half the battle in painting models and, alas, is not at all “gender” in the ratio of upcoming veils to the source compressed air, so necessary for the success of the process. However, there are options. Let's start with the cheapest ones. You should not buy, “buying” into simplicity, disposable branded cans with a charge of compressed air - they are enough for one or two small models, and the pressure drops noticeably when air is produced from them. A slightly better alternative to the latter is pumped up automobile tire(the larger it is, the more time work) and cylinders with carbon dioxide (there is a regulator and a pressure gauge). The latter, for a relatively small fee, can be recharged; they will never cause condensation, but require careful handling and safety when charging and storing. But if assembling a model is not a sporadic process and life without plastic is not nice, a compressor is needed.
Airbrush compressor
Of course, the most the right way- unfasten several hundred “greens” and get an almost silent, shiny, branded beauty with a receiver, filters, regulator and pressure indicator. Noisy but cheaper alternative piston compressor- the membrane counterpart will cost less. But the pressure it creates is less. (The ability to regulate pressure, as will be discussed below, is sometimes very important, because there usually is not much of it.)
Today, the JAS 1203 compressor is optimal: a productive, quiet compressor with a receiver - I recommend it.
I've been using this for several years now:

Excellent results will be achieved by using compressors from household and industrial refrigerators (our brother uses the most of these in Rus'). It is easy to modify such a compressor with a homemade receiver from a plastic bottle.
It will significantly reduce pressure fluctuations (pulsations) and prevent oil and moisture from getting into the airbrush (which is unacceptable, otherwise droplets of unwanted liquids will ruin the whole thing!!!) If the compressor is new, the receiver can be equipped with a pressure release needle or something similar to regulate the pressure downwards. You can, for example. insert into the line a piece of metal tube with a hole drilled in its wall. By blocking it to varying degrees with a flexible line tube, we get the same effect as from a needle.
Of course, there are many branded filters that perform the same functions. In general, methods of purchasing compressors and (or) their modification is a big and painful topic. I would like to wish my beginning colleagues to be more inventive and enterprising. But vacuum cleaners and automotive compressors, alas, will not fit - I’ll omit the details - they do not create the necessary pressure.
 There are a lot of paints now, as well as articles about them. Of course, expensive paints from Acromaster, Tamiya, Gunze Sangyo and more affordable Model Master, DuPont, Humbrol and Revell are definitely better than “nitra” bought for half a liter from familiar artists, but they are not a panacea for the very unimportant results when using them, and other nitra is better than the same killed - matte paint from Humbrol. Read special articles, study photos and make a choice based on your wallet. It is highly advisable to use branded paints, but not necessary. You can, through trial and error, stock up on nitro paints purchased on occasion. However, when it comes to adhesion and hiding power, a good “brand” is definitely preferable. And the dispersion is much better.
To work successfully with an airbrush, the paint must be of proper thickness and free of foreign particles and dirt. We’ll talk about cleaning the airbrush and the features of working with acrylic paints later, but for now remember the following. Mix the paint thoroughly before use.
If necessary, add solvent to the paint, but do this not in a can of paint, but in a separate container. You can use, for example, film cases or other suitable containers. The consistency of the paint for spraying is “milk”. When you shake a jar of paint, it leaves faint translucent marks on the walls.
Let me say right away that the degree of dissolution is a delicate process. Glossy paints require slightly more solvent than matte ones. In addition, domestic nitro solvents (acetone 646, 647, etc.) are quite suitable in some cases for replacing the “company”; you just need to take into account that the higher the number, the heme is “heavier” the solvent, because it takes longer to dry and, with longer drying, gives the paint more time to spread evenly over the surface being painted, which means it will make it less dull. If there is any uncertainty, experiment first, then use a suitable solvent.
To prepare the color (if the neg is ready), also use a separate container.
If the paint is of unknown origin or old, filter it through at least clean gauze (2 layers).
Do not pour the dissolved paint back into the original jar!
Wash the airbrush after changing the color with a clean solvent (the same as that used for paint), and after completing work on the next model, disassemble the airbrush and give it a general cleaning.
If you are saving the paint on the side, make sure. that the settled binder was not cast for you. (The paint consists of a coloring pigment, a binding liquid and a solvent. There is also a matte base - tooth powder was used everywhere among USSR modelers.) In general, before any pouring of paint, mix it thoroughly.
Video: Working with an airbrush