The shoe rack is original. Which shoe rack is suitable for the hallway
To create a round shelf on casters you will need some materials and tools:
- screws, plastic caps – 16 pieces;
- chain, studs;
- rollers (4 pieces), screws;
- hammer, glue, drill;
- parts for separating elements made of 12 mm wood - 8 pieces;
- elements for the base made of 12 mm wood - 3 pieces;
- grinding machine;
- workbench, pencil, tape measure;
- white paint;
- clamps;
- upholstery filler, fabric.
The process of making the shelf itself is quite simple.
- First, you should make 3 circles of equal size from wood. You can draw circles with a pencil, using a chain and a nail installed in the center of the wood.
- Wood circles are cut with a jigsaw.
- The finished circles are placed on top of each other, and their edges are polished.
- Then you have to draw the inner circles on the main ones. They must be 170 millimeters from the edge of the main product to accommodate dividers with a width of 160 millimeters.
- Each divider is positioned diagonally so that its inner edge aligns with the inner circle. 140 and 40 millimeters from the edge are marked.
- After marking, 2 mm holes are made at the resulting points. It is necessary to drill holes in the lower and upper parts of the separating elements.
- Screws are placed in the resulting holes.
- Dividing bases are screwed to one of the circles.
- The second circle is placed, the dividing bases are screwed on.
- The third circle is attached to the dividing bases.
- All that remains is to glue the caps on the screws, paint the product, attach the rollers, upholster top part shelves with fabric filling.

The result will be a practical and functional shoe shelf - a bench.
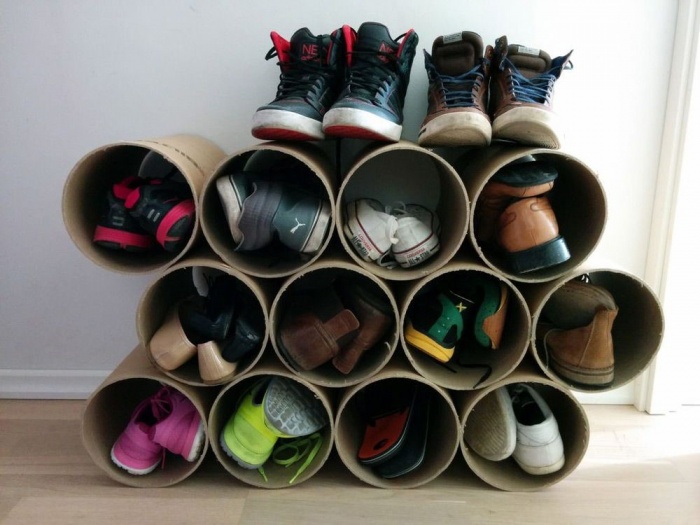
PVC pipe shelf
You can make shoe racks with your own hands from ordinary PVC pipes. It is recommended to take new products. The diameter of the pipe should be 300 millimeters. The length of the product is usually 3 meters, so it should be cut into 10 pieces of 30 centimeters each, respectively. One pipe should reach thirty centimeters because shoe size 42 is 30 centimeters.
Each section of the pipe can be originally designed to look like birch.
- Wallpaper with the appropriate pattern is taken and each PVC piece is covered with it.
- Next, 4 blanks are glued together with glue and fastened with clamps to each other. This will be the base of the shoe shelf.
- Then 3 pipes are glued to it on top and 3 for the base.
- After the parts have dried, you can begin to use the product.

Shelf made from a wooden box or pallet
You can make a shoe rack from ordinary wooden box, which can be found at the dacha. All you have to do is take a box and paint it bright color, the product will look bright and modern, and it can be used to store shoes. You can take several boxes and paint them different colors. This way, each family member will have an individual place to store boots and shoes.
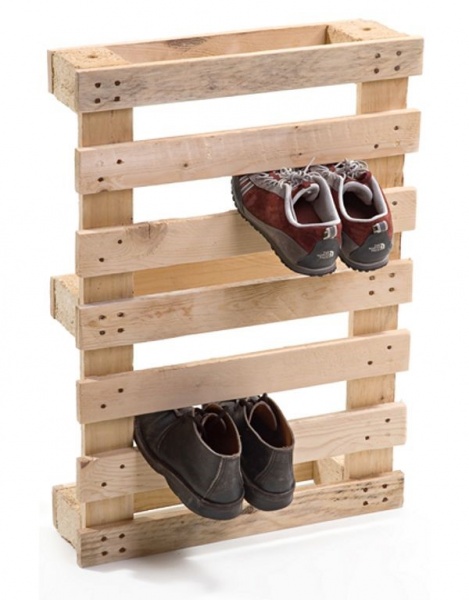
You can use a wooden pallet in the same way. It is enough to decorate it with paintings or appliqués, and the shoe rack is ready. But it is important to sand the product well so as not to be injured by untreated wood during operation.
DIY shoe rack (video)
Making a shoe rack from scrap materials is not difficult, the main thing is to start! A self-made product will not only be functional, but will also delight you with its original appearance.


When entering a home, a person finds himself in a hallway, which should be functional. It is not easy to equip it correctly because small sizes, but it is necessary to provide a place to store shoes. To do this, you don’t have to buy expensive furniture - you can make shelves for shoes in the hallway yourself. Lack of space forces owners to choose multifunctional solutions. For example, a clothes hanger can be combined with a shoe rack.
Every owner wants his home to look perfect, and for the pieces of furniture to combine and complement each other. To do this, from the huge variety of shoe stands that can be seen in the photo, you need to choose suitable option. The main requirements for them are versatility and compactness.
Types of shelves
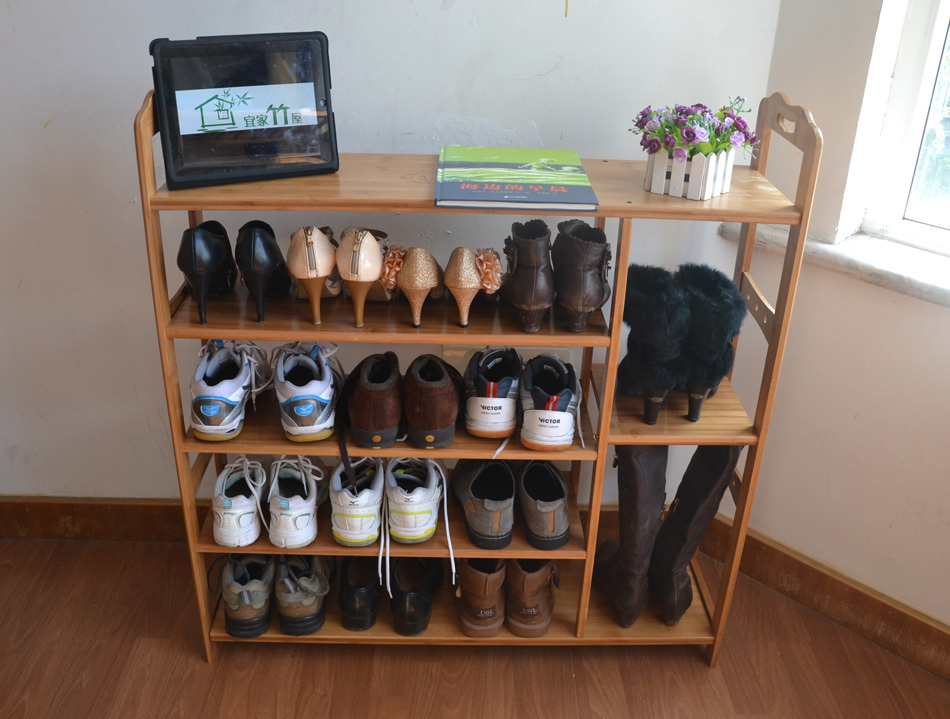
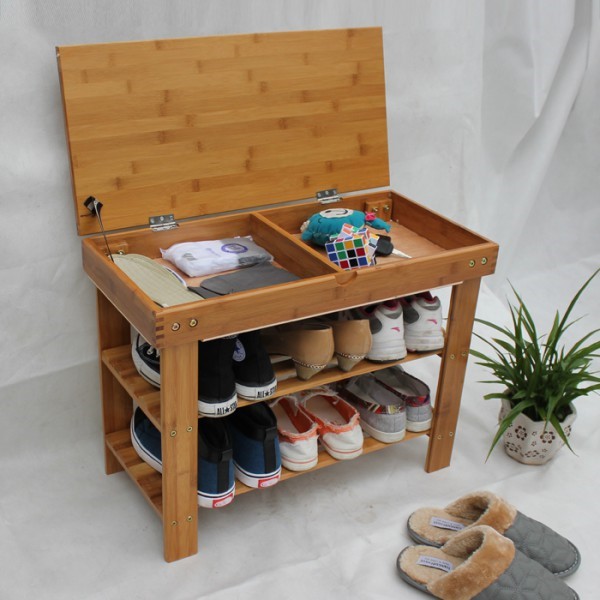
The choice of shelves depends on the number of shoes, area and style of decoration of the room. They should be simple and reliable, they should be easy to make with your own hands. This universal solution which saves space and has an attractive appearance. Shelves are placed at the bottom of the wall. An ordinary hanger consisting of a row of hooks and a small shelf-bench, under which shoes for daily use are stored, will perfectly complement the interior. A good solution is a rack, the upper part of which will become a bench. It is usually equipped open shelves(example - in the photo).

Externally, such shelves in the hallway resemble cabinets, but do not have doors and often they also lack side walls. There are drawers or doors under the seat, and a stylish hanger can stand next to it. The rack will allow you to put things in order, it is practical and universal option. Models with open and closed shelves, in which the shoes are placed on the entire sole.

A slim cabinet with folding doors is suitable even for a very small hallway. Shoes will not gather dust, but they should only be placed in the cabinet when they are dry and clean. The open hanger with shelves and seat is practical and convenient. It will fit clothes and shoes used every day. To store shoes not used this season, provide closed systems. Special stands are made from ordinary cardboard boxes, they are covered with material that does not get wet and covered with pebbles. Shoe shelves in the hallway can be made horizontal, multi-tiered, or vertical. Creating own design products can be made combined option, combining several types in one design.

Shelf materials
There are a huge number of materials suitable for making shelves and racks for shoes. Please note the following before starting work:
- budget for making shelves;
- the number of people who will use the shelves;
- will this model of rack or shelves be combined with a hanger;
- Is a seat (bench) on top required?
The following materials are used to make shelves: metal, wood, plastic, etc. Narrow and corner models are made from chipboard. Shelves of the simplest design are attached to the wall and take up minimal space. They look quite original and do not reduce the space of the hallway.
Shoe racks for classic interiors are made from natural wood. Wood is affordable and environmentally friendly pure material, it is easy to process.

A DIY shoe rack made of metal will provide natural ventilation. Her distinctive feature is that the metal will not absorb odors. This shelf can be decorated additional elements and add personality. The metal does not rot and does not get wet. If it is treated with an anti-corrosion compound, it will not rust. A metal shelf is usually mounted on a wall or mounted on racks.

How to make a shoe rack with your own hands
The easiest way is to make shoe racks with your own hands. To do this you will need the usual tools and materials:
- wooden bars – 6 pcs.;
- self-tapping screws (3 mm – diameter, 25 mm – length);
When making a shoe rack with your own hands, you need to start by making the side parts. To do this, prepare 6 identical bars 33 cm long (33 cm is the required depth, which will allow you to place shoes of any size on the future shelf). Then evenly distribute the 4 remaining bars on the workpiece and make cuts on them of the required depth.
The universal width of the shelf is at least 62 cm. It will allow you to place several pairs of shoes in one compartment at the same time. Each shelf is made from two blanks, which are attached to each other with self-tapping screws. After all installation work sharp and rough parts of the shelves are sanded using special paper.
Height of shoe rack made with my own hands, will be approximately 80 cm. Its lower part is located at a distance of at least 25 cm from the floor, which will allow you to place boots and other types of high shoes.

Racks for shelves can be made from planks 80 cm long. Special cuts are made on them the size of the thickness of the timber (in in this case– 16 mm), the distance between cuts should be 25 cm. The shelves are inserted into four prepared racks with pre-cut sections.
The upper part of the rack is made from the materials that remain after preparing the shelves and racks for them. To do this, 33 cm bars are sanded, varnished and fastened with self-tapping screws to the finished structure.
Pay attention! If you use 4 screws for each shelf, then you will only need 2 screws to secure the top.
Remember that you can create any structure for storing shoes with your own hands, be it a rack, a closet or a regular hanging shelf on the wall. You can find enough on the Internet ready-made options, but if you have the time and desire, experiment. This way you can get an exclusive piece of furniture that all guests will admire. All you need to create shoe shelves for your hallway with your own hands is a little imagination and basic supplies.
Practical and versatile products are very popular. We recommend choosing multifunctional models, capable of easily changing their appearance. When choosing a shoe storage option, focus on your habits and the ease of use of the rack or shelves in your hallway. For example, for large quantity shoes, you can choose a high rotating stand.
From the materials available in the house, which, for example, remained after renovation, it is quite easy to create original shelf or a DIY shoe hanger. A wire hanger will become in an interesting way solving the problem of storing house shoes in a small hallway.
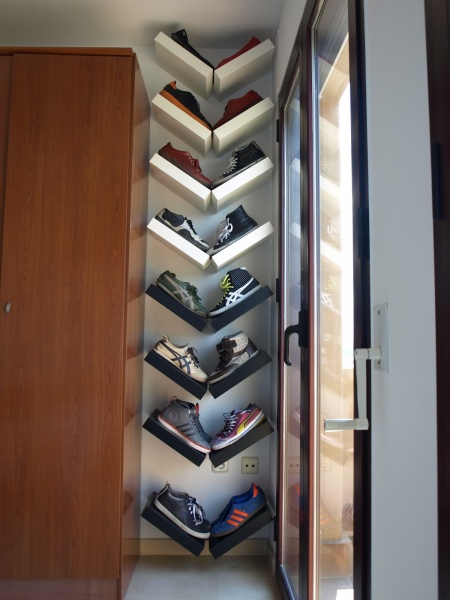
Often in small corridor special holders and hanging containers are installed. Hanging furniture will become in a great way placing shoes in small room. Wall shelf will give the room additional volume and save space on the floor. We recommend hanging doors on the shelf to hide its contents. In this case, the room will look tidier. If you place a multi-tiered structure along the wall, it will fit not only shoes b, but also, for example, umbrellas with bags.
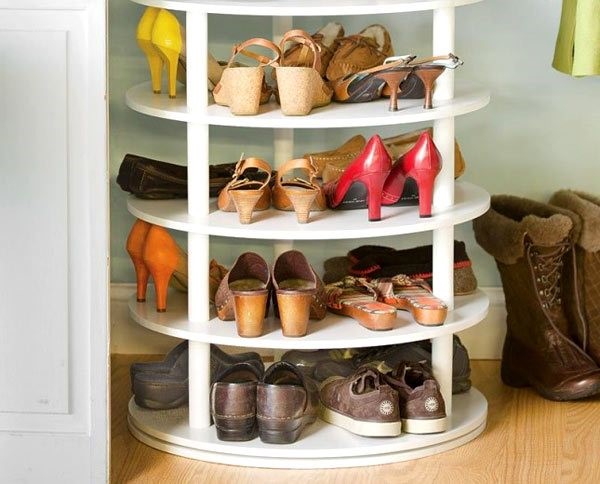
The carousel shelf is assembled from several round parts. It provides a separate place for each pair of shoes.
Old wooden or metal staircase Easily converts into a convenient storage system. The ladder is very easy to attach to the wall. Additionally, it can be painted in the desired color, and hooks can be attached to the crossbars.

Autonomous systems, like the one in the photo below, can be used to sort shoes. Ordinary pallets, decorated with paintings or appliqués, will become reliable storage containers and decorate the interior of your hallway.

Using your imagination, it’s easy enough to create an original shelf for storing shoes, which will be admired by all household members and guests for a long time.
Photo gallery (19 photos)


Inhabitants small apartments Often faced with the problem of storing shoes. Two or three pairs per season for one person is the required minimum, so even a small family of 3 people needs a design that allows them to compactly place shoes in the hallway.
Shoe storage options
There are several main reasons to make a shoe rack yourself. Undoubtedly, it is easier to purchase ready-made furniture, but often standard sizes not suitable for small rooms. The situation when shoes need storage at the dacha is also more practical to solve on our own from scrap materials, without resorting to additional costs. The third side of the issue is the desire to create an exclusive design, striking in its originality and unconventional approach. Let's consider various options installation of shelves for shoes, depending on the final goals - to save space or budget.

From the point of view of saving money, the material for making the shelf is chosen as accessible as possible: it can be cardboard boxes or cheap plywood. The design of such shoe shelves depends solely on the owner’s imagination:
- From disassembled boxes they are assembled using tape and staples classic shape Shoe shelves with vertical posts and cross bars;
- Several cardboard containers suitable shape are fixed together in a vertical shelf, and then attached to the wall. Its minimal depth allows the structure to be installed even behind a door.
Note! This shelf model is suitable exclusively for light shoes. To store winter boots, you will have to take care of a more secure place.
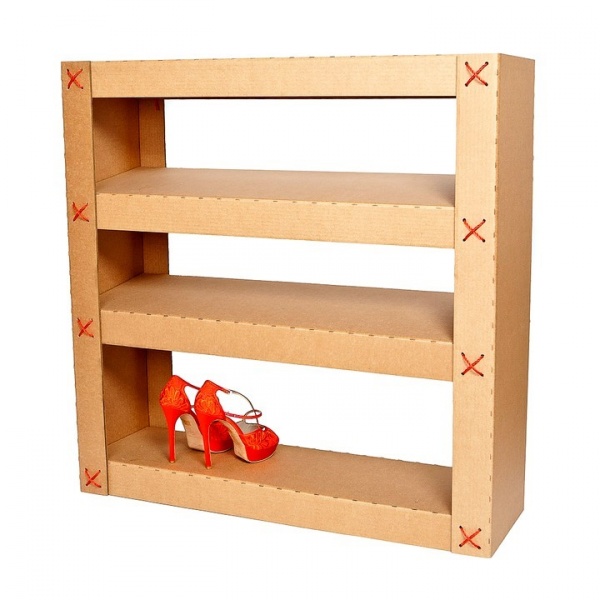
The plywood construction allows you to achieve a successful combination of cheapness and originality. To do this, assemble a frame in the form of a box, after which it is equipped inside with shelves with asymmetrical bends, allowing you to place shoes various shapes and sizes.
Adherents classic interior It’s better to make traditional shelves for shoes from wood material or combined with metal elements. They can differ in height, have a variety of configurations, and be additionally equipped with doors. It all depends on the material possibilities, the area where the premises will be located and the design of the premises.
For those who like to impress others or simply push away from the usual forms, they will like non-standard approaches in the form of using PVC pipes or equipping a kind of shoe shoe that simultaneously performs two functions: storing and drying shoes.

Budget offers
Available materials in the form of cardboard, plywood or slats will allow you to build a shelf for shoes without additional expenses.
Cardboard
Most economical solution question - the use of cardboard. It is appropriate to place such a product in a dacha, but in some cases creative approach In design, a shoe rack made of cardboard can be installed in an apartment. One option involves the following steps:
- on cardboard boxes markings are made with a pencil;
- elements of the blanks are cut out with a special knife;
- boxes are formed from rectangles;
- the blanks are connected to each other, forming grooves for shoes;
- the elements are connected to each other by brackets;
- the shelf is fixed to the wall.

As mentioned above, you can also build standard model, where transverse elements are attached between the vertical parts. The connection is made using tape and staples. Decorating it with decorative film will help give a cardboard shoe rack a more aesthetically pleasing appearance.
Plywood
A shelf made of plywood will last much longer. To make it you will need:
- jigsaw and drill;
- perforator and hammer;
- pins and glue.
Having built a frame of the required dimensions, internal filling shelves are made at your discretion, depending on the number of shoes stored and their sizes.
Important ! Before joining, all parts are thoroughly sanded.

A more simplified model is a shelf assembled from U-shaped elements that can be attached directly to the wall or fixed on a previously prepared panel. As in the case of cardboard, it is recommended to cover the final structure with decorative film. This will not only make it attractive, but will also protect it from moisture, making it easier to care for.

Reiki
Slats can be a practical solution for a summer house. Minimum Required tools: screwdriver, hammer and nails. The design of the shelves in this case may be different, but all options have advantages, these are:
- saving costs on purchasing materials;
- ease of manufacture;
- good ventilation.
What models can be built from slats:
- The most primitive one is to connect two slats various widths. There is a wider part at the bottom and a narrow one at the top. Shoes are inserted into the shelf with the toe.
- The following design of a shelf made of slats resembles the semblance of a pallet placed vertically. Having secured the crossbars to the vertical posts, the shelf is additionally equipped with slats for fixing to the wall.
- It's also easy to make a traditional shoe rack shape. For convenience, the upper part can be equipped with an ottoman.
It is worth noting that in each case it is better to carefully treat the slats so as not to damage the shoes in the future. At the final stage, it is preferable to carry out finishing work, be it painting or varnishing.
Classic designs
Traditional models of shoe racks are made of wood, chipboard and metal elements. In most cases you will need:
- saw and plane;
- screwdriver and screws;
- metal corners;
- sandpaper;
- wood glue;
- tape measure and pencil;
- finishing material (paint or varnish).
An essential condition is preliminary design. You can use ready-made diagrams or draw a sketch of a shoe rack yourself.


Tree
Let's talk about one of the many options. Suitable material there will be a board 25-35 cm wide, the thickness of the workpiece is 2 cm. Manufacturing includes the following steps:
- The vertical side walls are being prepared. The height of the parts is 80-90 cm.
- For shelves, 4 fragments 60-70 cm wide are cut out;
- All elements are processed with sandpaper;
- Using self-tapping screws, the crossbars are connected to the side walls.
- To enhance strength, metal corners are fixed at the rear ends of the shelf.
- The final stage consists of finishing works- after treatment with primer or stain, the shoe rack is painted or varnished.

Chipboard and MDF
A shoe rack made of chipboard with an ottoman combines practicality and attractiveness. In the process of preparing parts according to the selected project, it may be necessary to remove chips and irregularities using grinder. The edges of the finished elements of the future shoe rack are pasted over special tape using a hot iron. Fine-grained sandpaper is useful for sanding corners; this will prevent damage to the shoes during storage. In some cases, slots should be prepared; the parts of the shoe rack are often connected using confirmations. To decorate an ottoman, take care of purchasing foam rubber and leatherette in advance.
Using your imagination, you can make an original and practical shoe rack from laminated chipboard. Material consumption is determined depending on the number of shelves; you will also need to purchase metal tubes and clamps to hold the transverse elements of the structure. The edges of the metal tubes are closed with plastic plugs.
Will fit well into the interior of a square hallway corner model shelves for shoes. The stages of its production are not much different from previous versions:
- a diagram of the future shelf is being prepared;
- for the material you can choose laminated chipboard or MDF;
- parts are cut out according to the selected dimensions;
- All roughness is removed from the edges, after which they are decorated with tape;
- The structure is assembled using confirmations.

The “Slim” shoe rack model has maximum functionality. Accommodating a large number of pairs of shoes, it has a compact size. Making it yourself is extremely difficult due to the large number of accessories. It is much easier to purchase a ready-made design and start self-assembly. The following diagram will help you:


Use of metal elements
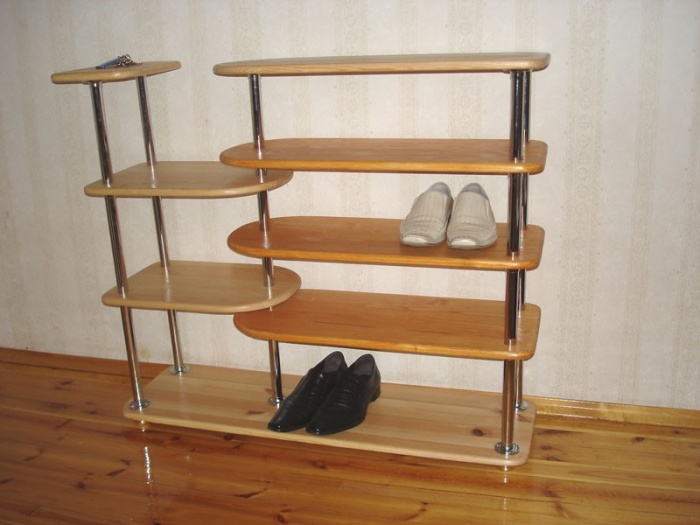
The designs have external lightness, in the manufacture of which they used for the transverse shelves metal elements. Working with such a sketch requires the presence of a grinder, a jigsaw for metal and some experience. Having blacksmithing skills, you can create an exclusive model of a shoe rack with forged elements.

Extraordinary models
Non-standard shelves also have two directions: shape and material used. Sufficient space in the room allows you to install a round shelf for shoes; its ease of use is facilitated by a rotating mechanism. The most difficult stage will be sawing round blanks and installation of a mechanism to ensure mobility of the device.
Note! The radius of the circle should be larger than the largest shoe size you have in your home.
If we consider non-traditional options for shoe shelves in terms of the chosen material, it could be a stand made of sewer pipes PVC. What does the assembly of such a shelf include:
- Sawing material to length, taking into account shoe size.
- Sanding the edges with sandpaper.
- Decoration of sections with decorative film. In this case, the imitation of birch logs looks very impressive.
- Between each other individual elements shelves connect plastic holders or belts. If necessary, a similar design of a shoe rack can easily be supplemented with new cells.
Regardless of which model you like best, important point is the final finishing that can turn the most unpresentable shelf into an exclusive furniture structure.
Caring for shoes piled up is problematic. To prevent boots from getting dirty, suffering from dampness and dust, you need to install. The easiest way is to purchase ready-made solution, but this is not always possible.
Here we will look at an alternative route - not just making a shoe rack with your own hands. We have to select tools and materials, decide on the dimensions and internal structure. At the end you will find diagrams, drawings and photographs.
The amount of material and set of tools will depend on the chosen design. To make a wooden cabinet you will need the following tools:
- drills (confirmed, 5 or 8 millimeters);
- tape measure (square, ruler) and pencil;
- hammer;
- screwdriver (can be replaced with a drill);
- 4mm hex wrench;
- awl;
- Forstner drill;
- template (its task is to mark for drilling).
Of course, if you are going to make a cardboard shoe rack, the set will be different. But more on that a little later.
Do you want a more durable and cheaper shoe rack? Use as a material laminated chipboard sheets. In addition, you will need accessories:
- pens;
- euroscrews;
- shoe rack mechanism (if provided);
- screws;
- decorative supports (you can do without them, but with supports the structure will look more solid).
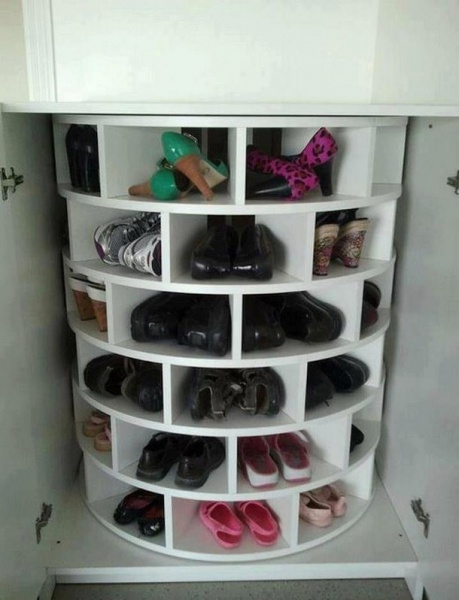
For the carousel shelf you will need metal pins (round shelves are attached to them) and a vertical pin. You don't need any special tools (except a drill). The complete list of materials for the “carousel” looks like this:
- round pins (holders);
- fiberboard disks;
- plastic tips;
- steel tube;
- metal corners;
- screws (plus lock washers for them);
- half a liter of primer;
- machine screws (together with nuts and washers);
- acrylic paint.
More comfortable solutions are also possible (including leather upholstery). Read about this below, as well as about the sizes of shoe racks you create with your own hands.
Product dimensions
The dimensions of the product depend on the size of the hallway and the needs of the owner. For single people, a small locker nestled in will be enough, but a family of 3-4 people needs a full-fledged shoe rack designed for 20-30 pairs. Store-bought models often turn out to be made in China, whose inhabitants have a strange penchant for miniaturization.
Shoe racks can also be wide. It is difficult to make a cabinet or make one yourself, so it is better to limit yourself to a simple cabinet. The product requirements are:
- functionality;
- ergonomics;
- good ventilation;
- aesthetics;
- capacity.
A minimalist shoe drying rack does not require a lot of space. The wall-mounted model is quite small-sized and simple. The parameters can be as follows:
- facades (curly MDF boards or STRAIGHT chipboard) - 119.5x44.7 centimeters;
- sidewalls (standard furniture panels) - 118.4x32 centimeters;
- back wall (thin hardboard) - 119.5x89.5 cm;
- drawers (can be purchased at furniture stores) - 86.8x10.
There are also more compact solutions. Most of them are mounted on the hallway wall or placed inside a wardrobe (“carousel”). The dimensions of such structures are much smaller.
To pick up ideal option For your hallway, we recommend using special design programs - you can download them and install them on your computer. There are also finished projects, including diagrams, drawings and detailed tables with lists of parts.
Photo of a shoe cabinet in the hallway with your own hands

How to make a shoe rack yourself
There are different types homemade shoe designs that allow you to optimize the hallway space. Some of the solutions are quite complex - for example, a carousel shoe rack. We will not follow the path of complexity and will deal with the simplest schemes shoe cabinets made from cardboard and wood.
Let's look at an example of hand-assembling a narrow shoe rack for a bachelor's apartment. This design is designed for a small number of pairs of shoes, and during assembly you will need a drill, a hacksaw and a screwdriver. Here is a list of materials you will need:
- moisture-resistant plywood (five sheets of 12 mm thickness);
- long shoe brushes (the quantity depends on the length of the shoe rack, the bristles should be stiff);
- wood screws;
- spikes (6 pieces, 6 mm each);
- acrylic paint;
- construction adhesive (for wood);
- brush;
- transparent moisture-resistant varnish;
- dowels
The shelf can be painted with gouache or acrylic - it doesn’t matter. The brushes here serve as shoe holders. The assembly order is as follows:
- The block with brushes is assembled. Through holes (6 pieces) are drilled in the plywood edge.
- Apply glue to the spikes and insert them into the resulting holes.
- Similar “holes” are made in plywood C, which is connected to sheet B. You can press the parts with clamps - then the glue will set faster.
- Element D is attached to an existing structure.
- The handles of the brushes are cut off (you can buy brushes without handles - it will be cheaper).
- A pair of through holes are drilled into the brushes, after which they are fastened along the entire length of the structure (a centimeter from the edge) using short self-tapping screws.
- Unused parts A and E are drilled.
- All shelf fragments are fastened with self-tapping screws.
- The penultimate touch is painting the shoe rack. You can involve little family members in the process. Decoupage and other creative experiments are welcome.
- The hallway wall is being drilled. Dowels are installed and the shelf is hung.
We have also prepared several for you useful videos who will teach you how to create shoe racks with your own hands.
Narrow shoe racks - best solution for small hallways? If you don't believe me, watch the following video:
The following video will also tell you how to assemble a shoe rack with your own hands:
Do you want a shoe rack for more comfortable removal of boots? Then the following video will definitely be useful to you:
You can create hanging and floor-standing shoe racks with your own hands from cardboard. The hanging shelf is made of thick, high-strength cardboard; you can store demi-season pairs of shoes in it. You will need an unnecessary box (it’s easy to ask for one in stores) and other things:
- furniture knife (can be replaced with large scissors);
- wood glue;
- large tape;
- ruler and pencil;
- stapler (the staples for it should be large in size).
The cardboard is laid out on flat surface, after which you divide it (using a pencil) into several rectangular sections. The height will be 30 centimeters, and the length will be comparable to the width of the cardboard. The rectangle is divided in half and bent - the side walls must be filled with equal triangles (the vertices will point down).
By bending the rectangles, you form boxes. Cover their edges with tape to protect them from moisture. The drawers are inserted into the grooves of the “neighbors” and secured with wood glue - this is how you get a single structure. Attach hooks on top and secure the product to the wall.
A floor-standing shoe rack is formed in a similar way, but it is not attached to the wall.
The disadvantage of this solution is its extreme instability. Cardboard is a lightweight material, so floor shoe racks can be knocked over by hitting the edge of a coat.
Cardboard shoe rack

Made of wood
Using wood and metal strips as the main components, you can build a fairly stable shoe rack that deserves its place in the hallway. You can save money by replacing wood with chipboard or fiberboard. The thickness of the sheets should be about one and a half centimeters.
You will also need special strips made of stainless steel. The shape of the planks is cylindrical. In total you need to get eight of these parts.
Please note: the cross-sectional diameter of the planks is two centimeters. Fasteners and clamps will also be useful to you (flanges and screws). Here is a list of tools for making it yourself:
- pencil and ruler;
- screwdriver;
- grinding machine;
- jigsaw;
- nails;
- compass;
- hammer.
So, how to make a shoe cabinet out of wood with your own hands? The process begins by cutting out the back and sides. Usually the height of the shoe rack is arbitrary, and the width is 23 centimeters. This will allow you to make a two-level shoe rack.
The back wall is cut out at the very beginning - it will consist of a pair of thin strips. The width of the shelf should be 20 centimeters. After cutting out the fragment with a jigsaw, you need to sand the edges and work on the side walls.
First you need to mark a couple of rectangles of the same type. Use a pencil, compass and ruler to mark the front roundings. The rounds are cut out with a jigsaw, then the walls are sanded and fastened into a single section.
The final assembly of the shoe rack with your own hands. Here's the procedure:
- The flange attachment points are marked.
- The side walls are fastened together using planks.
- The back walls are nailed to back side(end) of the sides.
If desired, the scheme can be complicated. As an option, replace the laminated chipboard with wood and upholster the upper part with leather.
Photos of shoe racks that were created with your own hands
White color Simple and tasteful Old pallet Banquette Eco-style
Drawings, diagrams, photos
We move from general descriptions to visualized specifics. We have placed all the diagrams and drawings of the structures described above in this section. Here you will also find photographs of finished shoe racks and individual assembly stages.
Below we have prepared drawings, diagrams and photos for you that will tell you how to make a shoe rack in the hallway with your own hands.
DIY shoe cabinet drawings
 Low cabinet
  Open cabinet
In a small apartment, every centimeter counts! There is always a catastrophic lack of storage space here. The owners are constantly looking for solutions, looking for original ideas, which will help make your home more spacious, cozy and comfortable.
The hardest thing is for families with children, fashionistas, and young people who always want to look perfect. All these categories of people need a huge amount of shoes, for any weather, combined with all sets of clothes. And, in the end, the question: “Where to store all this?!” - it becomes very acute.
After all, shoes are seasonal item. You probably won't need sandals in winter. Remove what is not needed at the moment shoes from the hallway. Leave here only what you are actively wearing at the moment.
It is most convenient to store shoes in transparent boxes. This way you will always see what is where, and you won’t have to spend a lot of time looking for the right pair. If you want to avoid the financial costs of purchasing special boxes, then you can print out an image of each pair and stick it on the desired cardboard box.
Without regret, throw away all unnecessary shoes that are worn out, too tight, not comfortable to wear, have disappointed you - in general, everything that you haven’t “walked” for a year or two. You'll be amazed at how much space you free up!
Many people are very annoyed by the huge number of different boxes and boxes. You can buy several large boxes on wheels: put winter shoes in one, summer shoes in another, and demi-season shoes in the third. Arrange inside each different sizes partitions. Now it is enough to pull out only one box and delve into it.
Shoes can be stored on a plastic-glazed balcony, provided there is low humidity and above-zero temperatures.
Solving a complex problem
In our case, the customer is a young man, not married (yet), who has a certain weakness for shoes, that is, he has a lot of them, but, as is usually the case, there is a shortage of storage space. You can also turn to a professional furniture assembler, but making a shoe maker yourself is not at all difficult.
As a result, it was decided to produce two narrow shoe racks. One is two compartments wider, the other is three narrower.
Obviously, for a small corridor it is better to make (order) shoe racks that are narrow, but at the same time quite high. So small hallway It won't look cluttered and all your shoes will fit.
In each of the compartments you can store low shoes in two rows. This is both a plus and a minus. The advantage is that the depth of such a cabinet is minimal, and the disadvantage is that it is impossible to accommodate high-top shoes, boots, etc.
To visually make the hallway larger, which is usually the darkest room in the apartment, choose light colors for decoration.
The dimensions of the cabinets were dictated by the available space. The color was chosen based on general design apartments - in unison. The buildings are “Wenge” color, the facades are “Milk Oak”.
Making shoe racks
1. Tool
- drill (screwdriver)
- drills with a diameter of 5 mm and 8 mm or a “confirmed” drill;
- pencil, ruler (square, tape measure), awl, 4 mm hex key or screwdriver bit, hammer;
- corner clamps, if you are assembling alone;
- template for marking-drilling
- Forstner drill 20 mm.
2. Project
We create a model in the PRO100 program (download for free). You can download the shoe rack model.

3. Details from laminated chipboard
Table with dimensions of shoe rack parts for two facades:
| № | Length | Edge 0.4 mm | Width | Edge 0.4 mm | Quantity | Note |
| laminated chipboard | ||||||
| 1 | 379 | 2 | 483 | 2 | 2 | facade |
| 2 | 520 | 2 | 300 | 2 | 1 | edge 2 mm, cover |
| 3 | 778 | 1 | 290 | - | 2 | side walls |
| 3 | 488 | 1 | 60 | - | 2 | screeds |
| 3 | 520 | 1 | 290 | 2 | 1 | bottom |
Table with dimensions of shoe rack parts for three facades:
| № | Length | Edge 0.4 mm | Width | Edge 0.4 mm | Quantity | Note |
| laminated chipboard | ||||||
| 1 | 379 | 2 | 353 | 2 | 3 | facade |
| 2 | 390 | 2 | 300 | 2 | 1 | edge 2 mm, cover |
| 3 | 1165 | 1 | 290 | - | 2 | side walls |
| 3 | 358 | 1 | 60 | - | 2 | screeds |
| 3 | 390 | 1 | 290 | 2 | 1 | bottom |
Table with dimensions of fiberboard parts:
4. Accessories
To assemble the shoe rack you will need:
| № | Name | Quantity |
| 1 | Euroscrew (confirmed) | 16 pcs |
| 2 | Pens | 5 pcs |
| 3 | Screws 3.5x16 | 50 pcs |
| 4 | Shoe rack mechanism | 5 pcs |
| 5 | Decorative supports, H-60 mm | 8 pcs |
5. Assembly
Marking the sides of the cabinet body


Mark and drill the bottom of the cabinet body


With the help corner clamps we fix the body parts, drill them and twist them onto the confirmat


Installing cabinet supports


Installing the cabinet cover

We fix the back wall with 3.5x16 screws


Similarly, we assemble the body of the shoe rack into three facades


According to the markings made earlier, we drill holes for the shoe rack mechanism


For assembly rotary mechanisms under shoe shelves You will need a 20mm Forstner drill bit.