How to make a picture of butterflies. Butterflies for interior decor (52 photos): original ideas and examples
What to do if you are tired of decorating a room, but there is no money or energy for repairs? The fastest and least expensive way is to change textiles and decorative elements. Moreover, not all decor needs to be purchased. For example, decorative butterflies will help add an element of lightness. They are used to make panels and wall compositions. Larger and brighter ones “live” on curtains or flowers.
What are they made of?
Butterflies on the walls are made from different materials, sometimes even exotic. The spring appearance of the resulting decor depends on this choice. While you have no experience and you don’t really imagine the end result, you can make several different decorative butterflies for testing. They can be attached to the location of the planned decor. This will make it easier to evaluate the effect and choose the most suitable option.
Paper
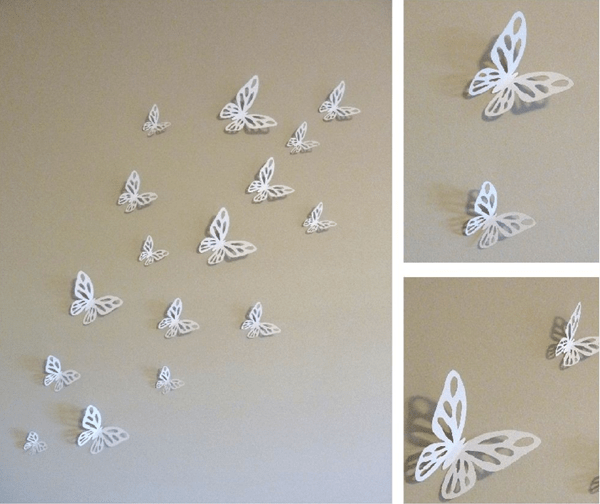
Butterflies for decoration from paper are the easiest and cheapest to make. There are several various techniques. If the product is flat and is glued entirely to the wall/panel, only the front surface is important. If a three-dimensional composition is intended, the paper should be double-sided - both sides should be colored, because the white “wrong side” often spoils the impression.

Instead of regular colored paper, you can use corrugated paper. The effect will be different - it is lighter, airier, translucent, and with its help it is easy to make the decor with butterflies three-dimensional.

Butterflies for decoration made from corrugated paper are airy and light
You can make butterflies from an old magazine, newspaper, postcards, colored napkins, wallpaper of a suitable color, or any other printed material.

As you can see, there are a lot of options just from paper. If you consider that they can still be slightly tinted, combined, made multi-layered, it is clear that there is huge scope for imagination...
Cardboard
Cardboard is not very dense. It's more like a very thick paper. It is also colored and double-sided. It is often used to create voluminous decor - you can easily bend the wings relative to the body. This material even holds its shape better. Just remember that you can’t make corrugated wings - the material is too hard to make a small fold.

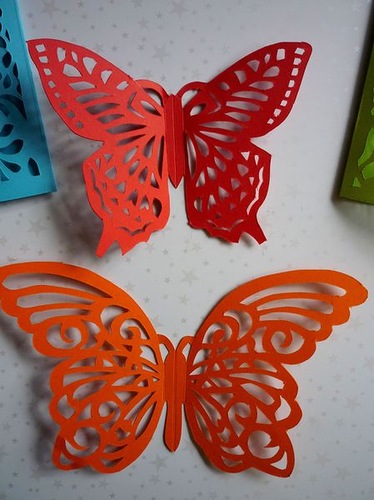
It is also easier to make openwork butterflies from cardboard. Having enough sharp knife cut out the “extra” leaving only the partitions. Such decorations require perseverance, great patience and accuracy.

Cardboard is also used to make templates for “mass” production of identical butterflies. With the help of such stencils you can make insects of the same type and size and spend a minimum of time on it.
Textile
Having a template, you can make butterflies for wall decoration or a fabric chandelier lampshade. The fabric will need to be given additional rigidity, but otherwise the process is not much different: the outline is applied, cut out, decorated if necessary, and mounted on the wall.

It is more difficult to work with fabric, although very interesting decorative crafts are obtained. This is an option for more advanced decorators and needlework skills or sewing machine. With their help you can recreate the veins on the wings.
Exotic materials
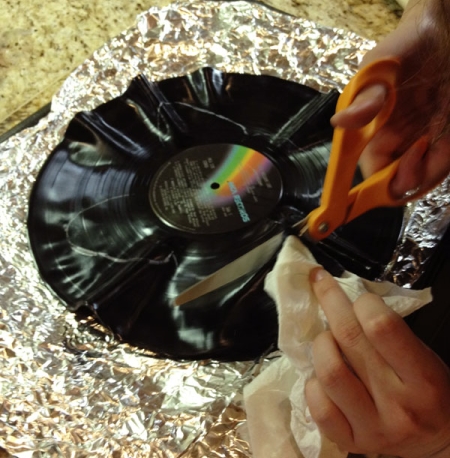
Old vinyl records will also be an excellent raw material for making butterfly decor. Since vinyl is hard, you will have to heat it in the oven to cut a butterfly out of it. And in order not to spoil the baking sheet, you need to cover it with foil.

An outline is applied to the vinyl using chalk, the record is placed in a preheated oven, as soon as it begins to soften, it is taken out and quickly cut along the outline with scissors. Often the “workpiece” has to be heated several times. After cutting, heat it one last time and give it the desired shape.
Beer cans or any other relatively soft sheet metal also make excellent flying beauties. First you need to cut off the bottom and lid and level the piece of tin. Then, using an awl, transfer the contours from the template to the sheet metal, connect them with a marker and cut along the resulting contour.

You can even use beer cans for “butterfly” wall decor.
You can decorate the back - the shiny part. To do this you will need markers or felt-tip pens, you can try decorating with nail polish. The painted beauties are given the desired shape. One caveat: the edges are very sharp, you need to work carefully, otherwise cuts cannot be avoided.
How to make outline butterflies from paper
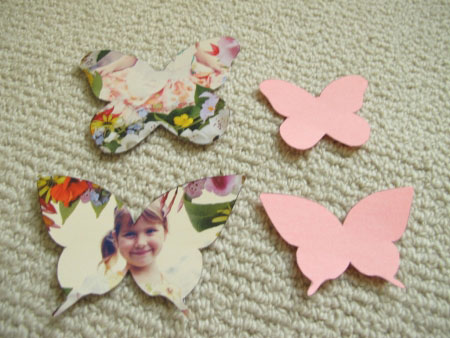
Let's start with the simplest, but most effective - contour butterflies. You will need colored paper or magazine pages, contour maps etc. You can use old postcards or colored cardboard. You will also need regular cardboard to cut out the template.

These are contour butterflies for decoration - they are easy to make and look great
Preparing the template
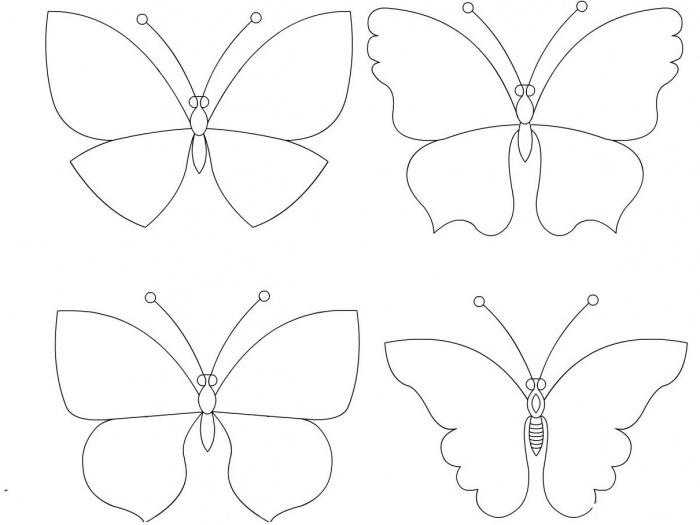
We take a piece of cardboard - any kind, you can even use some kind of packaging (tea, breakfast cereals, cereals, etc.) the main thing is that the cardboard is dense and not porous. Find a butterfly silhouette that you like, transfer it to cardboard and cut it out. There are several silhouettes in the photo gallery. They can be printed, then cut out and transferred to cardboard.
A butterfly on the wall - it would be nice in color. The swallowtail is attractive with its “tail,” but the paper consumption is greater and the work requires more accuracy. Paper butterfly templates for interior decoration are made in half. The second is obtained “automatically” after unfolding a piece of paper folded in half
Some tips for working with templates. Many butterfly contours are given with two wings, but it is better to cut off one wing - you will definitely get it symmetrically.
Winged insect decorations look good different sizes. Therefore, the same contour can be enlarged or reduced using the simplest functions of graphic editors - the same Paint, which is available on any computer. Since in in this case Only the outline is important, the quality of the drawing is not so important, so feel free to experiment with sizes. We cut out the printed template, apply it to cardboard and trace it. We cut it out and get a hard working template with which you can make dozens of identical elements.
Cut and attach

Take a sheet of paper, fold it in half, attach a template, and trace it. Cut along the drawn line. Next, we bend the wings from the “body” and get a working blank. Having cut out a certain number of butterflies, we attach them to the chosen place - on the wall, a piece of cardboard, etc.
You can attach it with regular glue (PVA usually best option), small strips of double-sided glue. You can use wallpaper glue, etc. If you are in doubt about the result, stock up on sewing pins. They can be mounted on the wall several times without much risk of damaging the surface. When you have placed all the butterflies and you are satisfied with the result, you can glue or use tape.
Openwork
The situation is a little more complicated with openwork butterflies. They are made from paper or cardboard. It is important to have a good sharp knife and a template with lines marked on it along which you will need to cut out the excess paper. It should be said right away that this is painstaking work.
Patterns of butterflies with openwork wings - a variant of medium complexity The second half is symmetrical
The process is the same as described above: prepare a template, then cut out the required number of elements from it. The peculiarity is that they first cut out and remove small fragments, and then cut out an outline from a piece of paper. With this sequence of actions, there is less chance of breaking thin jumpers, and it’s easier to work this way.

How to make an openwork butterfly from paper - the process in pictures
You need to work with a knife with a thin and sharp blade. It’s better not on the table, but by placing something quite hard - maybe a piece of plastic, etc. But you need to understand that grooves and cuts will remain on the surface, so it will be problematic to use this piece for any other purposes.
Multilayer volumetric
When making multilayer volumetric butterflies, several pieces of the same shape are cut out (size and color may vary). They are stacked one on top of the other, the “bodies” are glued together, and the wings are bent at different angles. This is how these butterflies turn out to be more voluminous.

You can make a combination of openwork and contour butterflies. Take paper of contrasting colors or find one color, but different shades. Make them into butterflies of the same shape. Only some will be with openwork, others - without. Arrange them by placing a fragment without a pattern underneath. This produces an interesting effect.

There is a technique that allows you to immediately cut out voluminous butterflies from paper. You will need two rectangles of paper - a larger one (for large wings) and a smaller one. We fold them diagonally once, then a second time. The result is two triangles of different sizes. Now we bend the paper inward from two opposite sides so that we get a triangle like in the third photo (with the newspaper).

Draw wings on the resulting triangles. In larger ones, the openwork can be located only along the edge, in smaller ones - over the entire area. We cut out the blanks and put them one inside the other and glue them together. On top we glue a separately cut out “body” with antennae. Due to the fact that the paper is folded and the wings are double, the products have a larger volume.
Corrugated paper
WITH corrugated paper It’s easier to work with and butterflies for decoration are more airy and light, since the paper is translucent. We select suitable colors, take threads, scissors, glue. Nothing more is required. We cut out rectangles of approximately 7*10 cm from paper.

We sew the resulting rectangles in the middle with a needle and thread, tighten them, and make a couple of turns with the thread. It turns out something resembling a bow. We fold it in half, straighten the paper with our fingers, trying to leave as few folds as possible - we form wings.

When the result satisfies you, take scissors and cut off a strip of a few millimeters from the edge - into antennae. On the remaining part we form a patterned edge reminiscent of a butterfly wing.

We twist the antennae strips with our fingers into thin tubes. Now they definitely resemble antennae. We unfold the wings and finally straighten them. The result was light butterflies.
From folded paper
From double-sided colored paper or old magazines you can make paper butterflies for decoration, folding them into a small accordion. We cut out two squares or rhombuses from paper (one a little larger, the second a little smaller), fold them into a small “accordion”, starting from one of the corners. The smaller the fold, the more interesting the product will be.

We put two folded rhombuses next to each other, tie them in the middle with thread or flexible wire in a sheath suitable color. We make antennae from the remnants of the wire, straighten the wings, and adjust the shape if desired.
Photo for inspiration
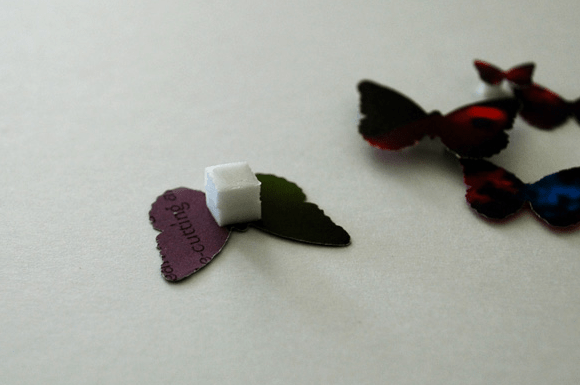
First, a little about how and what you can attach already made paper butterflies to. The easiest way is to apply glue to walls or panels. The second no less simple way is to double sided tape. But to make the decoration more voluminous, it is best to glue it not directly to the wall, but to a small piece of foam rubber. The result will be a more airy composition, with clear shadows.

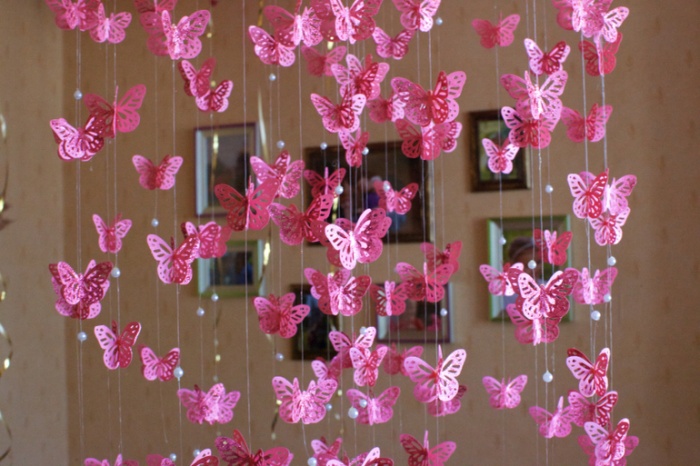
Paper butterflies are used to create three-dimensional decorative compositions on small hoops with a fishing line tied to them. Cut out paper insects are attached to the fishing line. You can’t hang them on the wall, but they look very original, although creating such a composition is more difficult than on the wall.

Hoops and fishing line are all you need to create this beauty
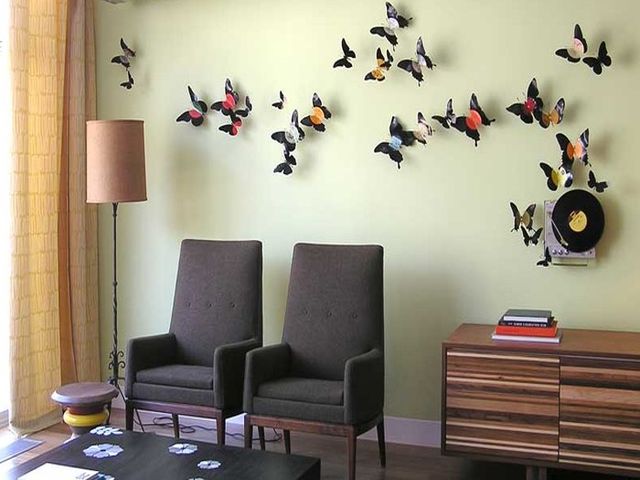
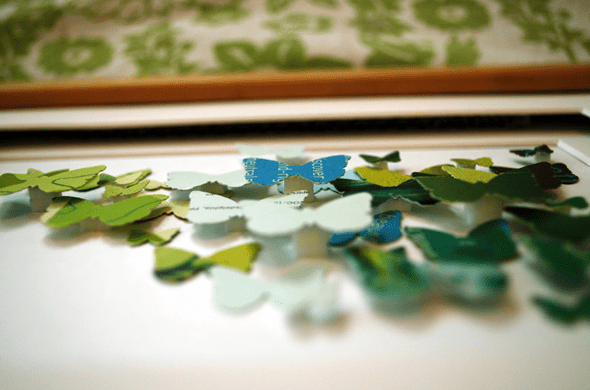
And several wall compositions in which butterflies are used for decoration, made from different types paper.


Another option with a large butterfly...

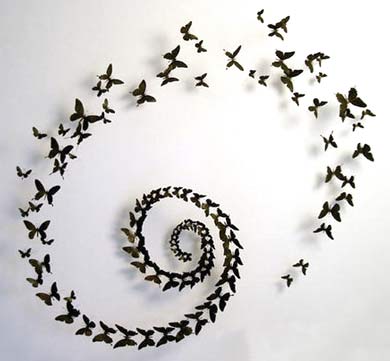
Colorful tornado...


The main thing is to find a bright picture and even a simple silhouette will look great
Decorative items and compositions play an important role in creating a cozy atmosphere. But not always and not everyone may have enough money to adequately decorate their home with expensive decorations. Creating such interior items with your own hands is often the best way out of the situation; moreover, such handicrafts bring a lot of pleasure - both in the process and in the end result. Today, moths and butterflies have become a popular type of home decoration. These creatures fluttering along the walls are capable of causing a mass positive emotions, reminiscent of beautiful sunny days. We will devote our article to an overview of the various possibilities for decorating walls with butterflies yourself, and will also consider methods for making them.
Wall compositions from butterflies
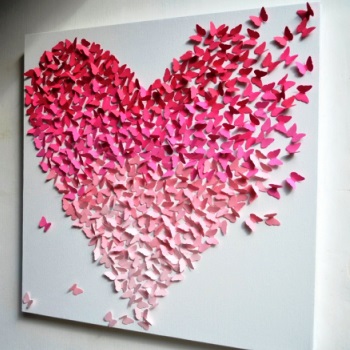
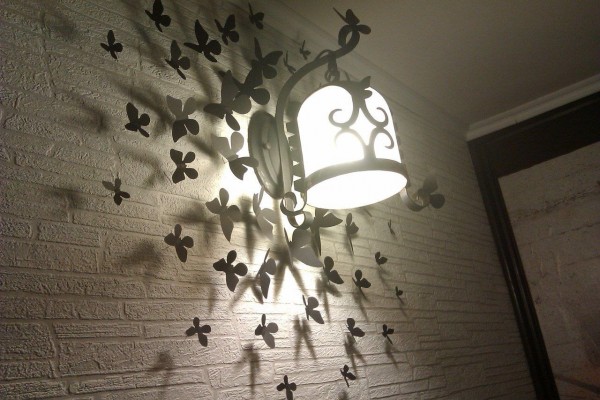
Butterflies in the interior of a particular room can be presented in different ways: they are placed in the form of panels, scattered in chaotic or ordered compositions, and used to decorate certain areas (for example, around lamps, artificial trees etc.) or paint on the walls, often using luminous paints. Just look at the photo beautiful panel in the shape of a scarlet heart made of butterflies, you will immediately want to place this romantic composition in your bedroom.
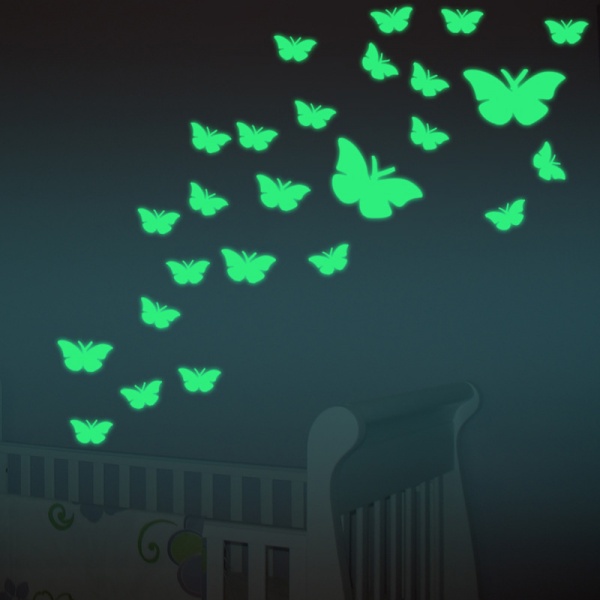
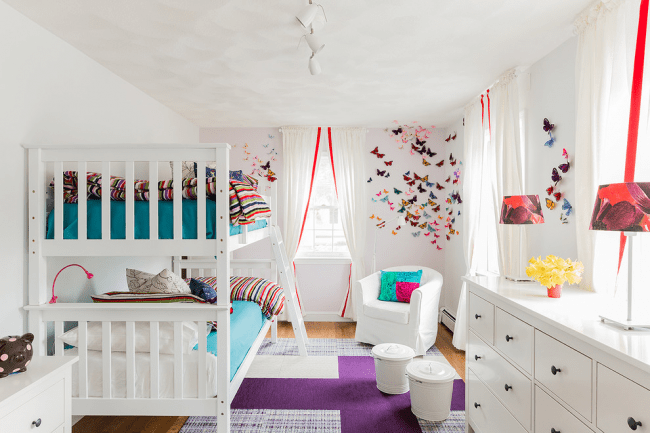
The advantage of decor from moths is their ability to complement the interior of any room, regardless of its functional purpose and style present. It is important to choose the right color scheme so that it matches overall design. For example, on beige wall Red or green moths will look great, and black ones on white. In the children's room you can create multi-colored pictures of butterflies fluttering merrily over the crib, and in the living room you can decorate an empty wall with a swirl of plain butterflies.
Glowing moths created using special paints look incredibly beautiful. In the evening they become original decoration rooms, enlivening it and filling it with mystery.


DIY butterflies on the wall: manufacturing methods
If you decide to decorate your apartment with such decorations yourself, we suggest you familiarize yourself with in various ways making butterflies. Although the work will require some expense, time and perseverance, the result, believe me, will undoubtedly please you. To make the composition look more natural, it is better to make moths for it different forms and sizes, using templates that you can draw yourself or take ready-made ones from the Internet.
How to make butterflies from paper and cardboard
The easiest way to make paper butterflies. To do this, you can take white sheets and decorate the winged beauties at your discretion, or get a set of colored paper. Advantage of this material lies in the ease of working with it, so it is quite possible to involve a child in its production by decorating, for example, a panel of butterflies in a nursery. In addition to paper, you will need supplies such as scissors, templates, pencils, and PVA glue (for bulky items).
There are two ways to make a paper butterfly. The first one is to take ready-made template and use it to transfer the outline of the moth onto a sheet of paper and cut it out using scissors. The second method is simpler. First, cut out a square (rectangle) from paper, fold it in half, apply a half butterfly template to the fold line, trace it with a pencil and cut it out. Then we unfold it and get a beautiful moth. The advantage of butterflies cut out of paper is their airiness - if a slight draft blows, their wings will move as if they were real.
You can make the butterfly wings more elegant by cutting them out using nail scissors or stationery knife pre-drawn internal parts. To make a lush butterfly, cut out two identical blanks from paper of different colors or the same one, and then glue them together. In this case, the lower plane - the base - can be simple, and the upper one can be decorated with patterns or cutouts. Double-sided tape is used for fastening.
The cardboard butterfly is also cut out in two ways - using a full or half-template. As a base, you can use not only ordinary colored cardboard - multi-colored moths cut out from old postcards and magazines look beautiful.


Corrugated paper butterflies
One of the successful ways to make a three-dimensional butterfly is to use corrugated paper. To do this, you additionally need to prepare a needle and thread. On sale you can find material of various variegated colors and create a real colored butterfly cloud.
First you need to cut out a strip of paper measuring 7x10 cm (you can use other sizes depending on the desired size of the butterfly). Using a needle and thread, we form an accordion in the central part and tighten it, as shown in the photo. We fold the resulting side panels, connect them and, slightly stretching them to the sides, get rid of the folds - we have two wings, which now need to be given a beautiful wavy shape. You need to cut out two wings at the same time, not forgetting to also select areas for the antennae. In this case, templates are not needed - you can give the shape at your discretion.
At the final stage, we unfold and straighten the workpiece, and twist the antennae with our fingers. The butterfly is ready!


Paper origami butterfly
A beautiful, voluminous butterfly can be made using the origami technique. Making it is a little more difficult than in previous cases, however, when you make a couple of these beauties, things will go much faster. Beginners need to take advantage of schemes for such work, of which there are quite a lot on the World Wide Web, and be patient and persevering. The art of origami does not stand still, constantly evolving, so there are various ways to fold butterflies - from simple to modular, capable of moving wings, etc. Since we are learning how to make an origami butterfly for wall decor, you can use a simplified technique.
First you need to cut out a paper square, bend it along possible diagonals and twice through the center. Opposite sides fold it, and bend the lower corner tops, turn them over - you get a double triangle. We bend its tip so that the tip is located above the entire part, after which we wrap it and fold it in half along the central guide. On final stage fold the part twice. When making a voluminous butterfly in this way, you do not need to intensively smooth out the folds.


Making butterflies from fabric
Knowing the origami technique, you can make a magnificent butterfly from fabric. To do this, you will need two rectangular pieces of different fabrics of the same size. We sew them together along the perimeter - we get a base fabric, from which, following step by step diagram, presented below, we form the product. To fix all the necessary folds and the final structure, use an iron. Butterflies made of fabric will be an excellent decoration for the room. You can use materials of various colors and structures, including tulle and lace.


Butterflies from tin cans
If you have empty drink cans, don't rush to throw them in the trash - they can be an excellent material for making shiny winged beauties. Use scissors to cut top part and the bottom of the jar, cut it in half, obtaining a base sheet. Next, we will use the template and apply the image of the moth to the surface, cut it out, giving the edges a wavy appearance. To prevent the wings from curling, you can give them a corrugated finish by making longitudinal indentations with the blunt side of a knife or scissors. The resulting blank is decorated using multi-colored markers.

DIY glowing butterflies
Glowing moths look amazing and excellent in the interior, capable of charming with their mystery in the dark. In this case, their images will be applied to the wall using phosphor paints. To get the glow effect, you need to make sure that there is some kind of light source next to the decor.
So, for work you will need paints of different colors, a sponge, a brush, spray glue and stencils. First, we prepare stencils of future moths from cardboard and glue them to the wall. We wrap a piece of sponge to a brush and use this simple tool to decorate the butterflies. To better understand which paints will look best, it is better to carry out work in twilight. After application, you need to wait a quarter of an hour and remove the stencils. The paints will dry completely in two hours, after which you need to trace the contours with a pencil. To “revive” the composition, you can apply additional strokes of paint near the wings. The decor is ready. Let's turn off the lights and admire the beauty of our glowing, fluttering moths.


Butterflies on the wall - decor photo
In conclusion, we suggest visiting our photo gallery. Here we have tried to collect best examples decorating the apartment with compositions of butterflies. We hope these creative works will bring you a lot of pleasure and inspire you to create your own wall decorations. Enjoy watching!
The idea of decorating living space with butterflies is not new, but thanks to the indefatigable imagination of designers, it comes to life in new forms, techniques and colors. It was in childhood that we “dabbled”, cutting out butterflies from colored paper or making them from my mother’s nylon tights, and designers went even further; in the process of making such a decorative element, tin cans, vinyl records and genuine leather are used.
Can butterflies play a primary role in the interior and be the main accent? The answer is yes, they can! Let's get to know them better and find out how to use decorative butterflies in the living space of a house or apartment.

Decorating the interior with butterflies
Fluttering butterflies symbolize lightness of being, renewal and joy. They remind us of the sun, summer, green lawns, and this makes our souls warm and cheerful. Isn't that why cold winter or on a chilly autumn evening your hands reach out to make a few butterflies and hang them on the wall? But we’ll talk about how to make them later, but for now let’s see how designers propose to use this element in decoration.
To decorate the interior with butterflies, the walls of the room are most often used. Take, for example, the butterfly pendant. Translucent moths hanging on the thinnest threads are moved by a light blow of wind or by the air flow of a person passing by. They bring in living room a certain dynamism and a feeling of the presence of someone nearby, albeit invisible, but quite tangible. Today you can even find them in stores lighting fixtures with suspended fluttering butterflies or made entirely of them.


If “flying” butterflies are not your option, then pay attention to those specimens that are rigidly attached to the wall or on interior items and do not move their wings. They can be made of paper, plastic, fabric and attached to the wall using double-sided tape or pins.


Or here’s another option - decorative ones in the shape of butterflies can be glued not only to the wall, but also to furniture, doors, and other objects. Bright, vibrant creatures will enliven the interior and give it expressiveness. You can complement the created image with various accessories in the shape of butterflies: these can be watches, chairs, all kinds of lamps or .


Not only artificially created moths are used to decorate walls with butterflies; in the interior design of residential and non-residential premises, dried specimens are often used, which are arranged in groups in frames on the wall. These are entire collections of once living insects, grouped according to special characteristics, forms and types.
In any case, no matter what decorative butterflies you hang on the wall, the moths will look better in “their own” space, surrounded by bright colors and light floral scents. Let some naughty shades into the room, decorate it not only with fresh flowers, but also with their images on the wall and furniture - believe me, there will be no place for sadness and sadness in such an interior!


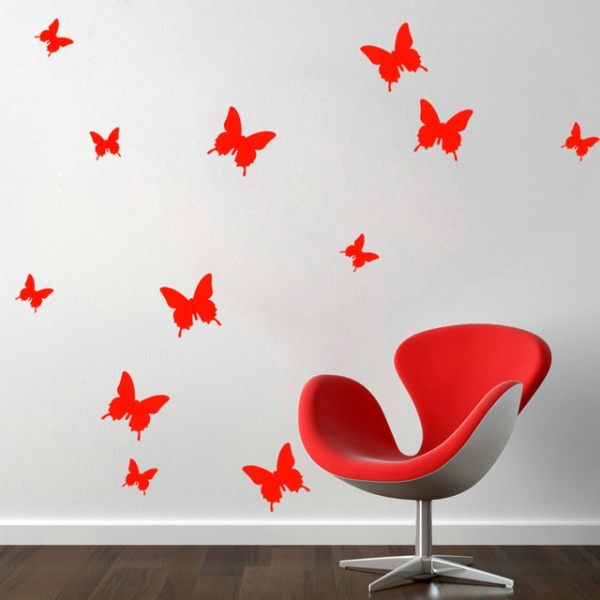
Use a game of contrasts - place butterflies on light walls dark colors and vice versa. Colorful bright moths look beautiful in monochrome interior, for example, red butterflies on gray walls. Such decor, made in a single design, will give a special chic to the living space. color scheme For example, use only red or only blue butterflies.

Decorative butterflies on the wall

How to make butterflies on the wall
Butterflies and feng shui
For many peoples, butterflies symbolize a happy and carefree existence, love and prosperity. But followers of the Chinese teachings of Feng Shui give butterflies a special meaning - in their opinion, moths are a talisman of love and joy.
This fact will be especially interesting for single people looking for a soul mate. By hanging voluminous butterflies on the wall in, you can hope in the near future for a romantic meeting that will develop into serious relationship. But also married couples You shouldn’t neglect this talisman either, it will help strengthen the union and family happiness, will bring a new spirit to intimate life spouses. As an idea, you can use it in the shape of a butterfly.


Butterfly interior stickers
How to position the moths correctly? You need to attach the butterflies to the wall or ceiling as naturally as possible, so that it seems like a swarm of moths that accidentally flew into the bedroom window. Place them randomly, without measuring the distance between them to the nearest millimeter, and be sure to use butterflies of different sizes, even if there are both large and small individuals. As an option, you can hang a panel with a flock of butterflies at the head of the bed.

Making butterflies with your own hands
Paper butterflies are used most often in the interior, let's make several copies and decorate the room with them? For this we will need a butterfly pattern and colored paper (it is better to take double-sided paper). So, we decide on the size of the future moths, cut out the squares and fold them in half. On each half of the square, draw the outline of half a butterfly and cut it out. All! Our butterflies are ready. How many of them you need to make depends on the composition you choose; for one, a dozen paper insects will be enough, and for another, five hundred pieces will not be enough.


So, we figured out how to make butterflies on a paper wall. Now let's see how they can be made from bottles? For this we need plastic bottles various sizes (including transparent and dark), patterns (with contours of spots on the wings) and acrylic paints.
We place a paper pattern inside the bottle and use a marker to transfer onto the plastic not only the external outlines of the butterfly, but also the outline of the spots on the wings, which we will later paint in different colors. Next, use scissors to cut out the resulting butterfly along the outer contour and begin to paint the spots on the wings. It is better to do this undiluted thick acrylic paints- this way they will fit better on the plastic.

Agree, butterflies on the wall, made by yourself, have more “power” than those bought in a store, because part of the energy and warmth of your hands is transmitted through them. And if with fashionable direction“handmade” you are not at all friendly and cannot make moths yourself, then just transfer their image to the wall. This is easy to do - you just need a butterfly stencil and paint.
We apply the stencil to the surface and carefully, using a roller or sponge dipped in paint, apply the image to the wall. That's it! It is not at all necessary to open the resulting picture with varnish. And if you take luminescent paint, you will get gorgeous glowing butterflies on the wall.
Content
You can update your bedroom, give it some romance or freshen up the nursery, or decorate it for the holiday with the help of butterflies on the wall. Decorating with butterflies gives the room a coziness, a feeling of celebration and does not require large expenses. There are a lot of options for decorating walls, and in this article we will look at the most popular and original ones.
Paper butterflies-beauties
The simplest and economical option make paper butterflies on the wall using any paper you can get your hands on. We will need:
- colored paper or self-adhesive film;
- cardboard;
- scissors;
- tape or glue;
- pen or pencil.
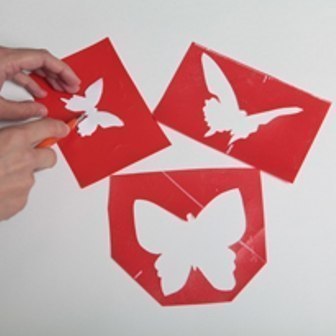
We will apply a stencil on the cardboard; you can create several different in style and size.
Now, using a stencil, transfer the outlines onto colored paper or sticky film. You can glue beauties from plain paper with tape, glue, or attach them with needles. Distribute them in a chaotic manner or use them to form a heart or the same butterfly.
Butterflies on the wall in the photo in the shape of a heart:

By the way, to wall panel looked the most original, cut out not symmetrical, but slightly uneven marigolds, i.e. nothing bad will happen if the wings on both sides are slightly different, in general, if there is some asymmetry.
In general, for applications in the form of these wonderful insects, you can use everything that comes to hand: printing paper, wallpaper scraps, fabric, plastic bottles, tin cans, colored cardboard and even vinyl records.
Decorative butterflies made from plates
There are probably old records lying around the house that you certainly won’t listen to, or ones that are no longer possible to listen to due to their old age. So these will make excellent wall moths.
To do this, you will again need butterfly stencils for the wall, plates, chalk, sharp scissors, and an oven.
Using the template, transfer the contours of the moth onto the plate, touching its center.

The plate should be placed on foil, placed on a baking sheet and placed in a preheated oven on the top rack. Very quickly the plate will become pliable, then you need to take it out and try to quickly cut the workpiece.
Now the wings need to be slightly bent, and now the blank for wall decor is ready. Make as many of these beauties as possible, in various sizes, and distribute them around the room.
Retro wall with butterflies
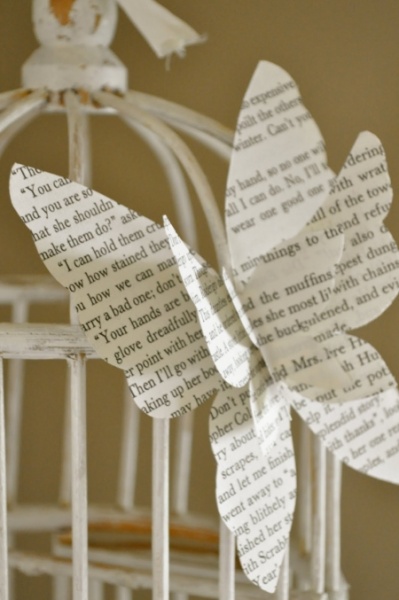
Paper fluttering from old books and newspapers will fit chicly into the retro interior. What you will need:
- old books and newspapers;
- scissors;
- glue;
- white paint;
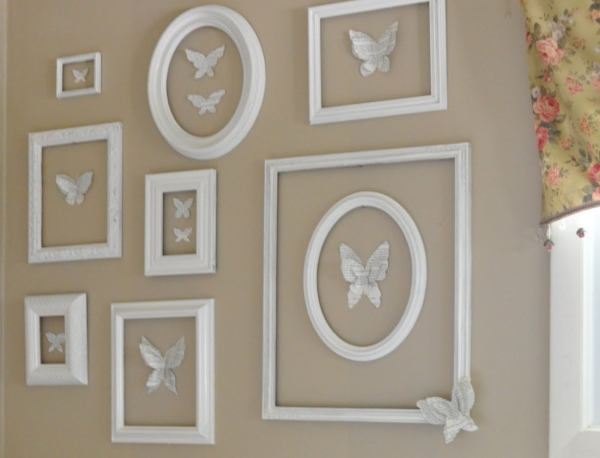
- photo frames of different shapes.
From old issues and books you need to cut out blanks of different shapes and different sizes. Then several blanks of different shapes need to be glued together with little bodies to get this composition:
The prepared frames need to be painted in white and place it on the wall. And place the moth in the frames. It looks very cozy and stylish.
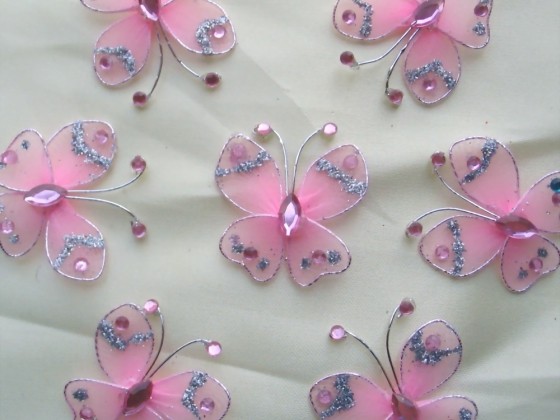
Nylon tights will help you
What just doesn’t go into use folk art. So the butterflies in the interior can also be made from multi-colored tights. What is needed for this:
- wire;
- tights;
- needle nose pliers;
- beads for decoration.
As you may have guessed, you need to create the frame of the future swallowtail from wire. Now this frame needs to be covered with a piece of tights. Make sure that the frame does not fall apart, tighten the material tightly. When the base is ready, you can stick beads on it or decorate it with fabric paints.

For the composition, you need to make at least 15, or even 20, such swallowtails. You can take children's nylon tights and any other suitable transparent fabric, the main thing is that it can be easily tightened.
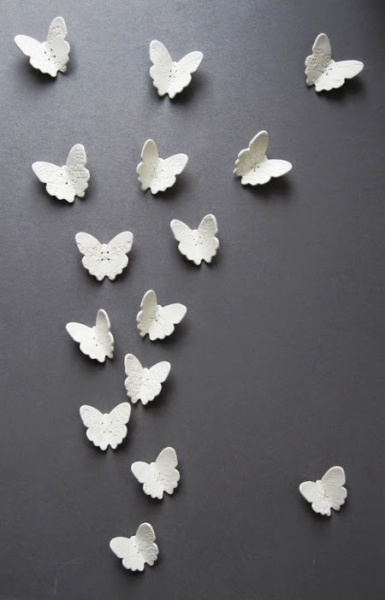
Butterflies made of clay or plaster
You can make your own butterflies on the wall from ordinary polymer clay, which is sold in a craft store. Plaster of Paris will also work.
Take the clay, roll it out slightly, not too thin, but not too thick, so that the moths look graceful. Now use a baking mold to mold the blanks. You also need to make a hole in them so that you can hang them later. We send the blanks to the oven to simmer.
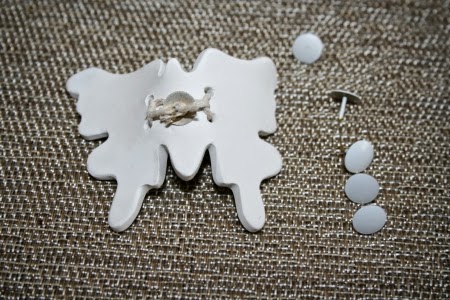
When all the beauties are ready, you need to thread a decorative ribbon or any suitable rope into them and place them in the interior. Pushpins are also suitable for these purposes.
Glowing butterflies
How to decorate a room with glowing fireflies? Prepare the following materials:
- special phosphor paint;
- stencils for butterflies on the wall;
- sponge;
- brush.
Prepare several stencils. Let each have its own example.
Now the stencil needs to be attached to the wall with glue. And then you need to apply paint using a sponge.
You can apply several colors at once to get a 3D effect.

Place natural beauties randomly, as if they were a flock of fireflies that had just taken off. This decor will fit wonderfully into a children's room, especially for the youngest children, who will look at everything around them with joy and interest.
Openwork butterflies
Openwork and perforated paper butterflies look gorgeous. And they're pretty easy to make.
To make the workpiece neat and elegant, it is better to print the stencil in advance.

Now prepare the basis for the future openwork - photo paper, colored double-sided paper or bright leaves from glossy magazines will do.
A sheet of paper should be folded in half and placed on some kind of stand, maybe on plywood. Better secure it with tape to prevent fidgeting.
Now you need to attach your template and carefully, using a pencil, transfer the contours onto paper.
Then, using a utility knife, carefully cut out the openwork wings. Then, using nail scissors, cut out the openwork itself.
The more blanks of different sizes you cut out, the more amazing and impressive the panel will look in the interior. In addition, you can decorate the wall with butterflies, either plain or multi-colored, bright, cheerful.
Volumetric panel of butterflies on the wall
Another technique for 3D butterflies on the wall. To work, we will need a familiar set: glossy multi-colored paper, old magazines, scissors, a stencil, glue or double sided tape, foam rubber
First you need to cut the magazine sheets into strips. The stripes should be the same width as the future insects.
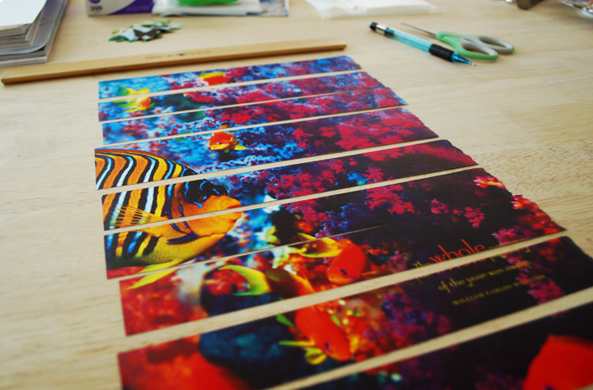
Let there be stripes different widths, so that the templates do not turn out the same.
Now, using a stencil, draw the contours of the butterflies to cut them out of the prepared paper.
In order for the composition to truly create a 3D effect, on the workpiece, with reverse side, you can stick a piece of foam rubber.
Now you can safely glue your bright insects to the wallpaper or you can make a composition in a frame.
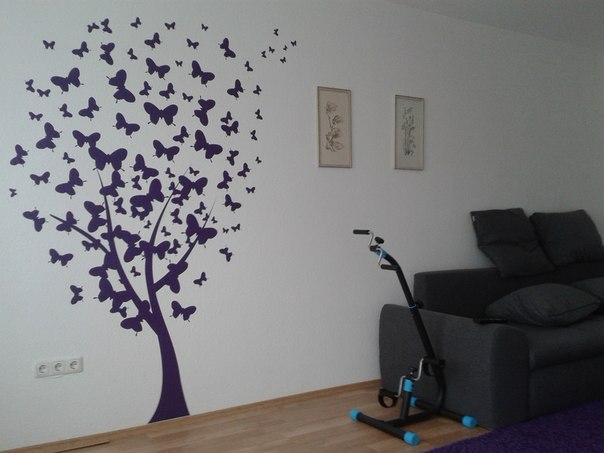
It is believed that butterflies should be literally in every home and in every room, because they bring positive energy and put you in a positive mood. But, as with everything, the main thing is not to overdo it; try to create different compositions in advance so that they look harmonious and impressive. For example, a tree with butterflies:
Or moving from one wall to another and to the ceiling:

By the way, with the help of this technique they make a conditional division of the room into different zones: it turns out to be very original and inexpensive.

Don't forget about origami
Origami can be a successful way to decorate the interior with butterflies; this art should not be dismissed. The main thing is to master the creation technique and that’s it, consider it beautiful and original wall you already have. We offer the following butterfly patterns:

These beauties can be immediately glued to the wall using tape, or you can make a hole in each one, thread a thread and make a floating composition. Place the beauties on at different levels and distance, then the composition will seem more voluminous.
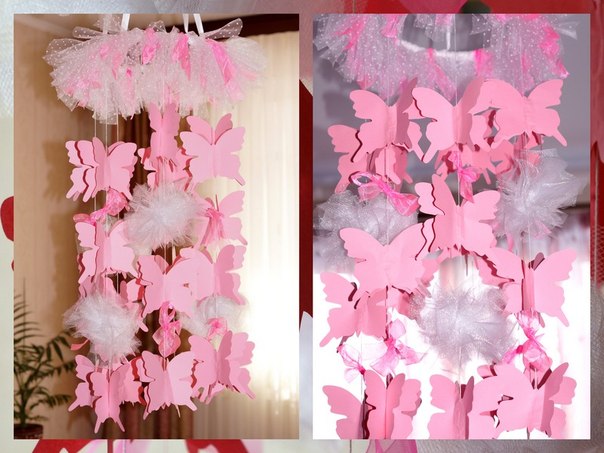
By the way, a similar composition can be created from openwork. You already know how to make them. There is nothing complicated about this, connect the butterflies as if you were decorating curtains from threads. You can also use a wooden ring, to which you need to tie strings with pre-attached decorations, you will get a kind of chandelier.
When decorating the interior, do not focus only on the wall, because the decor can be placed on the ceiling, on furniture, along the stairs, on mirrors, curtains, windows and even on the floor.
Remember about the combination of colors in interior design: if the room is made in pastel colors, then butterflies can play the role of a bright spot, but if the interior is rich, “active,” then monochromatic, perhaps even muted tones, will do. Cabbage pots of the same color look very stylish in combination with some decorative elements or furniture.
They also look wonderful in a children’s room, and it doesn’t matter whether the room is a girl’s or a boy’s. Believe me, everyone loves butterflies. It will be especially nice if you involve the children themselves in creating the decor. It's an amazing time.
Mobile made of tin butterflies
A unique mobile of cabbage bowls made from tin cans will look impressive.
So, using a stencil or by eye, if you have filled your hand, try to evenly cut out the beauties from tin cans. Then each workpiece must be attached to a wire, which, in turn, must be secured to the wall. The effect will be amazing when, from a light breeze, the butterflies will flutter as if alive. A little advice instead tin can you can use foil or you can combine these two materials.

And this is what a whole panel looks like - decorating the walls with butterflies:

For more clear example, we invite you to watch a video master class on creating these charmers and an equally charming applique on the wall from blanks:
Post Views: 85