Do-it-yourself small house for Barbie. DIY plywood dollhouse: diagram and step-by-step instructions
Every little girl dreams of her own dollhouse. Nowadays you can find a lot of them in stores, but they are all of the same type and expensive. From this article you will learn how you can make an original dollhouse without spending big money. Such a house will become unique, the child will be able to furnish it the way he wants. Your whole family can have a great time creating their own masterpiece.


Popular master classes
There are many different workshops on making dollhouses. The materials used are very different: wood, plywood, drywall, laminate, boxes, bookshelves, document folders. This is by no means a complete list of materials offered.
The front wall of the house is either not made at all, or made in the shape of an opening door. This is necessary for the convenience of the game. We invite you to choose what suits you and get to work.
From plywood, laminate
The option of making a dollhouse for girls from wood is one of the most popular. The undoubted advantages of such a house are its strength and durability. It is easy to decorate both from the outside and from the outside. inside. However, for making wooden house will need male help.


If the house is built with high quality, it will be indistinguishable from the one purchased. You can make the drawings for building such a house yourself, or you can use ready-made ones. You can attach wheels to such a house and then it will become mobile.

What will be needed:
- Laminate or plywood, it is better to choose a thickness of at least 7 mm;
- jigsaw;
- glue – wood glue, PVA;
- self-adhesive film, which we will use to cover the floor in our house;
- wallpaper, they are useful for covering walls in rooms;
- simple pencil;
- roulette.
 Approximate drawing of a plywood house
Step by step instructions:
- We cut out the walls of the house from sheets of plywood, according to the dimensions in the drawing.
- We mark where the windows and doors will be located and cut them out.
- Using wood glue, we assemble the structure as shown in the figure. You can use small nails to secure the structure.
- Make a roof. Cover it with corrugated cardboard and paint it to imitate tiles.
- Glue ready house on a piece of plywood larger in size than the floors in the house. This will give it more stability. You can make a lawn on the plywood that remains on the sides of the house.
- Now we cover the walls in the rooms with wallpaper, and the floors with film.
- We arrange the furniture.
- We decorate the interior with textiles: curtains for windows, rugs, tablecloths for furniture.


Watch the next video for a master class on making a dollhouse from plywood.
See the necessary drawings from the video below.


From plasterboard
Many of us, after renovations, are left with pieces of drywall that are no longer needed. Why not put them to work and please your little princess? You can make a wonderful dollhouse out of it.
A house made of plasterboard has a lot of advantages, including: ease of working with it, its lightness. Even if you don't paint the walls of your house after assembly, they will still look neat thanks to it. white color. A significant disadvantage of such a house is its fragility. As soon as you put a little pressure on any part of the house, it will immediately break.
In order to make a house from plasterboard, you can use the diagram given above, or you can simply make cross-shaped partitions to save space in the nursery. These partitions will separate the rooms from each other, external walls and there will be no roof.


From large sheets plasterboard can be made into a full-fledged one beautiful house. Watch the master class in the next video.
From foam plastic
If you have sheets of packing foam lying around the house, you can build a house out of them. To work you will need:
- foam sheets;
- glue gun;
- toothpicks;
- wooden rulers;
- bamboo sticks;
- corrugated cardboard;
- pieces of wallpaper;
- acrylic paint;
- foam sponge;
- pieces of ceiling plinths;
- necessary accessories for the interior: pieces of carpet, curtains, furniture and everything that your imagination is capable of.
 House frame made of thin foam plastic
Step by step instructions:
- First you need to think about what your house will be like and make a drawing. To save space in the apartment, the house can be built tall.
- We cut the foam according to the drawing. It is convenient to do this with a hot knife, so the foam does not crumble.
- We are thinking about where you will have windows and doors, you can make a staircase between floors. We cut out the necessary openings.
- We begin assembling the house. Z We break the cleaners in half. We will need them to create a more durable structure. Glue the foam sheets together using glue gun, having previously connected them using toothpick halves.
- We use bamboo sticks to strengthen the floor and ceiling from Chinese napkins. We glue the sticks to foam sheets as beams. After this, the sheets intended for the floor-ceiling can be glued to the side walls.
- We glue the interfloor stairs separately. It can be made from foam plastic or wooden rulers. We use toothpicks as railings. After this we glue in the finished staircase.
- The roof can be glued together from foam plastic or corrugated cardboard. Shingles can be imitated by cutting cardboard into small pieces and gluing it, then painting it.
- On external wall you can make a balcony. We glue it together from polystyrene foam and use bamboo sticks as railings.
- Outside paint the house acrylic paints using a regular sponge.
- We cover the walls of the rooms with wallpaper and cover the floors with carpet. From ceiling plinth We cut out the baseboards and window sills and glue them. We create coziness with the help of curtains on the windows.
- We arrange the furniture, which can also be glued together from foam plastic, and we invite new residents.
 Design interior decoration At home you can ask your daughter to come up with
Home decoration can be very diverse. You can use a clear plastic box, make prints of the underwater world and place an aquarium in your home. You can print out pictures, lay tablecloths on tables, add toys to dolls. Let your imagination run wild and you will have the most wonderful dollhouse for girls.
From a bookshelf/rack
You can make an excellent dollhouse from a bookshelf or shelving unit. It’s very easy to make, because you already have a ready-made base. To decorate the house, use cardboard, wallpaper, self-adhesive paper, and wrapping paper will also work.

Involve your daughter in this creative process. She will be able to act as a designer for her dollhouse.
If the house is located permanently against the wall, then you can make the roof of the house using black electrical tape, gluing the contours. Glue the chimney in the same way. If you need to move the house to another location, you can easily peel off the tape without damaging the wallpaper in the room. You can purchase furniture for dolls ready-made or use your imagination and make it yourself.
 By placing the house against the wall, it will increase free space in the nursery
From an old cabinet or chest of drawers
Your daughter is asking for a dollhouse, but it's gathering dust in the garage. old chest of drawers? You can breathe a second life into old, no longer needed furniture. Delight your child by making a dollhouse from an old cabinet or chest of drawers . Such houses are very convenient for those whose children play with large or tall dolls.
First of all, you need to know the height of the dolls. This is necessary so that the dolls can be placed in rooms in full height. You may have to combine 2 shelves by removing unnecessary partitions. Work carefully, being careful not to break the inside walls of the cabinet or chest of drawers. In place of the partitions that we removed, a void we do not need will appear. It can be sealed with thin slats that fit in size.
After waiting for the glue to dry completely, treat the walls of the chest with putty thin layer. After this, the chest of drawers must be sanded, then it will become even and smooth. You can use a jigsaw to cut out windows.
 House from old furniture will look very solid and reliable
The last step will be decorating your house. The outside can be painted. You will most likely have to paint it in several layers to get it covered. old color chest of drawers The walls inside can be covered with wallpaper, colored, packaging or self-adhesive paper. Or you can just paint them too. We arrange furniture, hang pictures and mirrors on the walls, curtains, lay out carpets and invite dolls to a housewarming party. Now your daughter's room will always have dolls tidy!
From cardboard
Budget option Making a dollhouse is corrugated cardboard. With its help, you can create a wonderful toy that will delight your girl for a long time.
We will need:
- corrugated cardboard for the frame of the house;
- decorative cardboard for decorating a house;
- templates for parts that will depend on the size of your future house; sweeps;
- stationery: pencil, ruler, eraser, scissors;
- knife, paints, brushes, felt-tip pens;
- glue gun;
- colored, packaging and self-adhesive paper;
- textile;
- decorative elements - beads, rhinestones, stones, artificial flowers.
 A girl can independently “make repairs” in her dolls’ new house

Let's start making the house:
- If you have a large sheet of corrugated cardboard, you can apply a reamer to it. Select the dimensions based on the size of the house. If there are no large sheets, then each part needs to be cut out separately. There is no need to do the front wall.
- To make the cardboard easy to bend, you need to make a groove at the bend by running a ruler along it. If all your parts are cut out, glue them at the junctions of the cardboard.
- Cut and glue interior partitions. In such a house they are simply necessary. They will perform a load-bearing function.
The structure is assembled. You can start decorating.
It is better to cover the inside walls with decorative paper or fabric. This way you will hide the seams in the gluing areas. The outside walls can be decorated to your taste: painted, pasted over. Decorate your home with beads, rhinestones, stones or other elements of your choice. Make sure that the decorative elements adhere well to the cardboard, otherwise the house will lose its attractiveness during the games.
Arrange the furniture and invite your child to play.
 In a house made of cardboard, you can easily re-paste the wallpaper if you get tired of the old ones
See below for master classes on making a dollhouse from cardboard.
From boxes
A very easy to make dollhouse from boxes. For it you will need to choose boxes of suitable size. The size will depend on the height of the dolls for which this house is being made. The number of boxes will depend on the number of rooms you are going to make. One box - one room. Such a house can be made multi-story by gluing boxes on top of one another. This will save space in the room.
It is necessary to fasten the boxes together so that its top is on its side, revealing interior space rooms. This can be done in various ways: using a stapler, glue, double sided tape. We cut out the windows. We decorate the house according to your taste. We furnish the furniture and delight the girl with a new toy, on which you spent a minimum of money and effort.

 A cardboard house is one of the most simple options please my daughter
Watch the following master class, which shows in detail the process of making a beautiful dollhouse from a box.
It’s quite easy to make a great house out of boxes! See the following videos for more details.
From document folders
If there is very little space in the children's room, you can make a folding dollhouse.
For such a house we will need 4 document folders. We tape each folder inside beautiful paper– this will be wallpaper for the walls. Decorate the folder clip with fabric, making it into a kind of curtain. Print out interior items and stick them on the walls. The house is ready. All that remains is to open the folders and place them vertically. Add the necessary furniture.
You can make a separate room from each folder of folders.


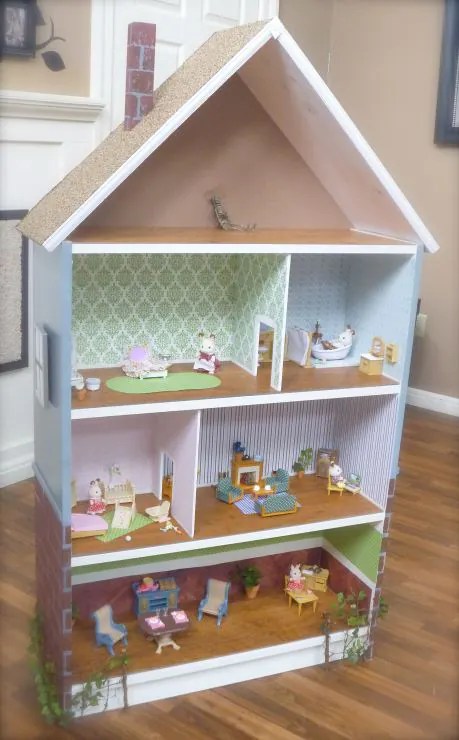
The stores offer customers a wide range of all kinds of toys, including doll houses. Every girl dreams of getting one of them, while parents can easily make a beautiful and durable house for dolls in just a few days. Moreover, the child will be able to take an active part in the process and express all his wishes regarding size and design. To make a dollhouse with your own hands from plywood, you will need a diagram that you can draw yourself or find a ready-made one on the Internet.
We make a drawing of a dollhouse from plywood with the dimensions of all structural elements
A toy house and plywood cannot be built without a detailed drawing, which will show the dimensions of all its parts. To do this, you must first determine the approximate dimensions of the future house and imagine what shape it will be.
When reducing or increasing the structure, it should be remembered that all dimensions should also be changed proportionally.

The house consists of the following parts:
- Rear wall: pentagon shaped. Its sides are 76 cm, and its base is 106 cm. The upper side is an uneven triangle, the apex of which is at a height of 91 cm.
- Gender: has rectangular shape. Its dimensions are 106x38 cm.
- Second floor ceiling: rectangle with dimensions 104x36 cm.
- Side wall (2 parts): is a rectangle 36x76 cm.
- Internal wall on the right side: rectangle 25x50 cm.
- Internal wall on the left side: rectangle 25x43 cm.
- Left side of the roof: rectangle measuring 76x39 cm.
- Right side of the roof: rectangle with parameters 45x39 cm.
How to make a dollhouse with your own hands from plywood: step-by-step guide
After cutting out parts using a jigsaw or hacksaw, you need to carefully process them sandpaper with a fine spray, and then proceed to assembly. At this stage, windows of arbitrary sizes are cut out and also carefully processed with sandpaper.

Making a house step by step:
- The side walls are attached to the base using self-tapping screws and construction adhesive, and then the ceiling of the second floor and internal partitions.
- The roof is being installed.
- Decorative tiles made of cardboard, colored paper or other materials are glued to the roof.
- Next, the house is painted with paints (acrylic, gouache, watercolor);
- The rooms are covered with wallpaper, fabric, film.
- The floors are covered with pieces of linoleum, laminate, carpet, and felt.
- Furniture and interior items are being placed.
Near the house you can make a small garden, placed in a box, in which trees cut out of cardboard will grow.
If the parts were not cut too smoothly and a gap has formed between them, then it can be covered with wood putty and then painted over.
How to assemble a plywood house for children with your own hands quickly and easily
A small plywood house designed for games will appeal to any child. After all, he will have his own personal space there. It is not difficult to assemble such a structure yourself if you first make drawings and cut out the parts.

What you will need for work:
- Sheets of plywood, the thickness of which is at least ten millimeters. The required quantity can be easily determined by adding up all the areas of future parts.
- Timber for the frame measuring 40x40 or 50x50 mm.
- Plexiglas or plastic for windows.
- Door awnings.
- Finishing materials (wallpaper, non-toxic paint, putty).
Blanks are made from timber and plywood and sanded with sandpaper until completely smooth. The frame is assembled from timber, and plywood blanks are attached to it. Next, windows and doors are installed. Then the house can be painted outside and inside or covered with wallpaper. Furniture is brought in. You can make decorations from leftover plywood and install them around the house. The children's playhouse is ready.
The fastening elements must be hidden so that the child cannot be injured.
We make a castle from plywood with our own hands: drawings and recommendations
Plywood is one of the easiest materials to process, so it can be used to make not only simple houses, but also beautiful castles for princesses and knights. To do this, you need to be patient and carefully draw every detail of the future castle. The drawings are made in a similar way to the drawings of a doll's house, but towers, balconies and terraces are added to the details. There are a lot of interesting models on thematic sites that are easy to build yourself.

Tools required for work:
- The pencil is simple;
- Ruler (simple and curly);
- Jigsaw;
- Screwdrivers or screwdriver;
- Hammer;
- Sandpaper;
- Tassels;
- Fastening elements.
You can use ice cream sticks to fence balconies.
Beautiful furniture for dolls made of plywood: drawings and manufacturing methods
Almost any furniture can be made from plywood. toy house: beds, tables, chairs, cabinets, sofas, shelves. The furniture made according to the drawings turns out to be quite large, so it is suitable for both Barbie dolls and baby dolls.
Furniture parts can be glued or connected with self-tapping screws and furniture nails. Basically, plywood is taken, about 4 mm thick.

What you need to make furniture:
- Pencil and paper;
- Hand jigsaw;
- Fine sandpaper;
- Liquid nails or wood glue;
- Paints and varnish.
When assembling small furniture, it is better to use glue, because fasteners can damage the parts.
For all furniture parts, you first need to draw and cut out a template. Then trace it on the plywood and cut out the structural elements with a jigsaw. The edges are sanded. The parts must be connected to each other, and then painted and varnished or covered with fabric using a stapler.
Making a house out of plywood for a doll with your own hands (video instructions)
You can make durable and beautiful toys from plywood that will delight your child for a long time. If you have drawings, free time and a little patience, this will not be difficult even for those who do not have any skills in this matter. And by showing your imagination, you can create real masterpieces that will cause surprise and delight not only in the child, but also in those around you.
Every girl loves to play with dolls. Today, dolls such as Barbie, Monster High, Brats and others have become very popular. Playing with such dolls completely reflects real life. What does it mean? This means that the dolls should have everything like you and me in real life– house, furniture, household appliances, a lot of clothes and accessories, a personal car, a husband and many children.
Nothing has as many problems as a dollhouse. By the way, in real life similar problems, don't you think? The point is that doll houses They are sold in children's toy stores, but their prices are quite high, which means that not everyone can afford to make such a purchase. Dollhouses that are sold in stores and markets are most often made of plastic, which does not make them particularly strong and durable.
 The news portal “site” in this article will offer you several options for creating a first-class dollhouse. Believe me, your child will be simply happy.
Do-it-yourself dollhouse from a bookshelf
 Remember the bookshelves that hung on our walls in our distant childhood? They are probably still hanging, or maybe they have already taken their place of honor somewhere in an old garage or country house. It's time to breathe some life into the old bookshelves. new life.
 You need to thoroughly clean the old bookshelf from dust and dirt, and if necessary, cover it with paint or varnish.
Use two pieces of chipboard to build a roof for the house and use screws to secure it on top of the bookshelf.
Make the back wall from a sheet of plywood.
That's it! Dollhouse ready for your girl! All that remains is to do the most interesting and enjoyable thing - repairs. Pieces of wallpaper or decorative paper glue it to the walls, put scraps of linoleum on the floor or glue decorative adhesive paper, furnish everything with furniture and hang curtains.
 If you have the opportunity and necessary tools, then in a dollhouse you can make windows, build stairs and make doors.
From ordinary wooden ice cream sticks you can build a dollhouse fence around the house.
 A very modern and unusual dollhouse can be made from bookshelves, which were closed with glass or wooden doors.
By placing one shelf on top of another, and tightly fastening the shelves together with screws, you can get not only an ultra-modern dollhouse, but also small area around the house. In this area, the child will be able to organize a pool for the doll, have doll picnics, and even park the doll’s car.
Do-it-yourself dollhouse from a cardboard box
Do-it-yourself dollhouse from a closet
 If there are no bookshelves, then you can make a dollhouse from any small cabinet.
The roof may or may not be attached. Windows can be made by gluing regular stickers to the cabinet doors.
What's so good about this dollhouse is that there will always be order in the children's room. The doors in the dollhouse are closed and the toy mess that children often create when playing with their dolls is not visible.
When the child grows up, the dollhouse can again become a full-fledged cabinet where books or items of clothing can be stored.
As you can see, it’s not at all difficult to make a real dollhouse with your own hands. Therefore, there is no need to rush to spend big cash, purchasing plastic doll houses, which break easily and do not provide the opportunity to develop a child’s imagination.
The news portal "site" will be glad to congratulate you and your child on your doll housewarming!
Childhood is the most beautiful and carefree time. A time when you can and should believe in miracles. And every parent strives to do everything to ensure that their child lives this wonderful time like in a fairy tale. And that no matter how much a do-it-yourself dollhouse is made, it can bring this fairy tale to life. And if you also involve your child in the process of creating it, then this, in addition to developing his imagination and fantasy, will instill in the child such character traits as independence and hard work.
Lesson on creating a dollhouse for girls
Measurements:

51 1/2" high 45" wide 12 1/4" deep
You will need:
- 4 pieces - 1x12.8ft
- 1 piece - 1x4.4ft
- 1 piece - 1x2.8ft
- 1/4″ sheet of plywood (45″ wide x 51 1/2″ high, cut to house shape. Vertical rails are 38 1/2″).
- 2 inch - screws
- 2 inch – upholstery nails
- Wood glue
- Wood filler
- Sanding paper 120
- Primer
- Dye
- Brush
Tools: tape measure, glasses and earplugs for protection, drill, circular saw, miter saw, nail gun, grinding machine
Cut out:
A) 2 – 1×12, 38 1/2″ (top side, 30 degree angle)
B) 2 – 1×12, 12″ (Lower vertical partitions)
C) 3 – 1×12, 42″ (Internal partitions)
D) 1 – 1×12, 17 1/2″ (Upper partitions, cut at an angle of 30 degrees)
E) 2 – 1×4, 1 1/2″ (Side stand)
F) 1 – 1×4, 45″ (Front stand)
G) 2 – 1×12.27 1/2″ (Top side at 30 degree angle)
Measurements for windows and doors
H) 6 – 1×2.4″
I) 4 – 1×2, 4 3/4″
J) 4 – 1×2, 10 1/4″
1: Cut out the pieces according to the measurements shown above. Using the diagram as a guide, cut off the corners. Unless otherwise directed, use 2-inch nails and glue to join the pieces together.

2: Windows and doors (A). Using the diagram as a guide, cut out the doors and windows.

3: Windows and doors. Start by constructing the window and door frames as shown above using 1 ½ nails. Then, attach the frames to the cut holes using nails. If you prefer to paint the frames and shelves in different colors, you can attach the frames at the end, after painting the house.

4: Once you've finished side A, start working on the center section. Connect board B and C with nails as shown above. Then attach D to the top shelf. Once you have pieces B, C, and D together, attach piece A to them.

5: Use 1 1/2″ nails when attaching bottom part,E,to part ,A, as shown above.

6: Stand. Attach the front lower part F.

7: Roof. Secure the roof as shown above. Nail the roof sections.

8: Cut the plywood and attach the structure back side to it using wood glue and 1 1/2″ nails.

9: Final stage. Fill the nail holes with wood filler, sand, prime and paint. And now our doll house is ready to be filled:

Boy's toy house
The following product can serve as a great place for a boy to play: we make our own fire house.

Measurements:

List of materials:
- 1 - 1/4 from a sheet of 3/4" birch wood.
- 2 - 1x2.8 feet long
- 1 - 1x4.4 feet long
- 2 inch - screws
- 1 1/4 upholstery nails
- Wood glue
- Wood filler
- Sanding paper 120
Tools:
- Roulette
- Pencil
- Mask and earplugs for protection
- Drill
- Mechanical jigsaw
- Nail gun
- Sanding machine
- Drills
List of blanks:
- 3 - 3/4" plywood measuring 15 3/4" x 15 3/4"
- 2 - 3/4" plywood measuring 15 3/4" x 8"
- 4 - 1x2.18 1/4" (Legs)
- 4 - 1x2.15 3/4" (Sides)
- 2 - 1x4, 17 1/4" (Front sides)
- 2 - 1x2.17 1/4" (Bottom Sides)
1: Saw the wood panel into 8" and 15 3/4" width pieces. As shown in the diagram.

2: From all the shelves, cut off the corners using a power jigsaw as shown above. Sand the cuts.

Note: Cut using circular saw hole in the top and middle shelves for a fireman's pole.
3: Now we cut out the door, the dimensions of the door can be changed at your discretion.

4: On the legs, mark the location of the middle tier and secure the legs as shown above.

5: Attach the internal partitions, don't use a lot of glue, but a couple of nails won't hurt for better stability.

6: Turn the structure over, base facing up, and attach the bottom trim with nails.

7: Lastly, fasten the long part; you can also attach wheels. For mobility at home.

8: Turn the structure over and attach the top trim.

9: Shape the front and back trim as you wish.

Time to paint and decorate!!!
Fill all holes (nail holes) with wood filler. Let dry. Sand the house with 120 degree paper. Vacuum the structure, removing all dust after sanding. Wipe the structure with a damp cloth and coat it with primer, and then apply paint.

Fabric dollhouse


You will need:
- Interior material: 9" x 21" and two pieces 6" x 9"
- material for the exterior of the house: (same as used for the interior) 9" x 21" and two pieces 6" x 9"
- 2 10.5"x 13.5" plastic sheet
- Padding
- Adhesive tape
- Buttons and ribbon (elastic band)
- 2 textile strips for handles
1. Cut from a sheet of plastic
three 4" x 6" rectangles, two 2¾" x 6" rectangles, two house-shaped pieces with a 4" base, 4" sides and a 2¾" roof.

The details should match like this:


2. We upholster the frame from plastic, wrapping the entire structure with electrical tape or adhesive tape. All around the perimeter.
3. Using the 6" x 9" piece, connect internal part(made of textile) with external detail. Apply these pieces to the house upholstery, and pin the material tightly to the last panel, leaving the bottom edge open.

Sew along the pin line, along the line marked with the red dotted line in the diagram. Turn it inside out front side out and put it on the part. The same thing, repeat with all panels.

4. Using the 9" x 21" piece, fold the fabric, right sides together. Fasten the panel inside and sew, securing the handles of the house. In the same way as in the first case. Leaving room for loops.
A different color material is used for the roof, but this is at your discretion. Sew the pieces together with a patchwork seam, first pinning them together.

Sew along the line from A to B, grabbing the edge of the panel, paying attention to the loops.
5. Pin the handles with pins. Sew along the line from C to D, grabbing the edges of the handles.
6. Repeat step 4 for the other long sides of the rectangle. Turn them right side out as shown in diagram 2. Roof panel 2 3/4" x 6", then walls - 4" x 6", floor panel - 4" x 6", then walls - 4" x 6", roof panel - 2 3/4" x 6") . Pin all the panels together.
Fold the open edges under and pin the pieces. It should look something like this:


7. Sew open edges, catching handles and buttonholes.
8. Make a couple of fixed stitches and remove the pins between the panels. pins.
9. Hand stitch the edges of the bottom panel to the walls and to the roof on each side.

10. Sew buttons according to the loops. Decorate the house as follows, adding windows and doors. Your mobile dollhouse is ready!!!


In modern toy stores you can find a lot of houses for dolls - for every taste and color. But parents very often make such houses on their own, showing their creativity and ingenuity. After all, in fact, making a house for Barbie with your own hands is not so difficult.
First, decide what space you can allocate for a house. Its design will largely depend on this:

Two-story house standing against the wall

Horizontal arrangement of the house on the floor

The house is open on all sides, stands on a stand
There are two options for making a house for Barbie with your own hands. The first is simpler - making a house from scrap materials (boxes, an old bookshelf, etc.). The second - more difficult - making a house from scratch. Let's consider both options.
But first of all, look in the pantry. Surely you (or someone you know) still have some materials left after the renovation: pieces of laminate flooring, scraps of wallpaper. All this is perfect for making a house. In addition, you can use scraps of rags, wooden sticks(for example, from ice cream), parts from the designer and much more.
Making a dollhouse from scrap materials
The option is quite simple and easy to handle. We will need one or more cardboard boxes or a couple of old ones wooden shelves. We glue the boxes together, decorate them with wallpaper, pieces of fabric, or simply paint them.


For the horizontal version, we will need a flat box (for example, from a TV), from which we need to cut off the top cover. From the cut lid we make partitions that we glue to the walls.

Making a dollhouse from scratch
In this option, you can come up with the layout of the house yourself. Then all the parts must be cut out of plywood or cut out of thick cardboard and glued together.
Consider, for example, the process of making such a house:

We cut out the parts from plywood (be careful, the dimensions are in inches, 1 inch = 2.54 cm. However, you can take your own dimensions while maintaining the proportions):

Don't forget about the safety of children! All parts must be thoroughly sanded so that the child does not get hurt.
We assemble the parts according to the plan.

Rear wall (A), two side walls(D), the front wall (E) is attached to the top of the base (B). The windows measure approximately 9 by 6.25 inches, except for the triangular window, which is the same width. Its height and shape of the long side must correspond to the angle of the roof (see photo of the detail drawing). Windows are cut out with a jigsaw.

To assemble the house you will need small finishing nails and a hammer. If gaps form between the parts, they must be covered with a primer.


We paint the house in the desired colors.

The inside of the Barbie dollhouse can be covered with leftover wallpaper or self-adhesive film.

We lay a piece of carpet, fleece or felt on the floor. Or maybe there is a laminate?

We furnish the house with furniture and invite your favorite doll to a housewarming party!
In addition, the Barbie house can have opening doors.