Cutting and sewing Roman blinds with your own hands: step by step instructions with photos
Simple, graceful, strict and elegant, Roman blinds will be a wonderful decoration for any style of interior and absolutely any room, whether it is a living room, bedroom, dining room, nursery or kitchen. Especially organically laconic and compact design of Roman blinds fits into the interior of the kitchen, where everything should be as convenient and functional as possible. Have you long dreamed of sewing Roman blinds with your own hands, but doubted your abilities? Step by step guide to help you! Indeed, Roman blinds are not as simple as they seem. They have their own little but very important secrets. To achieve impeccable performance, it is important to know a couple of tricks that we will gladly share with you. But still, there is nothing supernatural and mega-complicated in this matter, so go ahead with the song!
Sewing Roman shades with your own hands is easy if you follow the recommendations exactly.
Choosing fabrics for sewing Roman blinds
Roman blinds can be sewn from absolutely any fabric, from heavy curtains to light transparent tulle. But still, it is preferable to use dense, rigid materials that hold their shape well, emphasizing the beauty of the folds when assembled. When the curtain is lowered, a perfectly straight cut without draperies in all its splendor demonstrates the beauty of the ornament and the texture of the material, so for tailoring Roman curtains it makes sense to choose something really special that will please the eye and cheer up every day. Given the modest size of the Roman blind and the minimum consumption of fabric, it is quite possible to treat yourself to exclusive designer textiles. After all, this is not a curtain, but one of the most economical models of curtains, so don't go broke! From time to time, you just need to give yourself gifts!

We choose fabrics for sewing Roman blinds so that it harmoniously fits into the kitchen decor
If you want your roman to keep prying eyes out of your room while still letting in as much sunlight as possible, choose translucent fabrics. On the contrary, if your goal is to block sunlight, pay attention to light-proof black out fabrics, which are treated with a special impregnation on the wrong side. Lightproof fabrics not only do not fade themselves, but also reliably protect wallpapers, furniture and other interior items from fading.
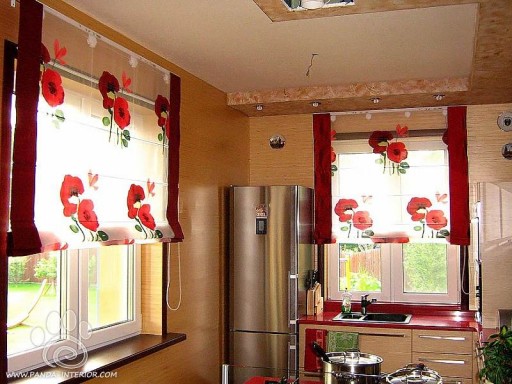
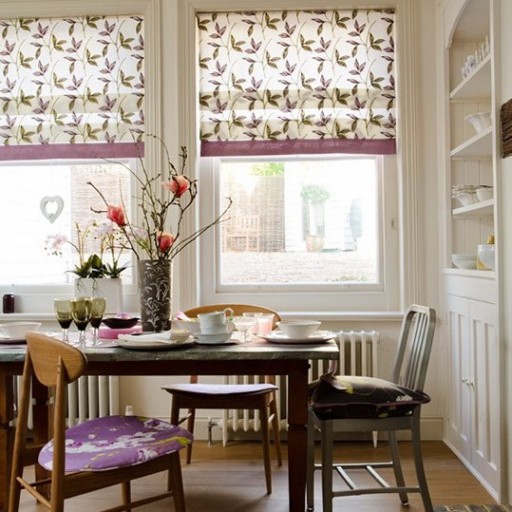
Roman blinds made of translucent fabric with a bright floral print will become a real window decoration
If you decide to sew Roman curtains specifically for the kitchen, you should approach the selection of fabric with all responsibility, because even if your kitchen is equipped with the most powerful and modern hood, you still won’t be able to completely protect yourself from steam, soot and smells of cooking food. Kitchen curtains should have dirt-repellent properties, absorb a minimum of odors, retain an attractive appearance for a long time, be suitable for frequent washing and wash well. All these characteristics correspond to synthetic fabrics. Adherents of everything natural and natural should pay attention to modern combined and blended fabrics, in which a small percentage of synthetic threads is added to cotton, linen or silk. Thanks to the admixture of synthetics, curtains made of mixed fabrics do not require careful maintenance and look like new for a long time, while retaining all the charm and soulful aesthetics of natural materials.
![]()
The blended fabric chosen for roman blinds has its own decorative merits that will showcase in the right lighting.
Please note that according to the method of tailoring, Roman blinds can be either double or single. Double is appropriate for dense colored fabrics to protect them from fading in the sun. The second option is preferred for light fabrics with a print and a white wrong side, as well as for thin translucent fabrics such as patterned organza or linen voile.
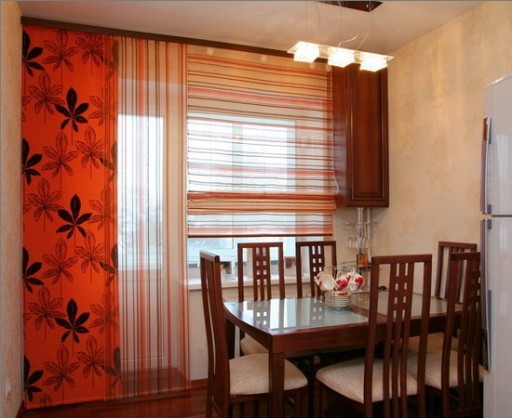
Single translucent Roman blinds on this window are part of an interesting combination of different patterns.
And, of course, do not forget, when choosing a fabric for curtains, to take into account the correspondence of the pattern, color and texture to the overall style of the interior and the design idea. Plain fabrics are the most versatile, they work great in any style. Cheerful floral and gastronomic motifs, as well as a check, will be a great addition to country, Provence or simple rustic style. Geometric shapes and abstractions will organically look in a modern or avant-garde kitchen.
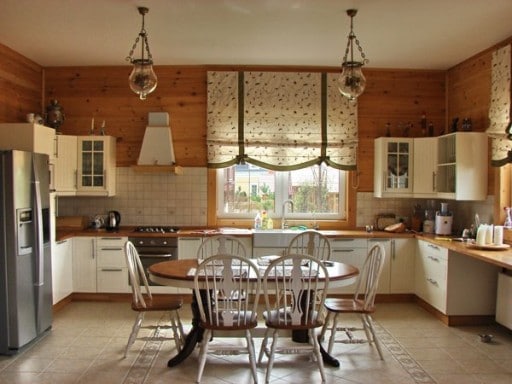
Roman curtains in the interior of the kitchen look modest, but with dignity, performing not only practical, but also decorative functions.
Determining the size of the Roman blind
Regardless of whether you sew a Roman blind yourself or to order, it should have ideal proportions and “sit” on the window like a glove. To cope with this paramount task, you need to correctly take measurements and calculate the consumption of fabric, and for this you need to decide on the method of attaching the Roman blind.
Roman shade options:
- In the window opening
The curtain fabric is located near the glass itself. This mounting option is mainly resorted to when there is a large window sill near the window - in this case, even with the curtain lowered, access to it will remain, and it will be possible to use it without hindrance. Also, the Roman blind is “let on the glass” when it does not go solo, but is used in tandem with curtains, curtains, lambrequins and other curtain designs. When placing a Roman blind in a window opening, its dimensions must match the dimensions of the opening.
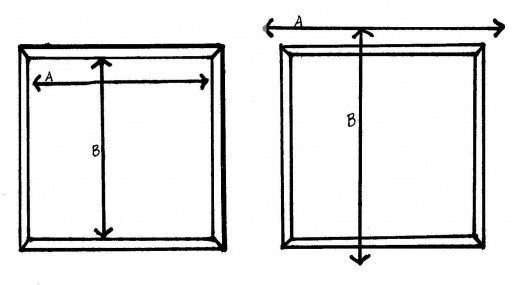
We determine the dimensions of the Roman blind, depending on the method of fastening, so as not to make a mistake when cutting and sewing
- On the wall above the window opening
The curtain fabric is attached not inside the opening, but on its outer side. This method is preferable in the presence of vents and opening sashes for ventilation, or when the window opens into the room along the entire height. In this case, the Roman blind should be 5-10 cm wider than the window opening and 10-15 cm longer at both ends. Allowances on the sides will cover the slopes with a curtain so that there are no gaps. And the allowance from below will allow you to fix the cornice above the window opening so that the curtain in the assembled state does not interfere with opening the window frame.
Master class: how to sew Roman blinds with your own hands
Roman blinds can be solid or made up of several sheets. If several canvases are provided, each curtain must be attached to a separate cornice. For beginners, in order to understand the essence of tailoring, to understand the fastening and the principle of operation of the cornice structure of a Roman blind, it is recommended to start with sewing a single piece of fabric.
An interesting pattern on the fabric is often an important decorative element of Roman blinds.
Necessary materials:
- Curtain fabric and, if necessary, lining material
- Velcro tape across the width of the curtain
- 7-8 pieces of metal, wooden or plastic pins / rods with a diameter of 4-5 mm, 3 cm shorter than the curtain width
- Small plastic rings with a diameter of 10-12 mm for each drawstring, into which cords will be threaded to lift the curtains
- Three pieces of nylon cord, each equal to two curtain lengths and one curtain width
- Weight bar
- Wooden plank or bar for hanging a rim with a section of 2.5 x5 cm according to the width of the canvas
- Nails, screws, hooks on a screw leg
how to make roman blinds step by step
1. We measure the window opening. We add 5-7 cm for the side seams and 10-15 cm for allowances at the top and bottom. Curtain height allowances are usually around 20% of the roman. Before cutting the fabric, in order not to make mistakes with the calculations and to exclude shrinkage of the fabric during the sewing process, it is advisable to decant the fabric: soak it in warm water for several minutes, dry it and iron it. The number and size of folds are determined by the height of the window and the length of the future curtain. The following table will help determine the optimal distance between the folds:

Calculating the number and size of folds for a Roman blind will help determine the best option
The ability to correctly calculate the size of each "fold pocket" is one of the main secrets of tailoring Roman blinds.
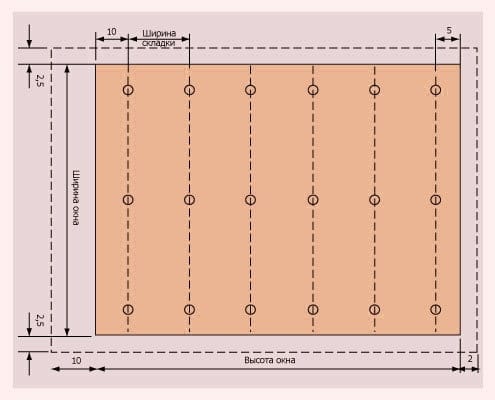
Open Roman blinds: fabric calculation scheme
2. From the wrong side, we outline the lines of the hem and future folds, as well as the places for installing the rings for the cord according to the above diagram. In order for the Roman blind to drape beautifully, the lines of future folds must be at the same distance from each other, and also be identical in width.
3. We process the side edges with a double hem. Remember to adjust the thread tension so that the stitches do not pull the sides.
4. With carnations or a furniture stapler, we nail the Velcro to the underside of the wooden block to which the curtain will be attached. We process the upper section of the curtain and sew the rest of the Velcro to it, which will allow us, as the need arises, to easily remove the rim for washing. It is advisable to pre-paint the wooden block that you will use as a cornice in a suitable color. Instead of a wooden block, you can use a lambrequin strip with Velcro, which is sold with ceiling brackets.
5. At the bottom of the curtain, we make a turn and create a drawstring, the width of which should allow us to insert a weighting bar into the formed “pocket”. As a curtain weight, you can use a flat aluminum profile 1-2 cm shorter than the cornice. For transparent or white fabrics, it is desirable to dye it white or to match the color of the fabric. You can buy such a profile at a building materials store.
6. We attach a finishing border on the wrong side of the curtain and insert the prepared pins into the pockets formed. We close the holes. In order to be able to wash the curtain in the future, we sew the edge of the drawstring only on one side so that the pins can be removed before washing, and after washing and ironing, return them back. The edges of the pins should not cling to the fabric of the curtain. The ideal option is to use special plastic rods, which can be purchased from a private textile designer. You can also use corset inserts, which are sold by the meter in sewing accessories stores. Since corset inserts are stored rolled up, we pre-cut them into the necessary segments with a small margin, heat them through the fabric with an iron with steam, and then put them warm for several days under the press until they are completely straightened. As an alternative, you can use wire, but only if we are talking about a straight stainless steel twig.
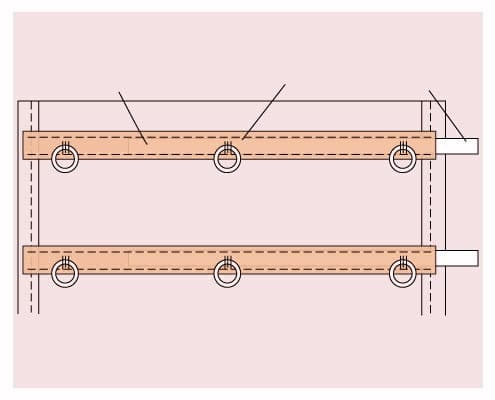
Roman blind elements
7. Having marked the position of the rings, guided by the diagram, we sew them on manually. We fasten the rings to the wooden block with the help of nails. Here they are needed to fix the lifting mechanism. Cord rings should be located symmetrically with respect to the middle of the curtain. In this case, the extreme rings should be placed at a distance of 5-10 cm from the edge of the curtain.
8. With the help of Velcro, we fix the curtain on the beam. We fix the fastener of the cord on the window frame and wrap the cord around it to fix the curtains. From the bottom edge, we begin to thread the cord into the rings. We tie a knot on the lower ring and additionally fasten it with glue for strength.
9. We pass the cord through all the rings to the very top edge of the Roman. We perform a similar operation with all rows of rings. Please note that when all the cords are threaded, they must be brought out through the upper rings to one side of the curtain. We tighten all the cords tightly so that the folds are distributed evenly over the entire width of the rim. With the help of ribbons we fix the folds in this position.
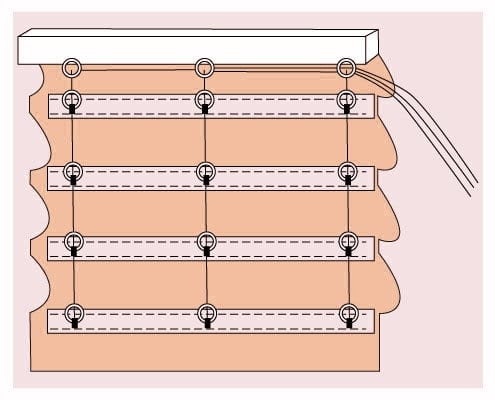
When all the cords are threaded, we bring them through the upper rings to one side of the curtain
10. We fix the wooden beam above the window opening or attach it to the window frame. We remove the ribbons holding the curtain in the folded state. Rome will go down. We equalize the tension of all cords. Having collected all the cords together, we tie them in a knot behind the last ring. Then we thread the cords through the handle to lift the curtains and tie another knot at a distance of about 45-50 cm from the first knot. Carefully cut the ends of the cords below the second knot. Do-it-yourself Roman blind is ready!