Hidden curtain rod: installation features
A carefully thought-out interior of the room and competently selected secondary design components are the key to creating the harmonious beauty of your home. And if we are talking about the design of the living room and even more so the bedroom, one of the main components of a harmonious interior is window and doorways. Every master, whether he is a pro or a beginner, will agree that it is difficult to overestimate the role of curtains in the interior of the room. However, their integral element - the cornice does not always fit into the overall stylistic solution of the room, and therefore, there is a quite appropriate desire to hide it, which will not affect its functionality in any way. This is due to the fact that curtain rods are, first of all, a functional element of the structure, and only after that they are given a certain decorative load. In this regard, if you plan to create a harmonious and impressive interior, hiding minor flaws, and want to decorate the window opening so that nothing distracts from contemplating the play of light in massive or weightless fabric panels, pay attention to the hidden curtain rod, the installation of which will make your dreams come true. When it becomes necessary to install these structures and what are their features, as well as what are the advantages of curtains with a hidden cornice and how strong their interior potential is - these are the main questions of our readers who opted for hidden cornices. Given the relevance of this topic, we will try to answer these questions, and also consider several options for installing hidden cornices.
When does it become necessary to equip hidden cornices?
The popularization of hidden curtain rods taking place in modern design is due to several fundamental reasons, which will be named below.
1. Functional necessity in order to create a harmonious design ... Often the need to use a hidden cornice arises in rooms decorated with stretch ceilings. This is due to the fact that it is forbidden to mount any protruding rigid structures that can damage the ceiling film on the surface of the stretch ceiling. It is quite logical that in this case it is impossible to use traditional ceiling cornices. As for the wall mounting option, it must also be safe for the PVC film of the stretch ceiling, and therefore, we come to the conclusion that the structural elements of the cornice should in no way come into contact with the PVC film. The most optimal and functional solution to this problem is the installation of a hidden cornice;
2. An interior without flaws and a desire to comply with the fundamental principles of modern design - another reason for the installation of a hidden cornice. An elegant design technique, which has become especially relevant recently, is decorating window openings with curtain canvases flowing straight "from the ceiling" without any additional fasteners. And if, in addition to everything else, they are decorated with lighting, then they are able to win the heart of even the most inveterate skeptic who does not welcome non-standard design solutions. To solve this problem, craftsmen prefer to install plasterboard ceilings, which is also due to the undeniable advantages of this material. If you have opted for a hidden plasterboard curtain rod, you get the opportunity to equip not only traditional straight curtain rods, but U-shaped, curved and even semicircular structures. However, in this case, it will be necessary to equip a niche in the plasterboard ceiling in order to hide the cornice with its help. The technology for installing such a niche will be discussed in this article;
Designers distinguish one more type of hidden cornices - the so-called baguette structures , which are a kind of traditional wall cornices. The peculiarities of their installation involve masking all elements of the cornice under decorative overlays made of wood, plastic or metal.
Hidden curtain rods photo

Benefits of hidden cornices
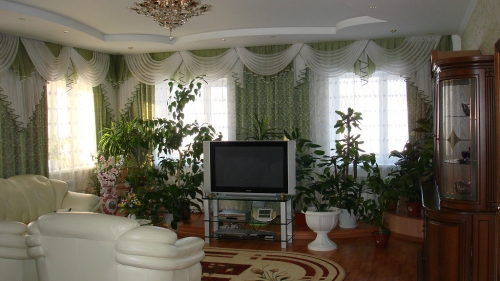
Practicality and aesthetics of the design... Concealed ceiling curtain rods are the preferred option for attaching curtains in rooms with low ceilings. In such rooms, the installation of a traditional cornice will further reduce the height of the ceiling, as opposed to a hidden cornice, which will effectively organize the space, making it more spacious and higher;
If in a room with stretch ceilings there is enough wide window sills, a traditional wall cornice may not fit in width. Using a hidden curtain rod, you can hang any curtains regardless of the width of the window sill;
Additional design and functionality... The niche in which you hide the cornice is an additional place where you can hide the wiring, the laying of the fiber-optic Internet line, as well as ventilation and lighting. Having equipped this niche, you can refuse to install additional structures to mask communications;
Formation of a single interior space and focusing on the decor, cut and design features of curtains. The absence of additional fasteners will allow you not to be distracted from the atmosphere created by the flowing fabric. Arrangement of additional lighting in the stretch ceiling niche will allow you to emphasize the textile composition without being distracted by the light source;

This method of fastening textiles is ideal for any design solution.... You will not need to match the curtain rod to the door handles or to the color of the furniture, to search for decorative caps for the curtain rod, and so on. Using a hidden cornice, you can not be distracted from your main task - the choice and design of curtains;
The opportunity to save... This is due to the fact that an aluminum cornice installed in the ceiling niche is much cheaper than that, which, in addition to being functional, also solves a decorative task, and therefore, it is decorated with carvings, forging and expensive metals, which cannot but affect its cost;
As for the benefits baguette cornices then they are limited to them decorative design, which is striking in its diversity. By choosing baguette curtain rods, you can find everything your heart desires: from laser engraving on metal surfaces and wood carvings to airy acrylic structures and heavy bronze alloys.
Important! As for the disadvantages of hidden cornices, they include the need for additional installation work and, as a result, financial costs, as well as the complexity of replacing hidden structures.
Selection and operation of hidden cornices: practical recommendations
It is no secret that the choice of even the most perfect and thoughtful design is characterized by its subtleties and nuances, the careful observance of which will allow avoiding unpleasant surprises in the future.
- If you decide to give preference to a hidden cornice, experts recommend that you think over the design and design features of the curtains in advance. If you neglect these tips, then when choosing the cut and design of curtains, you will have to focus on the design features of the cornice, which will significantly complicate your task;
- In the process of installing a hidden cornice, be guided by the width of the window sill and the heating devices under it. This is due to the fact that the curtains should not touch the battery, and therefore, during the installation of the cornice, it must be pushed forward 1-2 cm from the window sill;
- If you cannot boast of spacious rooms and plan to visually expand its space, during the installation of the cornice, do not limit yourself to the width of the window sill and window, but organize the cornice, the length of which corresponds to the length of the wall. By hanging curtains along the entire width of the wall, you will make its space unified, and therefore, it will be perceived as slightly larger in area;
- If you prefer a baguette cornice, during its installation, take all measurements along the width of its decorative part, which should fit freely into the wall space, and also not hang into the window opening and not rest against the ceiling surface;
- In the process of choosing a curtain rod, it is important to pay special attention to its functional elements - hinges and runners. Their movement should be silent and free, in the process of movement they should not cling to the rails of the cornice.
Hidden curtain rod in a stretch ceiling: features and installation
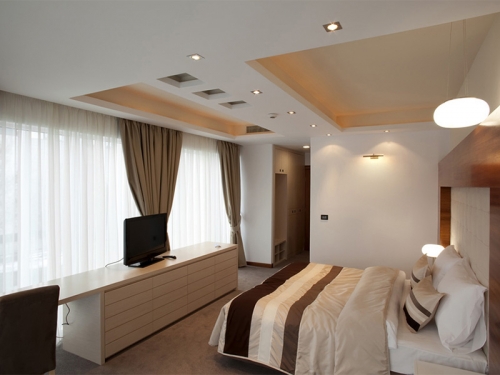
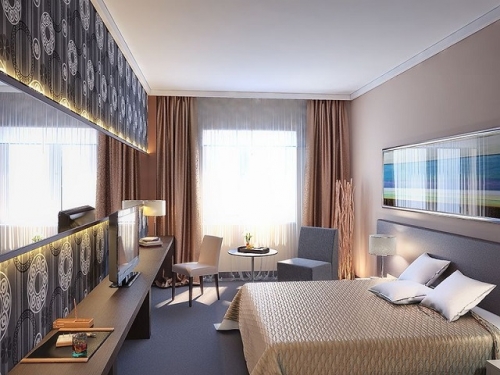
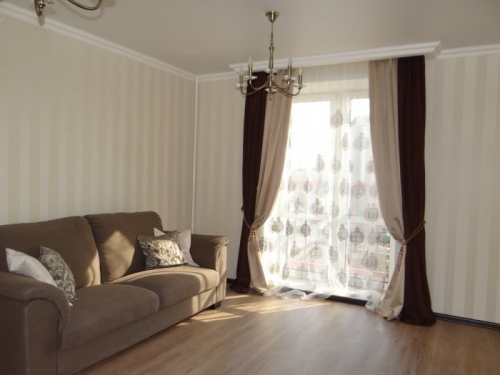
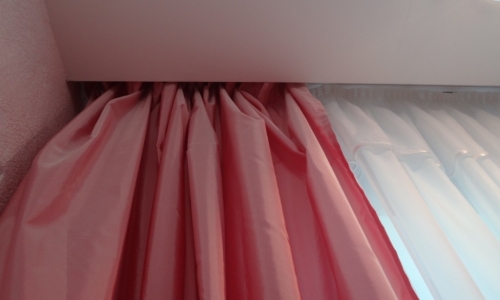
A hidden cornice is one of the options for installing a cornice, which is a kind of rail attached to the ceiling and placed in a specially equipped niche that is formed between the wall and the stretch ceiling. The resulting depression is almost imperceptible even when you stand directly under it. In connection with the design features of the hidden cornice, a non-standard design solution is created, when the curtains practically "float" in the air, which is especially important for low rooms, since the curtains visually increase the height of the ceiling.

Features of installation of a hidden curtain rod for curtains in a stretch ceiling:
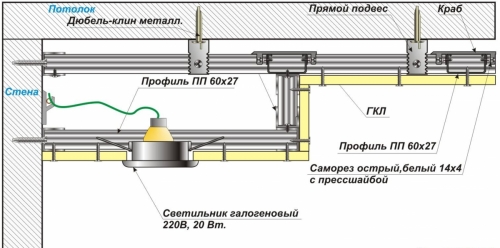
At a distance of 20 cm from the wall in which the window opening is located, a furniture corner is attached to the base of the concrete ceiling slab, to which a wooden beam is subsequently mounted along the entire length. Determine the middle of the bar and fix the wall molding in this place, which is necessary so that the ceiling film covers and, as a result, hides an unsightly structure consisting of a bar and a furniture corner. The center of the formed niche is determined and the hidden cornice is fixed in this place.
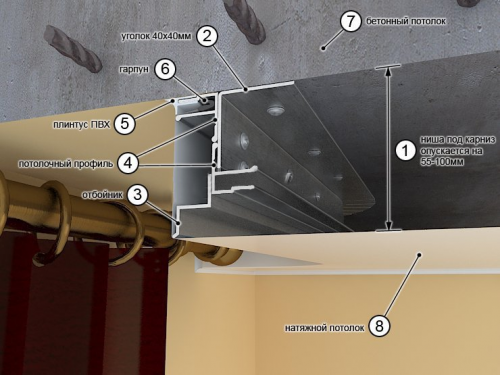
Important! The decorative design of the hidden cornice in the stretch ceiling has no meaning, since it will be completely hidden from prying eyes. The main requirement for this element is the reliability of fastening curtains, lightness, mobility and smooth movement of rings and hooks on the cornice.
Important! You can diversify the interior design of your room or carry out competent zoning of space by installing additional LED lighting in the ceiling niche where the hidden cornice is located. The most optimal solution to the task of dividing the space into functional zones is a diode tape, which gives bright illumination and at the same time consumes a small amount of electricity.
How to make a hidden cornice: arranging a plasterboard niche
Using one of the modern finishing materials - drywall, which has a number of indisputable advantages, you can realize your most daring design ideas, one of which is the arrangement of the cornice. However, given its low strength and inability to withstand heavy weight loads, hanging heavy structures from ceilings and walls finished with plasterboard becomes difficult. The solution to this problem was found, and the masters unanimously stated that the only correct way out of this situation is to equip the ceiling niches in which the cornices will be installed. In this regard, the masters rightfully ask themselves the question: "How to hide the ceiling cornice for curtains by arranging a niche in the plasterboard ceiling?" Next, we will try to answer this question by considering the features of installing a hidden cornice for drywall curtains.
How to make a hidden curtain rod: material preparation
According to experienced craftsmen who are familiar with drywall, the most suitable material for arranging a niche is Volma drywall, which is characterized by a whole set of positive qualities that are often absent in more expensive finishing materials. Due to the low weight of the material, it can be used for the manufacture of various ceiling structures, including niches in which cornices are hidden. However, its main advantage is considered to be environmental safety, due to the absence of harmful substances in its structure, which makes it possible to use drywall for interior finishing work.
A sheet of drywall must be cut into strips 15 cm wide. To cut drywall, no expensive professional tools are required. It is enough to stock up on the following basic set:
- Roulette, the length of which must be at least 3 meters;
- Long metal ruler, in the absence of which you can use a metal profile;
- Stationery or utility knife, characterized by the presence of replaceable double-sided blades;
- Hacksaw. In this case, even a poorly sharpened wood saw is suitable, which must necessarily be narrow, or a hacksaw designed for cutting knots;
- The only professional tool that you will have to purchase is a roughing plane, since using it you will be able to carry out the highest quality processing of the cut edges.

Important! Experts propose to distinguish between several methods of cutting drywall, among which the most popular are methods such as straight cut, uneven cut, double-sided cut and round holes. To make a plasterboard niche, you need to master the straight cut technique, which is not difficult.
The required size is marked on both sides (in our case, it is 15 cm). A metal ruler is applied to the indicated marks and, using a knife, the top layer of the material is cut. At the same time, experts do not recommend drawing a preliminary line with a pencil, since in this case the cut may turn out to be uneven. If you deepen the cut 2-3 times, you can be sure that the drywall will break exactly along the intended line, and not elsewhere.
Next, drywall is installed on the edge and lightly knocked on it with your knee in the place where there is no cut. Having carried out 2-3 blows, you will be able to break the gypsum core exactly along the intended line. Finally, use a knife to cut the cardboard holding both halves of the sheet. To cut wider strips, you can use a hacksaw.

Installation of plasterboard boxes
For installation you will need:
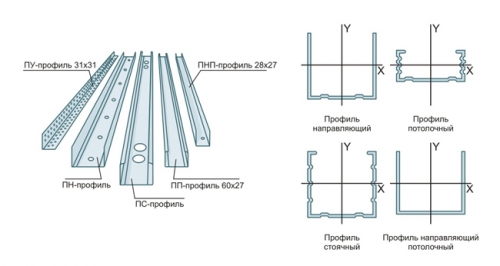
- Metal ceiling profile 27x60x3000 cm;
- Guide profiles are preferably made of aluminum, but it is forbidden to use wooden ones, 28x27x3000 cm in size;
- Plasterboard sheet;
- Drill or screwdriver;
- Self-tapping screws (self-tapping screws) or staples.
First of all, mark the dimensions of the niche in which it is planned to hide the cornice. To do this, measure the distance from the wall in which the window opening is located to the edge of the window sill or heating battery (in the event that the battery protrudes beyond the edge of the window sill). Subsequently, add 10 cm to it, which is the size of the allowance required for the free movement of curtains in the niche. In most cases, this distance should be at least 15 cm, which will facilitate the subsequent installation of the cornice, but at the same time it should not exceed 20 cm.Further, using a paint cord, mark a line running parallel to the wall, which will be the edge of the niche.
Using a drill or a screwdriver, fix the guide profiles along this line so that the step for the dowels is at least 60 cm.In order to make the sides of the box, the previously cut drywall strips are screwed to the guide profiles. In this case, the step is at least 15 cm. From the end sides of the box, the perimeter is marked and the guide box is fixed in the same way using self-tapping screws. In this case, the profile should "look" towards the walls. Using a hacksaw, plasterboard strips are cut along the profile, which are simultaneously the sidewalls of the niche. The ends are carefully processed with a plane.
Using the ceiling profile, the crate is assembled, with a step of at least 40 cm. The drywall is cut to the width of the niche and the bottom of the box is sewn up. As for the side walls of the niche, they can be made of glass or transparent plastic. Modern design solutions involve the manufacture of curly edges of the box - in the form of waves or various geometric shapes. The width of the box is a variable indicator and depends on the height of the ceiling and the size of the room.
How to cover a plasterboard niche?
In the process of plating, the screws are sunk into the drywall so that the caps do not protrude. Putty joints and screw holes are made. If necessary, you can putty the entire box. To putty the inner corners, experts recommend using a rubber spatula.
If you want to simplify the finishing of the box, after finishing the work, finish the inner corners of the box by placing plastic or metal corners on them. Making putty work, the corner is pressed into the putty. Upon completion of these works, you will see that the angle is perfect. If you want to do without using a corner, carefully sand the edges of the drywall with sandpaper. After the putty has dried completely, sand the box with fine sandpaper. If you have carried out all the above measures, you just have to sweep the dust from the finished box and paint the niche.
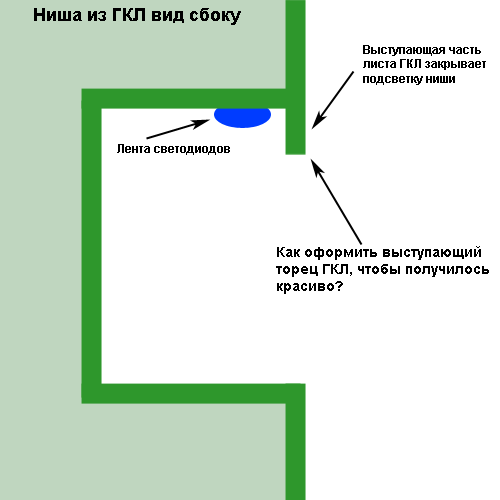
If you want to add a touch of mystery and originality to the interior of the room, install the lighting for a drywall niche. For this purpose, halogen lamps are inserted into the box from the back, creating diffused light, or neon tubes, which will become a source of light that adds coziness to the room. Having performed these steps, you will create a decorative element that can decorate any room. LED strips will accentuate the architectural features of the ceiling and highlight the curtains floating in the air with a bright stripe.