How to sew a roman blind with your own hands. Step-by-step instruction
Good afternoon friends!
Recently I accidentally saw a video on how to sew a Roman blind. I didn't even imagine that it was easy to do it yourself and pretty quickly.
I myself suddenly wanted to hang such curtains at home. I just caught fire and became interested in this issue. I began to study the material in detail, find out all the nuances and secrets, looked at the reviews. As a result, I had a clear idea of how to sew a Roman blind with my own hands: I decided to describe the detailed guide right away and describe it before I forgot.
What are Roman shades
A Roman blind is a small canvas that covers the window within the frame. It has a lifting mechanism, so the curtain can be raised or lowered if necessary: close the window from the sultry sun or, conversely, let sunlight into the room.
When lifting, the curtain lies down in horizontal folds.
According to one of the legends in the construction of Ancient Rome, such curtains made of heavy, dense and wet fabric were invented to close the windows from dust that flew from building material and stone, and then they were useful for protection from the scorching rays. But at the same time, it became necessary to raise them in order to let in air and ventilate the room.
According to another legend, the idea of curtains came from Roman sailors; the sails were then made according to the same principle of raising and lowering.
Nowadays, Roman blinds are a very fashionable element of the interior. It is a combination of the softness of the fabric and the functionality of the blinds. Fashionable curtains are hung not only in the kitchen and in the bathroom, small rooms with narrow windows, but also in spacious living rooms with large plastic windows. In the latter case, use either one wide curtain, or several small ones. Personally, I am more impressed with the option of several curtains.
Roman blinds are sewn from different fabrics - monochromatic and patterned, with flowers and stripes, dense and translucent, with intricate weaving. Sometimes the bottom edge is additionally decorated.
Curtains can be mounted both inside the window opening close to the glass and on the outside of the window. You can see samples in the photo.
They are hung separately by themselves or together with classic curtains and tulle.
It is believed that everything that is fashionable is expensive. But for us - needlewomen, nothing is impossible. And it is quite possible to sew Roman shades by yourself.
Do-it-yourself roman blinds on windows or on a doorway are made in the same way.
Materials for making Roman shades
We need the fabric itself first of all. In terms of quality, for a Roman shade, it is better to use a not very heavy canvas so that it can be easily draped. At the same time, the fabric should be dense, do not use jersey that will stretch under the weight of the inserted rails.
Not a lot of fabrics are required for one curtain, its consumption is determined based on the length and width of the window, taking into account the seam allowances. Plus a little more fabric is needed for the pockets into which the slats will be inserted.
For the lifting mechanism:
- Double-sided sticky tape for attaching the curtain to the curtain, 2.5 cm wide. These are sold in sewing stores.
- Metal or plastic rings and self-tapping screws with a hook through which the cord will be threaded.
For a narrow curtain, three hooks are required.
The number of rings = the number of folds on the shade multiplied by 3. - Nylon cord. You can use any other, and for better glide, connect it with a fishing line (4mm).
- Reiki, along which folds will form. The width of the slats is about 1.5 cm. You can use a plastic profile, glazing beads, cable channels, pins, bamboo sticks.
- The weight is a bar that is inserted along the bottom of the curtain. You can buy some cash in a repair shop.
- A bar at least 2.5 cm wide, on which our curtain on the window will be attached, is, in fact, a homemade cornice.
We prepare slats, a weighting agent and a bar with a length of one centimeter less than the width of the finished curtain. - Mounts for the cornice.
- Hot glue, furniture stapler or studs with decorative caps.
And also we will need a needle, thread, scissors, a sewing machine and an iron.
We build a pattern of a Roman shade with our own hands
We do not need a universal pattern of Roman shades, since you can do it yourself for each individual case.
You just need to know the size of the window. I will use a 120 x 220 cm window size as an example.
Curtain width
The width of the curtain inside the window is equal to the width of the window - 1 cm.Add 1.5 cm to this value for allowances on each side:
120-1+1,5+1,5=122
If the curtain will be located on the outside of the window, then add 5 cm to its width:
120+5+1,5+1,5=128
Curtain length
Here our calculation will be more complicated.
A Roman shade can be sewn double, sew on the wrong side of the drawstring from braid or strips of fabric to insert slats. But I propose another option, simpler and more accurate, as it seems to me. I like everything to look beautiful from the seamy side.
The length of the curtain is equal to the height of the window - 1 cm (for the inner curtain, for the outer one - any size).
We add 7.5 cm to the bottom hem and 3 cm to the top hem:
220-1+3+7,5=229,5
And we also need to add fabrics to the pockets for the slats.
The width of one pocket is 1.8 cm (for a rail with a width of 1.5, taking into account the thickness). Multiply it by 2 = 3.6 cm.
We divide the length of the curtain by the width of the fold chosen at your discretion:
For an integer, we get 7 folds, hence the number of pockets: 7-1 = 6.
We multiply the width of the pockets by their number: 3.6x6 = 21.6.
It turns out that for the length of the curtain you need:
229.5 + 21.6 = 251.1 cm.
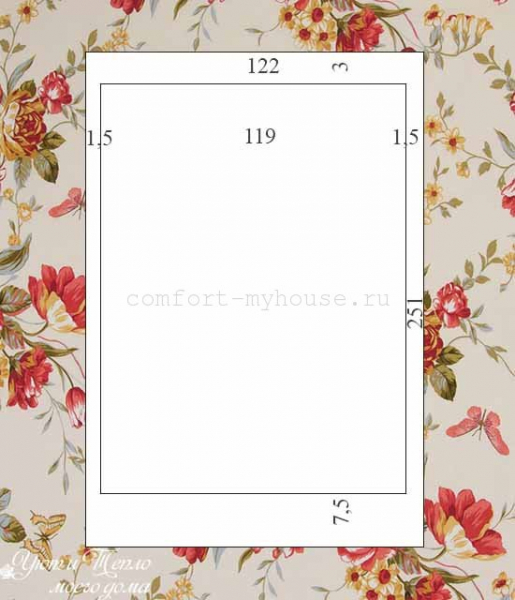
We set aside the dimensions of the width and length on the seamy side of the fabric and cut out the blank curtain.
Sewing Roman blinds
Now we start sewing a Roman shade with our own hands.
Step by step description:
Step 1. We hem the side seams, iron them with an iron.
Keep the seams small and neat.
Step 2. Set aside 3 cm on top, bend to the wrong side, turn the edge by 0.5 cm inward, iron and hem.
Step 3. Set aside 7.5 cm from the bottom and hem the bottom edge at a distance of 5 cm, after having also ironed it.
Step 4. On the seamy side, mark with a pencil the lines for the location of the pockets, starting from the bottom, at the following distances:
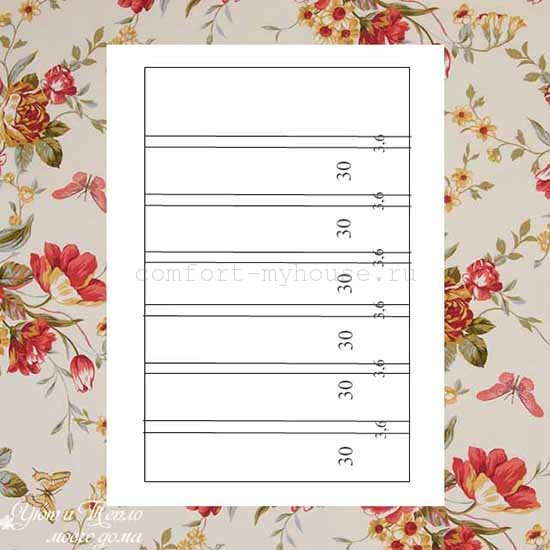
30 cm (fold width) -3.6 cm (pocket width) -30 -3.6 -30 -3.6 -30 -3.6 -30 -3.6 -30 -3.6
A little more than 30 cm will remain in the upper part, but this is not scary.
After all, a Roman shade is not raised to the very top, so the size of its upper part can be arbitrary and not necessarily equal to the width of all folds.
Step 5. Fold the fabric in the places of the pocket, connecting two lines, with the right side inward. We get small folds, sweep them off, sew them on a typewriter.
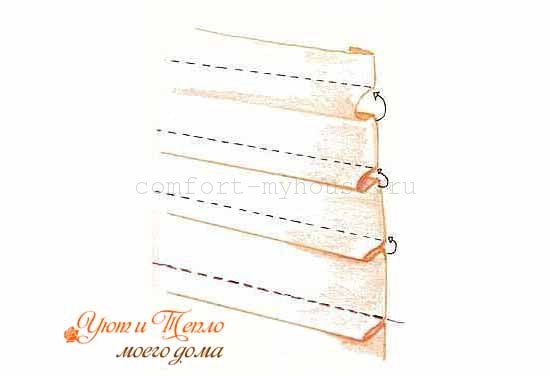
We iron, directing all the pockets necessarily down.
This is an important condition, if not observed, the folds will not fit well.
Step 6. Sew the Velcro tape to the upper edge of the curtain with two stitches (along the upper and lower edges of the tape).
That's it, our Roman blind is ready. Iron it again.
Do-it-yourself cornice for Roman blinds
In principle, it would be easier to buy a ready-made curtain rod for Roman blinds. But if you do everything with your own hands to the end, then we proceed as follows.
We take the prepared bar and wrap it in fabric. We use the same as for sewing curtains. We fix it with a stapler or decorative carnations.
We nail the sticky tape to the block from the front side, you can try to glue it with a hot gun.
On the reverse side, at the ends, we fasten the corners to the bar, on which we will hang the cornice to the wall.
In the lower part of the bar, from the edges and in the center, we screw in self-tapping screws with hooks.
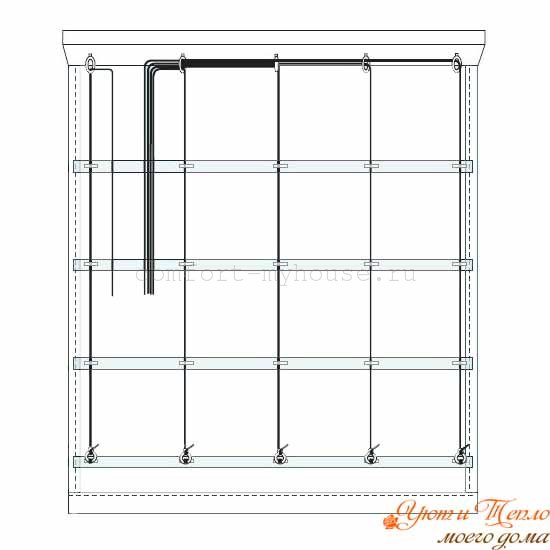
How to make a lifting mechanism for a Roman shade
And finally, we have reached the main and final stage in the manufacture of a Roman shade.
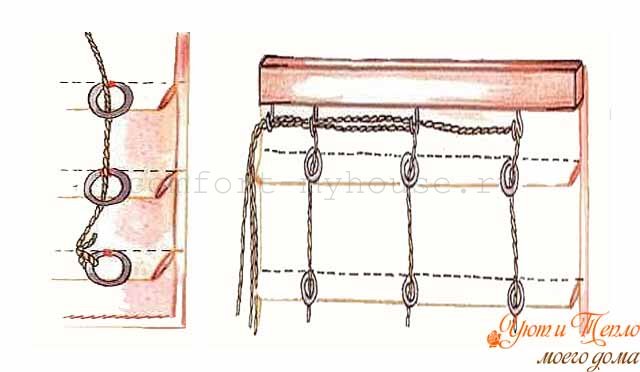
Sew carefully along the edges (preferably as close to the edge as possible) and in the center on all the pockets for the slats, rings with a needle and thread.
We attach the curtain to the cornice with Velcro.
We lay out the entire structure on the floor.
We determine from which side the cord will hang, for which we will pull the curtain and thread it through the rings.
We burn the edge of the cord with matches so that it does not bloom.
Facing us is the seamy side of the curtain:
- We pass the cord through the hook on the bar on the left, then through the hook in the middle, then through the hook on the right and go down along the right edge of the curtain, pulling the cord through the rings.
- We tie the cord in a knot on the last ring.
- We straighten the curtain, pull on the cord and cut it on the left side at about the height of the middle of the curtain.
- We take a new rope, thread it through the left and middle hooks of the cornice and then through the rings along the middle part of the curtain. We tie the end of the cord on the bottom ring. We align the beginning of the cord with the first cord and cut it at the same level.
- We put the third rope through the first hook and go down along the rings on the left side of the curtain. We tie on the last ring. We cut off the beginning of the cord in the same way as the first and second.
- We pull the threads again, check that the tension of all three is uniform. Otherwise, the folds may be skewed when the shade is lifted.
We braid the three free ends of the cord into a pigtail, tie them beautifully.
If you decide to run the ropes some distance away from the edges, then you may need to screw in another hook on the block to secure the rope.
If the curtain is wide, then the threads for lifting can be skipped not along three, but along five vertical lines.
We insert slats into the pockets, it is better to leave the edges not sewn up. Then it will be easier to wash the curtains: pulled out the slats and wash without problems.
At the bottom of the curtain, insert a weighting bar.
It remains to hang the curtain on the window. Here you may need male help.
They pulled the lace - the curtain gathered into folds and rose.
They loosened the cord, pulled the curtain down - it sank.
I hope you understand how to sew a Roman blind with your own hands from my detailed step-by-step description.
And here is the video that inspired me, but I made my own changes to this master class, which I wrote about:
When you hang the curtain, sprinkle it with water from a spray bottle, lift it up, straighten the wrinkles and leave it in this state until dry. Thus, the folds will remember the position they need and will always fit easily and correctly when lifting.
Wrap the free end of the cord around a decorative hook that can be attached to the wall.
I wish you creative success!