Cookie molds from improvised materials. DIY cookie cutter
You will need
- - aluminum can;
- - plastic bottles;
- - ruler;
- - metal crochet hook or knitting needle;
- - sandpaper;
- - ballpoint pen;
- - scissors;
- - stapler;
- - sharp knife;
- - tracing paper or other transparent paper;
- - a computer with any graphic editor;
- - printer.
Instructions
For toy molds, choose plastic bottles. They can be the most different shapes. It would be great if you could find baby shampoo bottles in the shape of symmetrical animal figures. Draw a line of symmetry. The best thing to do is ballpoint pen, but you can scratch it. Make sure it crosses the entire figure.
Cut the bottle along the marked line with scissors or sharp knife. If there are any unnecessary parts, such as the “spout” through which the shampoo is poured, cut them off too. Process the edges sandpaper to get rid of hangnails. You may end up with two molds at once.
Such sand molds can be made from asymmetrical and shaped jars. Choose the most expressive and convex area (for example, the face of an animal). Step back a few centimeters from the marking line and draw another line. Cut the bottle along it. In this way, you can give a second life to broken plastic toys.
It's okay if you only have round and rectangular bottles on hand. Step back 3-4 centimeters from the bottom and draw a line along the entire perimeter. It should be parallel to the bottom. Cut the bottle along this line. You have a mold and “production waste”. If this second part has a neck, with one movement of the scissors it turns into a scoop. Once again, cut the bottle 5-6 centimeters below the neck. Give it a scoop shape. The neck will be the handle, and shape the blade depending on the shape of the bottle.
Make cookie cutters from heat-resistant material. An aluminum can of beer or any other drink will do for this. Canning jars will also work, but they are not very convenient because the strip you need will be too short. Wash the jar well, cut off the bottom and top. Cut it along the seam to make a rectangle. It is desirable that its edges be smooth, so cut off the bottom carefully with a sharp knife or scissors.
Straighten the sheet and mark its strips 1-1.5 cm wide. The strips should be parallel to the long side of the rectangle. You can draw lines with a ballpoint pen or scratch them with a knitting needle. Fasten two or three of these strips together. The size of the mold depends on whether you are going to bake a large cake or small cookies. It is most convenient to fasten with the most ordinary stapler.
We will need:
- a tin of cheese or pate
-ruler
- pencil
-knife
-scissors
-pliers
- thread
-paper
First, we come up with a shape and draw sketches. As I said above, for the first time it is better to take a simpler form. Perhaps the key will be difficult for some. Then we cut out our shape from paper. By the way, it is not necessary to do this at all, you can just leave the drawing on paper, but it was more convenient for me :).
Then take some thread and a marker. And we draw the outline of our shape with a thread, marking with a marker (dots) all the folds on the thread. We do this to make it easier to repeat the shape.
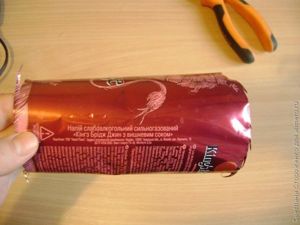
Now let's take our tin can. I have this container from Camembert. It is important that the walls are quite thin and not too hard.
1) Using a large sharp knife, make a cut at the top hard rim of the can.
2) Insert scissors into the resulting hole and begin to carefully cut along the border line. I used regular scissors, they work great and easily with thin metal.
3) Make a transverse cut to the base of the can.
4) Now cut along the bottom line.
5) So we didn’t cut too much flat strip metal
6) Using a ruler and pencil, we draw out the uneven edge of our strip, giving it the appearance of a rectangle with smooth edges.
7) Use the same scissors to cut along the line jagged edges.
8) Now we also cut the strip into two parts lengthwise. We need a strip of metal about 1.5 cm wide.
Now we can proceed to our form. IN in this case-key :)
1) Since the top of the key shape is rounded, we need to find an object with a suitable diameter. This could be a pen or marker. I have a test tube with sparkles)) We wrap our strip of metal around this object and press it with our fingers to make a semicircle.
2) Then, using a pencil, transfer all the marks from the thread to a strip of metal. So we marked all the bend points.
3),4),5) Now, using a ruler and a marker / pen / any object of suitable diameter, we begin to carefully bend the desired shape. It is very important to apply the ruler to the strip at a right angle so that the shape comes out even. So, apply the ruler to the point and bend it straight along the ruler. Here you can and should help yourself with pliers and fingers to achieve the desired contour.
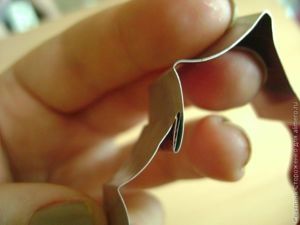
6) Well, the key is almost ready, all that remains is to close the ends.
We all love homemade baked goods, because they turn out incredibly tasty, thanks to the fact that housewives put all their love and warmth into them during the cooking process. But, unfortunately, not everyone has the opportunity to diversify its external appearance. For example, mothers want to prepare interesting products with an original thematic shape for their babies, but they may not have it on hand. necessary devices. It doesn’t matter, because today we will learn how to make cookie cutters with your own hands from scrap materials. This article will describe the most simple ways their manufacture.
Making metal molds
To do metal molds for making your own cookies, which can then be used to cut out dough products, you will need the following materials and tools:
- Aluminum molds for oven use.
- Metal scissors.
- Clothespins.
- Pencil, marker and ruler.
- Thick gloves.
- Superglue.
- Pliers.
- Paper.
- Sample rectangular shape from any material for strips 4 cm wide.
Important! When making aluminum molds, you only need to wear gloves, otherwise you can seriously cut yourself from the sharp, raw edges.
First you need to prepare the material for work as follows:
- Remove the side edges from the mold and, using a marker template, draw stripes 4 cm wide on the metal.
- Draw another line right in the middle of the resulting strip with a marker. Thanks to this line, it will be easier to form a metal blank.
- Now you need to cut off part of the workpiece along the main line.
- Fold the cut piece in half along the line.
- We unfold the workpiece, on the left side we fold it in half along the length directly along the fold line.
- We do the same actions with the right side.
- We fold the workpiece inward with sharp edges.
- Using the handle of the scissors, smooth the edges.
- As a result, we get a durable and flexible tape.
Now let’s look step by step at how to make cookie cutters with your own hands:
- Draw a sketch of the required shape on paper. There is no need to use too complex bends to make the shape easier.
- Form an aluminum strip around the design according to the sketch. The tape must be bent using any available tool - a bottle, a rectangular or round glass, a pipe or a rolling pin.
- When you get the desired shape, you need to leave a few centimeters for fastening, and cut off the remaining piece.
- The ends should be glued together with superglue, secured on top with clothespins and left to dry completely.
So we have a durable baking pan.
Molds from an old tin can
When thinking about what to make your own cookie cutters from, you can check if you have any unnecessary ones at home tin can? If you are lucky, then you will also need to take metal scissors and superglue for the work.
And making molds from these materials is as easy as shelling pears:
- Cut off the top and bottom of a tin can, and cut the wall lengthwise with scissors.
- Cut the resulting tin rectangle into strips 2-3 cm thick.
- From these strips, make the necessary shapes, for example, diamonds, hearts, houses, people, flowers or sponges.
- Glue the ends of the forms together with superglue, and if they are too sharp, go over them with a file.
Important! Using the resulting molds you can very easily cut out cookies from sugar or shortcrust pastry, but keep in mind that they quickly become unusable.
Simple foil cookie cutters
If you urgently need to bake a lot of cookies, but at the same time you want to give them a special shape, then you can use regular foil and a glass with a round or square bottom.
Follow this pattern:
- Cut the food foil into small squares.
- Wrap a square of foil around the bottom of the glass and iron it well to get the desired shape.
- All that remains is to place the resulting blanks on the baking sheet.
How to make molds from a plastic bottle?
Many may be surprised, but you can even make your own cookie cutters from plastic bottles.
Important! You can use finished products to work not only with dough, but also with mastic.
They have undeniable advantages:
- We get them completely free of charge, the process of making them only takes a few minutes.
- The quality of the molds and the features of their application will depend on the selected material.
- you get necessary equipment and dispose of the bottle.
- These molds are made from food grade plastic, thanks to this they are completely safe and harmless.
- Making them yourself is quite simple.
To get them, you need to draw sketches of future shapes on paper, then cut the bottle, attach them to the base, and cut them clearly along the contour. At the end you will need to secure their ends with a bracket.
Previously, glass rims, baby beads and other things were used as molds for baking cookies and other dough products. Today there is a wide variety of special baking dishes. However, what to do when there is no stock suitable forms? Alternatively, you can make them yourself!
How to make molds with your own hands?
It turns out that making a mold of any size is quite easy, and we don’t need a lot of materials for this. In this article we will tell you how to quickly make simplest form for baking in the shape of a heart.
All we need is:
Tin or aluminum beer can.
Scissors (it is better to use metal scissors).
So let's get started!
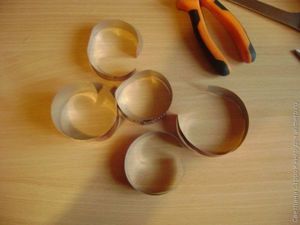
1. First, cut out a ring from the jar with a width of 2 to 2.5 cm.

2. We bend one side of this ring inward and press it with two fingers so that two semicircles are formed (the top of our heart)

3. IN opposite side form a fold in reverse side to make a pointed end.

And now our heart-shaped mold is ready! You can make several of these molds from one jar. In the same way, you can make any shapes - round, square, triangular, star-shaped, etc.
VIDEO. How to make your own baking dish?
Making a cookie cutter with your own hands is not such a difficult task. We will need a sketch for the future mold and an ordinary tin can, the one in which carbonated drinks are sold, a little “flexion-extension” exercises with a tin can, and you will be able to quickly stamp cookies of the most complex shape.
You will need:

- empty soda can;
- paper, pencil, eraser or finished sketch printout;
- ruler;
- scissors;
- a sharp knife and better knife for paper (layout);
- tools like pliers, it would be nice to have a tool with rounded tips, like the one in my photo;

We will need:
- a tin of cheese or pate
-ruler
- pencil
-knife
-scissors
-pliers
- thread
-paper
First, we come up with a shape and draw sketches. As I said above, for the first time it is better to take a simpler form. Perhaps the key will be difficult for some. Then we cut out our shape from paper. By the way, it is not necessary to do this at all, you can just leave the drawing on paper, but it was more convenient for me :).
Then take some thread and a marker. And we draw the outline of our shape with a thread, marking with a marker (dots) all the folds on the thread. We do this to make it easier to repeat the shape.
Now let's take our tin can. I have this container from Camembert. It is important that the walls are quite thin and not too hard.
1) Using a large sharp knife, make a cut at the top hard rim of the can.
2) Insert scissors into the resulting hole and begin to carefully cut along the border line. I used regular scissors, they work great and easily with thin metal.
3) Make a transverse cut to the base of the can.
4) Now cut along the bottom line.
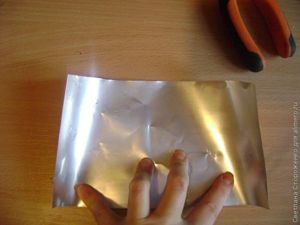
5) So we cut out a not too smooth strip of metal.
6) Using a ruler and pencil, we draw out the uneven edge of our strip, giving it the appearance of a rectangle with smooth edges.
7) Use the same scissors to trim the uneven edges along the line.
8) Now we also cut the strip into two parts lengthwise. We need a strip of metal about 1.5 cm wide.
Now we can proceed to our form. In this case, the key :)
1) Since the top of the key shape is rounded, we need to find an object with a suitable diameter. This could be a pen or marker. I have a test tube with sparkles)) We wrap our strip of metal around this object and press it with our fingers to make a semicircle.
2) Then, using a pencil, transfer all the marks from the thread to a strip of metal. So we marked all the bend points.
3),4),5) Now, using a ruler and a marker / pen / any object of suitable diameter, we begin to carefully bend the desired shape. It is very important to apply the ruler to the strip at a right angle so that the shape comes out even. So, apply the ruler to the point and bend it straight along the ruler. Here you can and should help yourself with pliers and fingers to achieve the desired contour.
6) Well, the key is almost ready, all that remains is to close the ends.
Making a cookie cutter with your own hands is not such a difficult task. We will need a sketch for the future mold and an ordinary tin can, the one in which carbonated drinks are sold, a little “flexion-extension” exercises with a tin can, and you will be able to quickly stamp cookies of the most complex shape.
You will need:
- empty soda can;
- paper, pencil, eraser or finished sketch printout;
- ruler;
- scissors;
- sharp knife, or better yet, a paper knife (modeller);
- tools like pliers, it would be nice to have a tool with rounded tips, like the one in my photo;

I recently got a couple of tins at home. I felt sorry for throwing them away and I decided to think about how I could use them usefully.
I don’t have any interesting cookie cutters, but sometimes I just want to childishly look for cookies of my favorite shape in a bowl. “Why not combine pleasure with usefulness,” I thought, and made a set of cookie cutters out of tin jars.
For this exciting activity I needed:
– tin can (several are possible)
- scissors
- pencil
– stapler (optional)
– hot glue (optional)
– pliers (optional)
Workflow
Step 1. Cut off the bottom and lid from the jar.
Step 2. I made a cut along the entire can and trimmed the edges.
Step 3. I cut strips 1.5 cm thick with scissors.
Step 4. Now it's time to get creative. The resulting strips can either be carefully bent into in the right places, or create rounded shapes using a pencil.
To do this, you need to pull the strip over a pencil and firmly press down the product on all sides. I did this both with and without pliers, but I didn’t see much of a difference. 

Step 5. In order to fix the ends of our forms, you can use several options.
- Secure the ends with a stapler.
- Secure the ends with hot glue.
- Secure the ends, giving them a lock shape.

I didn’t want to use hot melt glue in products that would come into contact with food. There was only one option left - to make a lock.
To do this, I tucked a few millimeters from one and the other end of the product.

But do it in such a way that the wrapped parts look in different directions.

In this case, they are combined with each other like a castle.
You can cut strips from a can without cutting lengthwise. Then the rings will be closed, and you won’t have to worry about joining the ends.

But then you won’t be able to give all the shapes to the product. And it will be of a strictly defined size.
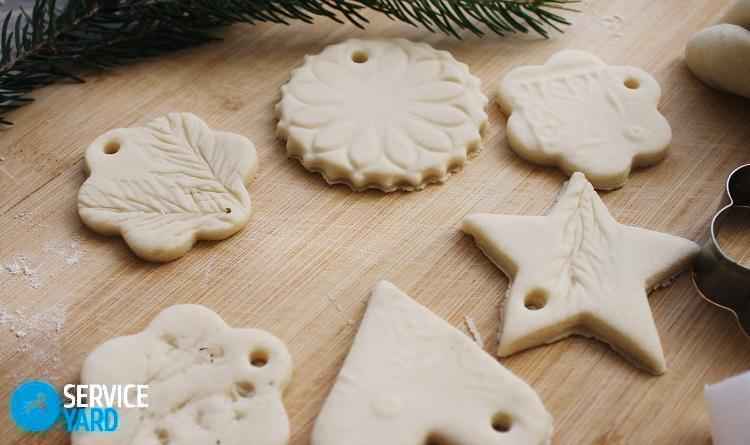
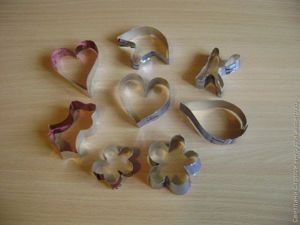
This way I made hearts, droplets, Christmas trees, mushrooms, flowers and even letters.
And most importantly, my one-year-old daughter really enjoyed participating in the process and watching what was happening.
I think that any child, and even more so those who are older, will really enjoy this creative activity. And after it, you can make your own branded cookies in new interesting molds and show off to your friends.

We all love homemade baked goods, because they turn out incredibly tasty, thanks to the fact that housewives put all their love and warmth into them during the cooking process. But, unfortunately, not everyone has the opportunity to diversify its external appearance. For example, mothers want to prepare interesting products with an original thematic shape for their babies, but they may not have the necessary equipment at hand. It doesn’t matter, because today we will learn how to make cookie cutters with your own hands from scrap materials. This article will describe the simplest ways to make them.
Making metal molds
To make metal cookie cutters with your own hands, which can then be used to cut out dough products, you will need the following materials and tools:
- Aluminum molds for oven use.
- Metal scissors.
- Clothespins.
- Pencil, marker and ruler.
- Thick gloves.
- Superglue.
- Pliers.
- Paper.
- A rectangular template made of any material for strips 4 cm wide.
Important! When making aluminum molds, you only need to wear gloves, otherwise you can seriously cut yourself from the sharp, raw edges.

First you need to prepare the material for work as follows:
- Remove the side edges from the mold and, using a marker template, draw stripes 4 cm wide on the metal.
- Draw another line right in the middle of the resulting strip with a marker. Thanks to this line, it will be easier to form a metal blank.
- Now you need to cut off part of the workpiece along the main line.
- Fold the cut piece in half along the line.
- We unfold the workpiece, on the left side we fold it in half along the length directly along the fold line.
- We do the same actions with the right side.
- We fold the workpiece inward with sharp edges.
- Using the handle of the scissors, smooth the edges.
- As a result, we get a durable and flexible tape.
Now let’s look step by step at how to make cookie cutters with your own hands:
- Draw a sketch of the required shape on paper. There is no need to use too complex bends to make the shape easier.
- Form an aluminum strip around the design according to the sketch. The tape must be bent using any available tool - a bottle, a rectangular or round glass, a pipe or a rolling pin.
- When you get the desired shape, you need to leave a few centimeters for fastening, and cut off the remaining piece.
- The ends should be glued together with superglue, secured on top with clothespins and left to dry completely.
So we have a durable baking pan.
Molds from an old tin can
When wondering what to make your own cookie cutters from, you can check to see if you have an unnecessary tin can at home? If you are lucky, then you will also need to take metal scissors and superglue for the work.
And making molds from these materials is as easy as shelling pears:
- Cut off the top and bottom of a tin can, and cut the wall lengthwise with scissors.
- Cut the resulting tin rectangle into strips 2-3 cm thick.
- From these strips, make the necessary shapes, for example, diamonds, hearts, houses, people, flowers or sponges.
- Glue the ends of the forms together with superglue, and if they are too sharp, go over them with a file.
Important! Using the resulting molds you can very easily cut out cookies from sugar or shortbread dough, but keep in mind that they quickly become unusable.
Simple foil cookie cutters
If you urgently need to bake a lot of cookies, but at the same time you want to give them a special shape, then you can use regular foil and a glass with a round or square bottom.
Follow this pattern:
- Cut the food foil into small squares.
- Wrap a square of foil around the bottom of the glass and iron it well to get the desired shape.
- All that remains is to place the resulting blanks on the baking sheet.
How to make molds from a plastic bottle?
Many may be surprised, but you can even make your own cookie cutters from plastic bottles.
Important! You can use finished products to work not only with dough, but also with mastic.
They have undeniable advantages:
- We get them completely free of charge, the process of making them only takes a few minutes.
- The quality of the molds and the features of their application will depend on the selected material.
- You get the necessary equipment and dispose of the bottle.
- These molds are made of food-grade plastic, making them completely safe and harmless.
- Making them yourself is quite simple.
To get them, you need to draw sketches of future shapes on paper, then cut the bottle, attach them to the base, and cut them clearly along the contour. At the end you will need to secure their ends with a bracket.
As we can see from the above master classes, you can make cookie cutters with your own hands from plastic bottles, foil, metal and even old tin cans. This way, you will not only get the elements you need for baking, but also use items that have been lying around on the shelves for a long time, and will certainly delight your loved ones with delicious, original cookies of an unusual shape.
You can make your own cookie cutters
DIY molds: choosing material
Everything you need to create a mold with your own hands is probably already in your kitchen. These are all kinds of bendable cans. For suitable for work such container:
- aluminum soda cans;
- tin packaging of condensed milk, coffee, corn, etc.;
- large aluminum baking dishes;
- plastic bottles.
The main criterion in choosing is that the future device can be cut/bent. The material must be sufficiently pliable.
Experiment with the size: for a small DIY cookie cutter, a 0.3 liter jar is suitable, for larger baked goods - a 0.5-1 liter beer can.
Create beautiful pattern Glasses with a pattern on their stems will help. Just print it on the test. And if you want to bake tube cookies, use two folded spoons as a base.
How to make your own cookie cutters
Make your own molds from aluminum cans and plastic bottles like this:
- cut strips of aluminum. For small pieces, cut the can crosswise, for large ones - lengthwise. The ideal strip width is about 5 centimeters;
- draw on paper the outline in which you want to bake the cookies;
- bend the strips, applying them to the paper outline;
- Glue the ends of the mold with superglue.
It is important to remember that the edges of aluminum cuts are sharp and dangerous. Polish them with sandpaper or a nail file. You can use ready-made models a day after they are created. This will completely remove the glue smell.
If you are making molds from tin, you will need pliers. With their help, you can give the container the desired look: folds, lines, corners. You can make a heart, a triangle, or even a star from cans.
Cookie shapes from jars are physically more difficult to make, but they are more convenient to use. You can press on the jar with your whole palm to cut out the dough, on the aluminum strip - only with your fingers.
For mini-cupcakes, you can make disposable molds from baking paper. To do this, take a metal mold with a bottom as a basis, cut out a circle of parchment according to its size + approximately 2 cm in diameter. We wet the paper circle, put it in a metal mold, insert another into it to fix the shape. After drying, you need to carefully trim the edges - and you can use it.
Use your imagination and experiment!
Both adults and children really like biscuits, muffins, and puddings, and the range of confectionery accessories for their preparation is simply huge. However, it often becomes difficult to remove the product from the container, but homemade paper cupcake pans can handle this with a bang. Making them is very simple, entertaining and interesting, and cooking in these baskets will save us from the tedious procedure of washing dishes.
As you know, paper will endure anything, and this applies not only to writing, because in our case, the durability, endurance and versatility of the qualities of cellulose are the main factors in its leading position among other figured “frames” for desserts.
These light, graceful baskets perform A+ in both the cold and the oven. In addition, the confectionery product is easily removed from such molds without losing its integrity and aesthetic value. Plus, if we wish, we won’t even need to pick out the cupcake from the capsule, because this particular detail, if skillfully designed and decorated, will become an excellent table decor.
Types of paper molds
Muffin pans can be made from several types of pulp industry products. The simplest option is parchment food paper, smooth and quite dense.
As a rule, this material undergoes special treatment for greater strength and moisture resistance, where acid is used as impregnation. Such capsules for confectionery products are characterized by high heat resistance and perfectly absorb excess fat.

However, today on the Olympus of confectionery glory is food paper with silicone coating. Such baskets have room to turn around. They are manufactured by the most various forms- from the largest to the smallest. These molds are most often preferred by confectionery production, small dessert cafes and shops, as well as experienced housewives.


DIY cupcake tins
Nowadays, retail outlets can offer a wide range of ready-made paper capsules for cupcakes, but when it comes to baking, there is nothing closer to the heart of hand-made forms.
There is no need to worry ahead of time, we won’t need to install a whole mini-factory at home and spend the whole day building baskets; on the contrary, the whole procedure will take no more than half an hour, and the only tools we will need are:
- Compass or circle stencil;
- Simple pencil;
- A sheet of parchment;
- Two metal corrugated cake pans;
- Bowl of water;
- Scissors;
and irrepressible enthusiasm.

You can also involve children in this activity. For them it will be both entertainment and a small feat. And if you decide to add a riot of colors and originality to the molds, then it is better to get food coloring so that our baskets are safe for use.
Now let's start making the molds:


To fill our handmade baskets with dough, you can use a special baking dish, placing them in the recesses. But this is only an additional measure, because our paper capsules, even without unnecessary support, will be able to perfectly withstand the pressure of the rising biscuit on their own.
If you find it difficult to make such molds, you can simply send parchment paper silicone or other molds.

If you started a tea party in the company of girlfriends, or your child needs to prepare a treat for a holiday at school or kindergarten, then muffins with raisins or chocolate, with jam or nuts will be great solution, and homemade paper cupcake pans will be an excellent help in this difficult task.
These cookie cutters are made using an aluminum baby drink can. Beer cans are also suitable for this purpose.
Of course, you can buy cookie cutters in the store. But when you urgently need it, but don’t have time to go shopping, you can quickly cut out the necessary molds from an aluminum can.

The jar must be washed and dried. To make molds you will need a knife, ordinary scissors, a ruler and a pencil, and of course - desire.

The lid and bottom of the jar are cut off. To do this, cut the jar with a knife at the base and top, then cut with scissors. This turns out to be a cylinder like this.

Now, using a pencil and a ruler, we divide the resulting cylinder into several parts, depending on the desired height of the molds. Cut with scissors, smooth out uneven edges. You can sand the sharp edges to avoid burrs.

All you have to do is show your imagination and give it the desired shape. The material is soft and pliable, so you can easily give it any shape: different animals, fish, hearts, mushrooms, stars, suits playing cards etc. Now you can start baking cookies.
These homemade cookie cutters will help you out when you need them.