Do-it-yourself water power plant schemes. Mini hydroelectric power plants for a private house, dacha
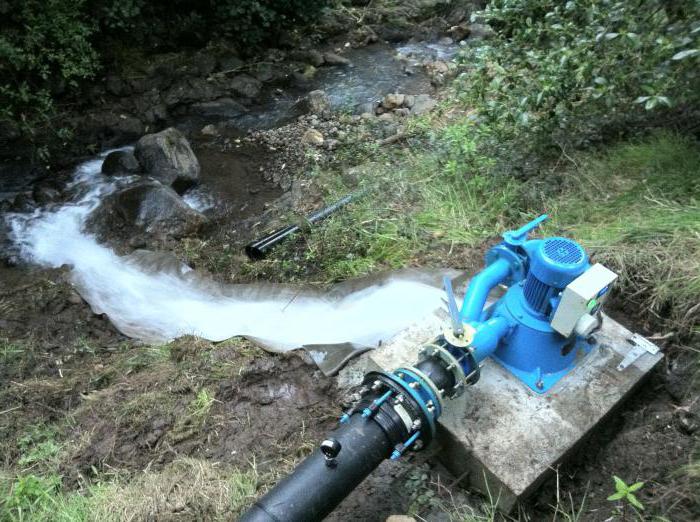
If there is a pond with a dam or a stream near the house, you can make an excellent source of free additional energy. The article will consider an example of how you can make a hydroelectric power station based on a water wheel with your own hands. A power plant made in this way is capable of delivering current up to 6 A; when installed on a small stream, the installation showed a result of 2 A. This is enough to turn on the receiver and a couple of light bulbs. Power depends on the force with which the water flow is.
Materials and tools:
- corners and cuttings of sheet metal;
- disks for creating a wheel (used from the Onan generator housing, which failed);
- generator (was made from two Dodge brake discs of 28 cm each);
- the shaft and bearings were also taken from Dodge;
- copper wire with a cross section of about 15 mm;
- Neodymium magnets;
- plywood;
- polystyrene resin (needed to fill the stator and rotor).

Manufacturing process:
Step one. Making a wheel
To create a wheel, you need two steel disks. In this case, their diameter is 28 cm (11 inches). The disc must be marked so that it is clear where to install the blades. For the manufacture of the blades, a pipe with a diameter of 4 inches is taken and cut lengthwise into 4 parts. In total, the wheel has 16 blades. To fix the discs, they are pulled together with four bolts. Then you can set the blades to the desired positions. They are welded on. The gap between the discs is 10 inches, that is, the length of the wheel is 10 inches.


At this stage, the assembly of the hydroelectric power station is over, the wheel is ready, now you need to make a nozzle and a generator. On one side of the disk there is a hole for convenient mounting of the wheel to the generator.


Step two. Making a nozzle
The nozzle is needed in order to direct water to the wheel. Its width is 10 inches, as is the width of the wheel. The nozzle is made from a single piece of metal by bending. Next, the structure is welded by welding.
Now you can install the wheel on the axle and the mechanical part of the HPP is almost ready. It remains to assemble and install the generator.
The nozzle is made adjustable in height, this allows you to control the flow of water depending on the situation.


Step three. Assembling the generator
The process of creating a generator consists of several steps. First you need to make a winding, it consists of 9 coils. Each coil has 125 turns. The diameter of the copper wire is 1.5 mm. Each phase is formed by three coils connected in series. A total of 6 ends are displayed, this will make the connection both a star and a triangle.
In conclusion, the coils are filled with polyethylene resin and the finished stator comes out. Its diameter is 14 inches and its thickness is 0.5 inches.


To assemble the generator, plywood is needed, a template is made from it. Further, according to this template, 12 magnets are installed with dimensions of 2.5 x 5 cm and a thickness of 1.3 cm. Finally, the rotor is also filled with polyethylene resin. That's all, after drying, the generator is ready.
Under the aluminum cover are rectifiers that convert three-phase alternating current into direct current. The ammeter scale has a range of up to 6 A. With the smallest gap between the magnets, the device outputs 12 volts at 38 rpm.

There are two adjusting screws on the back of the alternator that allow you to adjust the air gap. Thus, it is possible to select the most acceptable parameters for the operation of the generator.
Step four. The final stage of assembly and installation of the generator
All fasteners, as well as the water wheel, need to be painted. Firstly, this way the device will look more beautiful. And secondly, the paint will protect the metal from rust, which will quickly appear near the water source. It would be nice to equip the generator with a protective wing that diverts splashes, but the author did not find a suitable material.


In the photo you can see the place where the generator will be installed. This is a pipe from which water flows from the dam. The drop is about 3 feet. The wheel will take only a certain part of the entire water flow. In practice, the position where the water enters at an angle of 10 o'clock and exits at an angle of 5 o'clock has shown the best results. Then the maximum power is reached.
Next in line are structures, the prototype of which was the free-flow (model of 1964) daisy-chain hydroelectric power station of V. Blinov.
The hydroelectric power plants that will be discussed are free-flow, with a rather original turbine from the so-called Savonius rotors strung on a common (maybe flexible, composite) working shaft. They do not require dams and other large-scale hydraulic structures for their installation. Able to work with full efficiency even in shallow water, which, combined with the simplicity, compactness and reliability of the design, make these hydroelectric power plants very promising for those farmers and gardeners whose plots of land are located near small watercourses (rivers, streams and ditches).
Unlike dams, free-flow hydropower plants, as is known, use only the kinetic energy of flowing water. To determine the power, there is a formula here:
N=0.5*p*V3*F*n (1),
N - power on the working shaft (W),
- р - water density (1000 kt/m3),
- V - river flow velocity (m/s),
- F - cross-sectional area of the active (immersed) part of the working body of the hydraulic machine (m2),
- n - energy conversion efficiency.
As can be seen from formula 1, at a river speed of 1 m/s, ideally (when n = 1) a power equal to only 500 W per square meter of the active part of the hydraulic machine falls. This value is clearly small for industrial use, but it is quite sufficient for the subsidiary farm of a farmer or summer resident. Moreover, it can be increased by the parallel operation of several "hydraulic garlands".
And one more subtlety. The speed of the river in its different parts is different. Therefore, before starting the construction of a mini-hydroelectric power station, it is necessary to determine the energy potential of your river using a simple method outlined. We only recall that the distance traveled by the measuring float and divided by the time of its passage will correspond to the average flow velocity in this section. It should also be noted that this parameter will change depending on the season.
Therefore, the calculation of the design should be made, guided by the average (for the planned period of operation of the mini-HPP) speed of the river.
Fig.1. Savonius rotors for homemade daisy-chain mini hydroelectric power stations:
a, b - blades; 1 - transverse, 2 - end.
Next, you need to determine the size of the active part of the hydraulic machine and its type. Since the entire mini hydroelectric power station should be as simple and easy to manufacture as possible, the most suitable type of converter is the Savonius rotor of the end design. When working with complete immersion in water, the value of F can be taken equal to the product of the rotor diameter D and its length L, and n=0.5. The rotation frequency f with an accuracy acceptable for practice is determined by the formula:
f=48V/3.14D (rpm) (2).
To make the hydropower plant as compact as possible, the power specified in the calculation should be correlated with the real load, the power supply of which should be provided by the minihydroelectric power station (since, unlike a wind turbine, current will be continuously supplied to the consumer's network here). As a rule, this electricity is used for lighting, powering the TV, radio, refrigerator. And only the latter is included in the work during the day constantly. The rest of the electrical appliances work mainly in the evening. Based on this, it is advisable to focus on the maximum power from one "hydraulic garland" of the order of 250-300 W, covering the peak load with a battery charged from a mini-hydroelectric power station.
The transmission of torque from the working shaft of the hydraulic power plant to the pulley of the electric generator is usually carried out using an intermediate transmission. However, this element, strictly speaking, can be excluded if the generator used in the design of the microhydroelectric power station has an operating rotation speed of less than 750 rpm. However, direct communication often has to be abandoned. After all, for the vast majority of generators of domestic production, the operating speed of rotation at the beginning of the "delivery" of power lies in the range of 1500-3000 rpm. This means that additional coordination of the shafts of the hydraulic power plant and the electric generator is needed.
Well, now that the preliminary theoretical part is over, let's consider specific designs. Each of them has its own merits.
Here, for example, is a semi-stationary free-flow mini-hydroelectric power station with a horizontal arrangement of two coaxial, rotated 90 ° relative to each other (to facilitate self-starting) and rigidly connected transverse-type Savonius rotors. Moreover, the main parts and components of this home-made hydropower plant are made of wood as the most accessible and “obedient” building material.
The proposed mini hydroelectric power station is submersible. That is, its support frame is located across the watercourse at the bottom and is reinforced with stretch cables or poles (if, for example, there are walkways, a boat pier, etc. nearby). This is done in order to avoid the entrainment of the structure by the watercourse itself.

Fig.2. Submersible mini hydroelectric power station with a horizontal arrangement of rotors of a transverse type:
1 - spar-base (beam 150x100, 2 pcs.), 2 - lower cross-beam (board 150x45, 2 pcs.), 3 - middle cross-beam (beam 150x120, 2 pcs.), 4 - riser (round timber with a diameter of 100, 4 pcs. .), 5 upper spar (board 150x45, 2 pcs.), 6 - upper cross member (board 100x40, 4 pcs.), 7 - intermediate shaft (stainless steel, rod with a diameter of 30), 8 - pulley block, 9 - DC generator current, 10 - "gander" with a porcelain roller and a two-core insulated wire, 11 - base plate (board 200x40), 12 - drive pulley, 13 - wooden bearing assembly (2 pcs.), 14 - rotor "hydraulic garlands" (D600, L1000, 2 pcs.), 15 disk (from boards 20-40 mm thick knocked down into a shield, 3 pcs.); metal fasteners (including extensions, hubs of the outer discs) are not conventionally shown.
Of course, the depth of the river at the installation site of a mini hydroelectric power station should be less than the height of the support frame. Otherwise, it is very difficult (if not impossible) to avoid water entering the electric generator. Well, if the place where it is supposed to place a mini hydroelectric power station has a depth of more than 1.5 m, or there is a high flow and flow rate that varies greatly throughout the year (which, by the way, is quite typical for snow-fed watercourses), then this design is recommended to be equipped with floats. This will also make it easy to move it when installed on the river.
The support frame of a mini hydroelectric power station is a rectangular frame made of timber, boards and small logs fastened with nails and wire (cables). The metal parts of the structure (nails, bolts, clamps, corners, etc.) should be, if possible, made of stainless steel or other corrosion-resistant alloys.
Well, since the operation of such a mini hydroelectric power station is often possible in Russia only seasonally (due to the freezing of most rivers), then after the expiration of the operation period, the entire structure pulled ashore is subject to a thorough inspection. Timely change rotten wooden elements, rusted, despite the precautions taken, metal parts.
One of the main components of our mini hydroelectric power station is a "hydropower garland" of two rigidly fixed (and constituting a single unit on the working shaft) rotors. Their disks are easy to make from boards 20-30 mm thick. To do this, having made a shield out of them, using a compass, build a circle with a diameter of 600 mm. After that, each of the boards is cut according to the curve obtained on it. Having knocked the blanks together on two slats (to give the required rigidity), they repeat everything three times - according to the number of required disks.
As for the blades, it is advisable to make them from roofing iron. And better - from cylindrical stainless containers (barrels) of suitable size and cut in half (along the axis), in which agricultural fertilizers and other aggressive materials are usually stored and transported. In extreme cases, the blades can also be made of wood. But their weight (especially after a long stay in the water) will greatly increase. And this should be remembered when creating a mini hydroelectric power station on floats.
Spike supports are attached to the ends of the "hydroenergy garland". In fact, these are short cylinders with a wide flange and an end slot for a key. The flange is attached to the respective rotor disc with four bolts.
To reduce friction, bearings are provided located on the middle crossbars. And since ordinary ball or roller bearings are unsuitable for working in water, they use ... home-made wooden ones. The design of each of them consists of two clamps and insert plates with a hole for the passage of the spike support. Moreover, the middle bearing shells are positioned so that the wood fibers here run parallel to the shaft. In addition, special measures are taken to ensure that the insert plates are firmly fixed against lateral displacements. Do this with the help of tightening bolts.

Fig.3. Plain bearing assembly:
1 - crimping bracket (St3, strip 50x8, 4 pcs.), 2 - middle frame cross member, 3 - crimping insert (made of hard wood, 2 pcs.), 4 replaceable insert (made of hard wood, 2 pcs.) , 5 - M10 bolt with Grover's nut and washer (4 sets), 6 - M8 stud with two nuts and washers (2 pcs.).
As an electric generator in the considered microhydroelectric power station, any of the automobile ones is used. They give out 12-14 V DC and easily dock with both the battery and electrical appliances. The power of these machines is about 300 watts.
Quite acceptable for self-production is the design of a portable mini hydroelectric power station with a vertical arrangement of a "garland" and a generator. Such a hydroelectric station, according to the author of the development, is the least material-intensive. The supporting structure of the installation, which fixes its position in the river bed, is a hollow steel rod (for example, from pipe sections). Its length is chosen based on the nature of the bottom of the watercourse and the speed of the current. Moreover, such that the sharp end of the rod, driven into the bottom, would guarantee the stability of the mini-hydroelectric power station and its inseparability by its course. It is also possible to use additional stretch marks.
Having determined the active surface of the rotor by formula (1) and measuring the depth of the river at the installation site of the mini hydroelectric power station, it is easy to calculate the diameter of the Savonius rotors used here. To make the design simple and self-starting, it is advisable to make a “hydraulic garland” of two rotors connected so that the blades of the first are shifted by 90 ° relative to the second (along the axis of rotation). Moreover, to increase the efficiency of work, the structure on the side of the oncoming flow is equipped with a shield that plays the role of a guide vane. Well, the working shaft is mounted in plain bearings of the upper and lower supports. In principle, with a short operating time of a mini hydroelectric power station (for example, on a camping trip), large-diameter ball bearings can also be used. However, if there is sand or silt in the water, after each use, these units will have to be washed in clean water.

Rice. 4. Mini HPP with vertical end-type rotors:
1 - support rod, 2 - lower bearing assembly, 3 - hydropower garland disk (3 pcs.), 4 - rotor (D600, 2 pcs.), 5 - upper bearing assembly, 6 - working shaft, 7 - transmission, 8 - electric generator, 9 - "gander" with a porcelain roller and a two-core insulated wire, 10 - a generator mounting clamp, 11 - a movable shield-guide; a, b - blades: extensions at the upper end of the support rod are conventionally not shown.
The fastening of the supports to the rod is bolted and welded, depending on the weight of the "hydraulic garland" and the need to disassemble it into parts. The upper end of the working shaft of the hydraulic machine is also the input shaft of the multiplier, which (as the most simple and technological) can be used as a belt.
The electric generator is taken again by a car. It is easy to attach it to the support rod with a clamp. And the wires themselves coming from the generator must have reliable waterproofing. In the illustrations, the exact geometric proportions of the intermediate transmission are not conventionally shown, since they depend on the parameters of the particular generator you have. Well, transmission belts can be made from an old car camera by cutting it into tapes 20 mm wide, followed by twisting into bundles.
For the power supply of small villages, a daisy minihydroelectric power station designed by V. Blinov is suitable, which is nothing more than a chain of barrel-shaped Savonius rotors with a diameter of 300-400 mm, fixed on a flexible cable stretched across the river. One end of the cable is attached to a hinged support, and the other through a simple multiplier to the generator shaft. At a flow rate of 1.5-2.0 m/s, the chain of rotors makes up to 90 rpm. And the small size of the elements of the “hydropower garland” makes it possible to operate this microhydroelectric power station on rivers with a depth of less than one meter.
It must be said that before 1964 V. Blinov managed to create several portable and stationary mini hydroelectric power plants of his own design, the largest of which was a hydroelectric power station built near the village of Porozhki (Tver region). A pair of garlands here drove two standard autotractor generators with a total power of 3.5 kW.
MK 10 1997 I. Dokunin
Wind generators are the most common among alternative energy sources, but they are largely dependent on weather conditions. In the absence of wind or its weak flow, they are not effective. For the normal operation of such generators, areas are good where the average annual wind speed is not lower than 5-6 m/s and higher.
In Russia, there are not so many areas with intense winds, the steppes and the Black Sea coast of the Kuban, the Far East coast and up to a dozen uninhabited territories or small ones.
In the middle lane, in the mountains of the Caucasus, the Urals, Altai and other regions where there are small but swift rivers, tributaries, streams, people forget about the possibility of using hydroelectric generators.
It is not rational to refuse to use them, this is a guaranteed source of electricity, because a river with a stable level and flow is much more reliable than a changeable wind.
Power calculation and design selection

In essence, the electrical part of the wind generator device does not differ from the hydro generator, the principle is similar to convert the mechanical energy of rotation into electrical energy.
The difference in the driving force is wind or water, the drive devices will fundamentally differ. Instead of a propeller in hydrogenerators, drum-type wheels with blades are used.
It is not difficult to assemble a hydro generator with your own, if they grow from the right place, if there is a wind generator, it remains to design and assemble a hydraulic drive for its rotation.
In such cases, in order for the generator to rotate at the desired speed, it is often necessary to use gearboxes to change the force and speed of rotation, which depend on the water flow.
It is calculated that the power of the filling wheel is significantly greater than that of the pouring one, the filling is when the water flow falls on the blades of the drive wheel from above, the pouring wheel rotates with the flow from below.
Therefore, based on your conditions, use the design of the filling wheel whenever possible. However, such a wheel also has its drawbacks:
- spin it slower
- requires the construction of additional structures
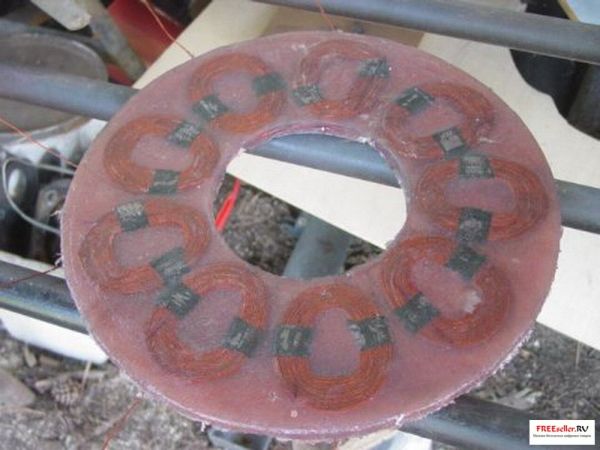
In the photo above, a direct-drive filling wheel is used on a homemade permanent magnet disk generator, the design of which will be discussed below.
In the designs of the drive mechanism, you can use elements of vehicles:
- discs
- asterisks
- gears
- chains and belts
In some cases, even gearboxes from mopeds and motorcycles are used; blades are welded onto the disks of large tractor wheels.
Variants of used generators and connection to the load

Generators can be used for automobiles, buses, and best of all, low-speed tractors with permanent magnets.
They are more reliable, easier to operate and repair, they do not have brushes.
1. generator G250-G1 2. R362 relay-regulator 3. car battery 4. ammeter 5 and 6 switches 7 fuse 8 load.
Depending on your conditions and capabilities, you can use 24V generators.

1. G-228 generator 2. voltage regulator 11.3702 3. 12V batteries connected in series 4. Ammeter for measuring charging current 5 and 6 switches 7. load.
In the simplest case, you can use 6ST-75 batteries, but for reliability, of course, it is better to put new lithium-ion starter batteries. Of course, they are more expensive, but lighter in weight than lead-acid, smaller in size, larger in capacity in A / H, the service life is much longer, they are superior to lead in all respects.
This is decided by everyone, depending on the purpose of the generator, operating conditions and financial capabilities.

If you are going to use a hydrogenerator to power household electrical appliances designed to power an industrial network 220/50Hz, you will have to use voltage and current converters.
These devices convert the direct current of the battery at 12 or 24 V into alternating current with a voltage of 220V. They are different in power, you need to choose depending on the current, what maximum load you are going to use.
They are connected according to the above scheme instead of the load, the simplest low-power converter can be assembled by yourself.
This circuit has been tested over the years, it works like clockwork, it is simple, it does not require configuration. The disadvantage is that it is low-powered 100W.
Use economical daylight lamps of 13-15W or LEDs of 5-10W are enough to illuminate a private house, garage and even a yard at night. 15 cotton lamps shine in brightness like 80W incandescent lamps.
If you need more power to fully operate the power grid, you can buy industrial converters. On sale a wide range of 12/220V; 24/220V; 48/220V, power up to 5 kW and more.
The Pulso IMU-800 inverter converts 12V direct current into 220V/50Hz alternating current. maximum output power 800W. This is quite
enough for lighting, connecting a TV, refrigerator, irons and boilers will need more powerful inverters.
Assembling a homemade magnetic generator
Many people make a hydrogenerator of electricity with their own hands, using the method of assembling a generator on neodymium magnets. As a basis on which the entire structure will be attached, you can take the hub of an automobile wheel with a brake disc.
Factory assembly, reliable and well balanced, disks with permanent magnets are mounted on the rotating part, between which the disk with the rotor windings will be fixed.
The advantage of a permanent magnet generator is that the magnetic field is controlled, this is achieved:
- minimum clearance between rotor and stator
- through a magnetically conductive disk, the lines of force of all magnets are interconnected
Therefore, the disks of a rotating rotor must be magnetically conductive; with a different material, the generator power will be halved. We draw the disks into 12 identical sectors then, evenly around the perimeter of the disk in each sector, glue magnets with a diameter of 25mm and a thickness of 5mm with super glue.
The poles of the magnets alternate through one (S-N-S-N ....) and so on in a circle. You can increase the number of magnets and windings, there will be more poles, this will allow you to achieve more power at lower speeds.
But in our case, 12 magnets, windings with 08-1 mm wire, 100 turns each generate enough power to charge a 12 V starter battery.
A wheel with a diameter of 5 m, rotating at a speed of 150 rpm, produces a current of at least 1A, at 200 rpm, charging currents reach 4A, this is quite enough.
Winding connection diagram

We make the disc diameter 30-35 cm, depending on the size of the hub you have chosen.
In our version, the magnets are round, but it is better to put rectangular 35x25x5mm, more magnetic flux, respectively, more generator power.
At the same time, the stator windings are made oval, with the dimensions of the magnets. When installing the stator, the magnets must coincide with the center of the windings.
The thickness of the stator disc with windings must be the same as the thickness of the discs with magnets. We place the windings on a plywood disk and connect them in series with each other according to the specified scheme in a star.
After connecting and insulating the contacts, the wires are carefully laid along the inner diameter so that they do not touch the rotating parts of the structure. Then they are filled with epoxy resin. For reliability, you can cover the flooded surface with fiberglass, press it a little, then once again abundantly impregnate the fiberglass with epoxy resin from above.
Such measures exclude mechanical damage to the windings and moisture ingress. After drying, we assemble the generator plates on the hub platform.
Through the mounting holes, we put the first disk on the long bolts of the rotating hub disk, fix the magnets outward with clamping nuts.
The next one is the stator disk with windings, and lastly the second disk with magnets inside. The discs are fixed with tension nuts so that the gap between them is uniform over the entire plane and is no more than 3 mm. After reassembly, rotate to check for vibration and wobble, adjust if necessary.
When assembling a hydrogenerator with your own hands at home, you should understand that the direct connection of the generator to the wheel simplifies the design, but there are not always such ideal conditions for supplying water to the wheel.
In some places, it is necessary to apply torque transmission schemes through a system of additional shafts, gears or belt drives, this reduces power.
For those who do not want to wind, drill and glue a lot, there are very simple options, you can buy a reliable Chinese generator, a manual drive, or rather a foot drive. Such generators are used in bicycle simulators, combine business with pleasure, and are convenient in emergency situations.

The NJB-800-12 generators are very practical, beautifully designed and compact.
At a rotation speed of 250 revolutions, the output power is 500W, at 500 revolutions 800W. 12V.
It is convenient to transport it in the trunk of a car to camping, for the use of water resources, you only need to attach the blades to the wheel.
Everything is good, but one drawback: it costs almost 30 thousand rubles, not everyone can afford it. If you have a suitable water source, modern technologies allow you to independently make a reliable hydro generator, the most important element in this project is your desire. How to make a manual video generator:
It is at this place that We will try to make our new hydroelectric power station. Earlier, attempts were already made on this pond to create a home-made hydroelectric power station from a squirrel wheel with a belt drive to a generator (by the way, it is shown in the photo at the end of the article), which gave a current of about 1 ampere, this was enough to power several light bulbs and a radio in our small hunting lodge . This power plant has been successfully operating for more than 2 years, and we decided to create a more powerful version of a similar version of a hydroelectric power plant on the site of this mini dam.
For the manufacture of a mini dam hydroelectric station, you will need:
Sheet metal scraps and corners;
- Disks for the wheel (used from the body of the failed Onan generator);
- Generator (it was made from two discs with a diameter of 11 inches from Dodge disc brakes);
- The drive shaft and bearings also seem to be from Dodge, we don’t remember exactly, so we removed them with our own hands from some other homemade product;
- copper wire with a cross section of approximately 15 mm;
- some plywood;
- magnets;
- polystyrene resin for filling the rotor and stator.

Manufacturing process
We make the blades of the drive wheel from a 4-inch steel pipe cut into 4 parts.

We made a template that helped lay out the hole. The side surfaces of the wheel are 12-inch rims.

We make a template with which we mark the holes for the hubs (5 pieces), as well as the position of the angle of the blades. In such a wheel, when viewed from the side, water hits the top at about 10 o'clock, passes through the middle of the wheel and exits at the bottom at 5 o'clock, so that the water hits the wheel twice. We reviewed a large number of photographs and tried to model the width and angle of the blades. In the photo above - markings for the edges of the blades and holes for attaching the wheel to the generator. The wheel has 16 blades.

The template was glued to one of the disks - the future side surface of the wheel, we clamped both disks together. In the photo above - drilling small holes for positioning the blades.

We make a gap between the discs of 10 inches, using studs with solid threads, and align them as carefully as possible before installing the blades.

The wheel welding process is shown in the photo above. It is very important that the blades are made of galvanized steel pipe. Before welding, it is necessary to strip the zinc from the edges of the blades, since galvanized metal emits toxic gas during welding, which we try to avoid.

The finished wheel of our future hydropower plant, without a generator. On the other side of the wheel (opposite the alternator) there is a 4" diameter hole in the side disc for easy screwing onto the alternator and also for cleaning to reach in and remove sticks and other debris that water might bring inside.

The nozzle is the same width (10 inches) as the wheel and about 1 inch high from the end where the water exits. The area of the nozzle is slightly smaller than the 4-inch pipe that the nozzle is mounted on. In the photo above - we bend a metal sheet with our own hands for a nozzle.

We put the wheel on the axle, our hydroelectric power station is almost ready, it remains only to make and install the generator. The whole structure is movable. We can move the nozzle forward, backward, up, down. The wheel and generator can move forward and backward.
Manufacture of a generator for our hydroelectric power station.>
We make the stator winding and prepare for pouring. The winding consists of 9 coils, each coil consists of 125 turns of copper wire with a cross section of 1.5 mm. Each phase consists of 3 coils connected in series, we brought out 6 ends, so we can make the connection as a star or a delta.

And this is the stator - after pouring. (We use polyester resin to fill it) Its diameter is 14 inches (35.5 cm), thickness 0.5 inches 1.3 cm.
We make a template from plywood - for marking under magnets.


In the photo - a template and one of the brake discs (future rotor).

We arrange 12 magnets 2.5 x 5 cm in size, 1.3 cm thick, according to the prepared template.

We fill the rotor with polyester resin, and when the resin dries, the rotor will be ready to work.

This is what our almost completed hydroelectric power plant with generator looks like.

Photo from the other side. Under the aluminum cover are two bridge rectifiers from 3-phase AC to DC. Ammeter scale - up to 6A. In this state, with the air gap between the magnetic rotors reduced to the limit, the machine outputs 12.5 volts at 38 rpm.
In the rear magnetic rotor, there are 3 adjusting screws to adjust the air gap so that the generator can spin faster as needed, hoping to find the optimum.

At leisure, 17 people took part in the creation of the hydroelectric power station.

We start manufacturing fasteners, for this we first clean all rust from sheet metal and corners, prime and paint, this is of course not necessary, but it’s more beautiful, and there will be a marketable appearance.

Our water wheel generator is ready, it remains only to install it!
It would be nice to build a splash screen for the generator that would rotate with the wheel, but we never found a suitable material. Therefore, we decided to do it later, if the hydroelectric power station starts working.

Another photo of the generator with a water wheel. The nozzle has not been installed yet, it is in the back of the body and we will put it in soon.

In the photo - the place where we want to put it. A 4" pipe exits from the bottom of the dam, a drop of about 3 feet. We take only a small part of the water flow.

This is our old micro-hydro power plant, which has worked for 2 years, including winters. It was enough for 1 ampere (12 watts) or so. This is a squirrel wheel, with a belt drive to the engine from an Ametek computer streamer. Belt tension is critical to successful operation and must be adjusted frequently. We hope we've built something better than this.

Here is our HPP in place, we are setting it up. Finally, we come to the theoretically predicted parameters: the best result is obtained when the water enters at 10 o'clock on the rim, and exits around 5 o'clock.

Earned! The output is about 2 amps (1.9 to be exact). Can't increase current. Adjustments are not easy to make - each movement of the wheel requires a corresponding movement of the nozzle, and vice versa. We can also change the air gap and change the connection from star to delta. The result is clearly better for a star - the power is higher than that of a triangle at the same speed. We ended up with a 1.25" star (quite a lot).

The machine can be made a little cheaper by using less powerful magnets and a smaller air gap... or it can produce more current with the same magnets, smaller gap, and coils with more turns. Someday we'll get to it. In the meantime - the wheel produces 160 rpm at idle, 110 rpm under load, producing 1.9 A x 12V.
We got pleasure from the sea, it was a lot of fun, and the mini-hydroelectric power station works well. We still need a screen for the generator - the river is full of black sand! Every few hours it is necessary to clean the magnetic rotors from sand buildup. It is necessary either to put a screen, or to attach a couple of powerful magnets at the entrance to the pipe.
Based on materials from the site: Otherpower.com
The regular increase in electricity prices makes many people think about the issue of alternative sources of electricity. One of the best solutions in this case is a hydroelectric power plant. The search for a solution to this issue concerns not only the scale of the country. Increasingly, you can see mini-hydroelectric power plants for the home (cottage). The costs in this case will be only for construction and maintenance. The disadvantage of such a structure is that its construction is possible only under certain conditions. Water flow is required. In addition, the construction of this structure in your yard requires the permission of local authorities.
Scheme of a mini hydroelectric power plant
- Channel, characteristic of the plains. They are installed on rivers with a slight flow.
- Stationary use the energy of water rivers with a fast flow of water.
- Hydroelectric power plants installed in places where the water flow drops. They are most often found in industrial organizations.
- Mobile, which are built using a reinforced sleeve.
For the construction of a hydroelectric power station, even a small stream flowing through the site is enough. Owners of houses with central water supply should not despair.

One of the American companies has developed a station that can be built into the water supply system at home. A small turbine is built into the water supply system, which is set in motion by the flow of water moving by gravity. This reduces the flow rate of water, but reduces the cost of electricity. In addition, this installation is completely safe.
Even mini-hydroelectric power plants are being built in the sewer pipe. But their construction requires the creation of certain conditions. Water through the pipe should flow naturally due to the slope. The second requirement is that the pipe diameter must be suitable for the equipment. And this cannot be done in a detached house.
Classification of mini hydroelectric power plants
Mini hydroelectric power plants (the houses in which they are used are mostly private sector) are most often one of the following types, which differ in the principle of operation:
- The water wheel is the traditional type and is the easiest to make.
- Propeller. Used in cases where the river has a channel with a width of more than ten meters.
- The garland is installed on rivers with a slight flow. Additional structures are used to increase the speed of the water flow.
- The Darrieus rotor is usually installed in industrial plants.

The prevalence of these options is due to the fact that they do not require the construction of a dam.
Water wheel
This is a classic type of hydroelectric power plant, which is most popular for the private sector. Mini hydroelectric power plants of this type are a large wheel that can rotate. Its blades are lowered into the water. The rest of the structure is above the channel, forcing the whole mechanism to move. Power is transmitted through a hydraulic drive to a generator that generates current.
propeller station
On the frame in a vertical position there is a rotor and an underwater windmill, which is lowered under water. The windmill has blades that rotate under the influence of the flow of water. The best resistance is provided by blades two centimeters wide (with a fast flow, the speed of which, however, does not exceed two meters per second).
In this case, the blades are set in motion due to the emerging and not due to water pressure. Moreover, the direction of movement of the blades is perpendicular to the direction of flow. This process is similar to how wind farms work, only it works underwater.
Garlyandnaya HPP
This type of mini-hydroelectric power station is a cable stretched over the channel and fixed in a support bearing. Turbines of small size and weight (hydraulic rotors) are hung and rigidly fixed on it in the form of a garland. They consist of two semi-cylinders. Due to the alignment of the axes, when lowered into the water, a torque is created in them. This leads to the fact that the cable bends, stretches and begins to rotate. In this situation, the cable can be compared to a shaft that serves to transmit power. One end of the rope is connected to the gearbox. Power is transferred to it from the rotation of the cable and hydraulic torches.

The presence of several "garlands" will help to increase the power of the station. They can be connected to each other. Even this does not greatly increase the efficiency of this HPP. This is one of the disadvantages of such a structure.
Another disadvantage of this species is the danger it creates for others. This kind of station can only be used in deserted places. Warning signs are mandatory.
Rotor Daria
A mini-hydroelectric power plant for a private house of this type is named after its developer, Georges Darier. This design was patented in 1931. It is a rotor with blades on it. For each of the blades, the necessary parameters are selected individually. The rotor is lowered under water in a vertical position. The blades rotate due to the pressure drop that occurs under the action of water flowing over their surface. This process is similar to the lift force that makes airplanes take off.
This type of HPP has a good efficiency index. The second advantage is that the direction of the flow does not matter.
Among the shortcomings of this, one can single out a complex design and difficult installation.
Advantages of a mini hydroelectric power station
Regardless of the type of construction, mini hydroelectric power plants have a number of advantages:
- Environmentally friendly, do not produce substances harmful to the atmosphere.
- The process of obtaining electricity takes place without the formation of noise.
- The water stays clean.
- Electricity is generated constantly, regardless of the time of day or weather conditions.
- Even a small stream is enough to equip the station.
- Surplus electricity can be sold to neighbors.
- You don't need a lot of permissive documentation.
Do-it-yourself mini hydroelectric power station
You can build to generate electricity yourself. For a private house, twenty kilowatts per day is enough. Even a do-it-yourself mini-hydroelectric power station can handle this value. But it should be remembered that this process is characterized by a number of features:
- Precise calculations are difficult to make.
- The dimensions, thickness of the elements are selected "by eye", only empirically.
- Homemade structures do not have protective elements, which leads to frequent breakdowns and associated costs.

Therefore, if there is no experience and certain knowledge in this area, it is better to abandon this kind of idea. It may be cheaper to purchase a ready-made station.
If you still decide to do everything with your own hands, then you need to start by measuring the speed of the flow of water in the river. After all, it depends on the power that can be obtained. If the speed is less than one meter per second, then the construction of a mini-hydroelectric power station in this place will not justify itself.
Another step that should not be omitted is the calculations. It is necessary to carefully calculate the amount of costs that will be spent on the construction of the station. As a result, it may turn out that hydroelectric power is not the best option. Then you should pay attention to other types of alternative electricity.
A mini-hydro power plant can be the best solution for saving energy costs. For its construction, it is necessary to have a river near the house. Depending on the desired characteristics, you can choose the appropriate version of the hydroelectric power station. With the right approach, you can even make such a structure with your own hands.