How to lay down a soft roof. Step-by-step process of roofing with soft roofing
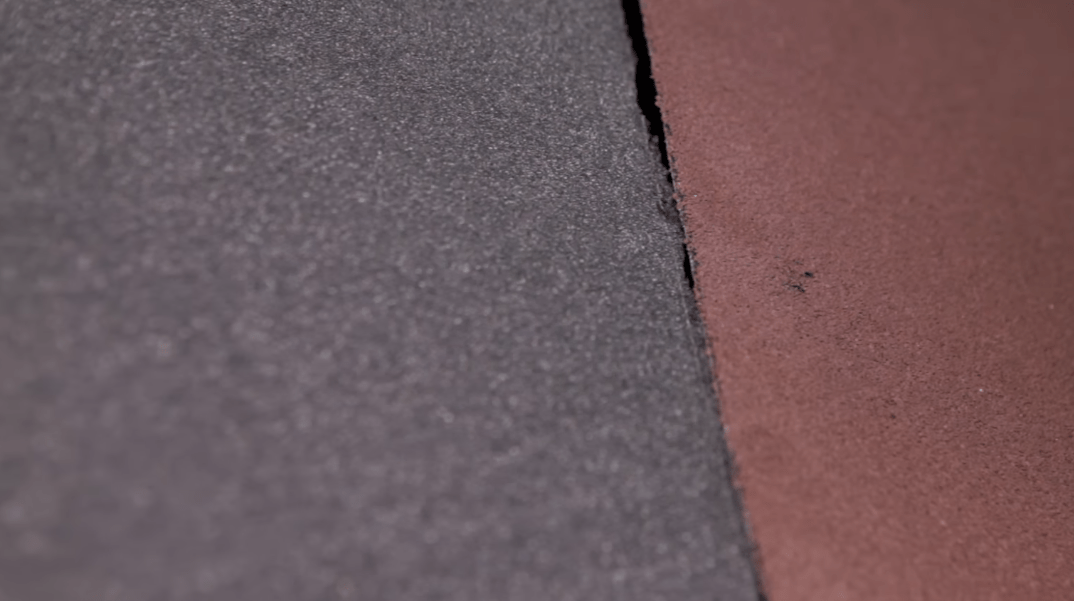
Soft tile, also flexible or bituminous, is a roofing material based on fiberglass covered with bitumen and stone powder. The fiberglass base is strength and long service life, bitumen gives it high waterproofing qualities, and stone dressing is a protective layer from sunlight and mechanical stress. The main advantage of bituminous tiles over other roofing materials is its flexible structure, which makes it possible to install on roofs of any configuration and shape without unnecessary undercuts and waste.
Laying technology
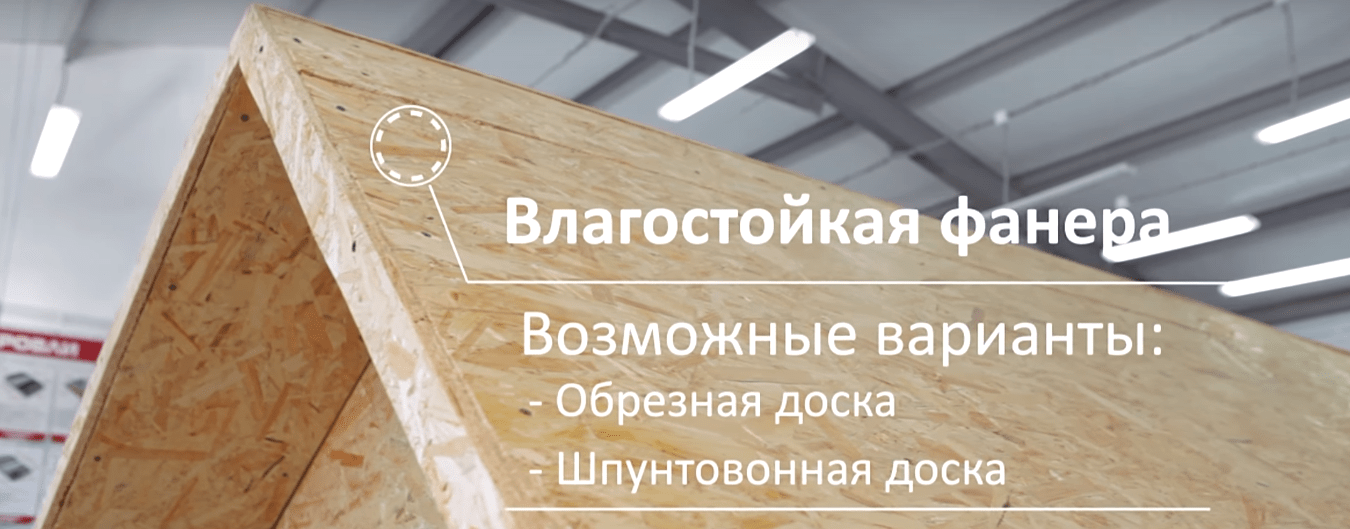
Before you cover the roof with a soft roof, you need to understand that this material not only has a flexible structure, it is soft. This means that a very solid foundation must be laid under it. Therefore, first of all, the sheathing for flexible tiles must be solid and made of durable materials. Usually, OSB-3 boards, plywood (moisture resistant), tongue-and-groove boards, or edged boards (with a moisture content of not more than 20%) are used for this.
What is permissible when assembling the lathing under a soft roof:
- a small gap between the elements within 1-2 cm;
- plane difference within 2–3 mm.
If OSB or plywood are used as elements of the crate, then they are laid with an offset. That is, the seams between the panels should not match in horizontal rows. The reason for this laying is to create a plane that will evenly distribute loads over its entire surface. It should look like this: 
Preparing for installation
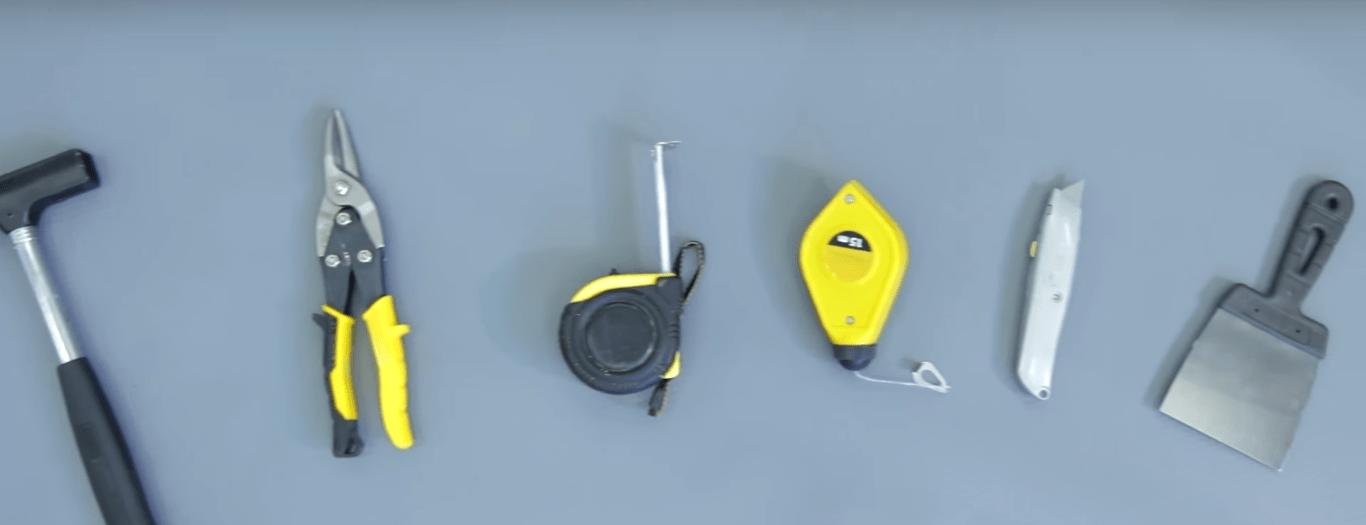
Before you cover the roof with shingles, you need to prepare everything you need, except for the roofing material itself. From the tools you need to prepare:
- hammer;
- scissors or knife;
- pencil and tape measure;
- putty knife.
From additional products:
- special nails for fastening;
- bituminous mastic for connecting shingles to each other;
- metal strips: cornice and end.
Assembly operations
The very first installation operation is laying the lining layer. This is a roll material with a width of 1 m and a length of up to 15 m, which is laid out parallel to the cornice overhang. Its main task is to hide the differences in the plane, plus increase the waterproofing characteristics of the roof as a whole. In its composition, it resembles the soft roof itself, because it is based on fiberglass impregnated with bitumen. This process looks like this: 
What you need to pay attention to when laying the underlayment carpet:
- fastening to the crate is made with nails for bituminous tiles, the installation step of fasteners is 25 cm;
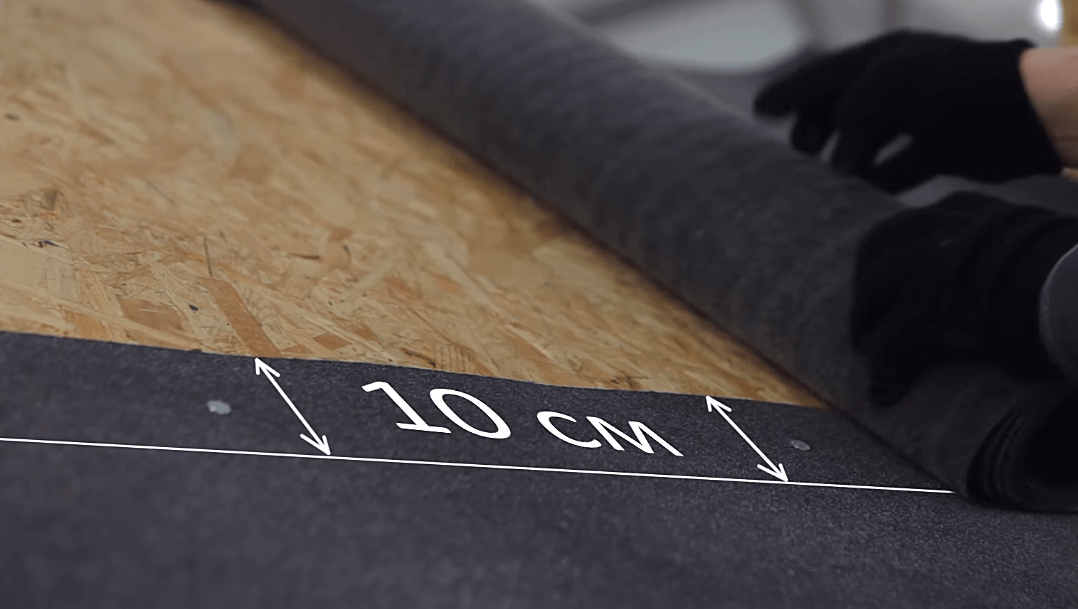
- adjacent strips are overlapped relative to each other with an offset of 10–15 cm;
- places of overlap are smeared with bituminous mastic using a spatula, the thickness of the applied mastic is not more than 1 mm.
The second installation operation is the installation and fastening of the cornice strips. They serve to strengthen the roof structure, plus they create conditions for the removal of precipitation in the form of water from the roof plane. They are laid along the cornice with an edge so that the plank covers the two planes of the cornice horizontal and vertical. Fastening is carried out with ordinary roofing nails, which are staggered. The distance between the fasteners is 15 cm. For clarity, we give a photo example of the installation process: 
The third operation is the installation and fastening of the end strips. They are mounted on top of the underlayment. Like cornice strips, they are attached to the batten with roofing nails in a checkerboard pattern with a step of 15 cm. 
Laying and fastening of a soft roof
All preparatory operations have been completed, it remains to install the shingles themselves. This process is actually simple, but the question of how to do it right is constantly heard today. Therefore, it is very important to perform installation procedures strictly in a certain sequence.
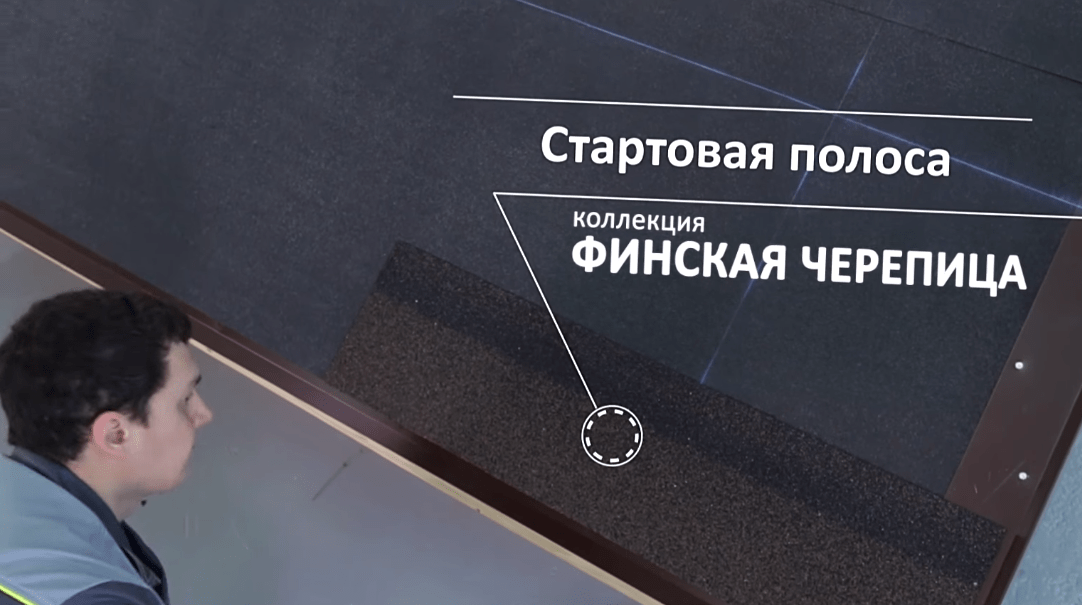
- First of all, you need to lay the starting strip. This is not a separate element, it is an ordinary ordinary bituminous tile, from which petals are cut off with their own hands. This requires a ruler and a knife. The resulting strip is laid along the edges of the eaves on the cornice strips with a 1–2 cm indent from the bend. The strip is fastened using bituminous mastic, which is smeared on the back side of the element with a width of 10 cm and a thickness of not more than 1 mm. Before applying, do not forget to remove the protective film. Additionally, after laying the strips, they are pierced with nails along the outer edge (along the cornice strip) in increments of 25 cm.
Note! Before laying the strips, it is necessary to smear the end strips with mastic so that the material attaches well to them. This is an important point that should not be missed.
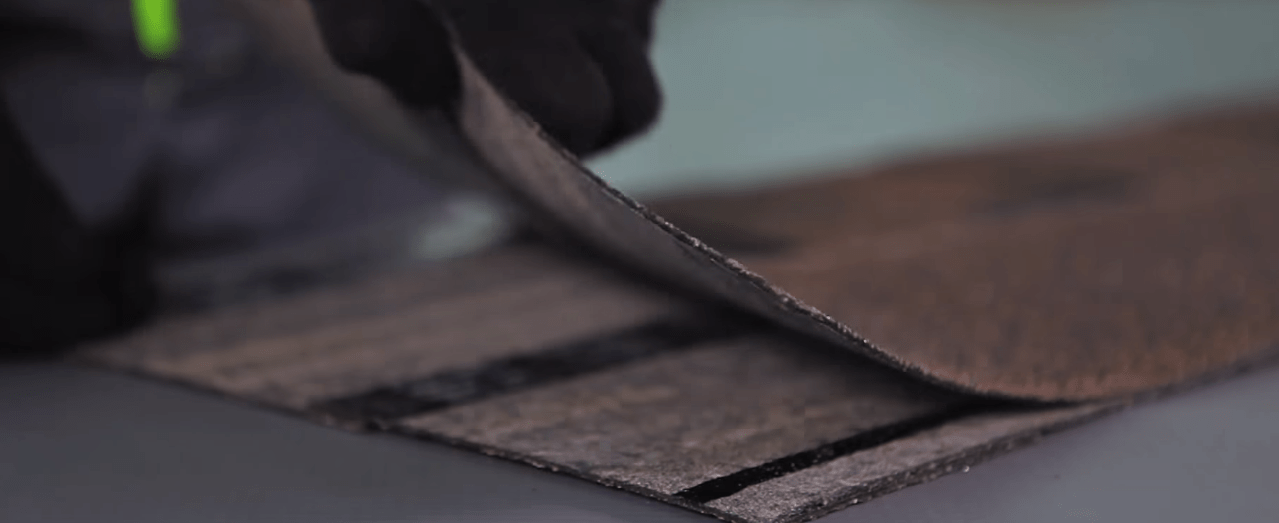
- Before laying each element of soft tiles, it is necessary to remove the protective polymer film from the back. It must be removed from the inside, pulling towards the location of the petals.

- The first bottom row of shingles is laid from any edge of the roof with the end strips laid on the smeared part. The material must be laid strictly parallel to the eaves. Fastening is carried out with nails for flexible tiles in strictly defined places. Here it is necessary to indicate that each manufacturer has its own attachment points. But most often these are the areas between the petals. This is done in order to be able to close the nail attachment points with petals above the shingle. That is, the nail heads remain under the petals and are not adversely affected by natural precipitation.
Note! If the angle of inclination of the roof structure is less than 45°, then four nails are used to fasten the shingles. If the angle exceeds 45°, then six nails are used.

Skate decoration
Correctly covering the roof with soft tiles is not easy to lay roofing material strictly according to technology. This is to create a cover that would cover the entire structure, leaving no gaps and crevices, through which rain, snow and other precipitation can penetrate under the roofing. Therefore, it is very important to close the skate correctly.
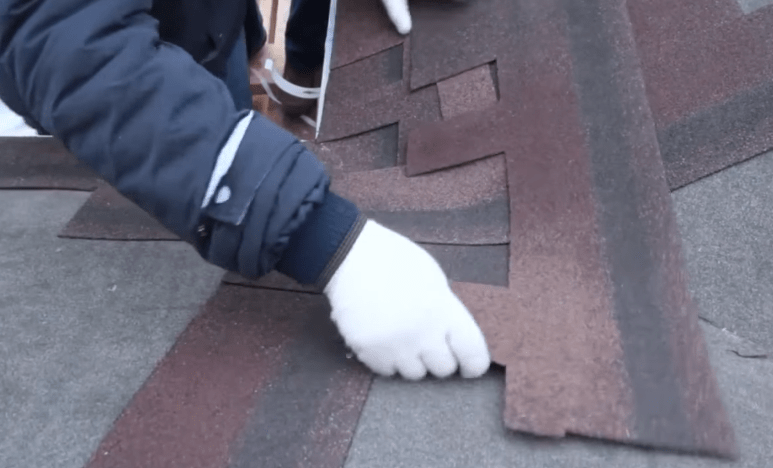
To do this, they use the soft roof itself, the shingles of which are cut into pieces, or rather, into petals, making cuts with a knife along the ruler perpendicular to the shingles. That is, elements from the petals of the tile should be obtained. Now about how to properly lay the resulting patterns:
- they are laid along the ridge along, that is, the petals should “look” along the ridge element;
- installation is overlapped so that there are no gaps and gaps;
- overlap is carried out taking into account which side the wind blows more often, that is, the laying of elements must be carried out taking into account the least resistance.
The assembly process itself is carried out according to the following technology:
- The protective film is removed from the patterns.
- The back side is coated with bituminous mastic.
- Installation is being done.
- Fastening is carried out with nails - two on each side of the ridge. The nail heads must overlap the next element.
For a better perception, we suggest that you familiarize yourself with the photo-instruction for decorating the roof ridge: 
To ensure ventilation of the roof, the roof ridge is often not covered with a solid carpet. It is left open, and a special device is installed on top (usually made of plastic in the color of the roofing), similar to a gable roof. Fasten the device with nails or self-tapping screws directly on the laid flexible tiles. In its design there are slots through which air will escape from under the roof structure.
Design of valleys
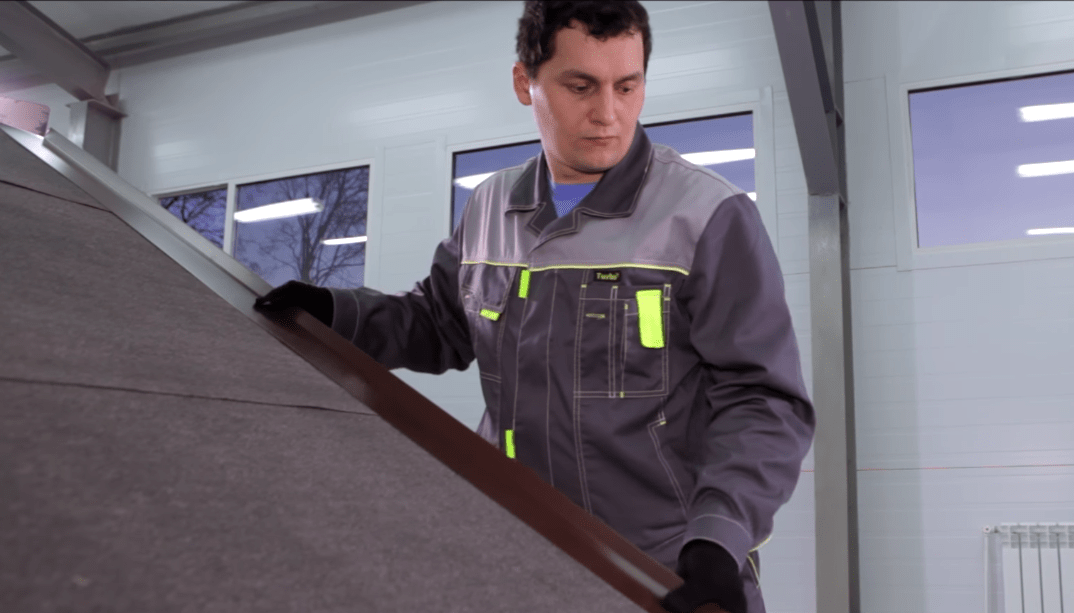
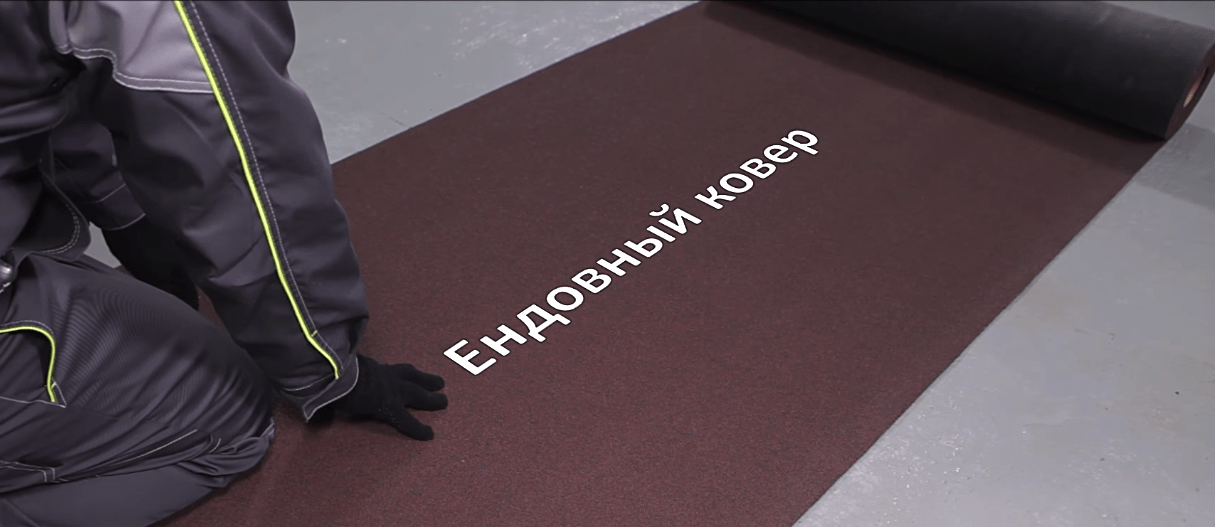
Before you cover the roof using soft tiles, you need to pay attention to whether there is a valley in its design. This is the part of the roof that is most affected by atmospheric precipitation. It is on it that they flow in large quantities. Therefore, it is reinforced with two layers of metal strips: one from the bottom of the crate, the other from above. The planks are mounted with an overlap with an offset of at least 15 cm.
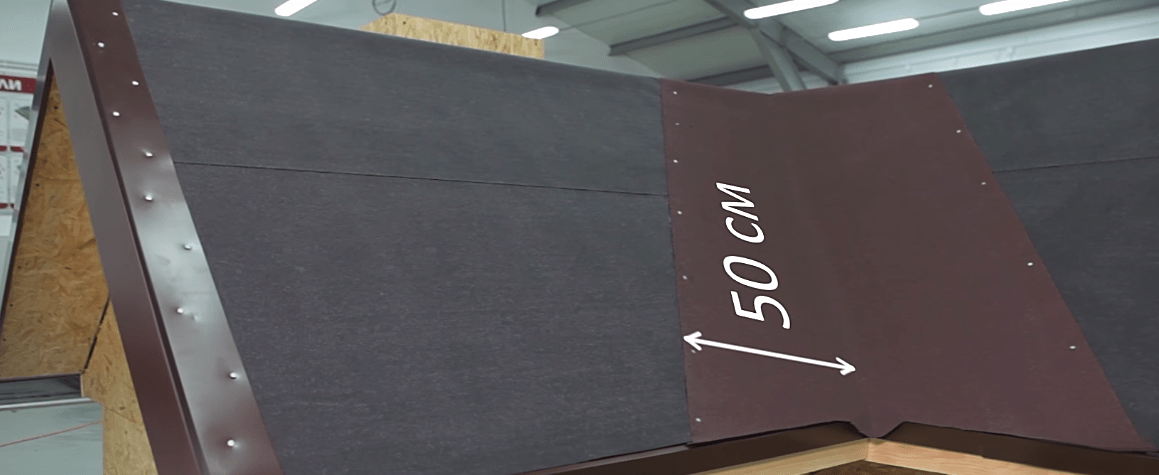
As for protection, a lining layer is laid on top of the crate and plank. And already on top of it the so-called valley carpet is laid in its entire width (1 m). That is, on each side of the valley, it will cover planes 50 cm wide. Nothing can be cut and saved here. As for the length of the valley, if the length of the lining material is not enough, then it is overlapped with an offset of at least 30 cm.
Attention! The carpet laid on the valley on the lining material should lie down for several hours before the installation of the tile itself begins. During this time, it will straighten up and will definitely take the form of a valley.
The valley carpet is fastened with bituminous mastic and ruff nails every 15 cm along the edges of the laid strip. In principle, the carpet itself is a ready-made coating, sprinkled with stone chips and impregnated with bitumen. It is selected in the color of the roofing material, so that by itself it will not spoil the roof. 
The valley carpet does not have to be covered with soft tiles, although fasteners (nail heads) will have to be closed.
Pipe decoration
Chimneys and ventilation pipes are an integral part of roofs. These are serious ledges when the question is how to cover the roof with shingles. Well, if they pass through the skate. But more often they are located on the roof slopes, so when laying soft tiles, you must strictly follow the rules for installing the lining layer using special devices that ensure the tightness of the pipes to the roof plane.
These devices are plastic products in the form of caps with a through hole, the diameter of which is selected to match the diameter of the chimney or ventilation pipe. To install the pipe, you must first mount the cap.
- Therefore, a hole is made in the laid lining layer at the place where the pipe passes.
- Then, bituminous mastic is applied with a spatula at the place of installation of the cap on the laid lining material.
- The cap is laid in place, pressed against the plane of the roof.
- Additionally, it is attached to the crate with self-tapping screws or roofing nails along the perimeter, preferably in two lines: along the outer edge and closer to the pipe.
Then one of the shingles, which will rest against the lower part of the cap pipe, must be laid in place and a part of the upper strip cut around the circumference of the pipe. That is, the tile must accurately describe the shape of the pipe so that everything looks beautiful.
The upper surfaces (fields) of the cap are lubricated with mastic. A prepared shingle is laid on it, which, in turn, is, as usual, attached to the roof with nails. In the same way, the shingles are fitted and laid on the sides and top of the cap. It should be noted that it is necessary to coat with mastic. In this case, it performs the functions of not only a bonding material, but also a sealant.
Important! It is recommended to reinforce the junction of the tiles and the plastic cap with a sealant. For this, the same bituminous mastic is used, only not from a can, but from a pistol. It is thicker, and the material is fed from the gun in an even groove. In addition, the applied mastic must be covered with stone chips. Just sprinkle the material with pebbles that can be collected from the softest roof. The stone coating will protect the sealant from the negative effects of the sun.
Video instructions for installation work
Generalization on the topic
As practice shows, today more and more often the owners of suburban real estate are trying to do some construction processes with their own hands, saving the family budget. In this regard, it is easiest to cover the roof with flexible tiles. Of course, to cover large roofs, you will have to call in craftsmen, but in order to close the roof of a gazebo or porch, terrace, bathhouse or garage, you can not call specialists.
Roof covering materials, united by the common name "soft roof", also have a common feature: they are installed only on a solid base. Soft roofing, which can be installed on various types of roofs, is nothing more than a waterproofing carpet that does not require additional waterproofing. These are bituminous tiles, euroruberoid, mastic materials and polymer membranes.
The use of bituminous tiles is justified in the case when the roof plane has a minimum slope with respect to the horizontal of at least 12 degrees. If the slope is less, moisture will inevitably stagnate at the joints, which will lead to rapid deterioration of the coating.
Better in warm season
It is recommended to mount bitumen shingles on the roof if the “overboard” is at least five degrees above the zero mark. It's all about the features of the shingle - a sheet that consists of three or four "tiles". It can be attached to the surface both with nails and with the help of a special self-adhesive layer located on the inside. The tightness of flexible tiles is ensured by solar heat, under the influence of which the sheets are soldered to each other and to the base. At sub-zero temperatures, this does not happen, so the insulation is unlikely to be of high quality. In addition, the fragility of the shingle in cold weather will not allow you to install the material with an overlap - and this will definitely be required, for example, on a ridge.
If, nevertheless, due to necessity, it is necessary to do the installation of a soft roof with your own hands at the wrong time of the year, before starting work, the tiles must be kept in a room with room temperature. You can also use a hot air burner.
Installation of a soft roof video (tile)
It goes without saying that the installation of a roof is a complex event and includes a certain number of stages.
Foundation preparation
As a basis for flexible tiles, you can use edged boards, moisture-resistant plywood, OSB-board and other building material with a flat surface, the maximum allowable humidity of which is 20%. The boards at the joints are attached to the supports and overlap at least two runs between them.
The seams of the bottom skin must have at least two millimeter gaps. If the crate is made of edged boards, then the gaps are made five millimeters.
Tip: during installation, annual rings on edged boards should be placed with rounded parts up.
The ventilation system provides air circulation, which is necessary to prevent condensation on the bottom of the base. Neglecting this stage of the construction process will lead to the fact that the truss system will begin to rot, and in winter icicles and ice will form.
Elements of the roof ventilation system:
- ventilation outlets;
- vents in the overhangs of cornices;
- air gap between the base and waterproofing - not less than 5mm.
Tip: in order for the attic to ventilate naturally, ventilation holes should be placed evenly under the overhang of the eaves along the entire ridge.

Lining layer
When installing a soft roof, the installation technology provides for laying the lining layer. It is mounted on cornice overhangs, roof ends and valleys from top to bottom.
If the roof slope exceeds 18 degrees, you can limit yourself to lining only where leaks are most likely. Valleys and skates are reinforced by 500mm and 250mm, respectively. At the same time, the valleys are equipped with a lining layer on both sides, and along the eaves and end overhangs, it must be laid to a width of at least 400 mm.
If the roof has a slope of 12 to 18 degrees, the lining carpet is laid over the entire area - in the direction from the bottom to the top, in a parallel direction with the cornice overhang. In the longitudinal direction, the overlap should be 150mm, in the transverse direction - at least 100mm. The lining is nailed to the base with galvanized roofing nails at a distance of 200mm from each other.
Tip: for better tightness of overlapping places, they need to be coated with bituminous mastic.
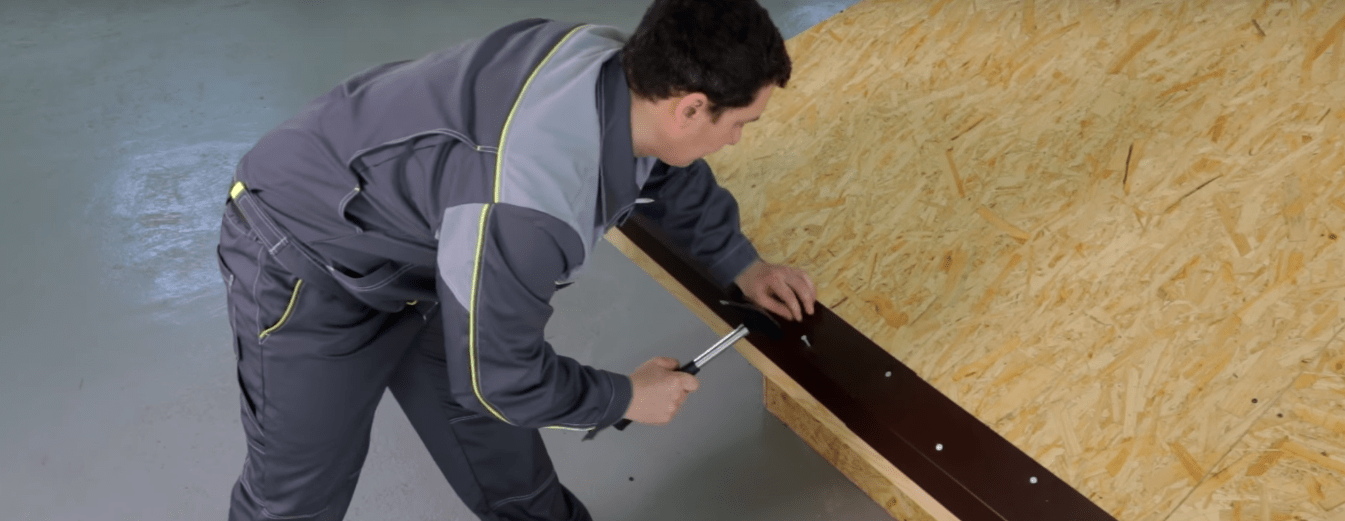
Cornice strips: installation
Such strips are made of metal and are attached to the lining on the overhangs of the cornices. They are needed to protect the edges of the crate. Fasteners are made with mounting nails, the step between them should be 100mm. Where the cornice strips meet, there must be an overlap of at least 20mm.
Gable strips: installation
They are also made of metal, they are attached to the lining layer at the ends of the roof. Designed to protect the edge of the crate. Fastening is similar to cornice strips.
Valley carpet
Additional protection of the roof from atmospheric precipitation. You need to choose it according to the color of the tiles, it is nailed with roofing nails. The overlaps are carefully glued.
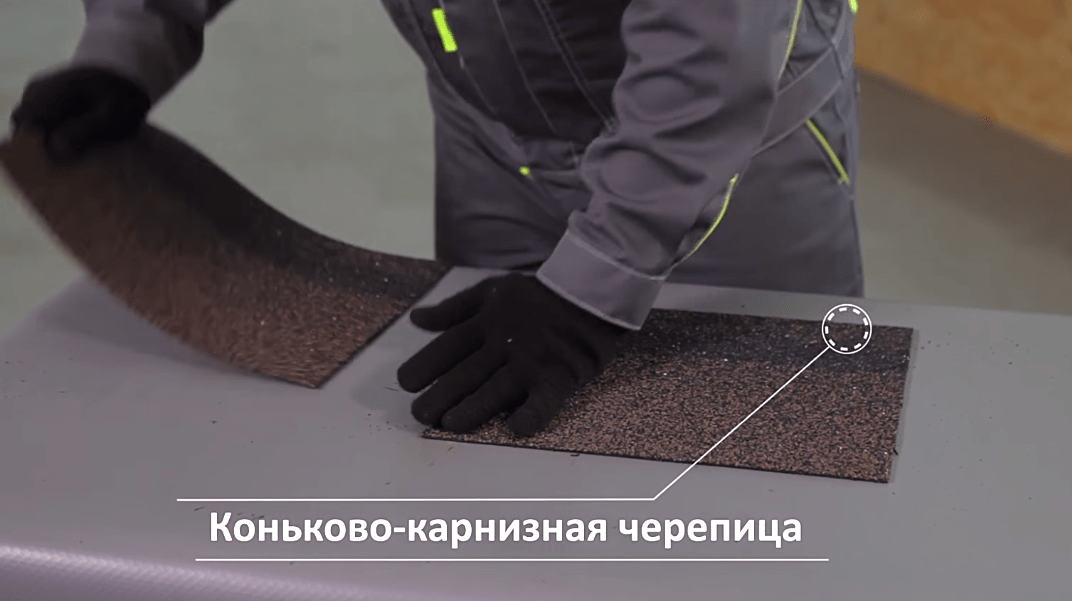
Cornice tiles: laying
When installing a soft roof with your own hands, it should be remembered that before laying the protective film must be removed from the bottom surface of the tile. Cornice tiles are laid at a distance of 1-2 cm from the edge of the cornice along its overhang, exactly butt to butt.
Ordinary tile: laying
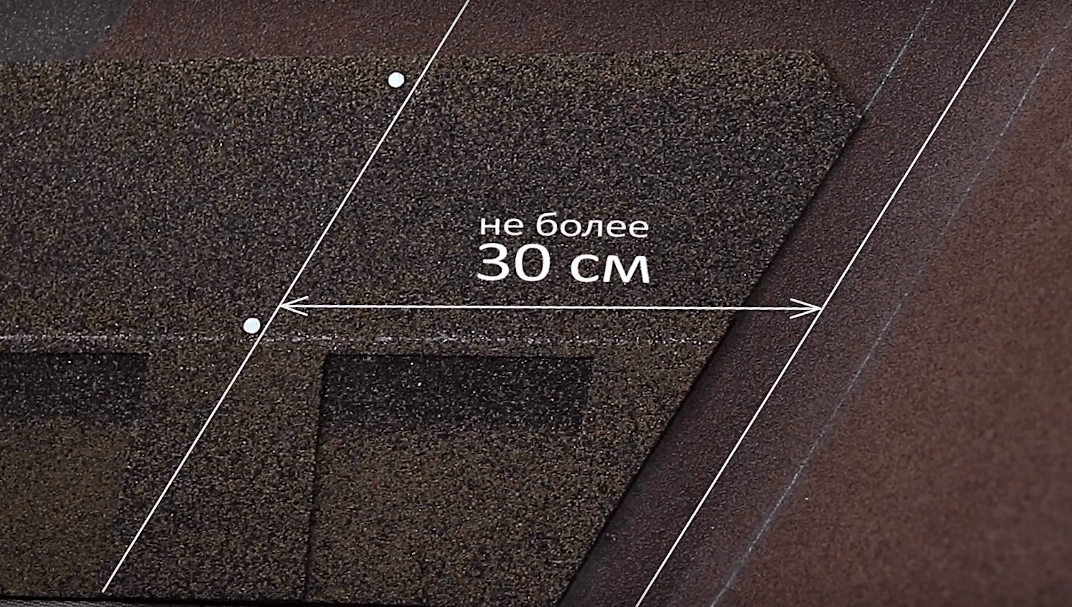
Start laying the main part of the tiled roof from the middle of the overhang towards the ends. Under standard conditions, sheets are nailed with four nails, but if the roof slope is very steep or the climate zone is famous for constant strong winds, at least six nails should be used.
The first row is mounted so that the location of its edge is no more than a centimeter from the upper edge of the cornice tiles. The joints should be covered with "petals". When laying the next row and subsequent ones, you need to make sure that the level of the cutouts of the previous row and the ends of the “petals” coincide. Along the edge, the shingles are cut and glued to a width of at least 10 cm.
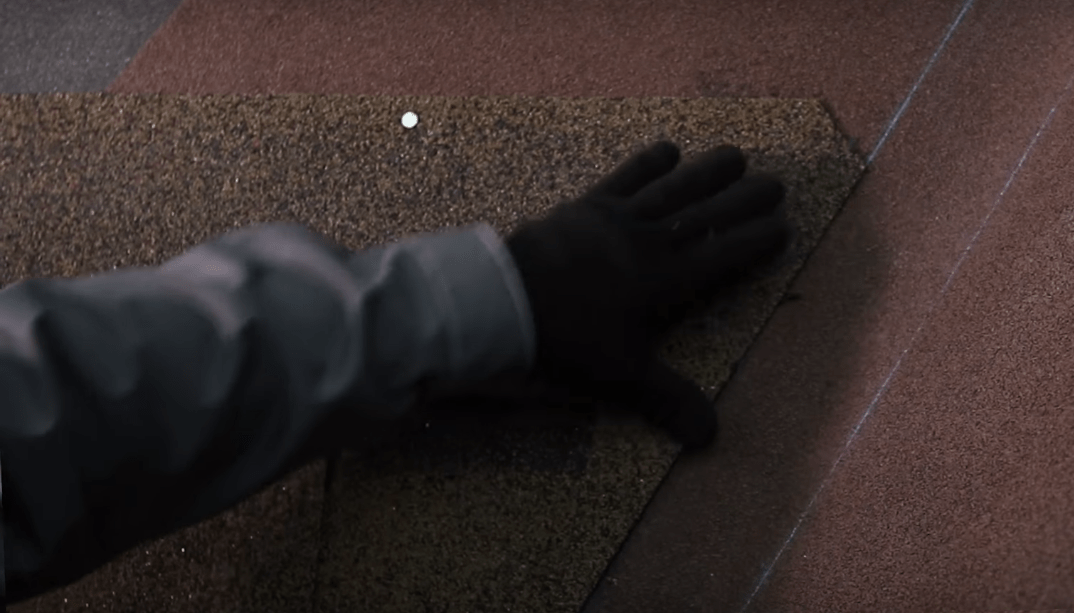
Tip: before proceeding with laying, the slopes must be marked with chalk - horizontal lines. This is necessary so that the sheets are accurately installed in an even row. If the slope geometry is broken or any additional elements (pipes, dormer windows) are installed on it, then the chalk markings will help align the rows.
Ridge tiles: laying
In order to get a ridge tile, you need to cut the eaves into three parts at the perforation points. They lay it on the ridge of the roof parallel to it - with the short side. Each part is nailed with four nails - a pair on each side. On top of the nails, an overlap is made with the next tiled sheet - at least 5 cm.
Soft roof installation technology: euroruberoid
Euroroofing material is a rolled material of the built-up type, which also applies to soft roofing. Unlike bituminous tiles, it can be laid on a flat roof.

Foundation preparation
A dry and solid base for euroroofing material must be completely cleaned of dirt and dust, and it must also meet all fire safety criteria. Any monolithic ceiling or concrete slabs can serve as such a base, only they must be equipped with slopes for water runoff, and also have a cement-sand screed.
It is also possible to fuse such roofing material on a pressed plate - OSB. If the roofing is done on an old roof that already has a resin cake, then it will be a good base for the new roofing.
Already prepared base should be treated with bitumen-polymer mastic. It can be purchased both in the form of a concentrate, and already in the finished state. Mastic is not needed when laying euroroofing material on an old coating.
Tip: the mastic packaging indicates how long it will take for it to dry completely. It is categorically not recommended to weld roofing material ahead of time, since the quality of the roof will suffer significantly.
Installation of a soft roof video (euroroofing material)
Laying work should always begin from the point of the roof where the drain line is located - that is, from below. The runoff line is parallel to the slope line, so the runoff water will not get into the junctions of the strips.
The roll is unwound in such a way that it is even, without gaps and folds, after which it is well stretched. One edge is fixed as follows: the roofing material is heated with a burner until the indicator film melts, then the edge of the material is glued to the base. After the edge hardens, the unwound roofing material is again rolled up to a fixed place - tightly, neatly and evenly.

The next step in the laying process is directly fusing. In order to no longer have questions about how to make a soft roof from euroroofing material, you should be especially careful about the rules for its construction.
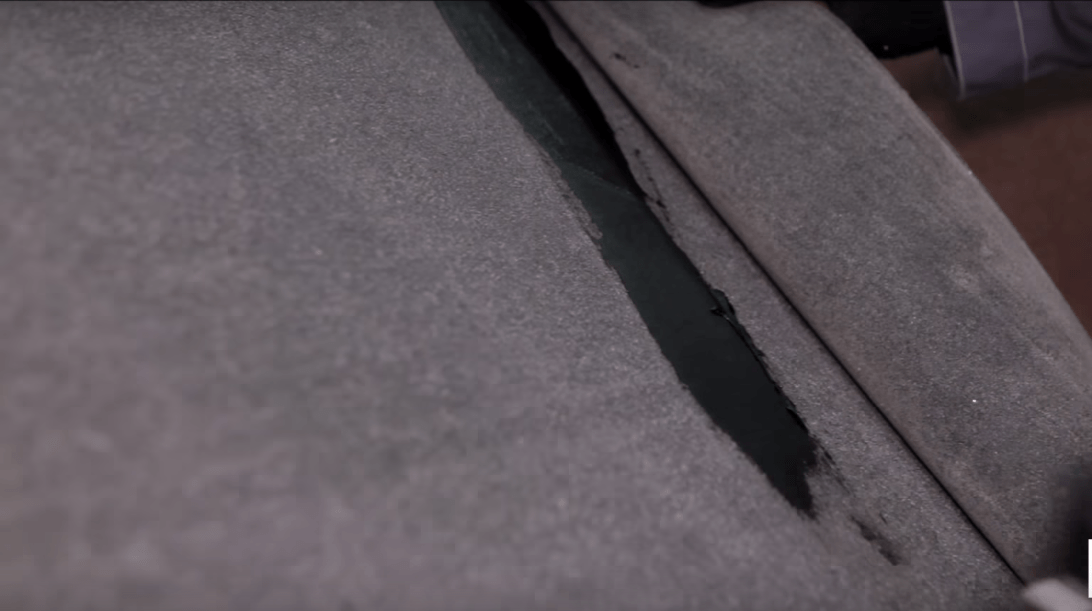
- Under no circumstances should the material be overheated. If this does happen, then you will have to buy a new one - overheating leads to damage, and the roofing material loses its ability to stick.
- The finished surface should not have places without protective dressing, black spots and voids: a high-quality deposited coating is always homogeneous.
- The fusing of strips of roofing material is done with an overlap of not less than 10 cm. In order to have something to navigate, a special strip is applied along the entire length of the material.
The closest attention should be paid to the places where the roofing material adjoins ventilation ducts, parapets and other elements. Problem areas should be treated with roofing mastic. After drying, it acquires the same protective properties as those of euroroofing material.

Snow can get into places where rainwater can't, so abutment treatment is just as important. If the roof has a steep slope, it is necessary to equip snow retainers, and also try to prevent icing in the winter by properly installing gutter systems and drippers.
When installing a ruberoid soft roof, the installation technology, of course, differs from the process of covering the roof with bituminous tiles, but after completing all the work in both cases, it is necessary to ensure that the roof is cleared of debris, stones and foreign objects. If this is not done, the coating may prematurely become unusable in places of contact with them.
Creating a stylish and solid building or giving a noble image to the house - soft roofing does an excellent job with all these functions.
In addition to aesthetic appeal, the material distinguished by durability, reliability and wear resistance.
However, in order to fully experience all the benefits of a soft roof, it must be correctly installed.
You can talk about the technical characteristics of a soft roof.
For preparatory and installation work with a soft roof, you will need the following tools:
- hammer;
- roulette;
- hacksaw;
- pencil;
- chalk rope;
- work gloves to protect hands;
- trowel for working with bituminous mixture.
Lathing under a soft tile
Can serve as the main building material with a firm, even and smooth structure. These include moisture resistant plywood, edged or tongue-and-groove boards, OSB boards. At the same time, the permissible humidity level is up to 20%.
When installing, you should set the joints of the boards in relation to the supports so as to overlap from two runs or more. At the same time, the gaps between the boards should not be wider than 10 mm. The minimum thickness of the gap between the seams of the bottom skin is 2 mm, and when using edged boards - 5 mm. Gaps are needed not only for ventilation, but also for the possible expansion of the structure under the influence of temperature changes.

Crate preparation
Ventilation system for soft tiles
Care must be taken to ensure air exchange and prevent condensation about the ventilation system. It will significantly increase the service life of the structure and protect it from decay, the formation of icicles and ice in the winter season.
For the organization of natural ventilation of the attic, it is recommended make holes for ventilation evenly along the entire length of the ridge under the overhang of the eaves, and the hood - in the upper part of the roof.

The ventilation system includes outlets, air vents located in the overhangs of the cornices and a special gap. The latter is the gap between the waterproofing layer and the base. The gap should be 5 cm or more.
Selection and installation of an insulating mat
For secure adhesion to the substrate before laying the tiles  an insulating carpet spreads - fastened from top to bottom at the ends, cornice overhangs and valleys.
Self-tapping screws for soft roofing are used as fasteners, namely roofing nails, located in 200 mm increments.
When choosing an insulating carpet, you should start from the corner of the roof. With a roofing angle of 18 0 or more, you can stop on the lining in places with a high probability of leaks: ridges and valleys, in places of chimneys or areas adjacent to a vertical wall, which are reinforced by 250 and 500 mm, respectively.
At the same time, for the first, the width is 400 mm, and for the second, layer equipment is required on both sides.
at 12-18 0 requires laying an insulating mat over the entire area. It is mounted from the bottom up in a parallel direction from the cornice overhang. In the transverse direction, the overlap must be at least 100 mm, and in the longitudinal direction - 150 mm and above.
NOTE!
In order to achieve a good tightness of the structure, it is possible to treat the overlap with bituminous mastic.
valley carpet
To protect the roofing system from climatic precipitation, an insulating layer is applied to the valley, matching the color of the tiles and nailed.
roofing cake
To protect the house from precipitation, wind, temperature changes and other influences, a roofing pie is equipped - multi-layer construction from various materials. For soft tiles, it looks like this:
- vapor barrier. Protects against the formation of condensate and minimizes the penetration of evaporation from the premises in the house.
- thermal insulation. Keeps heat, provides sound insulation, protects from wind, low temperatures.
- Waterproofing. Seals the inside of the building, preventing the ingress of water and moisture formed from rain or snow.
- decorative layer. Provides a certain look to the roofing cake and serves as an additional protection from the wind.
Soft roof device: technology and scheme
Protecting gables and eaves
To protect the edges of the lathing from rain moisture and snow, metal strips are used - droppers (cornice) and gable. Cornice strips are placed on the lining, located on the overhangs, and gable - on the lining layer in the roof ends.
Both varieties are fastened with nails in 100 mm increments and in zigzag arrangements.. In places where the planks are joined, an overlap of 20 mm or more is made. You can read about the installation at the link.
Upon completion of this stage, you can proceed to the main work - laying a soft roof.
Installation of a soft roof
Before starting the installation of a soft roof with your own hands, you should check the colors of all sheets in the packages, as there may be inconsistencies in the tiles. To avoid color deviations, you can mix 5-6 packs. The tile itself is suitable for roofs with a slope of 12-90 0 .
Greater attention is required to the temperature and climatic conditions at the facility. At temperatures below 5 0 installation of soft tiles is not recommended., since the roof sheets require the sun to seal with the base. If the installation does not tolerate waiting, and the temperature does not meet the requirements, it is recommended to keep the sheets to room temperature and use a hot air heater.

Do-it-yourself shingle roof
Flexible tiles: installation instructions
If both of the above conditions are met, the crate and tools are prepared, you can start laying. So, how to lay a soft roof? The technology for installing a soft roof is quite simple:
- Working with cornice tiles. Mounted on top of the slats on the cornice overhang. For fixing, glue and nails are used, located at a distance of 25 mm from the edge of the coating.. Another installation option is to use a pattern made from ordinary tiles. To do this, cut the petals from the shingle and mount the tiles end-to-end in an indent of 20 mm from the cornice overhang. To calculate the tiles, use ours.
- Working with ordinary tiles. Before installation, horizontal markings are carried out using chalk. This will allow you to lay a number of sheets evenly, especially if the slope has dormer windows, pipes and other elements in the structure. Next, the protective film is removed from the shingles and laying begins from the middle of the cornice overhang, heading in both directions. The roof is fastened with four nails driven into special holes. For slopes of 45 0 and above, you will need six nails.
- The first row of tiles is placed at a distance of 10-15 mm from the lower edge of the cornice tiles, and the petals are placed at its joints. The following rows should be placed in such a way that the end of the shingle petals is at or slightly above the cutouts in the previous layer. Working at the ends, it is necessary to cut the tiles along the edge of the roof and reinforce it with glue with a layer of 10 cm. In order not to damage the insulating layer when cutting plywood, you can put a piece of plywood or board under it.

Do-it-yourself installation of a soft roof with a step-by-step photo
The nuances of laying soft tiles on valleys and ridges
 Important attention when laying soft tiles is necessary give valleys and skates to which you should proceed upon completion of work with ordinary tiles.
In valleys, the roof is cut to open a strip of carpet, having a width of 150 mm.
Before laying soft tiles on skates, scaffolding should be prepared to help simplify the work. To obtain a ridge tile, it is enough to divide the eaves in three places of perforation, and then bend the resulting elements in half.
Such a roof is fastened with a short side along the ridge with an overlap of 50 mm using four nails.
CAREFULLY!
Don't forget about applying glue to the petals in places of fastening after dismantling of scaffolds.
Now consider how to lay a soft roof around the chimney.
Soft tile roofing: chimney bypass technology
Another important point during installation is the organization of the junction of the roof to the chimney. It must be insulated by nailing a rail around the perimeter of the pipes and attaching an insulating carpet to it.
After that, the roof is brought to a vertical surface and glued, closing the slopes by 200 mm, and the pipe by 300 mm. The protruding edges are closed with a metal strip and sealed.

Chimney bypass
Common styling mistakes
| Problem causing leakage or damage | Description |
| Poor fixing of the flooring | If the deck flexes or deforms, the fasteners can bend and damage the tile plates, causing leaks. |
| Ignoring the vapor barrier | This leads to the ingress of moisture into the insulation and the destruction of the roof structure. |
| Incorrect laying of a soft roof in the first row | If there is a coincidence between the joints of the plates in the starting and first rows, then this will inevitably cause leakage in the area of the lower part of the ramp |
| Poor fixation of plates | With weak fastening of the plates, a gust of wind will easily lift and tear off the plate. To avoid this, it is necessary to correctly position the nails: they must be mounted through the fastener strip above the adhesive line covered by the petals |
| Roof package bend | If, during installation, a package with plates is not placed on a flat surface, it will deform, and the roof layers will separate. Packages must be placed on a flat surface. |
| The adhesive strip on the plates goes continuously | In such structures, water does not get out, falling under the plate from the side, from which it moves to the side to the joints between the roof. Usually these are places near chimneys, valleys or internal drains. |
| Ill-conceived roof design | If the roof is not designed correctly, the following problems may appear: incorrect location of valleys or gutters, dormer windows, chimneys. It is difficult to solve this problem, since it appears even during construction. But leaks need to be found. |
| Poor chimney waterproofing | Before proceeding with the correction of this problem, it is recommended to check the masonry for the presence of fallen bricks. A common mistake that causes leakage: the lack of flanging aprons when laying |
| Poor quality valley coating | Most of the films offered on the market have a service life of 5-7 years, which clearly does not coincide with a roof that can stand for 50 years. Therefore, according to the installation rules, it is necessary to use a high-quality waterproof film in combination with a metal apron. |
Following the technology of laying a soft roof and having the necessary set of tools, the installation of a roof made of soft tiles will be carried out efficiently, quickly and safely. However, if there are doubts about their own qualifications or lack of time, it is better for owners to entrust the work to professionals who are familiar with the procedure for laying the roof. And finally, we recommend reading the article about
The service life of any roof depends on how well it is arranged, and the installation of a soft roof is no exception to this rule. There are many types of such coatings, but they all require the use of a solid foundation. Before proceeding with the work, it is necessary to analyze the conditions in which the installation of a roof made of soft tiles will take place. The lower limit of the temperature range is +5C, since lower temperatures are no longer suitable for work. The fact is that the fastening of the coating sheet (shingle) occurs with the help of nails and a self-adhesive layer applied on the back of the shingle.
This method of installation is the simplest and most reliable solution, but its disadvantage is that one of the elements of the technology is the sun's rays, gluing individual sheets into a monolithic carpet, making the roof airtight.
It is worth saying that even in frost, do-it-yourself installation of a soft roof can be done. For example, through the use of a kind of greenhouse mounted above the target section of the roof. The technology in this case is the same as in the usual case, since the temperature inside the volume limited by the film is maintained through the use of heat guns.
Roof structure - picture
In the general case, speaking of the base, they mean the truss system. After its installation, the vapor barrier is installed. As a rule, this is a special film, with which the roof structure is fitted from the inside. It is fixed with wooden planks, which can be used to fasten the inner lining of the attic.
Before covering the roof with soft tiles, heat-insulating material is also laid, it must be between the vapor barrier and the base of the tile.
For the installation of a soft roof, any material that "makes friends" with nails, and also has a flat and smooth surface, can be used. Another requirement is the ability of the material to withstand the considerable weight of such a roof. An OSB board (OSB), as well as a tongue-and-groove or edged board or moisture-resistant plywood, is suitable for the role of the base. 
The cost of installing a soft roof also depends on what plays the role of the foundation. However, regardless of the type of material used, the possibility of thermal expansion must be taken into account, therefore, in any case, appropriate clearances must be left.
Creating a ventilation gap

The presence of an air gap allows you to solve problems such as adjusting the moisture content of the insulation and the material of the crate, and also reduces the amount of ice that forms on the roof in winter. The attractiveness of this element is also in the fact that in summer it provides a decrease in temperature inside the roofing cake.
When do-it-yourself soft roofing is done , then you need to ensure that the width of the air gap is at least 5 cm. The holes for the inflow of fresh air are best located at the bottom of the roof, and the hood at the top.
Creating an underlay

Lining is a special material that is laid over the entire area of the roof. Its installation starts from the bottom-up from the edge of the cornice overhang. The rolls are unfolded with an overlap of more than 10 cm, and for fixing every 20 cm, they are fixed with nails.

In the event that the roof slope is large (at least 18 degrees), it is allowed to lay insulation only along the ridge and along the eaves, as well as where chimneys are located or adjoining a vertical wall.
Installing slats
The installation technology of a soft roof involves the use of eaves and gable strips, which are designed to protect the crate from rain moisture. The first of them are mounted on cornice overhangs directly on top of the lining. Such elements are also called drips. Planks of this type are laid with an overlap of more than 2 cm, and fastening is carried out using roofing nails arranged in a zigzag pattern along the installation line.
Gable strips are mounted on the end parts of the roof, with an overlap of at least two centimeters. Both types of products are fixed with nails located at a distance of 10 cm along the laying line.
After the installation of the planks, the valley carpet is laid, which makes it possible to increase the water resistance. Its color is chosen to match the color of the tiles, and the edges are fixed with nails spaced 100 mm apart. After completion of this stage, a soft roof can be laid katepal - its installation begins with cornice tiles.
Cornice tiles
 Cornice tiles - photo
 It is laid on top of the fixed planks on the cornice overhang. For its fastening, galvanized nails are used, driven into the base material at a distance of 25 mm from the edge of the material. Another option is also possible, which is also suitable if a soft roof is made by hand. We are talking about a pattern from an ordinary tile. Making it is very simple: you need to take a shingle and cut off the petals from it. In this case, the installation of tiles goes “joint”, and the indentation from the cornice overhang should be more than 2 cm.
Laying ordinary tiles
The first thing to note is the possibility of various color deviations, since the tone may vary slightly in different packages. To avoid this, you need to mix 5-6 packs.
Do-it-yourself installation of a soft roof starts from the middle of the cornice overhang and is carried out in both directions.
The protective film from the shingles must be peeled off right before installation, since sheets without it are no longer recommended to be stacked in packs.
The shingles are fastened with nails. As a rule, only 4 nails driven in above the tile groove are enough, but for a slope of 45 degrees (and above), it is better to use 6 nails.
 Laying ordinary tiles - picture
 The very first row of tiles is positioned so that the lower edge of the material is only 10-15 mm from the lower edge of the tiles located along the cornice overhang.
The “petals” of the shingle should cover the joints of the cornice tiles. Do-it-yourself soft tiles are mounted so that the "petals" of the next row with their tip are at or above the cutouts of the previous layer.
At the ends, the material must be cut along the edge of the roof, and also reinforced by gluing. The minimum width of the interlayer should be 10 cm. The situation is similar in the valleys, where the tiles must be cut to get an open strip 15 cm wide. In this case, the edges of the material are also smeared with special glue by 10 cm.
When cutting shingles, it is better to use a small piece of plywood that allows you to cut the material without fear of damaging the layer below.
Installation of ridge tiles
To perform work with the roof ridge, you will need to prepare a scaffold. They greatly simplify the work, but after dismantling them, you must not forget to glue the petals at the attachment points.
Do-it-yourself installation of a soft roof in this case is carried out with an overlap of 5 cm, and four nails are fixed. The laying of the ridge layer can be started only after the installation of ordinary tiles is completed.
Ridge tiles are obtained by dividing the eaves at the places of perforation. After that, each element is bent in half and mounted with the short side along the roof ridge.
Roof connections
Passages through the roof can be organized in different ways. In the event that their diameter is small, it is recommended to use special rubber seals. This applies to antenna inputs and other types of communications, but pipes are insulated differently. Here, the possible heating of the pipe is taken into account, due to which a slightly different technology is used.
First of all, a triangular rail is nailed along the perimeter of the place of contact between the pipe and the base of the roof. The most common option is 50x50 mm. The next step is the installation of the lining carpet, the overlaps of which must be smeared with glue. The pipe itself is glued with insulating material so that it covers at least 30 cm of the pipe and 20 cm of the slope.

When a soft roof is created with your own hands, this stage is often the final one, but one more operation is required - to fix the junction bar around the perimeter of the pipe. A metal apron is fixed over the insulating material, and all seams are sealed with silicone adhesive.
Adjacency to a vertical wall is carried out in a similar way. The only exception is the triangular bar, which does not create a perimeter, but is mounted along the wall.
The main questions discussed in this article will help a layman to quickly understand the course of the matter. Moreover, many difficult points are described here, which a beginner in construction will easily miss. On our website there is also additional information telling what a soft roof is. The technology of editing, video work of professionals and useful tips allows you to understand this difficult issue in the shortest possible time.
Soft roofs include bitumen-based roll materials, as well as a piece coating that externally imitates tiles. Soft roofs are widespread due to reasonable prices and the ability to do the work from and to with your own hands. Another important plus is the light weight of soft roofs, due to which the load on the rafter system and the foundation of the bath is significantly reduced.
It is worth choosing the type of soft roof, starting not only from the external design of the bath, but also from the angle of inclination of the slopes.
Roll roofs
Laying of rolled materials is most often done on flat roofs and shed roofs with a slight slope. Roofs with a large slope are usually not covered with rolled materials, since the appearance of the bath will be unpresentable.
| Material | Description |
|---|---|
| The most famous roll coating is roofing material. It is glued to the base with bituminous mastic. The material is the most budgetary, easy to install, but the service life of roofing material does not exceed ten years. | |
| Built-up roofing felt is a material of better quality compared to its "predecessor". A layer of bitumen has already been applied to the basis of the built-up roofing material. During the installation process, the material is heated with a burner and rolled into several layers. | |
| Stekloruberoid - material with a fiberglass base, resistant to temperature extremes and UV rays. A coarse or fine fraction is applied to the surface of the material. So, for example, S-RK glass roofing material, which is laid with the top layer, has a sprinkling of a large fraction on the front side, and a fine one, similar to dust, on the wrong side. At S-RF glass roofing material, which is also laid with the top layer, the sprinkling is scaly. And sprinkling of the smallest fraction on both sides of the C-PM glass roofing material, which is laid with the bottom layer of the coating. Laying is carried out by welding or mechanical fixation of the material. The service life of roofs made of glass-ruberoid does not exceed 10-12 years. | |
| Membrane materials - the most modern of all of the above, have a much longer service life, high waterproofing properties. Membrane materials are not susceptible to climatic factors and the action of sunlight, mechanically strong, light and elastic. In addition, you can choose the shade of the material yourself. |
Bituminous roofs
Piece bituminous tiles are an economical material with high decorative and soundproofing properties.

Flexible multilayer tile TechnoNIKOL SHINGLAS “Dragon tooth”
A rich color palette of shingles allows you to implement many design solutions, create your own unique roof design.

Flexible tile TechnoNIKOL SHINGLAS “Modern Brix”
Small size soft shingles can be installed on roofs of any configuration, including hipped roofs and domes, while the amount of waste is always minimal. Caring for a bituminous roof is not difficult - it must sometimes be cleaned of snow and accumulated fallen leaves. And roof repairs are carried out as simply and quickly as possible - you just need to remove the hardware and replace the defective element.

The top layer of shingles is a sprinkle of natural materials, such as basalt. The rough surface of the shingles allows snow to be retained on the roof and prevents its avalanche. In addition, coarse dressing provides mechanical strength to the coating.

Flexible tile Docke, collections "Cologne"
Roofing must comply with the quality of GOST 32806-2014.
Laying can be done independently, having a minimum set of tools and following the instructions.
Prices for shingles
shingles
A step-by-step guide to laying shingles
Soft shingles are laid only on a solid base, always hard, dry. As a base, it is recommended to use plywood sheets of increased moisture resistance or OSB-3 with a thickness of 11 or 12 mm (for some types of tiles, the use of plates with a thickness of 9 mm is acceptable). The recommended dimensions of the plates are 1.25 x 2.5 m.
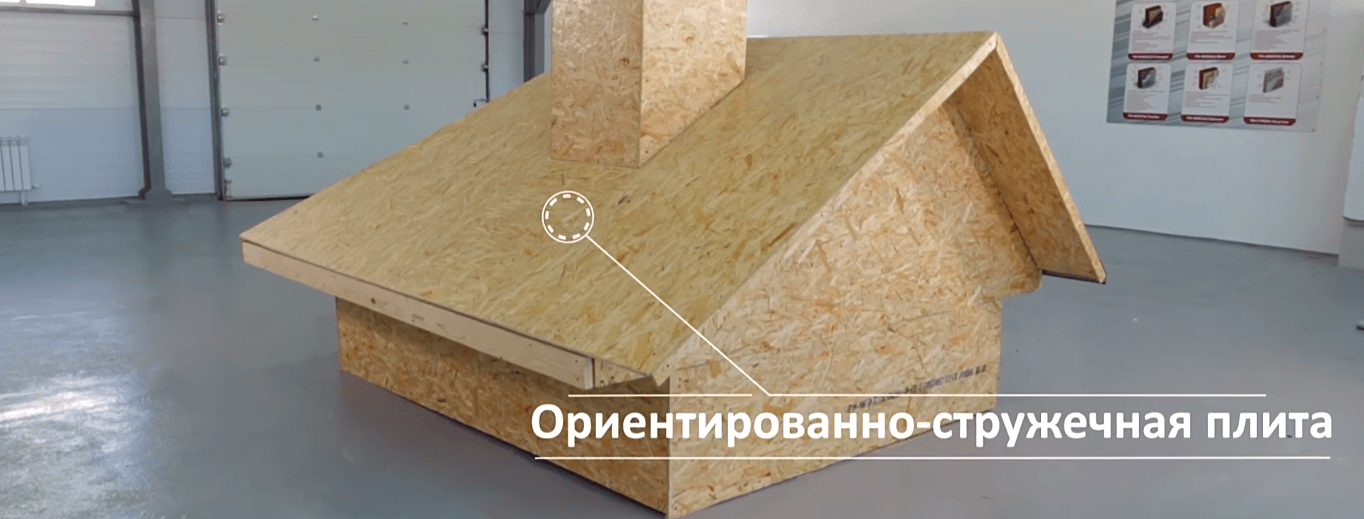
It is also permissible to make a continuous crate of tongue-and-groove or edged boards with a relative humidity of less than 20%.


The slabs are mounted on top of the crate of the "inch" board, mounted in 100 mm increments. A prerequisite for the installation of a continuous crate is the observance of the spread, that is, at one point of the roof, 4 corners should not converge at once.
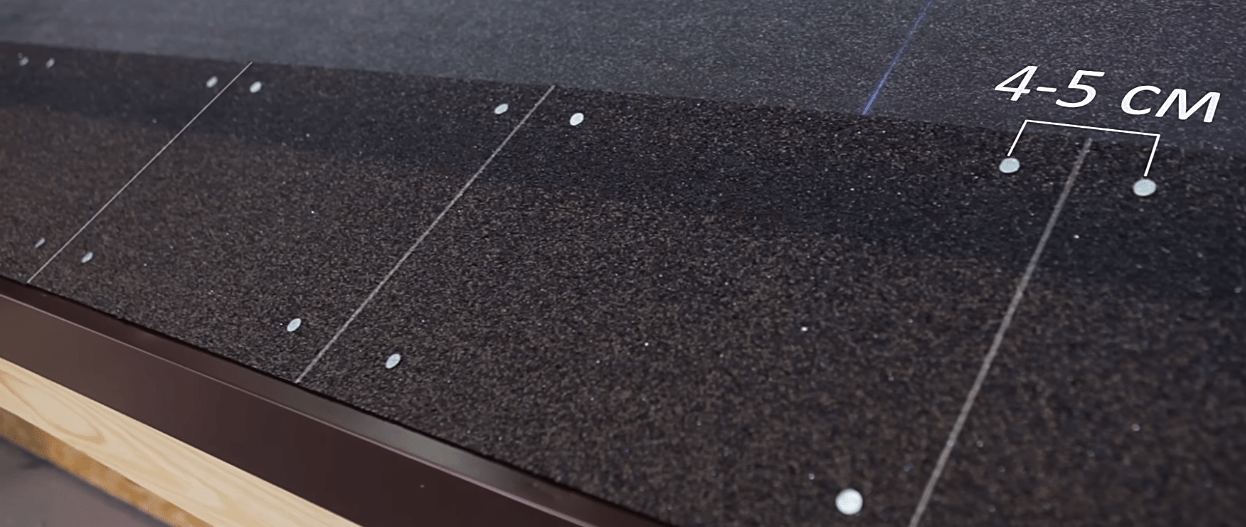
Stage 1. Before laying flexible tiles, it is necessary to fix additional elements, the first of which is a cornice strip. The element is necessary to drain water and strengthen the roof structure.

The bar is laid with an edge on the edge of a continuous crate and fixed with roofing screws. Hardware is driven in in a checkerboard pattern, observing a step of about fifteen centimeters. The overlap of the ends of adjacent planks is not more than five centimeters.


Stage 2. Lining carpets are used to provide additional tightness of the roof.


The first roll is rolled out parallel to the cornice strip, and the lower edge of the carpet should not reach 2-3 mm before the bend of the strip. The lining layer is fixed with roofing screws along the edges at the top and bottom. It is important that the carpet is laid with a slight tension to prevent the appearance of wrinkles and waves on the surface of the material.

The second row of material is laid with an overlap of the first 10 cm and fixed with nails along the upper edge, keeping the distance between them from 20 to 25 cm.


Between the canvases (in the place of overlap), a fixing mastic is applied with a spatula with a layer 1 mm thick. If the mastic is applied too thickly or previously diluted excessively with a solvent, swelling and smudges may appear on the roof.

If the lining carpet has adhesive strips along the edges, then additional mastic is not needed.
On a note! If there is a junction of slopes (valley) on the roof of the bath, then the lining carpet is first spread along the junction, and only after that the rolls are rolled out parallel to the cornice strip.
The total width of the lining carpet on the valley should not be less than 1 meter, that is, 50 cm in each direction from the junction line of the slopes. It is desirable that the lining carpet on the valley does not have joints, but if this cannot be avoided, then the layers are laid from the bottom up with an overlap of 30 cm and the junction must be smeared with mastic.

Stage 3. On top of the lining layer, gable strips are attached, which are also called wind strips. Fixation is carried out with nails. The hardware is hammered in with a hammer in a checkerboard pattern, a step of 12-15 cm. The end overlaps of the planks are 3 cm.

Stage 4. Design of valleys.
Moisture resistant plywood prices
moisture resistant plywood
Method 1. Open
A valley carpet is laid over the lining carpet.
The width of the valley carpet should also not be less than 50 cm in each direction from the axis of the slope joints. Bituminous adhesive mastic is applied to the wrong side of the carpet (strips 10 cm wide along the edges of the material).
The material is fixed around the perimeter with nails in increments of no more than 25 cm and indented from the edge of the carpet by 3 cm.

Method 2. With pruning
The design option for the valley does not involve laying a carpet. The shingles are cut and overlapped directly at the junction of the slopes.

Stage 5. You can go directly to the laying of shingles.


The first row is the starting one. A distinctive feature of the starting row shingles is the absence of slots. Whole strips are glued, stepping back from the bend of the cornice strip by 2 cm. Additionally, the shingles are fixed with twelve nails each (6 nails along the upper and lower edges).

On a note! If you have not additionally purchased bituminous shingles for the starter row, simply take a sharp mounting knife, a strip of ordinary shingles, lay it on a plank of a suitable size and cut the petals (teeth, triangles, etc., depending on the shape of the shingle cutting). Bituminous shingles with a “dragon tooth” shape can be left uncut.
Flexible tiles can be installed in all weather conditions, but if the outdoor temperature is below zero, then it is desirable to apply roofing material in small batches to the roof from a warm room.
Important! Do not forget to remove the shingles from the cardboard boxes and mix them together. So the roof covering will be more uniform in shade. You need to mix at least 5 packages at the same time.
The second row is started by moving the shingle of the second row relative to the shingle of the first row by half a petal horizontally and stepping back 2 cm from the bottom edge of the starting row.

The edge of the shingle, which will be laid on the wind bar, is cut at an angle of 45 degrees. The wind bar is smeared with mastic before laying the tiles.
The “dragon tooth” shingles are displaced by 15 cm. That is, the fastening of the lower row must be blocked by the petals of the overlying row.
If the shingle has a protective film on the back, it is removed by pulling in the direction from the top edge of the shingle to the bottom.
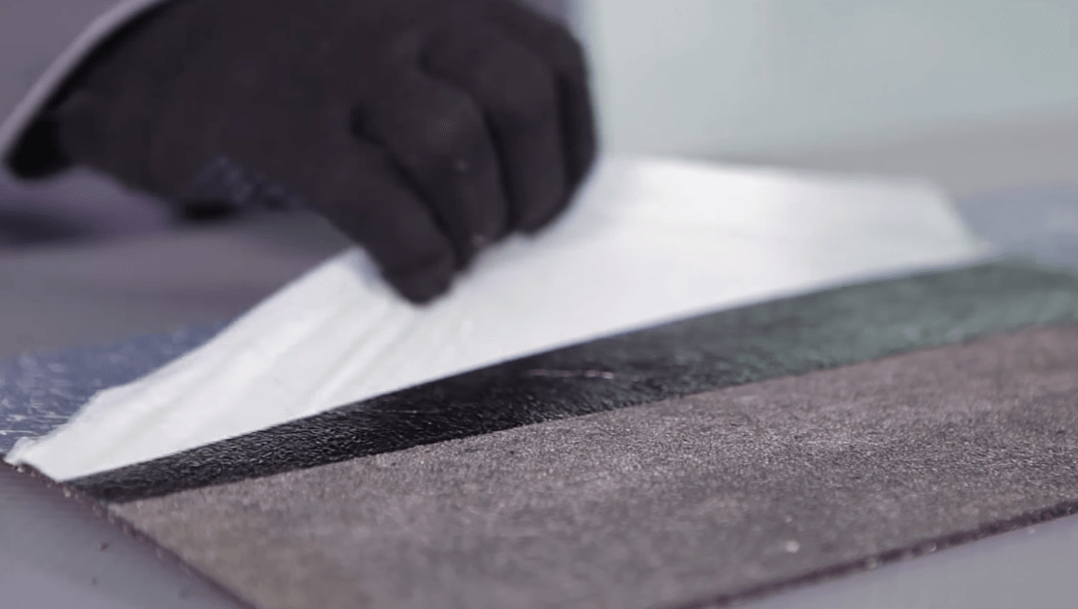
Some collections of tiles do not have a protective film, the shingles are simply folded into packages with the wrong side to each other. If the strips are difficult to unstick, they can be slightly warmed up with a building hair dryer and gently bent in different directions.
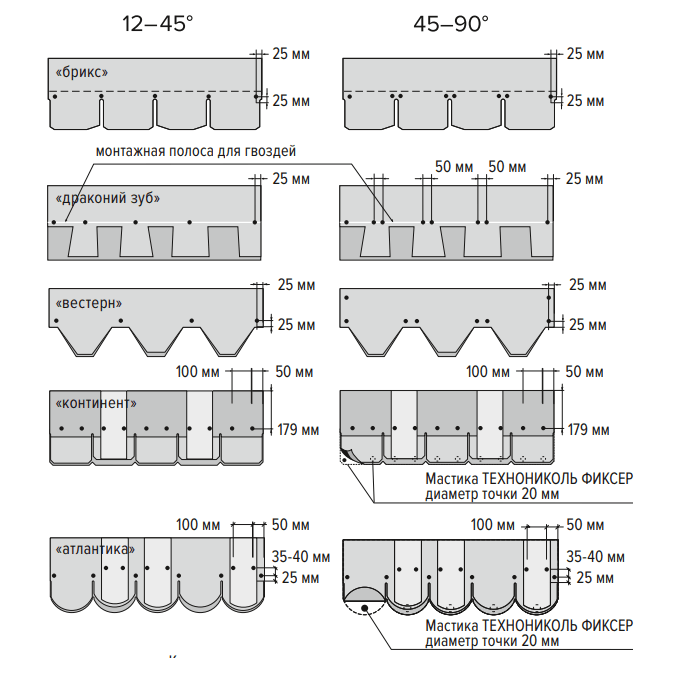
Nails for fastening tiles are galvanized with wide caps, the length of the hardware is 30-45 mm, the thickness is 3 mm. Hardware is hammered in a strictly defined order, which is recommended by the manufacturer, depending on the shape of the shingles and the angle of the roof. The greater the angle of inclination of the roof, the more nails are used to fix the coating.

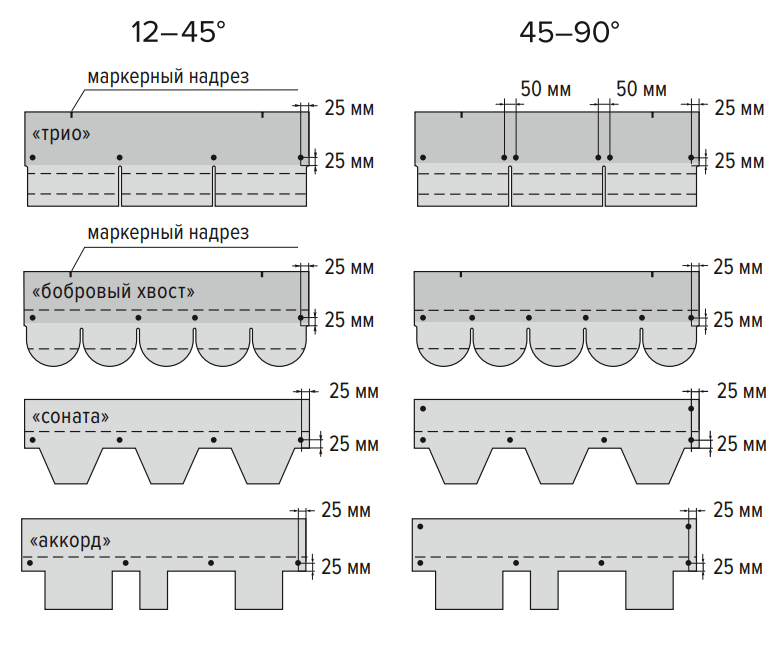
Schemes of the location of hardware depending on the angle of the slope
It is important to drive the nails perpendicular to the shingle so that the head is flush with the roofing material, not too deep into it, but not above the surface of the shingle.

The nails of the overlying row must simultaneously fix the underlying shingles. This is necessary for the durability and reliability of the roofing.

Tiles are laid on top of the valley carpet by cutting the corners of the shingles and smearing the wrong side with bituminous mastic. It is recommended to drive nails into the shingles at a distance of 30 cm from the central axis of the valley.


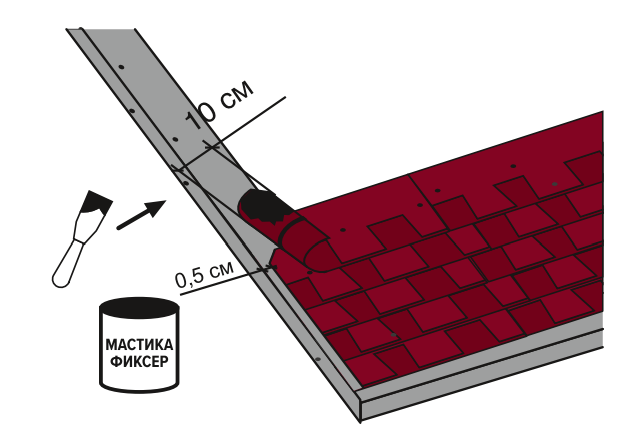
Stage 6. When the bituminous tiles are laid to the very ridge, they proceed to the design of the junction with the pipe.
Be sure to keep in mind that walking in shoes on the laid roofing in hot sunny weather, as well as negative air temperatures, is prohibited. Scaffolding and other devices are used to move along the roof.
The junction is made using a valley carpet.
- A pattern for the front side of the pipe is cut out of the strip (the tile should be covered with a carpet by 20 cm, and the material should go 30 cm onto the pipe). A thin layer of adhesive mastic is applied to the reverse side of the pattern with a spatula. The pattern is pressed tightly and smoothed so that there are no bubbles and irregularities.


- Next, the right and left patterns are cut out, smeared with mastic, glued in place, leading the edges under ordinary tiles.

- Lastly, the back of the pipe is closed, the canvas along the upper edge is fixed with metal strips.

If the pipe is more than 50 cm wide, it is recommended to make a slope behind its back wall to prevent rainwater from stagnating.

Instead of a valley carpet, the junction can be made using metal elements.
Video - Finishing the chimney
Stage 7. To decorate the ridge, ridge-cornice tiles are used.
Each shingle is cut into 3 pieces before installation. Ridge elements are laid from the bottom up (for hipped roofs) and fastened with four nails in the corners. The overlap of the elements is 3-5 cm, sufficient to make the heads of the clogged hardware invisible.

It is recommended to lay an aerator on a ridge with a slit 3-8 cm wide and located horizontally.

This is a plastic element necessary to ensure ventilation of the under-roof space.
Each element is bent along the central axis, applied to the ridge of the roof and fixed with nails, which are driven through the factory holes of the element. The connection of adjacent elements is carried out similarly to the designer, by snapping the existing fasteners.


The laying of tiles on top of the aerator is carried out, taking into account the direction of the prevailing wind direction for the area.
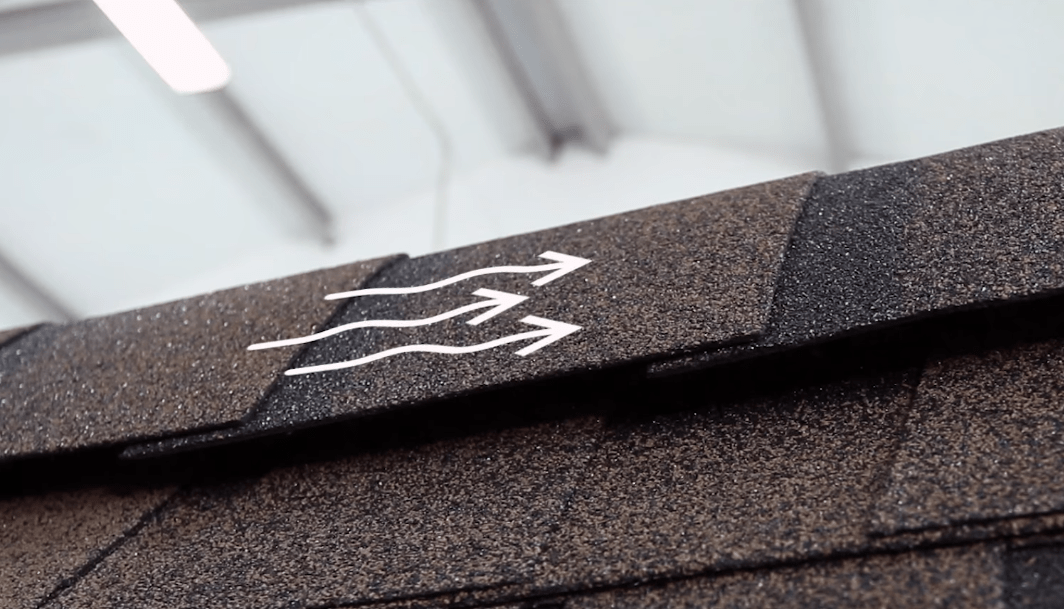
They begin to fasten the ridge-cornice tiles from the side where the wind most often blows. Fixation of the roofing material is performed using roofing nails of increased length.

Video - Installation of a soft roof
Answers on questions
How to arrange the junction of the bath porch canopy to the facade?
If the roof adjoins the wall (this may include the adjoining of the bath roof to the wall of a residential building), regardless of its shape, it is necessary to waterproof the joint using a valley carpet.

Procedure:
- put the lining carpet on the wall by 5 cm, smear with fixing mastic from the wrong side, press firmly;
- if the adjoining roof is located at an angle, then in the lower part, fix a plastic wall-turning flashing with self-tapping screws. If the connection is horizontal, the tide is not installed;
- lay the valley carpet in such a way that it goes 30 cm onto the wall, and 20 cm onto the lining carpet;
- smear the valley carpet on the reverse side with mastic, glue and level so that there are no bubbles or folds;
- fix the upper edge of the valley carpet with a metal rail with holes into which screws are screwed;
- lay flexible shingles, smearing the edges of the shingles with fixing mastic (at least 10 cm from the edge).
Prices for valley carpets
valley carpet
How to move along the slope of the roof during the installation of the coating?
For safe and convenient work at height, scaffold brackets are installed. The brackets have holes through which nails are driven in for fixing. A board is laid on top of the bracket, which is fixed with self-tapping screws. The length of the board is chosen so that the free ends extend beyond the brackets by at least 150 mm and not more than 300 mm. The cross section of boards for working on the roof is 200 x 40 mm.
The upper part of the bracket is installed under the petals of bituminous tiles. For fastening, it is recommended to use nails 10 cm long and 5 mm thick, 3 nails for each element. The nails must be driven through the battens into the rafters.

One bracket can withstand 140 kg. The distance between the brackets should be no more than one and a half meters (only one roofer can be on these one and a half meters).


To remove the brackets, you simply need to bend the tabs of the shingles and pull out the nails, then put the shingles back in place and fix them again. Brackets must be lowered from the roof carefully, without dropping them down.
Important! Walking on wet, icy boards is prohibited. Working on a roof in extreme heat or cold is strongly discouraged.
How to install a roof penetration?
Roof penetrations are installed to pass ventilation pipes and antennas through the roof.
General installation principle:
- on the roofing make markings for the installation site of the element;
- shingles are cut according to the markup, the cut out part is removed;
- in the crate, a hole is cut to fit the size of the passage element;
- if necessary, the hole is closed with a fine mesh;
- the penetration contour is lubricated with fixing mastic and pressed to the installation site;
- screws are screwed into the holes of the element contour;
- install the upper penetration element.

There are also penetrations that are mounted with a slight difference - the edge of the passage element is closed with tile petals, smeared with bitumen from the wrong side.


Variant of the installed penetration of the ventilation pipe. The base is covered with shingles
What snow retainers to install on a soft roof?
To prevent uncontrolled snowfall from a soft roof, the simplest snow stops are installed in the form of corners on a long leg. Snow guards are metal and plastic, it is recommended to opt for the former because of their greater durability.
The installation of snow stops is carried out simultaneously with the laying of shingles. The hooks are fastened with self-tapping screws to the crate, treating the attachment point with mastic. From above, the leg of the snow retainer is closed with bituminous tile petals.

The distance between the corners is approximately 60 cm. The minimum number of rows of snow stops is 3. On steep roofs, it is advisable to increase the number of rows or even fix the corners over the entire slope area.

How to take care of your roof
Care instructions are very simple:
- it is necessary to periodically visually inspect the coating;
- snow removal from the roof is carried out with a wooden shovel. Moreover, not all the snow needs to be removed, a layer about 10 cm thick should remain on the roof;
- it is necessary to clean the gutters and pipes in time, eliminate blockages;
- if moss or lichen began to grow on the roof, it is removed, and an antiseptic with an algicidal composition is applied to the coating.


Manufacturers of soft tiles usually provide a guarantee of at least 10 years for the coating. The coating is ideal for both hot southern regions and cold northern ones. The coating is environmentally friendly, does not require maintenance, ideal for any facade of the bath. Soft roof - a great solution for baths and saunas!
