Wind generator from a wheel motor. We create a wind generator from a motor-wheel with our own hands How to make a generator from a motor-wheel
Today we will look at very interesting information on how to make a homemade wind generator. After all, according to one resourceful guy named Ted Baer, it's very simple. He became a man who made homemade wind generators with his own hands in the form of a whole series of high-power and elementary devices.
A inverter generator can be considered a more sophisticated alternative to generating electricity using solar panels. Solar panels and possible batteries can provide electricity not only to houses outside the city, but also to multi-storey buildings in large cities such as Moscow. read about the types and cost of solar panels and batteries on the website of Sunways Pv Systems.
For example, the blades of our wind turbine are made of soft aluminum. Often this material is used in the manufacture of suspended ceilings. Therefore, it can be purchased at any hardware store or even found at home. After all, a good owner will always have the details necessary for mastery. In order to slightly increase the level of rigidity of our blade, a strip of 40 cm can be folded in half and fastened with special rivets.
Further, it is irresistible to simply take an ordinary unnecessary wheel from a bicycle and start attaching finished blades directly to its spokes. Such a homemade wind generator will be extremely suitable in many cases when it is necessary to obtain electricity. But without a generator, of course, these homemade windmills are worth nothing.
Ted recommends using a permanent magnet motor as the generator. It is important to have a wire belt that has a high level of UV resistance. Given the fact that the output current reaches two amperes at a speed of 20 km / h, such a homemade wind generator can really compete with solar panels. But subject to constant wind.
According to our inventor Ted Baer, such models of home-made wind turbines will cost no more than eighty dollars. If you purchase all the parts new in a hardware store. But after all, such simple elements can easily be found at home, in the form of trash in the garage or in the attic. For example, a wheel from a bicycle or aluminum plates. Almost every owner has them. Then the cost of such do-it-yourself wind turbines will decrease significantly, and there will be many benefits. And yes, the job is pretty easy.
Here, the most expensive purchase can be a DC generator. Its price hovers around $30 and a special wire strap that can resist UV radiation. The cost of the latter is about 10 dollars. Although if you are dealing in the agricultural sector, such a belt is used as a drive for a conveyor.
Our do-it-yourself wind turbines additionally have a tail. The beam of such a part is made using a plastic PVC pipe. It is also worth mentioning that the inventor recommends using only the rear wheel from a bicycle for his homemade product, which has a diameter of 61 - 69 cm. In this case, the wheel must be attached to the end of the plastic pipe plug. In the middle of which you need to drill a small hole.
We have already mentioned that we use a DC motor as a generator, which has an operating voltage of 24 V. Such an motor was most often used in outdated models of personal computers to drive disks. Therefore, such models of motors can be searched for dismantling computer junk or even in online stores. Maybe somewhere in the warehouse lying around? After all, their production has already ceased.
Such do-it-yourself wind turbines must be attached directly to the windmill using a regular corner. Thus, it is necessary to obtain a sufficiently strong and reliable shelf. Further, the engine is attached together with the shelf with clamps.
In this case, the pole for strengthening our wind farm is considered at the same time as a gutter for electrical wiring. On top of our metal pole, you need to attach a small piece of PVC pipe to contact the plastic with the windmill body. In other words, we get a plastic-on-plastic bearing design.
It is also important to pay attention to the fact that the weight of the tail of such homemade wind turbines must be selected with the condition of balancing the overall design of the windmill. Ted Baer approached this question creatively. Indeed, to achieve balance, the inventor used coins of one cent.
Wind turbine testing
Our inventor tested his own hand-made wind turbines on his own Windstar minivan, which has a special trunk on top of the car for attaching the platform. In order to fix such windmill structures with your own hands, it is best to use tripods for mounting a TV antenna on the roof of the house. At the same time, all technical characteristics, such as wind speed, voltage and current, can best be recorded using a video camera. So, for Ted Baer, these indicators were as follows - 2A, 16V, 32W at 20 km / h.
Fixing homemade windmill blades and installing them
The process of manufacturing such a device as wind turbines with your own hands is simple. It is important to simply follow all the recommendations that are detailed in the articles. So, the blades of our windmill must be attached with your own hands to the rear wheel of the bicycle by bending aluminum strips around each individual spoke. At the same time, it is best to hook the wound with a curved pin around the next knitting needle. Next, this hook must be inserted into the hole made on each blade.
It is important to understand that the process of bending each blade of our windmill must be done by hand. A good helper in this case can be a small piece of metal tinder, for example, with a diameter of 3 mm.
Of course, the material that the inventor used is somewhat thinner than that sold in stores. That is why Ted suggested that the aluminum strip be doubled. Here you can use different materials for making blades with your own hands. It is possible, for example. take plastic, wood or plywood. Choose what you already have on hand. To somewhat reduce the cost of his invention and make the windmill not only the most useful, but the most profitable.
What characteristics should be guided by when choosing a place to install a windmill?
It is very important not only to make wind turbines with your own hands, but also to place them appropriately. To maximize the efficiency of such devices. Such models of homemade wind turbines are usually installed on a support, but higher. But it is also important to take into account the characteristics of the terrain.
For example, do-it-yourself horizontal wind turbines are very sensitive to the direction of the wind flow. They are recommended to be installed so that the wind blows from one side. Whereas the wind generator made by us from the wheel of a bicycle will itself turn in the required direction. And therefore it is not necessary to arrange it somehow in a special way. Therefore, horizontal wind turbines are not recommended to be installed on the coast of the cliff. After all, then, created by turbulent flows, the wind forces will not allow the mill to work effectively.
When choosing a place to install a do-it-yourself wind turbine, it is also important to take into account the strength of the wind. It is not so difficult to find such information. After all, through the Internet you can find archival data of your area on meteorology. Naturally, they will be somewhat approximate. After all, the nature and strength of the wind in different parts of the city or village will be different. But for general information, it will fit.
An ideal option for measuring wind strength is a special device called an anemometer. After all, it is with its help that you can most accurately measure the strength of the wind flow in a specific place to choose the best place to install a homemade windmill.
Thanks to this article, everyone will have a unique opportunity to make a model of home-made wind turbines for minimal money. And if you try hard, then all the details and materials can be found from improvised means. The main thing is to understand well the very meaning of the idea to embody it somewhat transformed. So to speak, in your own way. After all, all the materials used have analogues that are easy to get or find at home or with friends. Just turn on your imagination and create something similar with your own hands. What can become a useful device for your comfortable existence and, of course, saving money.
Many companies manufacture wind turbines with screw propeller engines. This allows them to achieve efficiency (coefficient of performance) up to 45-50%. This is very good! But if you first decided to make your own wind turbine, then you should proceed with a more simplified version. For the first time with your own hands, you can make a wind generator from motor wheels. Here is an illustration of the final version:
What is the purpose of creating a wind turbine
If you ride an e-bike, then you know that you need a motor with a power of 500 to 1000 watts. Driving down steep hills, the motor automatically recharges the battery. And if you have an idea to get your own electricity generator, then this part (motor wheel) can be reused to create without significant rework.
Such a windmill can go along with factory generators, giving out current and charging the battery even at low speeds.
Stages of manufacturing a wind generator from a motor wheel
- Engine selection. In our case, this is the motor wheel. It is worth considering all the parameters (watts, volts, revolutions per minute).
- Let's make blades! You can choose the material for manufacturing - wood (needs painting and varnishing), fiberglass (a very long and painstaking process), or pvc pipe (the easiest option).
- We make the Hub (the place where the parts are connected, on which we make holes for fastening in accordance with the number of blades).
- Swivel mechanism (it is desirable that the material is steel, then your wind generator will withstand any bad weather).
- We buy a controller that will measure our power. (you can take the controller from the car).
If you want the wind generator to work efficiently and for a long time, then you need a vertical design - the Savonius rotor. It consists of two semi-cylindrical blades and an overlap, from which the axes of rotation of the rotor are obtained. The Savonius rotor operates at a low rotational speed, always orients itself in the wind, and is practically independent of turbulence. In cooperation with the blades and air currents, the efficiency of the rotor is increased.

Features of a hand-made wind generator
- The current is supplied immediately after installation (even if the wind speed is 1-2 m/s).
- The rotation speed of our wind generator is equally proportional to the rotation speed.
- You can reduce the power using windings (they need to be shorted).
- And to increase - the same windings are simply connected.
- As practice shows, most often the windings are connected according to the "star" scheme, and on a standard motor wheel it represents such a connection according to the "triangle" scheme. Consider this nuance. It is better to finish on time, then the work will be done better.
- Wind generators can provide different power. It depends on the initial weight of the motor wheels. A weight of 4-6 kg gives 500-1000W and an efficiency of about 80%, 8-10 kg - 1500-2000 W, weight more than 20 kg - 8000 W.
If you are seriously thinking about making a motor wheel, then our Sporte online store offers an alternative option for everyone. A powerful wind generator can be made from a 48V1000W rear wheel motor,
Many are looking for a ready-made generator for making a wind generator, and there is such a generator, this is a bicycle motor wheel, there are also more powerful ones for scooters and electric vehicles. The motor wheel is a ready-made three-phase generator with magnets, the rated power of which in the generator mode is already reached at 500-700 rpm, there are also higher-speed ones, depending on the specific model.
For example, a wheel motor (TM Volta bikes 48vv1000w), whose idle speed in engine mode is 460 rpm at 48v. In generator mode, it will give out 1kW at about 600 rpm on a 48v battery. On a 12-volt battery, of course, less, but the charge will start at about 100-120 rpm, and the maximum power with a good three-blade propeller will be no more than 400-500 watts. On a 24 volt battery, the maximum power will be better, but the battery charge starts from 200-250 rpm.
The motor wheels also have trouble, this is a rather noticeable sticking, so it will be difficult to start in a light wind, but this already depends on the starting torque of the propeller. The screw is a separate issue and I have not yet seen windmills with motor wheels and good screws, but here's what I managed to find on ready-made wind turbines.
>This wind generator has a wooden propeller with a diameter of 4 meters. The motor is a wheel with a chain drive and a gear ratio of 1: 2, that is, it rotates twice as fast as a screw. The maximum charge current of a 12 volt battery reached 30A. I think the design is clear below in the photo
 >
>
The wind generator seems to be made well, but the propeller has a too large diameter, and because of this, low speed, and a reduction of 1: 2 does not really help to increase the power of the wind generator. Therefore, charging starts too late and the speed is low. But I think the creator of this wind generator will understand this in the future. The screw itself is also made unknown how and has no twist, so it most likely has a low KIEV and speed. In general, the design is good except for the screw.
Wind generator with 1 kW wheel motor
and original mount
 >
>
The design of this wind generator, in my opinion, is more thought out. the motor-wheel has a weak axle, the diameter of which is only 12 mm, and besides, it is hollow and wires pass through it. Therefore, if the blades are attached to the body, and the generator is attached to the axle on one side, then this is a very weak attachment and such a thin shaft can easily break. An adapter with a bearing is made here, which accounts for the entire load of the screw.
 >
>
The screw here is three-bladed, has a direct drive to the generator, the screw itself is 2.7-3 meters in diameter, and has good speed and KIEV. The power of this windmill with a wind of 4-5 m / s is 150-250 watts, which is already very good.
Wind generators based on motor wheels
Below are links with descriptions to other articles on the site that describe windmills with motor wheels as a generator.  >
>
Wind generator from the motor-wheel 900 watts
A bicycle motor-wheel is used as a generator in this windmill, the maximum power is fixed at 900 watts, this is 30 volts and 30 amperes, the wind generator runs on a 24 volt battery  >
>
Wind generator from the motor-wheel
A few photos of a small vertical wind generator. As a generator, a motor-wheel from a scooter was used here, the transmission of torque to the generator was chain, the ratio was approximately 1:2.5. The dimensions of the rotor are 1 * 1.6 meters, the height of the mast is 9 meters. On an average wind, this windmill produces up to 3A and 17v to charge an alkaline battery.In general, the motor wheel is a good generator, but its cost is not so low, it costs about $ 200-250 per 1 kW, this is its main disadvantage, but this is a godsend for those who themselves cannot make a good generator. Also, as I already wrote, the sticking of the wheel motor is quite noticeable and three-bladed propellers will not start well in light wind. I myself have not tried to make a windmill on such a generator, but maybe it will work out someday.
Every year people are looking for alternative sources. A homemade power plant from an old car generator will come in handy in remote areas where there is no connection to the public network. It will be able to freely charge batteries, as well as ensure the operation of several household appliances and lighting. You decide where to use the energy, what will be generated, and also collect it with your own hands or purchase it from manufacturers, of which there are plenty on the market. In this article, we will help you figure out how to assemble a wind turbine with your own hands from the materials that any owner always has.
Consider the principle of operation of a wind power plant. Under a fast wind flow, the rotor and screws are activated, after which the main shaft starts to move, rotating the gearbox, and then generation occurs. As a result, we get electricity. Therefore, the higher the rotation speed of the mechanism, the greater the productivity. Accordingly, when locating structures, take into account the terrain, relief, and know the areas of the territories where the vortex speed is high.


Assembly instructions from a car generator
To do this, you will need to prepare all the components in advance. The most important element is the generator. It is best to take a tractor or bus, it is able to generate much more energy. But if this is not possible, then it is more likely to get by with weaker units. To assemble the device you will need:
voltmeter
battery charging relay
blade steel
12 volt battery
wire box
4 bolts with nuts and washers
clamps for fastening
Assembling a device for a 220v home
When everything you need is ready, proceed to the assembly. Each of the options may have additional details, but they are clearly specified directly in the manual.
First of all, assemble the wind wheel - the main structural element, because it is this part that will transform wind energy into mechanical energy. It is best that it has 4 blades. Remember that the smaller their number, the more mechanical vibration and the more difficult it will be to balance it. They are made from sheet steel or an iron barrel. They should wear a uniform not the same as you saw in the old mills, but reminiscent of the winged type. They have much lower aerodynamic drag and higher efficiency. After you use a grinder to cut out a windmill with blades with a diameter of 1.2-1.8 meters, you need to attach it, together with the rotor, to the generator axis by drilling holes and connecting with bolts.


Electrical circuit assembly
We fix the wires and connect them directly to the battery and voltage converter. It is required to use everything that at school in physics lessons you were taught to make when assembling an electrical circuit. Before starting development, think about what kW you need. It is important to note that without subsequent alteration and rewinding of the stator, they are not at all suitable, the operating speed is 1.2 thousand-6 thousand rpm, and this is not enough for energy production. It is for this reason that it is required to get rid of the excitation coil. To raise the voltage level, rewind the stator with thin wire. As a rule, the resulting power will be at 10 m / s 150-300 watts. After assembly, the rotor will magnetize well, as if power was connected to it.


Rotary home-made wind generators are very reliable in operation and economically profitable, their only imperfection is the fear of strong gusts of wind. The principle of operation is simple - a whirlwind through the blades makes the mechanism spin. In the process of these intense rotations, energy is generated, the voltage you need. Such a power plant is a very good way to provide electricity to a small house, of course, its power will not be enough to pump water out of a well, but it is possible to watch TV or turn on the lights in all rooms with its help.
From a home fan
The fan itself may not be in working condition, but only a few parts are required from it - this is the stand and the screw itself. For the design, you need a small stepper motor soldered with a diode bridge so that it gives out constant voltage, a shampoo bottle, a plastic water tube about 50 cm long, a plug for it and a lid from a plastic bucket.


A sleeve is made on the machine and fixed in the connector from the wings of the disassembled fan. The generator will be attached to this sleeve. After fixing, you need to do the manufacture of the case. Cut off with a machine or in manual mode the bottom of a bottle of shampoo. During cutting, it is also required to leave a hole at 10 in order to insert an axis machined from an aluminum rod into it. Attach it with a bolt and nut to the bottle. After all the wires have been soldered, another hole is made in the body of the bottle to output these same wires. We stretch them and fix them in a bottle on top of the generator. They must match in shape and the bottle body must reliably hide all its parts.
Shank for our device
In order for it to catch wind currents from different directions in the future, assemble the shank using a pre-prepared tube. The tail section will be attached with a screw-on shampoo cap. A hole is also made in it and, after putting a plug on one end of the tube, they pull it out and fix it to the main body of the bottle. On the other hand, the tube is sawn through with a hacksaw and the shank wing is cut out with scissors from the lid of a plastic bucket, it should have a round shape. All you need to do is simply cut off the edges of the bucket that attached it to the main container.


We attach a USB output to the back panel of the stand and put all the received parts into one. It will be possible to mount the radio or recharge the phone through this built-in USB port. Of course, it does not have strong power from a household fan, but it can still provide lighting for one light bulb.
DIY wind generator from a stepper motor
A device from a stepper motor, even at a low rotation speed, produces about 3 watts. The voltage can rise above 12 V, and this allows you to charge a small battery. As a generator, you can insert a stepper motor from the printer. In this mode, an alternating current is generated from the stepper motor, and it can be easily converted to direct current using several diode bridges and capacitors. You can assemble the scheme yourself. The stabilizer is installed behind the bridges, as a result we get a constant output voltage. To control visual tension, you can install an LED. In order to reduce the loss of 220 V, Schottky diodes are used to rectify it.


The blades will be made of PVC pipe. The workpiece is drawn on the pipe, and then cut out with a cutting disc. The span of the screw should be about 50 cm, and the width should be 10 cm. It is necessary to machine a sleeve with a flange to fit the size of the stepper shaft. It is mounted on the motor shaft and fastened with screws, plastic “screws” will be attached directly to the flanges. Also carry out balancing - pieces of plastic are cut off from the ends of the wings, the angle of inclination is changed by heating and bending. A piece of pipe is inserted into the device itself, to which it is also attached with bolts. As for the electrical board, it is better to place it below, and bring power to it. Up to 6 wires come out of the stepper motor, which correspond to two coils. They will require slip rings to transfer electricity from the moving part. Having connected all the parts together, we proceed to testing the design, which will start revolutions at 1 m / s.
Windmill from a motor-wheel and magnets
Not everyone knows that a wind generator from a motor-wheel can be assembled with your own hands in a short time, the main thing is to stock up on the necessary materials in advance. The Savonius rotor is best suited for it, it can be purchased ready-made or on its own. It consists of two semi-cylindrical blades and an overlap, from which the axes of rotation of the rotor are obtained. Choose the material for their product yourself: wood, fiberglass or PVC pipe, which is the simplest and best option. We make a junction of parts, on which you need to make holes for fastening in accordance with the number of blades. You will need a steel swivel mechanism so that the device can withstand any weather.


From ferrite magnets
A magnetic wind generator will be difficult to master for inexperienced craftsmen, but you can still try. So, there should be four poles, each will contain two ferrite magnets. They will be covered with metal linings a little less than a millimeter thick to distribute a more uniform flow. The main coils should be 6 pieces, wound with a thick wire and should be through each magnet, occupying a space corresponding to the length of the field. The fastening of the winding circuits can be on the hub from the grinder, in the middle of which a pre-turned bolt is installed.
The flow of energy supply is regulated by the height of the stator fixing above the rotor, the higher it is, the less sticking, respectively, the power decreases. For a windmill, you need to weld a support-rack, and fix 4 large blades on the stator disk, which you can cut out of an old metal barrel or a plastic bucket lid. At an average rotation speed, it produces up to about 20 watts.


The design of the windmill on neodymium magnets
If you want to know about the creation, you need to make the base of the car hub with brake discs, such a choice is quite justified, because it is powerful, reliable and well balanced. After you clean the hub of paint and dirt, proceed to the arrangement of neodymium magnets. They will need 20 pieces per disk, the size should be 25x8 millimeters.
Magnets must be placed, taking into account the alternation of the poles, before gluing it is better to create a paper template or draw lines dividing the disk into sectors so as not to confuse the poles. It is very important that they, standing opposite each other, be with different poles, that is, they are attracted. Glue them on with super glue. Raise the borders along the edges of the discs, and wrap tape or plasticine in the center to prevent spreading. In order for the product to work with maximum efficiency, the stator coils must be calculated correctly. An increase in the number of poles leads to an increase in the frequency of the current in the coils, due to this, the device, even at a low speed, gives more power. The coils are wound with thicker wires in order to reduce the resistance in them.
When the main part is ready, the blades are made, as in the previous case, and fixed to the mast, which can be made from an ordinary plastic pipe with a diameter of 160 mm. In the end, our magnetic levitation generator, with a diameter of one and a half meters and six wings, at 8m / s, is capable of providing up to 300 watts.
The price of disappointment or an expensive weather vane
Today, there are many options for how to make a device for converting wind energy, each method is effective in its own way. If you are familiar with the methodology for manufacturing energy-producing equipment, then it will not matter on the basis of what it is made, the main thing is that it meets the intended scheme and gives good power at the output.
Once I fell ill with the idea of energy independence and decided to make a windmill. For a long time I chose a motor-generator for a windmill. There were several options:
- remake an induction motor by installing permanent neodymium magnets on the rotor
- convert the generator from the car to permanent magnets, thus getting rid of the excitation winding, which needed to be fed well (for comparison: the efficiency of a generator with permanent magnets is 0.8, similar to the excitation winding - 0.6).
- Find a ready-made engine with permanent, preferably neodymium, magnets. Why neodymium, you ask, because there are more motors with ferrite magnets. It's simple: almost all engines with ferrite are designed for high speeds, the minimum that I found was 1500 rpm, 36 volts. This means that the design of the wind generator is complicated by a gearbox, which will reduce the overall efficiency of the entire product and complicate the design, as well as the operating costs, in short, a complete crap.
- Blades made of wood - not bad, but labor-intensive to manufacture, require maintenance (painting, varnishing)
- Blades made of composite materials (fiberglass and epoxy) - labor-intensive manufacturing
- Blades made of PVC pipe - easy to manufacture, do not require maintenance
The length of the blade from the pipe is approximately calculated as follows: blade length = pipe diameter * 5. You can, of course, make them longer, but they will bend very strongly in a strong wind. Divide the pipe circumference by diameter into 4 equal parts, then cut it along the length of the pipe, and you will get 4 blanks. Then mark 30-35 mm from one edge and draw a line to the corner of the other edge of the workpiece, cut off the excess. All the blade is ready, we do the same operations with the rest, and you get 4 beautiful blades. Next, we grind the corners for better aerodynamics. 

Manufacturing of the attachment point of the blades (Hub)
I made it from a plate 1.5-2mm thick. Cut out the circle and mark it into 5 equal parts. We drill holes for the bolts that will attach the blades and the hub to the motor wheel. 
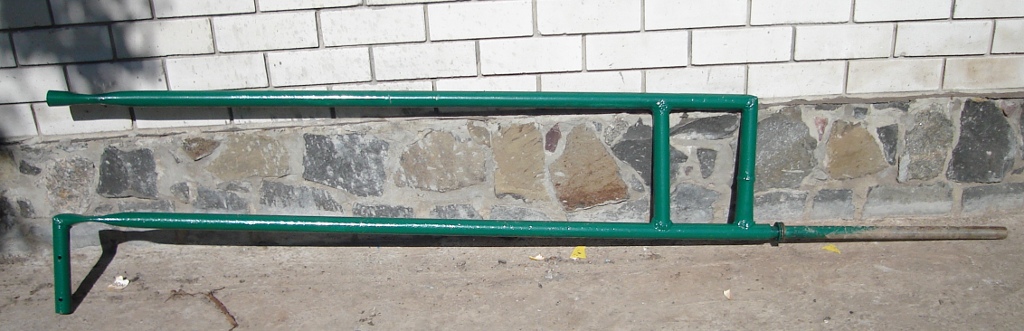
Swivel mechanism and mounts for mk