Is it necessary to trim the edge of the drywall. What is drywall cut with? How to properly cut drywall
Today drywall is widely used in construction and renovation. You can work with this material yourself. However, you should first find out what the drywall is cut with so that there are no difficulties during the repair process. Below are the main ways to work and the tools you will need are listed.
Cutting tools
What is drywall cut with? For its cutting, there are special devices that
are quite expensive. They are used in enterprises where work with drywall is carried out on a large scale. For home use, you can use the tools at hand that can be found in every home.
First of all, you need to mark the drywall sheet to cut it straight. This is done with a tape measure, a simple pencil and a long ruler.
Several tools can be used to cut the material. So, what is drywall cut with:
- a hacksaw for metal;
- construction knife;
- jigsaw.
In rooms with high humidity, moisture-resistant plasterboard is used. It differs from ordinary material in the presence of antiseptic additives in its composition. Some people have a question about how to cut It is not very different from ordinary material. It can be easily recognized by its green color. The same tools can be used to cut it. We will tell you in more detail how to work with each of them.
The better to cut drywall
Differs from the one that saws a tree, a thinner blade

blades. With its help, drywall is cut very easily. The edges of the material remain flat and virtually jag free. A sheet of material must be put on some kind of support and cut along the marked line.
With a construction knife with a double-sided sharp blade, you can easily cut a dense sheet of drywall. To make the edge of the sheet straight, you should first draw a marking line and attach a metal ruler to it. An incision is made along it with a knife. In the case when the drywall is thin enough, you can replace the construction knife with a regular office knife, which is used for paper.
It is convenient to make curly cuts with an electric jigsaw. When working with drywall, it is recommended to purchase fine-toothed files that are used for metal.
How to properly cut drywall
There are some helpful tips to make your job easier:
- Drywall is a flexible material. In order not to break it during work, you need to put the sheet on a stable flat surface.
- When cutting a large sheet, this should be done gradually.
- The workplace should be free of moisture, otherwise the material will get wet and become unusable.
- Which side to cut the drywall from is not so important. However, it is best to cut on a surface that will attach it to the wall.
- When cutting a profile, don't worry about uneven edges. They will subsequently be covered with a drywall sheet.
- When working with the material, it should be understood that it can crumble strongly and create dust. Be sure to protect your eyes and respiratory system.
Cutting along straight lines
First you need to put the drywall on a flat horizontal surface and
mark on both sides of the line along which the cut will be carried out. After that, a metal ruler is applied to them and pressed by hand. We take a knife in the other hand and draw it along the line several times to make the cut deeper.
Some people think they can do it well without a ruler. However, you should not neglect it. It is rather difficult to make a straight cut without it. It is possible, of course, but you will have to take the time to get a neat edge. With a ruler, everything is done much faster.
When the cuts are deep enough, the drywall sheet should be placed on the edge and tapped on the back side. Usually a few light blows will cause the drywall sheet to break along the line. Now all that remains is to cut the cardboard layer with a knife.
Curly cutting
There are situations when you need not a straight cut, but a curved or round one.

For example, if you are making an arch or hole for lighting fixtures. In this case, it is best to use a jigsaw.
They need to work slowly, following clearly along the outlined lines. The saw should be narrow with small teeth. It must work at high speed. If you cut it neatly, the edge will be flat.
If you don't have a jigsaw, you can use a hacksaw or a construction knife and hammer. Make deep cuts strictly along the markings. Place the drywall on a flat, indentable surface under the opening to be cut. Now hit this place with a hammer. After the unwanted part has fallen off, flip the drywall over and cut off the excess paper.
Edge processing
When the drywall is cut off, the edges should be leveled slightly so that they do not have

Chipping and chipping. This can be done using sandpaper. Carefully pass all the edges of it until they are smooth.
The final stage of preparation of the material includes its fascination. To do this, you need to cut off a few millimeters of gypsum from each edge (approximately two-thirds of the sheet thickness). The chamfer is removed with a plane or knife at an angle of approximately 45 degrees.
After installing drywall, all gaps between the material canvases must be putty. When the seams are dry, you can start painting the surface or pasting it with wallpaper.
How to cut a profile
Plasterboard sheets are attached to a special profile. It is made of metal
for the greatest structural strength. How to cut To cope with this work, you can use:
- hacksaws for metal;
- jigsaw;
- scissors for metal.
It is not recommended to use a grinder at home because it produces a lot of sparks. will be enough. They can easily cut through iron without creating unnecessary debris and shavings.

The profile can be cut into small pieces. After it will not be seen. The main thing is to screw the profile well to the wall or other surface in order to ensure the strength of the entire structure.
Working with drywall is quite simple. Due to this, it is in great demand for indoor use. Now that you have learned how to cut drywall, you can independently change your apartment beyond recognition, without spending money on professional finishers.
Drywall can, without any exaggeration, be called the most popular material for leveling walls and ceilings for their further decoration. It is very widely used in the construction of complex decorative structures that become an interior decoration. Such popularity is no coincidence, since drywall has all the qualities that are necessary for use in residential premises. It is very easy to use, and technologies with its use are quickly mastered even by beginners. There is one more important point - this is the quite affordable price of drywall sheets, in comparison with other building materials.
When purchasing this material for the first time for certain purposes, many novice craftsmen unwittingly wonder how to cut drywall at home so as not to spoil or break the sheet so that blanks with smooth edges and the required dimensions are obtained. There is nothing particularly complicated in this - further we will consider various options for cutting, processing and fitting drywall sheets for a specific area of work.
A few words about the structure of drywall
To begin with, a couple of minutes of attention must be paid to the structure of drywall, since this moment will immediately clarify the process of cutting it. And the "device" of the GCR is very straightforward.
Drywall prices
drywall

The structural structure of the sheet of this material is a three-layer "sandwich". The outer layers are made of thick cardboard, and the core is made of a compressed gypsum mixture. The long sides of drywall usually have rounded or trapezoidal edges and are also protected by cardboard. The edge is not provided on the end sides.
Cardboard is produced in several types - this is an ordinary (GKL) material of gray color, moisture-resistant (GKLV) has green shades of the front side, fire-resistant (GKLO) - pink or light purple, and moisture resistant(GKLVO) - dark green shade. In addition, an innovative drywall is now on sale for soundproofing walls. He manufactured in blue.
Most often, there are standard sheet sizes of 2500 × 1200 mm, that is, having an area of 3 m2. Other options are available, but they are less common: 2000 × 1200 mm (2.4 m²) and 3000 × 1200 mm (3.6 m²). The thickness of the sheets can be 12.5 mm (for walls), as well as 9.5 mm and 6 mm, which are usually used to create structures.
The table below shows the main standard dimensions of drywall with an indication of the approximate weight of the sheets. This is in order to be able to evaluate - the sheets are very cumbersome and rather heavy. That is, you should work with them carefully: they may not withstand the load on a fracture if handled carelessly - they may break.
| Drywall type | Sheet dimensions (length × width × thickness), mm | Leaf area, m2 | Approximate leaf weight, kg |
|---|---|---|---|
| 2000 × 1200 × 6 | 2,4 | 12 | |
| 2000 × 1200 × 9.5 | 2,4 | 18 | |
| 2000 × 1200 × 12.5 | 2,4 | 23 | |
| 2500 × 1200 × 6 | 3,0 | 15 | |
| 2500 × 1200 × 9.5 | 3,0 | 23 | |
| 2500 × 1200 × 12.5 | 3,0 | 29 | |
| 3000 × 1200 × 6 | 3,6 | 18 | |
| 3000 × 1200 × 9.5 | 3,6 | 27 | |
| 3000 × 1200 × 12.5 | 3,6 | 35 | |
| 2000 × 1200 × 12.5 | 2,4 | 24 | |
| 2500 × 1200 × 12.5 | 3,0 | 30 | |
| 3000 × 1200 × 12.5 | 3,6 | 35 | |
| 2000 × 1200 × 12.5 | 2,4 | 26 | |
| 2500 × 1200 × 12.5 | 3,0 | 31 | |
| 3000 × 1200 × 12.5 | 3,6 | 37 | |
| 2000 × 1200 × 12.5 | 2,4 | 27 | |
| 2500 × 1200 × 12.5 | 3,0 | 32 | |
| 3000 × 1200 × 12.5 | 3,6 | 38 |
However, whatever is used for construction or, it is cut the same way.
Basic tools for cutting drywall
To cut drywall sheets to a certain size, you will need some simple tools, the list of which includes the following names:

- Electric jigsaw. It can be convenient to make long cuts with this tool, and in particular it becomes necessary if a cut of a complex curved shape is required. As a rule, our jigsaw is included in the tool "arsenal" of any private house, since it is difficult to do without it on the farm.
- A special knife for cutting drywall or a regular stationery knife with a replaceable blade. More detailed information about this group of tools will be provided below.
- A narrow hacksaw for wood with a small set of teeth, or a special hand saw for drywall.
- Electric drill with a set of large pen drills, as well as crowns - for cutting large round holes for wiring communications, sockets for installing electrical outlets and switches.
- Plasterboard plane or regular wood plane. This tool will be necessary for processing edges when cutting material.
- A needle roller is required if it is necessary to form an arched opening from drywall or another curved surface, for example, for a complex
- To measure and mark the sheets, you will need a simple pencil or marker, tape measure, construction square, meter metal ruler.If there is no ruler, it can be replaced by a flat metal profile used to equip the frame crate. In addition, you need to have at hand a building rule for making long, even cuts "under the ruler".
Drywall knives
Due to the fact that the main tool for cutting drywall is a knife, its characteristics should be considered in more detail.
Prices for popular electric jigsaws

Drywall cutters can be divided into three categories. Detailed information about them is presented in this table:
| Knife categories | Characteristic features of the instrument |
|---|---|
| Standard knives | Such knives are the most affordable tool, and this is their main advantage. The design is quite simple, since it consists of four elements - a handle-body, a retainer cover, a blade adjuster-retainer and a replaceable blade itself. The reliability of such knives is rather low, especially when used for cutting drywall. They are more suitable for cutting paper. When cutting drywall, the blades quickly become dull. |
| Reinforced knife models | These are more expensive options compared to standard models. They differ from the first ones in the presence of a metal guide installed in the body, which more reliably fixes the blade and provides a rigidity of position during the cut. |
| Professional knives | Such tools are used by craftsmen who constantly work with drywall. There are many options for professional knives. They differ from each other in the ergonomics of the case, the principle of operation of the latch and some other design nuances. The price of such models is several times different from those mentioned above, and sometimes it reaches 1000 rubles. |
In principle, drywall can be cut with any of the named knife models. However, in order to determine the choice of this tool, it is worth considering all the options in more detail.
It should be noted right away that knives with a 9 mm blade are not even worth considering, since they are not suitable for cutting drywall. Such a blade may not withstand pressure and break. Not only will this greatly slow down the work - the breakage of a thin blade is often accompanied by a rather serious hand injury.
For cutting drywall, knives with a blade having a width of 18 or 25 mm are used.
| Product appearance | Types of knives and cutters and their features |
|---|---|
 | A wallpaper or stationery knife can be called the simplest and most affordable option. This tool is popular with non-professional builders as it is easy to use and can be used not only for cutting drywall but also for many other operations. The thickness of the blades can vary from 0.3 to 0.6 mm - in this case, the larger this figure, the better. This type of knife is produced in different versions, but their performance is basically the same. |
 | A knife with a trapezoidal blade is considered the best option for working with drywall, since it is designed specifically for cutting this material. The advantages of this tool include the ergonomic, comfortable shape of the handle, which makes it comfortable to work with the tool, since the force of the hand is perfectly transferred to the material being processed. The blade, which has a trapezoidal shape, is distinguished by its rigidity, thanks to which it does not bend and cuts drywall sheets with high quality. Knives of this type have a fairly wide range in cost, which mainly depends on the brand of the product. But even the most inexpensive options have shown themselves well in operation. |
 | Another option for a knife with a trapezoidal blade, designed for cutting drywall, is a product that has a folding design. It is very convenient because the tool is safe when folded and can be carried in your pocket without fear of injury. The rest of the characteristics correspond to the previous version. |
 | Knives with a disc blade are designed for cutting drywall, and many craftsmen prefer to use them in their work, since the tool perfectly separates sheets, making perfectly even cuts, including curved ones. The disc is installed next to a metal ruler set along the cut line, pressed and moved along it. In the course of the movement of the knife, an even cut of the same depth is formed. If necessary, the round blade can be pressed with quite a lot of force, since it has sufficient rigidity and can withstand such loads without problems. There are also disc-bladed folding knives. In such models, the disc comes out of the case when you press the movable part of the handle. |
 | A thickness gauge or a drywall cutter differs from previous options in its appearance and design. This tool consists of two discs located horizontally parallel to each other at a certain distance. The cutter is installed on a sheet of drywall and moves along it, cutting both layers of cardboard at once. The round cutting parts are removable, so they can be replaced with new ones if necessary. With this tool, you can make cuts, separating perfectly flat strips up to 120 mm wide from the whole sheet, which is often necessary when using drywall to form multi-level ceilings and other structures where narrow strips of perfectly even and uniform size are needed. The tool handle simultaneously serves as a guide - from it the required cutting width is set. Next, the cutter is installed on the end of the sheet, and is moved from beginning to end along its entire length. |
 | The Blade Runne drywall cutter is a tool that is known mainly among professional craftsmen. This is not an ordinary tool that can speed up the cutting process in half. From which we can conclude that such a device is necessary if you have to constantly open a large number of drywall sheets. The tool consists of two detachable parts, which are held together during operation by means of magnetic clamps. The blades are located in small blocks located in two parts of the body. The cutting elements can be replaced if necessary. It is quite easy to make cuts with this tool - the halves of the tool are separated and installed on both sides of the sheet on a line previously marked on it. Then, the cutter moves along a given reference point, cutting the cardboard layer from both sides at once. Thanks to this tool, you can make both perfectly straight and complex curved cuts. The main thing is that the marking lines applied to the sheet are clear and accurate. |
Now, having figured out which knife designs are most often used for cutting drywall, you can decide on the choice of the main tool for work. This takes into account the field of application of the material, the required shapes and sizes of workpieces, the required level of accuracy. And, of course, the cost of the tool is compared with the scale of the tasks ahead, with the intensity of its use.
Basic technological methods for cutting drywall and processing blanks
Cutting drywall itself is not difficult at all. But for that to it was convenient to work, and the markings and cuts turned out to be accurate, it is necessary that the room where the cutting takes place was well lit and free enough.
The main technological methods for cutting drywall sheets and processing blanks are shown in the instruction table below:
| Illustration | Brief description of the operations performed |
|---|---|
 | The plasterboard sheet is large enough, and for marking and cutting it must be laid horizontally on a solid base. It is clear that not everyone has such a spacious workbench. Someone places a sheet on the floor, others adjust tables or stools for this purpose. If the latter are used for the stands, then they must be placed close to each other, at a distance of no more than 300 mm, otherwise, when pressing on the sheet, it may break. |
 | On a sheet laid on a solid base, marking is made according to the required dimensions. For this purpose, a tape measure and a pencil, a ruler, etc. are used. A metal ruler or a long rule is applied to the marked marks and a line is drawn along which the cut will be made. Often, a square cannot be dispensed with to cut strictly perpendicular lines. |
 | Further, close to the ruler, a knife blade is installed on the drawn line and drawn along the entire length of the guide. Using a rule as a ruler is more convenient when the sheet needs to be cut along its entire length or width. A slight pressure is applied to the blade so that only the outer layer of the cardboard is cut. |
 | If one of the types of knives discussed above is used to cut the sheet, then the evenness of the cut largely depends on the hardness of the master's hand. However, in any case, you should not try to cut the drywall to its full thickness, since even if you manage to do this, the cut will turn out to be sloppy. And in vain there is no need to blunt the blade. |
 | Then the drywall sheet must be moved closer to the edge of the base on which it lies, and gently tap the cut from the back of the sheet. As a result of tapping, the gypsum layer along the cut line will lose its integrity. Next, you need to grab the cut off part of the sheet and bend it sharply downward, due to which the gypsum layer will break exactly along the line. |
 | It remains to take a knife, bend the sheet along the cutting line and finally divide it into two parts. It will not be difficult to do this, since the halves will be held by only one layer of cardboard, which is cut along the break line. You don't even have to turn the sheet over to do this. |
 | After the sheet is divided, the edges of the cuts can be cleaned using a special or conventional planer, since sloppy notches may remain on it, which will interfere with the joining of the sheets on the wall. Chamfering must be done without strong pressure, as the material may begin to crumble. However, you should not achieve the ideal shape of the edge, it is enough to remove the strongly protruding parts and unevenness of the cardboard, if they were formed during cutting. And a beveled chamfer - for high-quality reinforcement of joints between drywall sheets on the wall, it will be possible to cut through after their installation - otherwise, in the process of work, it is easy to destroy the refined and unprotected edge of the sheet with cardboard. |
 | It is somewhat more difficult to cut a curly hole, for example, a semicircle, since you have to constantly monitor the curved line. This process can be done with a narrow hacksaw or an electric jigsaw. The jigsaw makes a neater cut, but it is convenient for those skilled in the art with this tool. It is very important to start the cut carefully without crumbling the edge of the sheet, especially if there is no cardboard edge on it. Further, holding the hacksaw in the direction of the drawn line, the excess part of the drywall is carefully, slowly, cut out. |
 | Free-form through openings are also cut with a hacksaw or jigsaw. First, the location of this window is marked on the surface of the sheet, then its edges are precisely defined by lines. In the middle of each side, closer to the inner, cut out part, a hole is drilled - its diameter should correspond to the width of the file installed in the electric jigsaw. Usually a diameter of 8 ÷ 10 mm is enough. Further, a jigsaw file is inserted into the hole (necessarily - in the off state!), And a line is cut to one of their corners. Then the jigsaw turns off, the file is pulled out after a complete stop, the jigsaw turns to the other side, and is reinserted into the same hole, after which a cut is made to the opposite corner. In the same way, cuts are made on the rest of the sides, and the cut fragment is easily removed. |
 | A round window-socket for an outlet or switch is cut out using a drill with a crown bit of the required diameter, a narrow hacksaw or a jigsaw. The easiest way to perform this operation is with a crown drill, and this procedure will take just a few seconds. Any openings are most often cut out in place, that is, after fixing the sheet on the crate, since the strength of the sheet is broken, and often even a slight skew during transportation or installation leads to a break. And it is very simple to outline a round opening - you do not have to make any precise constructions - it is enough to determine the center of the circle. |
 | If you plan to cut a hole with a hacksaw or jigsaw, then the center is determined, and a cutting line is drawn using a regular compass. Then, on the line, two holes are drilled with a drill, as close to each other as possible. Next, the hole must be carefully combined with a file and the cut continues along the contour line. But, you see, a crown is much more convenient, but it costs - not at all expensive. |
 | If it is necessary to sheathe curved surfaces with plasterboard, the material can be bent, having previously carried out some preparatory operations. For example, if you intend to make a small bend for sheathing an arch with a large radius, then two ways to give the plasterboard the desired shape are suitable. |
 | You can make punctures on it with a needle roller, then moisten the sheet with a spray bottle. The material will become more flexible when it gets wet. Without waiting for drying, it is mounted on an arched frame, which must be done very carefully. |
 | Some craftsmen prefer to bend the punctured and moistened drywall according to a template made according to the parameters of an arched opening. To do this, the prepared sheet is laid on top of the template, slightly pressing its edges with a load. In this position, the sheet is dried, and then mounted on the frame of the arched opening. |
 | Another option that will help give the drywall the desired shape is to make cuts along the entire length of the sheet required for the sheathing. The cuts should be perfectly straight. If it is necessary to form a column from a gypsum plasterboard sheet or sheathe an arched opening with a small bending radius with it, then the cuts are also made along the entire length of the sheet, but in two opposite passes at an angle at the apex of 100 ÷ 110 degrees. That is, a small section of material is removed from such cuts, and the resulting groove itself should have a shape close to a triangle in cross-section. Otherwise, the sheet will not be able to bend. |
In conclusion, I would like to give some tips that will help you cope with the task without making fatal mistakes.
- Do not cut drywall with a grinder, as there will be not only a lot of noise, but also a cloud of gypsum dust, which will add problems with cleaning the room. And to be honest, there is no sense at all in such an approach.
- If you need to use a hammer when cutting material, you can only use a rubber mallet, since a metal tool can seriously damage drywall. And, of course, carefully measure the strength of the blows.
- So that there are fewer notches along the cutting line at the edges of the sheet, it is recommended to hold a hacksaw or a knife at a right angle - the lower the slope of the blade, the larger the rags of cardboard will turn out.
- All the main cuts are made before attaching the material to the crate, since if the cut is made unsuccessfully, then the sheet will have to be replaced with a new one, and the damaged one can be used for inserts. The exceptions are windows and openings - it is better to cut them out in place installation, after fixing to the frame.
- It is not recommended to cut complex patterns with thin partitions in drywall, for example, openwork nets, since the material is quite fragile.
- If a whole sheet is cut, then most often this process is carried out on the floor. After the cut is made, a bar is placed along its line under the drywall. Then you need to press on both parts of the canvas, which will easily break along the cut line.
Drywall knife prices
drywall knife
From the information presented above, a logical conclusion suggests itself that there is nothing particularly difficult in the process of cutting drywall sheets. And this work can easily be done by any amateur who has no experience in construction. If you have any doubts, then you can try your hand at a small piece of material and see how simple everything is if you follow the technological recommendations and use a quality tool.
Find out with step by step instructions from our new article on our portal.
At the end of the publication - a video in which the masters clearly demonstrate the techniques of cutting drywall.
Video: How to quickly and efficiently cut drywall
No wonder drywall is a common finishing material. After all, its installation and installation can be done by both an amateur and a professional. In this article, we will look at how to properly install drywall with our own hands, how to sheathe walls with it.
The ways
Installation of drywall is carried out using a wooden frame, a special adhesive mixture, metal profiles and cement. If installation is carried out on the ceiling, then instead of glue, it is better to use a wooden frame. Whichever method of installing drywall you choose, you need to achieve an even fixing of the sheets. The structure must serve reliably and durably without rattling and structure-borne noise.
Installation on a metal profile
The profile is a strip of steel, which must be bent into a rigid rail on a special conveyor. The rail must be made in compliance with the standard dimensions; in addition, a blind notch must be added, which increases the rigidity. You also need to make through holes with a step of 300-600 millimeters.
- you will notice an improved moisture resistance compared to wood.
- By standardizing the element, you can achieve high efficiency even on very curved walls.
- It is possible to additionally install thermal insulation.
Minuses:
- Weak insulation, if you don't take additional soundproofing measures, it will sound like a drum.
- You also need to use a huge number of tools, compared to the glue method.
The wood used for the frame must be flat, planed and not damp so that no blooms or bark marks appear.

Pros:
- wood is environmentally friendly, and this is an advantage over metal;
- good sound insulation;
- the ability to lay thermal insulation.
Minuses:
- you will have to additionally protect the structure from moisture, especially if there is a kitchen or other source of moisture next to the room.
For gluing drywall, you need to use cement-polymer glue. To complete the work, you need a minimum of tools, as well as a little experience with similar compositions. Only a sufficiently flat initially surface will fit, with maximum drops of up to 20 millimeters and a primed base.

Pros:
- such a structure takes a minimum distance from the base to the finished surface;
- provides good sound insulation and requires a minimum of tools.
- you need a very sturdy surface with maximum drops of up to 20 millimeters;
- there is no way to install thermal insulation. For insulation, you will have to use polystyrene: putty mesh plus a ball of putty and parachute dowels.
Plasterboard wiring
When all the profiles are installed, you can begin to carry out communications: network and telephone cables, electrical wiring, as well as future points of consumption.
Important! Electrical rules state that all power wires that are behind the casing must be in a fireproof corrugated pipe. You can also use a plastic corrugation or metal hose labeled "Non-Combustible".
Safety voltage wires do not have to be hidden in the corrugation, but this way the wiring can be protected from damage.
Finishing instructions
1. Determine the points of consumption. You need to measure whether the length of the cords is enough to connect the devices. Determine the number of electrical outlets so you don't have to turn off your computer to turn on the vacuum cleaner.
2. Determine the optimal height of the outlets and switches. They must be at a level that is safe for animals and children.
3. Draw each point on the wall.
4. Draw a wire to the points. To avoid problems in the future, consider a simple rule: the wire must go vertically from the outlet, but the horizontal sections must be connected at the level with the distribution boxes.

5. Fasten the wires well to the wall. Avoid tangling wires to the posts.
6. Leave the wire so long that it is possible to connect sockets 100-150 millimeters from the current wall.

7. Future holes for sockets must be installed according to the exact location of the centers or in a pre-cut hole on a sheet of drywall.

Mark the holes and measure out the diameter.

Learning to trim drywall is best on scraps of sheets, since the boxes differ in their diameter, or the crown may not fit. If you cut out a socket on an installed sheet, then do not forget about the wire. The flaws can be finished with a simple semicircular file or with sandpaper previously put on the round handle of the hammer. A properly installed box should fit snugly in the opening.

8. Now you need to put the wire into the box, and then tighten the legs with the screws so that the box is fixed. The screws can be positioned vertically or horizontally, depending on the specific model.

9. A small hole is sufficient for the luminaire, but it will be difficult to reach the wire through it. In this case, it is best to start the wire before screwing the sheet.
10. It is best to leave the installation of switches, sockets and lamps until the end of the work.
Interior items, furniture
If you are installing drywall on walls, then you need to take into account the peculiarities of fixing lamps, furniture and other elements. For drywall, special fasteners are made, which are also called butterflies. Butterflies are metal or plastic.


On the other side of the sheet, the butterfly firmly fixes the screw. Remember that only light objects can be hung on such a mount: a light shelf, a picture or a lamp.
However, if you wish, you can also hang up a boiler or a children's sports equipment. For fastening heavy objects, it is necessary to provide for the installation of a profile, which is also called a CD with an embedded bar. The profile, together with the bar, is attached to the wall and is able to withstand heavy loads. To obtain a reliable structure, spacer spacers must be laid, which together form a flat frame. After you finish finishing the walls, you can carefully secure the item you want.

To fix the skirting board, you need to insert the trims between the CD risers into the UD drywall. After finishing work, the skirting board can be easily screwed into this profile.

How to properly cut drywall
To properly cut drywall sheets, you need to take a pencil, knife, tape measure and a flat rail. You will need an assistant.
- Mark up.
- Cut through the paper with a sharp knife.

3. Break the sheet. The plaster core will break exactly along the line.

4. Hold the halves at a 90 degree angle and cut through the back of the paper.

How to remove a chamfer
Important: the edges of the sheets that meet other edges must have a 45-degree bevel.
1. To make a chamfer, you need to cut the paper under a flat bar parallel to the cut. You need to back out about 10 millimeters.

2. Use a knife to cut the chamfer as the paper on the face layer will not tear.

3. Sand any unevenness and paper with a drywall planer. You can also use sandpaper or a wood file.

Neckline
To make a cutout from the edge, you must first cut through the paper with a knife on one side along the markings.

Make two cuts from the edge using a jigsaw or a hacksaw.

After all the procedures, break through the drywall and break the sheet from the back.

If you need to cut a hole in the middle of the sheet, then you will have to saw through 3 sides and only then break it. You can also saw holes completely.
Processing of joints, corners
When all the sheets are installed, and the wires are brought out under the switches, sockets and lamps, you can seal the joints and grooves from the screws with putty. To seal the joints, you can use the Knauf mixture, which hardens after a short time and forms a durable material.
The beveled edge must be carefully primed and allowed to dry completely. Be sure to glue a reinforcing mesh to all joints, the width of which is 80-100 millimeters.
If the two edges of the drywall are cut to a 45 degree chamfer, then do the following:
1. Cut the mesh lengthwise so that it is level with the plane.

2. You can use a standard width mesh, but in this case you will have to putty the entire surface of the drywall 2 millimeters thick.

Important: the reinforcing mesh should always be in the middle of the putty. There is always glue on such a grid, which is designed for convenient use and storage. Never glue the mesh at the joints without putty, as this will cause the mesh to fall off. Apply 60% of the putty and only then sink the mesh into the putty, fill the entire depth with one more layer.

Use a Fugenfüller to fill in the screw holes. Take a narrow spatula and pull in several directions so that the mixture fills all the grooves. When the mixture is dry, it will suck in a little and that's okay. Retightening the dimples can be done with a regular putty.
Corner processing
Putty corners must be glued to the outer corners. Fugenfüller can be used as an adhesive base. Plaster mixes will also work, but remember that the layer of putty should be a little thicker here.
Basically, there are these types of corners:
- Aluminum - they are quite tough and do not corrode, but they break quickly.
- Plastic - less rigid, they do not break or rust.
- Galvanized - very tough, difficult to break, but rust in the process. Rust can even show up from under the finish.
Here are some guidelines to follow when working with corners.
It is very good if there are factory edges on the outer corner, in which case the corner will not protrude beyond the plane. Immediately after gluing the corner, you can begin to putty with the finishing gypsum mixture.
If one or both planes come with non-factory edges:
- Make a small chamfer with a knife so that the corner is flush: you need to prime the chamfer, glue the corner and putty everything with the finishing mixture.
- You can glue the corner to the plane: in this case, the sheet must be putty with the main putty to smooth out all the irregularities.
- You can not use the corner at all: in this case, you need to putty the plane, paint the walls or stick wallpaper, and only after that stick a plastic corner that would protect it from damage. The outer plastic corner can also be used if you have already installed the inner one.

Do not bother too much with the inner corners, since ordinary putty is enough to fill in the irregularities. The instructions for use state that internal corners can also be sealed with special paper, but this is rarely seen in practice.
To adhere the slope drywall to the window, you need to create an elastic seam. Plastic windows are very mobile, so cracks may appear over time. It is best to make a small 3x3 chamfer with a 45 degree angle. Treat it with a primer and wait until it dries completely. Then fill everything with acrylic sealant, which is elastic.
Important: If you ordered plasterboard cladding, then the sealing of screws, seams and corners will be included in the cost of plasterboard installation. You do not need to pay for these works separately.
Finishing
Drywall can be an excellent base for wallpapering, tiles, and painting. In no case do not use transparent wallpaper, as in this case all the joints will be visible.
If you decide to use wallpaper, then for the base, putty the base with a finishing plaster mixture. In this case, the base will be monochromatic. The putty will not affect the adhesion strength of the wallpaper. Before applying the putty, you need to prime the walls.
Plasterboard walls can simply be painted with paint for interior use, however, in this case, more than 3 layers will have to be applied, and this, as you know, will spoil the overall uniformity of the texture. That is why, it is much more profitable to putty drywall with putty, and also pre-prime it.
If you plan to glue the tiles, then the surface does not need to be further processed. However, be sure to seal the joints with elastic grout. Ceresit CE-40 may work.
Regardless of the type of finish, drywall must be carefully primed with a primer.
List of tools
To do the markup:
- Roulette.
- Rack level.
- Pencil.
- Plumb line.
- Water level and laser level.
For the manufacture of the frame
- Screwdriver.
- Perforator.
- Scissors for metal work.
- Hammer.
- Pliers.
- Bulgarian.
To work with sheets:
- Sharp knife.
- Long rail.
- Main planer or other similar tool.
- Hacksaw.
For sealing screws, joints and corners:
- Spatula 250-300 mm.
- Spatula 60-80 mm.
- Sandpaper or mesh 100-180.
- Container for mixtures.
- Primer roller or brush.
Conclusion
If you have read this article carefully, then you know the basics of installation, which will come in handy for installing drywall with your own hands. The following articles will tell you about how to sew up slopes and walls, as well as how to make a plasterboard partition. Practical data will also be given for installing a duct for a pipeline and other structures that will be needed for finishing a private house or apartment.
This article is a continuation of the cycle in which we consider the installation of drywall with our own hands. In the first article, we analyzed what drywall is, what types of it are and where each type is used. This article will focus on the basics of drywall installation technology. In it, we will reveal how to fix drywall in various ways, how electrical wiring is performed under drywall and how to install outlets in drywall. We will tell you how to cut drywall and what tool you need for installing drywall.
Drywall fixing methods
For the installation of drywall, a frame made of wooden bars, metal profiles or special adhesive mixtures based on gypsum or cement is used. Mounting drywall with glue on the ceiling is not recommended, for the ceiling it is best to use a frame. The essence of all methods comes down to one thing: to fix the sheets exactly, in one plane, reliably, durable, so that the already finished surface does not "booze", does not rattle, does not transmit structural noise.
Fastening drywall to a metal profile
Metal frame for drywall at the installation stage
Profile- this is a strip of galvanized steel, which is bent from a roll on a conveyor into a relatively rigid rail, of standard cross-sectional dimensions, an additional blind notch is added for rigidity, and through holes with a step of 300-600 mm for fastening to the wall.
Pros: durability, better resistance to moisture than wood, standardization of elements, it is possible to apply on very curved (for example, rubble) walls, thermal insulation can be installed.
Minuses: the poorest soundproofing: without special measures for soundproofing, it sounds like a drum, requires more tools than the adhesive method.
Fastening drywall to a wooden frame
The wood for the frame must be flat and planed, not damp, so that it does not lead, without blooming, traces of shashel, bark.
Pros: environmental friendliness of wood, as well as better sound insulation than metal, thermal insulation can be installed.
Minuses: requires additional protection from moisture (if there are prerequisites for its appearance), there is a risk that the bars "lead".
Fastening drywall to glue
In order to glue the sheets to gypsum or cement-polymer glue, you need a minimum of tools, some experience with adhesive mixtures, a fairly flat initial surface (drops up to 20 mm), and a strong, primed base.
Undeniable a plus- this is the minimum distance from the base to the front, finished surface, and, perhaps, the best sound insulation against structure-borne noise, a minimum of tools.
Minus: requires a solid surface, the differences in the original surface should not exceed 20 mm (approx), it is impossible to install thermal insulation under the drywall. For insulation under drywall, in this case, you will need a full cycle of foam insulation: with a putty mesh in a layer of putty (ceresit ct 85, or an analogue) and anchoring with "parachutes".
Plasterboard wiring
When the profiles are exposed, it's time to conduct communications: electrical wiring, telephone, television and network cables to future points of consumption.
Important! According to the rules for the installation of electrical equipment (PUE), the power wires behind the casing must be in a corrugated pipe that does not support combustion - a metal hose, or a plastic corrugation marked with NG (non-combustible).
Telephone and other wires with a safe voltage do not have to be hidden in a corrugation, but it also protects against damage to the wire, because the sharp edges of the metal frame remain behind the GK.
Step-by-step master class:
1. It is necessary to determine where the consumption points will be, whether the cords from the devices can be reached, whether there are enough of them in quantity, whether it will be necessary, for example, to turn off the computer to turn on the vacuum cleaner.
2. Consider the height of the sockets, switches. To make it convenient for you to use and safe for children and animals.
3. Draw each point on the wall.
4. To each point, now draw how the wire will go. In order not to bite your elbows after a few years, adhere to a simple rule: the wire should go vertically from the outlet (switch), and all horizontal sections are at the same height with the distribution boxes.

Socket marking, designation where the wire will pass
5. Secure all wires to the wall. If possible, do not bundle wires into the posts.
Important! It is forbidden to lay wires inside the profiles, because screws will be twisted in them.
6. The length of the wire must be left such that later it would be convenient to connect the sockets: a margin of 100-150 mm from the existing wall.

We fix the wires in the corrugation
7. For future holes for sockets it is necessary: either mark the exact location of the centers, and / or immediately cut the hole for the box on a sheet of drywall.

Mark the center of the hole, measure the diameter

Hole making tool
The first attempts are best done when trimming drywall sheets: it happens that the boxes differ in diameter, it happens that the crown does not fit. If you cut it in place (when the sheet is already screwed on), then do not forget about the wire. Cutting inaccuracies can be modified with a semicircular file, or with sandpaper worn on a round handle, such as a hammer.
As a result, the box should fit snugly in the hole.

The box should fit snugly in the hole
8. It remains to lead the wire into the box, and tighten the tabs with the screws to fix the box. The screws that will fix the outlet itself or the switch should be located either horizontally or vertically, depending on the specific product.

We put the wire into the box and tighten the screws
9. A small hole is enough for the lamps: it will be difficult to reach the wire through it. Then, it is better to lead the wire into the hole at the time of exposing the sheet, before screwing.
10. We leave the connection of sockets, switches and lamps until the end of finishing work.
How to fix interior items, furniture, etc. to drywall
If you sew up walls with plasterboard, then you need to take into account the peculiarities of fastening future items, furniture, lamps, and other elements. For drywall, there are special mounts, often called butterflies. They are metal and plastic:

Plastic hardware for drywall ("butterfly")
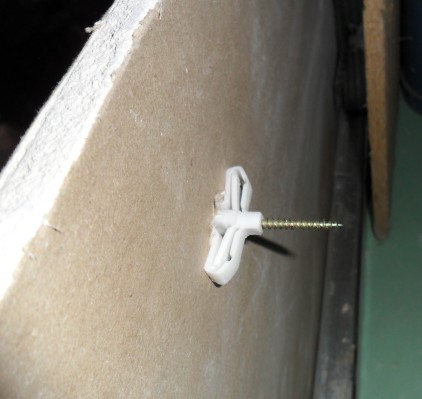
On the reverse side of the sheet, the butterfly unclenches and firmly fixes the screw
It should be remembered that light objects can be hung on such fasteners: a picture, a light shelf, a lamp.
However, sometimes you need to hang, for example, a boiler, fix a sports equipment for a child, or fix other heavy objects on drywall. Then it is best to provide a CD profile in this place, in which the bar is embedded. The bar together with the profile must be securely fixed to the wall so that it can withstand future loads. So that the profile, together with the bar, turns out to be in a plane with the rest of the frame, we put spacers. Then, after the finished wall decoration, it will be possible to neatly fix what you have planned.

So that you can gain a foothold on the drywall, you need to put the block in the CD profile
For attaching skirting boards to drywall, it is a good idea to insert CD trims between the uprights in the lower UD. And then, after all the finishing work, it will be enough to fasten the plinth with metal screws through the drywall into this profile. Impossible not to get in!

To fix the skirting board insert into the lower UD of the cut CD
Plasterboard profile connections
T-joint
For all transverse drywall joints, it is also necessary to install the CD in the plane of the main posts. In this case, a T-joint must be used:

T-joint
The option on the left is simpler: we make cutouts in the side shelves to a depth of 30 mm, twist with two fleas. Option on the right: we make two OVERCuts to a depth of 30 mm, and bend the side shelves. This option is more rigid, and you need to twist a couple more fleas into the folded shelves.
Cruciform connection
In the case when two CDs form a cruciform connection, we use a crab:

Cruciform connection "Crab"
Inside view. First, we snap the crab into the profiles, bend the legs, and screw a self-tapping "flea" screw into each hole

Cruciform connection
In the case of a T-connection, you can also use a crab, removing unnecessary protruding parts. In this case, the surface of the CD, to which we attach the plasterboard, remains flat, without screws.

T-joint with crab
Extension of profiles along the length
If needed extend the length of the CD profile,then there are special connectors for this. We put the connector into the profiles and twist it with fleas on each side.

Connecting profiles
How to properly cut drywall
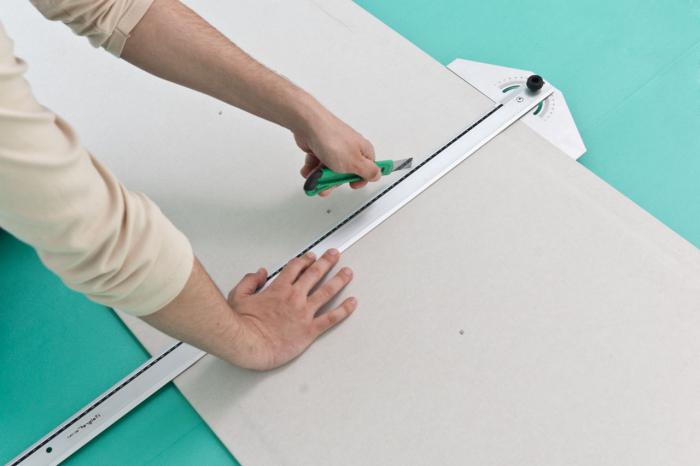
In order to cut sheets of drywall, you need: a tape measure, a pencil, a knife, an even rail (preferably for the entire length of the sheet), preferably an assistant.
Sheets are very easy to cut.
1. Mark up.
2. First, cut through one layer of paper with a sharp knife.

Cut through one layer of paper
3. Now the sheet needs to be broken. The plaster core will break exactly along the notch line.

We break the sheet
4. Hold the two halves at a 90 degree angle and cut through the back of the paper.

Cut through the second layer of paper from the back
How to chamfer drywall
Important! all non-factory edges of sheets that will be joined with other edges must have a 45 degree chamfer.
1. To make it neatly, you need to cut the paper under the ruler parallel to the cut, stepping back 10 mm.

Cut through the front layer paper 10-12 mm from the edge
2. Now you can cut the chamfer with a knife and the paper will not pick up on the face layer.

Cut a 45 degree chamfer with a knife
3. All irregularities of the ends and protruding paper can be sanded with a special plane for drywall, a float with emery paper, or a file for wood.

Modifying the ends
Drywall cutout
Cut out hem. First, you need to cut the paper on one side of the sheet with a knife according to the marking.

Marking the cutout on the sheet
And then make two cuts from the edge with a hacksaw or jigsaw.

Cutting two sides
And only then, break and cut the paper from the back with a knife.

Break and cut the second layer of paper
If you need to cut a hole in the middle of the sheet, then you will need to saw through 3 sides, and then break it. Or completely saw through the entire hole.
Processing of gypsum plasterboard joints, internal and external corners
When all the sheets are screwed on, the wires are brought out under the sockets, lamps and switches, the joints of drywall are sealed and the grooves from the screws are filled. For joints, we use a mixture of Knauf Fugenfüller (or its analogs) - a gypsum mixture, working time 30-50 minutes, hardening, forms a strong material, very difficult to grind.
Beveled edges must be primed and allowed to dry.
It is imperative that a reinforcing mesh be glued to all joints. If there are two factory edges at the junction, then we use a grid with a width of 80-100 mm.
If one or both edges of plasterboard are chamfered under 45 g:
a) cut the mesh lengthwise so that it does not go beyond the plane,

Application of putty mesh
b) we use a grid of standard width, but then we will have to putty the entire surface of the drywall by a thickness of 1-2 mm more.

Application of putty mesh 2
Attention! the reinforcing mesh must always be in the middle of the putty! Most often, such nets in rolls have an adhesive base: it is needed for ease of storage and use, so that the roll remains a roll. You cannot glue the mesh to the joints, but put putty on top. First, we apply 60% filling of the putty, then we sink the mesh into the putty, smooth it, fill the rest of the cavity.

Sealing drywall joints
Grooves from screws. With the same Fugenfüller we putty the grooves from the screws. We draw with a spatula (not wide 60-80 mm) in several directions so that the putty fills the entire recess. When the Fugenfüller is dry, it will suck in - this is normal. The pits can be repaired with the usual finishing putty (Saten gypsum, Knauf Finish, etc.).
Drywall Corner Processing
On the outer corners we glue the filler corners with corner glue, as the most durable is Fugenfüller. You can also use ordinary gypsum mixtures for putty, but a thicker layer is required for reliable gluing of the corner.
Basically, there are these types of corners:
a) aluminum - it is quite tough and does not rust, but it is easy to break;
b) plastic - less rigid, does not rust or break;
c) galvanized - very tough, difficult to break, but it can rust in the process, or even over time, rust can come out from under the finish.
The principle of operation is the same with all types of corners.
It is optimal when there are two factory edges on the outer corner: then the putty corner does not protrude beyond the plane. Then, after gluing the corner, you can immediately putty with a finishing putty.
If one or both planes come with non-factory edges, you need:
1. Or with a knife we make a small chamfer so that the corner becomes flush: then we prime the chamfer, glue the corner and putty the finishing layer.
2. Or we glue the corner on the plane of the sheets: then it is necessary to putty with the main putty (isogypsum, Knauf Start) in order to replenish and smooth out the unevenness.
3. Or we don't use the corner: we just putty, glue the wallpaper or paint, and then glue a plastic corner on top of the finish: it will close a possible crack and protect the corner from minor damage. However, a plastic outer corner will not interfere with any method of processing the outer corners.

Outside plastic corner
You don't have to bother with the inner corners, usually a regular putty is enough to fill the gap (if any). For example, Knauf has a Uniflot mix. The instructions for use indicate to close up the inner corners of the drywall using special paper. To be honest, I have never met this in practice.
To adjoin the drywall of the slope to the window, it is better to make an elastic seam. Windows, especially plastic ones, are quite mobile, and a crack is likely there. Here it is better to make a small chamfer on drywall with a size of 3 * 3, at an angle of 45 degrees, prime it and let the soil dry, and fill with acrylic sealant. Acrylic sealants are resilient and will help prevent cracking.
Attention! If you order plasterboard cladding, then usually the sealing of seams, corners, screws is included in the cost of plasterboard installation and is not additionally charged.
Finishing plasterboard
The surface of drywall with seams, corners, screws is a good base for opaque wallpaper, gluing tiles. If the wallpaper is at least a little transparent, then all the white stripes of drywall joints will be visible.
Under the wallpaper, it is advisable to putty the surface with a finishing putty (Saten Gypsum, Knauf Finish, Multifinish). Then the base for the wallpaper will be monochromatic. The putty does not affect the adhesion strength of the wallpaper. Prime the putty before wallpapering.
You can paint the drywall surface, but usually, interior paints (Matt Latex, Wand Farbe,) do not have sufficient hiding power, and you will have to apply at least 3-4 layers of paint. When the paint is applied more than 2 layers, it is already difficult to achieve a uniform texture. It is much more profitable to putty with a finishing putty. After filling and sanding, prime before painting.
You can glue the tiles directly onto drywall paper. Important: It is imperative to seal drywall seams under the tiles! It is better to seal the joints in the tiles themselves with an elastic grout, for example Ceresit CE-40.
In any case of finishing, the surface of the drywall must be primed with a primer for mineral substrates.
An approximate list of tools that you will need when working with drywall
For marking
- Rack level.
- Roulette.
- Plumb line.
- Pencil.
- Lace, preferably dyeing.
- For work with ceilings: water level (hose) or laser level.
To make a frame you need:
- Perforator.
- Screwdriver.
- Hammer.
- Scissors for metal.
- Bulgarian.
- Pliers.
To work with sheets:
- Long rail.
- Sharp knife.
- Hacksaw.
- Drywall planer, or alternative tool.
For sealing joints, screws, corners:
- Spatula 60-80 mm.
- Spatula 250-300 mm.
- Capacity for mixing mixtures.
- Grater with sandpaper or mesh No. 100-180.
- Primer brush and / or roller.
Conclusion
Now you know the basic installation that is used when installing drywall with your own hands. In the following articles, we will look at how to sew up a wall and slopes, a ceiling, how to make a plasterboard partition, how to make a duct for a pipeline, and other interesting designs that are found in every private house or apartment.
How not to make mistakes while editing this material?
Drywall is one of the modern building materials, a characteristic feature of which is the composition of the properties of various substances in one complex. The combination of the multidirectional properties of the starting materials in one product makes it possible to obtain results that are unattainable when these materials are used separately.
Gypsum plasterboard (GKL) is a material that, when used correctly, gives a significant gain in the speed of finishing work and in the ease with which it allows you to get perfectly flat surfaces. Some information about drywall work will help you avoid mistakes and make your work easier and more enjoyable.
Fact 1
Drywall was invented to increase the sale of paper.
Photo: board.kompass.ua
Drywall was invented in 1884 by the American Augustine Sackett, the owner of a paper mill. The search for new areas of application and markets for its products led to the birth of a new material.
The prototype of modern drywall consisted of ten layers of thick paper glued with plaster. Subsequently, Stephen Kelly simplified the structure of the material, using a solid gypsum core and a double-sided paper shell. Clarence Ustman came up with the idea of closed sheet edges. In this form, drywall has survived to this day, without undergoing fundamental changes.
Fact 2
Drywall, like any material, has its own area of application.
If you have an idea to level the walls or ceiling with drywall, you should evaluate the degree of unevenness of the surfaces. This material is most effective for leveling large irregularities and setting false walls, partitions and other structures. If the irregularities are small, the use of drywall can lead to wasted time and money. In addition, when using it as a "dry plaster", it should be remembered that the plasterboard cladding inevitably takes up some space in the room, which in some cases can be very significant.
Fact 3
When cladding walls with plasterboard, you can fix the sheets with glue.

Photo: mebelportal-nn.ru
If it is necessary to revet the wall with plasterboard, the irregularities of which do not exceed 20-50 mm, the sheets can be fixed with special glue, for example, Knauf Perlfix gypsum adhesive mixture. The mixture is applied to the reverse side of the sheet in three vertical stripes using a scoop with a "chipped" edge. For very even walls, a comb trowel can also be used.
If the irregularities exceed 20 mm, then the glue is applied in lumps of about 15 cm in size. The lumps are located along the vertical edges and along the midline of the sheet after about 25 cm in height. With very large irregularities in the wall, they can be compensated by gluing previously in these places on the wall strips of drywall.
When working with glue, it is important to remember that it remains functional for 30 minutes after preparation. You need to prepare the mixture in such an amount that will be used during this time.
The correctness of the stacking of sheets is checked with a ruler (right and scrap) 2.5 m long. The sheet protruding above the plane must be "planted" by tapping it with a rubber hammer through the rule.
Fact 4
Fastening drywall sheets to metal profiles with self-tapping screws does not require preliminary drilling.
To a person accustomed to working "by the rules", the idea of screwing self-tapping screws into smooth metal without holes may seem, to put it mildly, strange. However, the self-tapping screws used in plasterboard works for metal, after several turns of "slipping", independently make a hole in the profile and enter it, securely fastening.
Do not attempt to perform this operation manually. For this, a screwdriver or drill is used. For fastening drywall, black self-tapping screws with a countersunk head and fine threads are used, which securely hold in thin sheet metal.
Fact 5
Fastening the frame elements to each other has its own characteristics.

Photo: stroim-vmeste.ucoz.ru
To connect the elements of the metal frame to each other, there is a special tool resembling tongs. The work of this tool consists in the fact that with its help two parts (profiles) are tightly pressed against each other, then a hole is punched in their walls, the edges of the metal in it are bent and fix the parts. It turns out a kind of riveted connection that does not require any fasteners.
However, most builders prefer to use the same screws for fastening. Such a connection is unreliable for a number of reasons and can lead to gradual loosening of the attachment points. If you already use self-tapping screws, then you should prefer the option with a drill and a semicircular or hex head with a press washer. Such a self-tapping screw presses the parts to be fastened more tightly and holds more securely.
Fact 6
A drill is no worse than a screwdriver.

Photo: www.znaikak.ru
If there is no screwdriver at hand, then it can be replaced with an electric drill. Screwing in self-tapping screws with a drill is not so convenient and requires certain skills. But in the case of fixing the gypsum board, a special nozzle-bit helps a lot.
The bit for fastening drywall is a regular PH2 bit with a stopper attached to it. When screwing in, the stopper rests against the surface of the drywall and the screw head turns out to be recessed flush with the surface. In this case, there is no need to control the rotation speed and torque.
Fact 7
The bit is one of the important little things.
A bit, that is, a nozzle that directly turns the self-tapping screw, is a rather important part of the equipment when working with drywall. Mounting the frame and sewing on the sheets, you will have to screw in thousands of self-tapping screws. Under these conditions, the correct bit can have a significant impact on the speed of work and the amount of effort expended.
Firstly, the bit must necessarily correspond to the self-tapping splines, both in size and type. When installing gypsum plasterboard structures, self-tapping screws with a diameter of 3.5 mm with simple Phillips are usually used. The PH2 bit is intended for them. If self-tapping screws with eight-pointed slots are used (they are usually yellow or white), then it is better for them to stock up on PZ bits of the appropriate sizes.
Ideally, a self-tapping screw on the bit should hold tightly to it. In working with self-tapping screws, the magnetic holder is very helpful - an intermediate link between the chuck of a drill or screwdriver and the bat. It is simple to check the quality of the holder when buying: you need to install any bit in it and "dip" it into a bunch of self-tapping screws. If after that only one of them stayed on the bit, it is better not to use such a holder. A good magnet should hold at least three.
Fact 8
The edges of the drywall sheet have a special shape for high-quality sealing of joints.

Photo: dleamasterov.ru
The longitudinal edges of the gypsum board have a special shape. The beveled semicircular edge facilitates high-quality filling of the joint with putty. The reduced thickness of the sheet near the edge allows the reinforcement tape to be laid on the joint so that it does not create bulges in this place.
With longitudinal, that is, vertical joints, everything is more or less clear. But how to close up the transverse joints, which are inevitable when the wall height exceeds the length of the sheet?
Firstly, the transverse seams must be made "in a space" so that they are located on adjacent panels at different heights.
Secondly, the horizontal edges of the sheets, in contrast to the vertical ones, are not fixed on a rigid base along the entire length and can fluctuate. To fix the edges, you need to hem from the inside across the joint pieces of profile, 15-20 cm long. There should be two such reinforcements per sheet width.
Thirdly, the edges of the seam must be opened to a depth of at least half of the sheet thickness, removing the material along the edge at an angle of 45 °. Next, you need to remove the cardboard sheath of the sheet along the edge by the width that the reinforcing tape will take.
After that, the joint is sealed with Fugenfuller or Uniflott putty, as well as the vertical one. Despite the fact that Uniflott putty is intended for sealing joints without the use of tape, it is still better to use it on transverse joints, since they are less stiff and the likelihood of cracking is higher here.
Fact 9
The location of fasteners on the sheet is strictly regulated by the manufacturer of the gypsum board.
When attaching a sheet of drywall to the frame, the screws are arranged in a certain order:
- along the edge, the fastening screws are located at a distance of about 20 mm from the edge with a pitch of 125 mm;
- the sheet is attached to the middle profile along the center line of the sheet with a step of 250 mm;
- on the front side of the gypsum board, there are marks at the points where you need to install fasteners;
- when fastening edges that are not covered with cardboard (transverse joints, joints of cut fragments), self-tapping screws must be placed further from the edge, since the open edge has less strength.
Fact 10
The plasterboard surface must not rest on the floor.
Regardless of the method of fastening the gypsum board, the sheets are installed in place in the same way:
- the sheet is laid on the floor face down and the bottom end to the place of future installation;
- the bottom edge is laid on liners with a thickness of about 10 mm, usually drywall trimmings are used for this;
- the necessary preparation is carried out, for example, the application of glue;
- the sheet rises to a vertical position and is installed in place, while it must necessarily stand on the liners;
- after the final fixing of the sheet, the liners are removed.
The gap will protect against unpleasant consequences that may arise when the structure sags during operation.
Fact 11
A plasterboard false ceiling frame is distinguished by a wall frame.

Photo: gipsari.com
When installing vertical plasterboard surfaces, each sheet is attached to three profiles: two at the edges, common to adjacent sheets, and one in the center. With a sheet width of 1200 mm, the pitch of the vertical frame profile is 600 mm.
When installing drywall on the ceiling, higher requirements are imposed on the frame. To ensure sufficient strength and to prevent sheet sagging, the ceiling frame is installed at 400 mm intervals. That is, each sheet is held by four profiles.
Builders often neglect this requirement and make the ceiling frame the same as the wall frame, saving the profile. However, in this case, no one can guarantee the perfect service of the ceiling.
Fact 12
Ceiling mounts have special requirements.

Photo: vremonte.foxibiz.com
Of the fasteners intended for fastening to bricks, concrete, etc., the most widespread are plastic dowels, into which screws are screwed. However, in the case of suspended ceilings, they must not be used.
In a ceiling mount, in contrast to a wall mount, the fastener does not work for a "break", but for a "tear". The plastic dowel may begin to crawl under load. Well, if a fire suddenly breaks out, then the ceiling, fixed on thermoplastic fasteners, can become worse than the fire itself.
It is better to use impact metal dowels-wedges or anchor bolts for attaching the suspended ceiling to the base one.
Fact 13
You should not save on the rigidity of the plasterboard partitions.

Photo: nashakrepost.ru
When redeveloping an apartment, plasterboard partitions are very convenient. The frame made of steel vertical profiles is sheathed on both sides with plasterboard, the inner cavity is filled with sound-insulating material - and the wall is ready!
However, an unpleasant surprise may lie in wait here. The entire partition is fixed to the floor, ceiling and walls. In fact, a membrane is obtained that is capable of vibrations with all the ensuing consequences. In order not to get a huge drum instead of a wall, you need to take care of the rigidity of the frame in advance. To do this, you can:
- to minimize the length of the free partition, to build the layout so that the partition is reinforced by an angle, abutting another partition and other stiffeners;
- apply a profile of the maximum section for the frame;
- add reinforced profiles to the frame for installing doors;
- increase the mass of the partition by performing a two-layer plasterboard sheathing.
Fact 14
The junction of the plasterboard partition with the wall, floor or ceiling is a potential hole in the adjacent room.
The joint of a plasterboard partition with other structures, despite the apparent density, is an open window for heat leaks and sound penetration. No matter how carefully the installation is carried out, in this place a through gap is formed from one room to another.
In order to exclude the appearance of this defect, a special strip of foamed rubber is placed under the adjoining profile. The elastic gasket will tightly fill in all irregularities and seal the joint. The foam structure will absorb sound and retain heat.
Fact 15
Attach anything to the plasterboard wall with caution.

Photo: obystroy.ru
It is quite possible to mount shelves, cabinets and even rather heavy cabinets on a drywall wall. The main thing is to use special fasteners for this and correctly position the attachment points.
However, if you need to fix a heavy object that gives a high load, for example, a boiler, then it is better to arrange the fasteners so that the load falls not on the sheet, but on the power elements. It is best to lay the reinforcement in the required place at the stage of building the frame.