Shallow strip foundation for a barn. Do you need a foundation for a light barn?
Building your own home is unthinkable without a place to store your tools. A barn, garage or similar outbuilding precedes the “development” of an earthen plot. Well, the construction itself begins with the foundation. Preparing a foundation for a shed with your own hands is not a difficult task, but it requires preparation. In addition, the invaluable experience gained will be useful in the future. The topic of theoretical and practical skills will seem extremely useful when working on larger objects.

An outbuilding on a site, at first glance, may seem like a very simple structure in terms of construction. This simplicity is deceptive. But do not forget that a thorough approach to construction will ensure long-term operation without repairs. The appearance without cracks and dampness will be attractive with proper construction, which begins, regardless of the fact that it will be a foundation.
The soil as it is

Before starting work, you need to answer the question of how to ensure that the construction stood for a long time without defects and without unnecessary costs. The answer involves many conditions that you should pay close attention to. First of all, you need to choose a type of foundation that will absorb, distribute and transfer the load from the building to the ground without damage, and will not deform itself.
We are talking about the relatively inexpensive construction of a garage or shed, costs must be economically justified. Why invest a lot of money in the form of a deep slab foundation where you can get by with a cheap pile foundation?
The choice of the type of foundation for a future building is primarily influenced by the soil located on the site. In our latitudes there are rocky, sandy, and gravel soils. At the construction site there may be sandy loam and loam unfavorable for construction.

Rock option The most favorable soil for construction is an almost natural version of the foundation that nature itself prepared. It is stable, does not change its structure in frost, and is not affected by moisture. There is only one drawback - digging it is a very labor-intensive task, which is compensated only by its small volumes. On such soil the depth of the foundation may not be very deep.

How good is the type described above, how bad is the view from sandy loam and loam. It has a high freezing depth, like sandy soil, it forms quicksand, which, if the depth of the foundation is insufficient, can move the wall of the structure to the side. With these types of soil, the foundation must exceed the frost depth.
Outbuildings are not too heavy, so it is suitable for them shallow foundation, the dependence on the impact of low temperatures on the soil has not gone away; on average, it is believed that the depth of the foundation for a shed is sufficient, with a size of sixty centimeters.

Tape

Historically, the most commonly used foundation is strip foundation. For a shed 6 by 3 meters, this option is not bad, since the intricacies of the production of this foundation are known to almost everyone. A strip foundation for a shed is a fairly justified choice; it is a time-tested solution, if built correctly, will last for many years.
Let us remind you how to do it.

Along the perimeter of the building, whatever it is, digging a trench, about seventy centimeters wide, the depth should be fifteen centimeters greater than the freezing level. Bottom compacted in several passes, then a pillow is prepared at the bottom. It completely levels the bottom of the ditch, and takes on some of the functions of the foundation itself, plus provides protection from moisture.

Making a foundation without a cushion is a common mistake made by builders. The pillow will cope better with its “duties” if you make two layers: a compacted ten-centimeter layer of crushed stone and half as much sand. Then formwork is being prepared, its height should be twenty-five centimeters above ground level.

Reinforcement will strengthen the concrete and the foundation of the house. A mesh with a cell width of about thirty centimeters is knitted from reinforcement with a diameter of 1.2 centimeters. Concrete is gradually poured into the prepared pit, after hardening the wooden frame is removed, and the remaining voids are filled with earth. After installing the waterproofing, construction can continue. Knowledge of the technology of how to pour a foundation for a shed and practical experience will be useful in the further development of the site.

Columnar

A columnar foundation for a barn will be cheaper. The only thing that hinders the widespread dissemination of this option is that it cannot be laid on moving soils, since the connection between the supports is not rigid enough. However, favorable soils make a columnar foundation for a shed the best choice. It is quite possible to make this foundation, just like the strip foundation, yourself.

Work is carried out in the corners, and depending on the design, at the intersection of walls, installation of poles. A columnar foundation for a barn involves the use of brick, concrete, and asbestos pipes filled with cement mortar. The work requires exercise with a shovel, but to a much lesser extent than with a strip base.
Below the freezing depth, holes are dug, their bottom is compacted, and a fifteen-centimeter cushion of crushed stone-sand mixture is filled in. It is also compacted. The next stage is the installation of the supports themselves. Either, after preparing the formwork, the mortar is poured, or the bricks are laid, the meaning is the same. A metal rod is installed inside the support, increasing the load-bearing capacity. A columnar foundation for a barn will reduce material consumption, the amount of excavation work and construction time.
Foam blocks

Foam blocks are a fairly common building material, which excellent for foundation construction. When choosing such a solution, it is even permissible to continue construction using foam blocks; walls made of this material will not create an additional load on the base. But do not forget, in this case, about waterproofing.
The prevalence of construction from foam blocks is due to adequate price for this material, its lightness without compromising strength. Strength, in turn, allows it to be used to form a foundation. Perhaps this is the best base option for a shed.
Construction of this type is similar to creating a strip foundation. The soil around the perimeter is developed in the same way; the bottom requires compaction. Similar to the first considered option, a pillow is created from two layers. A wooden blind area will create boundaries for concrete, the height of which is within twenty centimeters. After it is poured and hardened, it is time to install the blocks.
Building a shed with your own hands is not such a difficult task, but you cannot do without such a building on a personal plot, especially if the plot is new and the construction of a house is just being planned. During this time, the barn will become a shelter for craftsmen, a storage for their tools, and later will be a workshop or a good warehouse for firewood and garden utensils. Therefore, you need to start equipping a fenced area with the installation of this utility structure.
Selecting a location
You cannot install a shed anywhere - first you need to carry out zoning, since you need to remember that the building will serve for more than one year and may become a hindrance to other buildings, or spoil the planned landscape design of the area. Therefore, it is necessary to allocate a place for it that will not be suitable for agricultural or decorative plantings, construction of a gazebo, garage, bathhouse, toilet and other buildings. If you install a shed in the far corner of the site, it will not only not interfere with the work process, but will also provide protection from prying eyes.

But if in the future you plan to build a woodshed in it, then you should not move the barn too far from the main building, since in winter it will be difficult to get to it, and firewood should always be at hand.
Having chosen a suitable area for installation, you can proceed to further actions.
Site preparation
The first thing to do after choosing a location is to mark the site. It is usually marked with pegs placed in the corners of the future structure. A string is pulled over the pegs - this will make it easier to control the level of the foundation being built.

The foundation for a shed can be made in different ways, and the choice will depend on what material the structure will be built from. Most often, a barn is built using a frame type, but some owners prefer to build such an outbuilding from brick.
A frame structure is much lighter than a brick one, so you can choose a monolithic, columnar or strip foundation for it, or you can install it on relatively large concrete blocks.
For a brick building, a strip and monolithic version of the foundation is well suited. You can, of course, adapt a columnar one to it by making jumpers between the pillars, but this is quite troublesome. To choose a suitable foundation for your intended structure, you need to know what they are.
Although the most expensive and labor-intensive to install, but it has several advantages over other types of bases.

- It is durable and strong, so even when a wooden structure becomes unusable, a new one can be built on the old foundation.
- Having arranged such a foundation, the owner receives not only a foundation for the walls, but also a finished barn floor.
- If concrete is strengthened with topping, then the floor will not require additional flooring. But if desired, you can put linoleum or tiles on it, i.e. the concrete base gives you complete freedom to choose its decoration.
The construction of such a foundation occurs as follows:
- A not too deep pit is dug on the marked area, since the barn is a light non-residential premises, does not require insulation basics. Therefore, its total thickness can be 300 ÷ 350 mm, i.e. its underground part will be 200 ÷-250 mm, and the above-ground part 100 ÷ 150. Even if the walls are built of brick, half a brick thick (and more is usually not required for a barn), this height of the base will be quite enough for it.
- In the prepared area, you need to loosen and remove the soil to a depth of 400 ÷ 550 mm.
- Then at the bottom of the pit you need to place a 100 mm sand cushion, which will waterproof foundation sn izu. The sand must be thoroughly compacted by pouring water.
- Crushed stone is laid on the sand in the same layer. It is also compacted to the maximum. Crushed stone will make the base more durable and will not allow it to sag.
- Formwork is installed around the pit, 100 ÷ 150 mm high above the soil level.
- Next, a coarse concrete solution is mixed, which is laid on crushed stone in a layer 7-10 cm thick and evenly distributed throughout the pit - this will be a rough screed.
- Then a reinforcing grid with cells 60 ÷ 100 mm is immediately laid. It can be fixed with wire staples by inserting them in several places into the rough screed.
- If the shed floor area is large enough, then after the rough screed has set, you need to install beacons flush with the height of the formwork. They will be necessary for the convenience of leveling the surface.
- Next, a thinner cement-sand mortar, made in proportions 1:3, is poured and leveled using the rule along the guides of the beacons.
- The structure should be given several hours to set, and then covered on top with plastic film to ensure even hardening.
- If it is planned to strengthen the surface with topping, then this process is carried out on a newly set, but still wet surface.
Strip foundation
It will require less costs, but having installed it, you will also have to make a floor from boards, plywood, or also pour a screed, but a thinner one, since this type of foundation is intended only for the base of wall structures. It can be made both under brick walls and under wooden frames.

- For a strip foundation, a trench is dug along the perimeter of the marked area, approximately 100 ÷ 120 mm wide than the thickness of the future walls. The depth of the trench, just like that of a monolithic foundation, should be 400 ÷ 550 mm.
- Laying the sand cushion and strengthening it with crushed stone is also done in the same way as when installing a monolith.
- Next, the trench is fenced from the outside and inside with formwork, which should be 200 ÷ 350 mm high.
- A welded structure made of reinforcement is installed on the crushed stone layer; it is desirable that it be 50 ÷ 70 mm high below the top edge of the formwork.
- Next, the concrete mixture is poured into it and tapped with a bayonet shovel to remove air, which can form cavities inside the concrete, which will weaken the structure.
- The top of the poured foundation is leveled along the top edge of the formwork, and the structure is left to harden.
- When the concrete hardens, the formwork is removed from the base.
- Inside the foundation, it is best to fill in fine expanded clay; it will insulate and waterproof the floor, and will also prevent rodents from getting in, since they simply do not live in it.
Columnar foundation

Used for the construction of frame structures. Install it as follows:
- The area allocated for the barn is marked specifically for a columnar foundation, since the supports must stand at a certain distance from each other, usually from one to one and a half meters.
- According to the markings, the required number of holes are dug with a depth of 350 ÷ 450 mm, width along the top approximately 400 × 400 mm.
- A layer of 100 mm of sand and the same amount of crushed stone is poured onto the bottom of the dug holes. Each layer is well compacted.
- The next step is to lay waterproofing from polyethylene film, it should line the hole and come out to the surface, to a height future columns, plus 70 ÷ 100 mm.

- Formwork is installed in each hole - a box without a bottom. The waterproofing film is spread out inside it and secured with staples along its top. The shed structure will be raised from the ground to the height of the box.
- A welded or wire-bound reinforcement structure is installed in each formwork box.
- After this, the concrete solution is poured. From above, along the formwork, it is leveled and left to harden.
- While the columns are hardening, if desired, you can carry out the following work, which will reduce the penetration of moisture into the barn room. To do this, 50–70 mm of the fertile layer is removed throughout the entire site, around the columns, and in its place sand is poured and compacted, and fine crushed stone is poured on top of it.
- After the concrete has hardened, the formwork is removed from the posts, and then it would be advisable to cover them with a waterproofing material, for example, bitumen mastic or liquid rubber.
Prices for bitumen mastic
Bitumen mastic
Video: barn on a columnar foundation
Concrete block foundation
This one is only suitable for frame construction, and its installation is the simplest of all those described above.
- First, the marked area is cleared, and the fertile soil layer is removed from it by 50 ÷ 70 mm.
- Instead of the extracted soil, a layer of sand is poured, watered and compacted.
- Placed on top of it a layer of fine crushed stone, which also needs to be compacted.
- Next, concrete blocks of the required height are laid on the prepared site along the perimeter. The distance between them should be no more than one and a half meters. The blocks must be leveled using a level.
After the foundation of any type is ready, waterproofing from roofing felt in 2-3 layers must be laid on its surface.
Video: building a shed on a base of concrete blocks
Installation of frame, roofing and wall covering

Since the most common The method of building a shed is a frame structure, it is worth considering this. This design is popular because its installation is quick and quite simple. The main thing is to keep under constant control the evenness of the installed and laid bars. A properly assembled and processed structure will reliably last 10 ÷ 15 years. The work is being carried out in stages.


- The support beams are fastened together at the corners using metal corners. Next, they need to be secured to the foundation with a through fastening or a metal corner.
- The construction of the wall frame can be carried out in two ways:
- each of the walls, taking into account windows and doors, is assembled in a horizontal position and installed vertically in its finished form. But in this case you cannot do without assistants;

- in the second option, each of the bars is installed separately according to a pre-developed drawing, and then they are fastened together at the installation site. This method of connecting frame elements is much more complicated.
- The entire structure must be rigid, therefore, if necessary, perpendicular jumpers are installed in the frames of the walls, floor and ceiling.

- All parts are connected to each other with a quarter or half-wood sample, fastened with the help of special metal corners.

It must be remembered that the front wall of the barn must be 200 ÷ 300 mm higher than the back wall in order for the roof to have a slope.

- After erecting the frame of the walls and connecting them together, the roof sheathing is installed.
- The sheathing bars are attached at a certain distance - it will depend on what material is chosen for the roof. For example, plywood sheets will have to be laid under a soft roof or tiles. But, basically, corrugated sheeting, metal tiles or slate are used to cover outbuildings. The sheets of these materials are wide enough, so they are attached directly to the roof sheathing. In this case, the step of laying parallel bars in a horizontal orientation (perpendicular to the direction of the slope) should be about 500 — 600 mm.

- When the frame structure is covered with a roof, you can begin covering the floor and walls. The floorboards (if a wooden floor is planned) are laid on the joists and attached to them with self-tapping screws.
- Walls can be sheathed in two ways: only from the outside or both from the outside and from the inside.
1. If you want the building to look neat and fit well into the landscape design, it is sheathed on top with modern vinyl clapboard. Inside, plywood is used for cladding.
Prices for lining, imitation timber, block house
Lining, imitation timber, block house

If the barn will serve as a workshop in which you plan to work until the coldest weather, the walls of the building can be additionally insulated with mineral wool. To do this, insulation mats are placed in the frame of the wall sheathing between the clapboard and plywood.
2. If it was not planned to sheath the inside of the shed, then the outside can be decorated with denser plywood or thick enough boards with grooves so that there are no gaps in the sheathing. However, cladding with boards with the upper elements overlapping the lower ones (like shingles) also looks quite original.
 A barn sheathed with boards using the shingle principle
 - When the building is sheathed, window frames are installed in it, if windows are provided, a door frame and the door itself.
- If the barn was installed on a columnar foundation or concrete slabs, the lower through part of the structure (subfloor) must also be sheathed. The sheathing is secured to poles or concrete slabs. Flat slate, ordinary boards or vinyl lining can be used as cladding.
- A gutter is fixed to the back of the roof to drain rainwater, otherwise water may leak under the shed, and this is undesirable for any building.
- Then you need to look through the entire room from the inside; if cracks are found somewhere, they are sealed with polyurethane foam.
- If the barn is raised on a high foundation, then it is necessary to make a staircase of several steps. It can be made of wood or made of brick and then plastered with cement mortar.
Video: erecting a wooden shed on a solid foundation
There are many different options for building a shed, and they use different materials. But if the building is being built for more than one year, and you want it to serve for a long time, you need to choose high-quality materials for the work, and also approach each stage of the process with care.
5 types of timber for construction
| Photo | Name | Rating | Price | |
|---|---|---|---|---|
| #1 |
|
⭐ 100 / 100 | ||
| #2 |
|
Solid profiled timber | ⭐ 99 / 100 | |
| #3 |
|
Glued laminated timber | ⭐ 98 / 100 | |
| #4 |
|
Non-profiled laminated timber | ⭐ 97 / 100 | |
| #5 |
|
Thermobeam | ⭐ 96 / 100 | |


This type of timber has the simplest manufacturing technology. To obtain it, four sides of the edge of the log are cut off. The most common cross-section of such timber is 150x150 mm or 150x200 mm. The production of solid timber does not require complex woodworking equipment, therefore, in terms of the number of offers on the market, this timber occupies a leading position.
- availability. Since the process of manufacturing solid timber is not complicated, it can be purchased almost anywhere, with minimal waiting time from order to delivery of products;
- the low cost of this material is due to the simplicity of its manufacture and the absence of costs for drying wood;
- environmental friendliness. This timber is able to regulate the level of humidity in the house, absorbing excess moisture that accumulates in the premises during human activity.
- complexity of laying a log frame;
- increase in construction time;
- cracking of non-profiled timber;
- significant costs for finishing and thermal insulation work;
- susceptibility to fungus.
Solid profiled timber
Profiled timber can be sold dry or naturally moist. It is best to use dry profiled timber for building a house, as it is less susceptible to shrinkage and deformation. Many companies produce ready-made house kits from profiled timber, which allows construction to be carried out in a very short time.
Barn on a strip foundation
A barn is a classic outbuilding that can be found on almost any rural site. Such a structure is small in size and is often built from lightweight materials at hand, but at the same time it must be strong and durable.
After all, given the small mass and large dimensions of the walls, it must stand on a reliable foundation that can withstand wind, rain and the effects of groundwater. Often sheds are made on heaving soils or those where there is a high groundwater level and an uneven terrain profile.
Therefore, in order to build this building with your own hands correctly, you need to choose the optimal foundation for such purposes.
Which foundation is better for a barn?

Selection criteria:
- Weight of the structure. As a rule, you can build outbuildings with your own hands using brick, foam blocks, wood or steel. Concrete blocks are not used due to their large mass and difficulty in installation. Therefore, the largest mass will be a brick structure, and a wooden one will be the lightest.
- Soil type. Sheds are often built on soils that are not suitable for residential buildings. Therefore, in most cases these are heaving soils with a high level of groundwater. The optimal foundation design is selected for this type of soil.
- Terrain. No one spends extra money on leveling a construction site or digging deep pits.
Therefore, taking into account the topography and construction features, you can make a barn with your own hands with the following types of foundations:
- Monolithic concrete or reinforced concrete slab of shallow type.
- Pile-grillage foundations with a shallow laying depth. The grillage is made shallow or hanging.
- Shallow strip bases made of concrete blocks, bricks or foam blocks.
- Columnar (foundation made of tires, etc.)
How to build a monolithic strip foundation for a barn
 An example of a finished trench filled with sand as a cushion
 Considering that the overall dimensions of such structures are small, the excavation work here is minimal. As a rule, the construction of a monolithic foundation consists of several stages:
- Development of a sketch drawing of the future building;
- Marking the construction site taking into account the dimensions of the foundation slab, its thickness and dimensions;
- Digging a pit to a depth of 60 cm, there is no point in doing more due to the high strength of the slab and the uniform distribution of the mass of the structure;
- The bottom of the trench must be carefully leveled, compacted and a sand and gravel cushion placed on the bottom. It also needs to be compacted so that the thickness of the pillow is no more than 15-20 cm. To facilitate compaction, the pillow can be pre-moistened with water.
- On the sides of the finished pit, it is necessary to install formwork in which the internal overall dimensions correspond to the specified parameters of the foundation. Align the finished formwork horizontally and vertically.
- Now you need to make high-quality reinforcement of the pit. For this, a metal mesh with dimensions of 8 mm is used; you can use a smaller one, only then you need to reduce the interval between the rods. It is recommended to connect it with formwork, but this is often not practiced in order to build a foundation in a much shorter time.
- Now you need to fill the pit with liquid concrete, carefully level and compact it. If necessary, the top edge must be leveled with liquid concrete using a hydraulic level.
The monolithic strip foundation for the barn is ready. Now all that remains is to wait approximately 3-4 weeks until the concrete gains grade strength and you can begin to build load-bearing walls using foam blocks or other heavy building materials.
Shallow strip foundation

In design, it is practically no different from a monolithic slab, only in such cases bricks and foam blocks are used as building materials. You can also use ready-made concrete blocks, but their installation is expensive and block foundations are not practiced for the construction of sheds.
Therefore, it is worth considering the stages of building a foundation with natural stone, which is always available at construction sites. This technology will be almost identical to brickwork or installation of foam blocks.
- It is necessary to mark the future foundation, taking into account the thickness of the load-bearing walls.
- Dig trenches around the entire perimeter of the building. If the project also provides for intermediate walls, then a trench must be made under them.
- The depth of the trench for heaving soils should be no more than 1 meter; sometimes they do less if a layer of hard rock is found under the loose soil.
- Pour a sand and gravel cushion into the bottom of the trench, compact it and fill it with liquid concrete. Leave the pillow to dry for several days.
- During this time, it is worth making wooden formwork along the outer and inner sides of the trench, connecting the walls together in the upper part, and covering the outer surface with waterproofing, for example, roofing felt.
- Lay broken stones on the finished concrete surface in layers, fill the space between the stones with fine gravel and fill them with concrete evenly in layers. As a rule, reinforcement is not practiced here, although strapping can be done in several horizontal layers.
- Lift the stone layer by layer to the surface, then cover with plastic wrap and leave to dry for a week.
In cases where it is possible to build a strip base from concrete blocks or foam blocks, then the width of the trench should correspond to the thickness of the blocks, and a reinforcing mesh should be provided between the rows.
The construction of strip foundations with concrete blocks is expensive, but also reliable, because you do not need to use several layers of waterproofing.
But it is difficult to build a structure from concrete blocks with your own hands, but tapes from foam blocks are lighter and can be quickly installed on the concrete mortar.
Video of the construction of a frame barn on tires (column foundation)

In some cases, the construction site has a difficult terrain, and it is difficult to level it, then a columnar structure with grillages justifies itself.
In such cases, it is possible to build a foundation using ready-made screw piles, but this is expensive. Or you can make asbestos piles with your own hands right on the site and install them in the wells. The advantages of such a foundation are obvious:
- A barn can be built even on difficult terrain;
- There is no need to use complex waterproofing of the base, because it does not touch the ground surface;
- Wells and piles can be made with your own hands;
- The technology is simple and accessible to everyone; a minimum of mechanized equipment is used;
- The cost of constructing foundations of this type is low.
The grillages on which the barn will then be built can be made from foam blocks, wood or metal sheets. It is necessary to immediately provide thermal insulation of the space under the grillage, and it is better to pour the piles into asbestos pipes or tubes twisted from roofing felt. This design will be more durable.
Thus, it is not difficult to build almost any type of foundation for a shed on heaving soils with your own hands. Even pile-grillage foundations are made in a matter of days, and immediately after pouring the piles with concrete, the grillage can be erected.
It is clear that the most labor-intensive will be a monolithic slab, and it must be poured from several concrete mixers at once. A strip design would be optimal; you can make it yourself using any available building materials.
The Persian pompous word “shed”, meaning both “palace” and the name of the capital of the Golden Horde, the Russian people habitually simplified and adapted to the name of the simplest outbuilding. When purchasing a property, sheds are usually the first to be built. They store tools and equipment for building a house and working in the garden. And then they can be used not only as a storage room, but also as an enclosure for animals, and as a workshop for the owner of the house. Building a shed is easy. You don't need any super skills to do this. And any construction project needs to start from the foundation.
Features of the base for a shed
Of course, a barn is a lightweight building compared to a house. But it also does not have the weight of a toy; it is susceptible to soil movements, rising groundwater, freezing, and rotting. Therefore, a foundation is necessary, at least the simplest one. It is a fundamental part of any building. And any foundation is bad and does not fulfill its functions if it is built inconsistently with the purpose and incorrectly.
A barn with the right strip foundation will last a long time
Foundation (from Latin fundamentum - foundation) is an underground or underwater part of a building (structure), which receives loads and transfers them to the base. There are strip foundations (including those made from cross strips), columnar, solid, and pile foundations. There are monolithic and prefabricated ones. Material - concrete, reinforced concrete, stone (rubble), wood.
Big Encyclopedic Dictionary (BED)http://slovari.299.ru/enc.php
There are not many types of foundations, and they all have common features. These are penetration into the soil, a cushion of drainage material (crushed stone, sand, pebbles), the foundation itself and waterproofing. Only pile foundations do not have a cushion - and only if they do not have a buried grillage. And for lightweight structures, completely shallow foundations are used. There is a strict connection between them and the type of soil and the weight of the structure.
Classification of soil on the site
Before designing a house, it is better to order a professional survey of the site (and it is advisable not to use the results of your neighbor: sometimes even nearby sites have very different soil conditions). But by the time you get to the point of building a house, a lot of time will pass; building a shed does not require such precision, therefore, before building a shed, you can do a soil study yourself: use a garden drill to drill a two-meter hole, removing and studying the soil from different depths.
There are several simple tests. Water is mixed into the soil, you try to roll it out like dough and roll it into a ring. If this is successful, then two-thirds of it consists of clay or loam. If soil is poured into water and it begins to dissolve before our eyes and the water becomes cloudy, then this indicates loam; sand and clay precipitate.
Scheme of sedimentation in a solution of soil in water
According to the reference book “Soils. Foundations. Choosing the optimal foundation” There are three types of soils:

The contact area of the foundation with the soil must correspond to the load, taking into account the expected resistance of the soil. The maximum resistance (reactive pressure) of the soil is determined experimentally based on the principles of soil mechanics, and state building codes provide tables of permissible soil resistance for certain geographic zones.
Collier's Encyclopedia
Groundwater
The groundwater level is also the most important indicator, on which not only the foundation “model” depends, but also the depth of its foundation.
The structure of groundwater in your area is very important information
Soil freezing
In addition to the composition of the soil, you need to know to what depth it freezes in winter. In our “latitudes” the freezing depth is usually from eighty to one hundred centimeters, but with certain rare types of soil it can be more or less.
The base of the foundation should be below the maximum freezing depth of the soil to prevent swelling of the soil when freezing. The safe depth depends on annual temperature variations, the type and range of local soil variations, and the normal groundwater level. In addition, seasonal changes in the volume of clay soils are sometimes observed, which should not be allowed under a foundation laid on a natural foundation.
Collier's Encyclopediahttp://dic.academic.ru/dic.nsf/enc_colier/6886/%D0%A4%D0%A3%D0%9D%D0%94%D0%90%D0%9C%D0%95%D0%9D %D0%A2
Since the barn is light, very simple and extremely economical types of foundations are often used. But sometimes in difficult soils you need to strengthen them.
Types of foundations suitable for a shed
Slab
Excellent for unstable or subsiding soil; in addition, it is often used if the barn is heavy. Pros: solidity, reliability. Disadvantages: labor intensive, lack of underground, high cost.
An example of a monolithic foundation - such a foundation for a barn is, of course, too solid
Tape
The best option is a shallowly buried strip foundation. It can be made from ready-mixed concrete, cement mortar, or concrete blocks with mortar. Pros: comparative simplicity and financial accessibility of its construction. Disadvantages: it cannot be placed on unreliable soils with close soil water, on clay and sand. But almost one hundred percent of the experts will recommend it to you, even if your site consists of unfavorable soils - but with amendments to the design: it will be necessary to make the “ribbon” of the foundation wider and deeper.
A strip concrete foundation in this design is also redundant for a light barn
Columnar
One of the easiest types to perform independently. Suitable for light wooden or frame structures. Such a foundation can also be shallow, but this is more suitable for gazebos and barbecues - for a house it is too ephemeral. It is placed in pits (on a bed of drainage material) made of factory-made concrete blocks. Pros: ease of implementation, low price, suitable for any soil. Cons: not suitable for heavy structures; It practically eliminates the presence of an underground floor, and the space under the shed will be poorly insulated.
Columnar foundation is very suitable for lightweight structures
Pile
It dampens movements well and is made from asbestos-cement pipes, which are concreted into pits with drainage filler, and sometimes from ordinary metal and screw piles. Pros: suitable for unstable soils and slopes, resistant to subsidence and landslides; asbestos cement is also cheap. Cons: pile-grillage with a metal grillage is very expensive due to the cost of metal for a heavy grillage and requires welding.
A pile-and-grillage foundation with screw piles is wonderful, but too expensive for a cheap shed
But there are also a lot of foundations that are combined in design and depth.
Photo gallery: examples of foundations suitable for a barn
The screw piles are camouflaged here. A barn made of logs on a columnar foundation. A barn on screw piles - an expensive solution
A strip foundation for a barn is sometimes very heavy and too redundant. A barrel barn on a slab foundation made of wood. A shed with a wood shed on a slab foundation made of rubble stone.
Shed with an old boat roof on a strip foundation in Wales Plank shed on a post foundation Designer shed can be installed on any foundation; made in Russia
Video: types of foundations for construction
What to build from and how: review of materials and methods
In order to have a good idea of what we will encounter when building a foundation for a barn, we will briefly describe how the most common versions of such foundations are made.
From large section timber
A foundation made of recessed timber is very simple
From blocks and bricks
Such a foundation is quite difficult to implement.
Foundations made from blocks and bricks are a complex undertaking that requires extraordinary skills.
Strip concrete foundation
The stages of constructing a strip foundation must be carefully followed
Piles and grillage made of timber
The procedure for installing a point foundation made of timber
Concrete piles
A board foundation on concrete pillars is often the best solution.
We'll talk about the columnar foundation made of concrete blocks in more detail later.
Preliminary preparation for choosing a shed and the foundation for it
It involves very few actions.
Selecting a location
It is very important to place the shed so that it is not exposed to strong gusts of wind or does not end up in a wind tunnel between two buildings (otherwise its parts will be subject to unnecessary stress). In addition, it should not be located under the slope of the roof of the house, so as not to be covered with additional snow; on a slope so that it does not flood; in the shade so that the snow does not remain on its roof for a long time; near large trees so that the roof is not pierced by branches and covered with leaves in the fall. And most importantly: the ground at the construction site must be suitable and level.
Choosing a location for a shed is a responsible matter; choosing the right location will make construction and further operation much easier for you.
The right place for your shed will greatly facilitate its construction and further operation.
Design selection
Here you have complete scope for creativity. It all depends on your needs, capabilities and skills.
A barn in the form of a trailer from the beginning of the 20th century - decoration of the site
The barn can be anything.
But we will focus on the simplest small lean-to frame shed, standing separately, for which you will need the simplest foundation of all possible.
Scheme of the future barn on a columnar foundation made of blocks
How to make a foundation for a barn with your own hands
If your goal is only to protect your structure from rotting and moisture, and not to create a full-fledged underground floor, then your path is a shallow columnar foundation made of foam or expanded clay blocks. Moreover, we will place the blocks not in a checkerboard pattern, 4 blocks per column, but one on top of the other - two per column. Our design is lightweight.
An example of blocks in the pillars of a shallow columnar foundation
Selection and calculation of material
Foam concrete blocks are the best choice among all blocks
Beam 100x100x6000 mm - the most reliable thing for a grillage
A board 25 millimeters thick is a sufficient foundation for a shed
M400 cement has good adhesion and will reliably hold the blocks together
The sand must be river sand, fine, without clay
Only fine crushed stone will ensure evenness and good adhesion of the blocks to the ground
You will need very little roofing felt
But on any site (unless you have just arrived on a virgin piece of field) there are always leftovers: pieces of roofing felt, a pile of sand or crushed stone, several blocks or a hundred bricks. So, most likely, you won’t need to buy materials. But if necessary, you can display the following numbers.
Table: calculation of the required material and its approximate cost, based on average prices
If you replace the timber with a board, then the already low cost will be even lower.
It is done in the most primitive way.
Tools needed
Step by step process
Site for a garden house: fertile soil is removed to a shallow depth
We install a grillage made of timber on posts
This is what the finished shed looks like
Video: how to design a frame barn and install a block foundation for it
A columnar, shallow foundation made of blocks with a grillage made of timber is the simplest and cheapest way to create a good foundation for your shed. And it will be quite reliable. Go for it!
The decision to build a new shed is accompanied by a desire to save on material consumption. A significant part of the estimate in any construction budget is the construction of the foundation. Therefore, it is important to choose the most practical way to install the support structure. Monolithic slab and MZLF are characterized by high costs; it is much more profitable to consider the option of a pile or columnar foundation. Studying the features of the popular foundation and the step-by-step process of arrangement will help you make a strong columnar foundation for a barn with your own hands.
Features of arranging a supporting structure for a barn
Before settling on a specific version of the supporting structure, you should study the factors influencing it during operation. The popular solution to use concrete blocks for a shed is not always acceptable. Problem situations that may arise are:
- Clay soil is subject to heaving forces, so it can overwhelm a columnar support on its side or squeeze it out from below, acting on the sole.
- The light weight of the shed cannot cope with heaving forces, and in this case it is a disadvantage.
- Spring floods or heavy rains provoke destruction of the reinforcement inside concrete blocks or lead to cracking of the material during subsequent freezing.
Therefore, when choosing the type of foundation for a shed, they are guided by the following indicators:
- groundwater level;
- freezing depths;
- soil structure;
- relief features.
Inviting a specialist for geological research when planning the construction of a barn is not economically efficient. Taking a neighbor's foundation as a model is risky - the occurrence of layers is uneven. The best way is to independently study the nature of the soil by screwing in a screw pile. This method will give an effective answer to points of interest.
Comment! The bearing layer must be below the soil freezing line to prevent heaving forces from affecting the foundation.

Options for columnar foundations
The result of independent geological exploration will be the determination of the type of soil and the appropriate method of erecting a columnar foundation for the barn:
- Rocky soil or coarse sand is the optimal condition for using bricks or concrete blocks, which are buried 1-2 rows deep.
- Detection of sandy loam will require additional insulation under the base of the columnar foundation. The second way to make a reliable support structure for a shed is to use permanent formwork into which concrete piles are poured. Asbestos or plastic pipes and roofing felt are suitable for it.
- On complex terrain or wet soil with high UGV, clay or loam, it is preferable to use screw piles, which do not require drilling wells, insulation and waterproofing.
At the final stage, all options for a columnar foundation are decorated with a grillage - a surrounding structure designed to evenly distribute the mass of the superstructure onto the supports. Due to the high cost of a belt belt for a barn, the grillage function is usually performed by wooden beams or a metal profile. In this case, it will not be possible to pour the floor over the ground, so they resort to flooring over beams.
Attention! This method of arranging a columnar foundation is unsuitable for a barn where livestock is planned to be housed. Regular cleaning and intensive use will require frequent repairs. It is better to place a poultry house or calf barn on a monolithic belt.

Preparatory work
The process of erecting a columnar foundation intended for a barn follows a simplified scheme. But you still can’t do without preparatory work. First, draw the project on paper, this will help determine the material consumption. The installation of supports is planned so that they are located at each corner of the barn. The gap between the pillars is from one and a half to two meters. Therefore, in addition to the perimeter, the elements of the columnar foundation are located inside the outline of the barn.
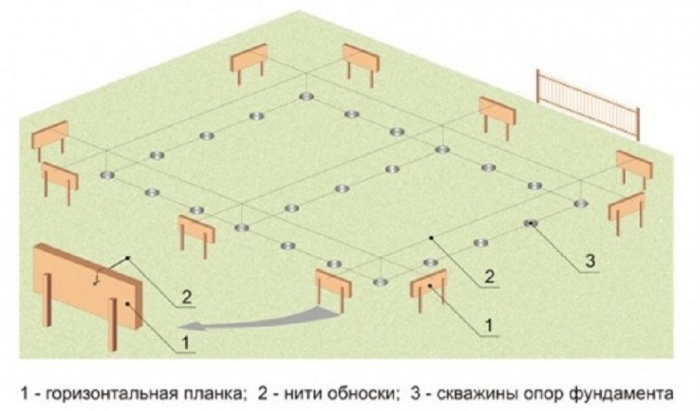
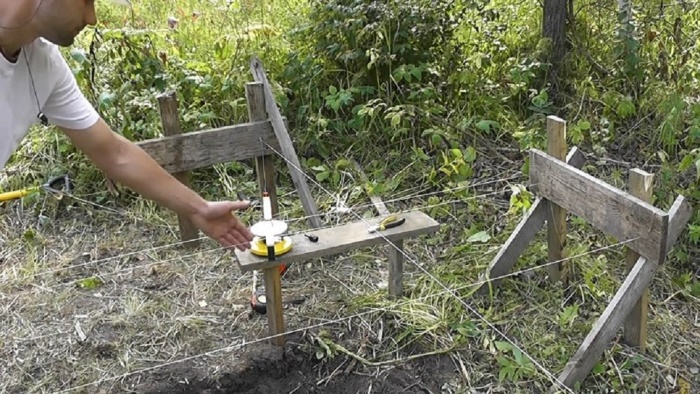
The rules for arranging columnar foundations involve removing the top layer of soil. Then they begin marking according to the existing project. The work is carried out using pegs and threads stretched between them. Be sure to monitor the evenness of the corners of the future shed. Additional diagonal lines, which should be the same, will help ensure the correct marking. Then they mark the points where a well or other recess will be prepared for a columnar foundation for a barn.
Application of pipe poles
Columnar foundations come in a variety of shapes. Here you can use the following as permanent formwork:
- sheets of roofing felt wrapped around a reinforcing frame;
- asbestos pipes;
- metal supports;
- PVC products intended for sewerage equipment.
The choice is determined by the desire and capabilities of the developer. In addition to pipes, concrete blocks and bricks are deservedly popular. Wells are prepared with a gasoline or hand drill. The approximate depth is 1.5-2.0 m.
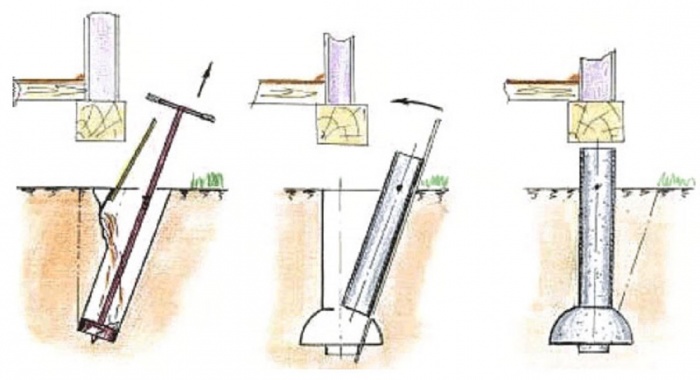
Asbestos supports
To achieve the desired strength, a columnar support made of pipes under a shed needs reinforcement. The height of the asbestos support is determined by the level of soil freezing and must exceed it. It is better to choose a diameter of 200 mm. The process of installing a columnar foundation based on asbestos-cement pipes occurs in two ways.
An option for strengthening with reinforcing rods is as follows:
- The support is lowered into the prepared well. There are metal rods inside it with a gap of about 7 cm between them.
- The length of the rods exceeds the size of the columnar foundation by 50 cm. They protrude beyond the edges of the pores at the top and bottom by about 25 cm.
- The rods, buried in the ground, reliably fix the base of the columnar foundation for the barn. The metal elements protruding beyond the edges of the pipes at the top are intended for fastening to the grillage.
- After installing the fittings, the pipe is poured with concrete and allowed to settle for a week.

You can securely secure a columnar foundation intended for a barn in another way:
- After immersion in the well and installation of reinforcing bars, the asbestos pipe is filled with cement mortar by a third.
- The support is raised by 12-14 cm to allow the concrete mixture to spread. The resulting base is called the sole, the purpose of which is to strengthen the stability of the columnar foundation.
- Next, the pipe is filled with solution to the top, while the rods do not protrude beyond the edges.
- The use of a vibrator or ordinary piercing with metal rods will help to compact the concrete mixture.
- A pin is installed on top, designed to connect to the grillage of a columnar foundation.
Important! The key is to get all the shed supports to the same level.
Depending on the planned period of operation of the barn, metal rods can be treated with anti-corrosion compounds to extend their service life in a columnar foundation.

Metal structures
Using metal pipes as a columnar foundation for a barn is an expensive undertaking. But if the construction of a relatively capital structure is planned for a long period, the option deserves attention.
The columnar structure can be designed not only with pipes with a diameter of 200 mm, but also with thinner supports, which are installed in one place, 3 pieces at a time. In this case, the grillage is made exclusively from a steel profile welded to the pillars.
The standard process of forming a columnar foundation for a barn consists of the following steps:
- A sand and gravel drainage pad is prepared at the bottom of the well.
- After which the metal support is lowered down. It is important to ensure a tight fit of the pipes to the walls of the well.
- The columnar foundation is filled with cement mixture.
A light barn does not require additional reinforcement of metal structures, but preliminary application of protection with anti-corrosion compounds will help extend their service life. Five days after pouring, they proceed to arranging the grillage of the columnar foundation for the barn.

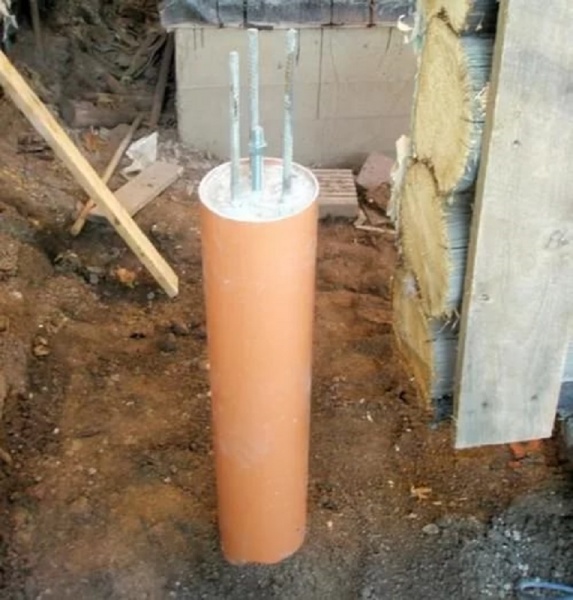
PVC pipes
The preparatory stage of arranging a columnar structure for a shed based on plastic pipes is similar to the process with asbestos supports. Before installing the PVC product into the well, a sand and gravel cushion is formed at the bottom, which serves as a drainage layer. Roofing felt or polyethylene is placed on top as waterproofing.
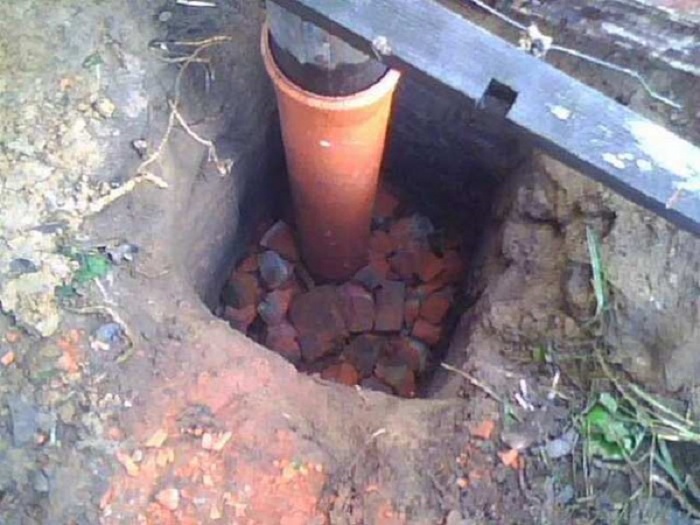
The well is filled with cement mortar, which is allowed to dry for an hour. Then insert the PVC pipe, pressing it all the way. By analogy with an asbestos columnar foundation, metal rods are placed inside, protruding from above by 20 cm. After the concrete mixture has hardened, they begin to arrange a grillage for the barn.
Installation of concrete blocks or bricks
After drawing up a plan for a columnar foundation, materials are purchased in a standard set - sand, crushed stone, PC 400 cement and concrete blocks. In the absence of solid specimens, the voids are filled independently with a cement solution with the addition of crushed stone. The design of a columnar structure for a barn begins with marking the site. It is carried out using pegs and thread. First, the perimeter of the shed is marked, then parallel lines are drawn to install the internal blocks.
The depth of the pit varies depending on the characteristics of the soil and the chosen method of arrangement.
Comment! Clay soils force you to take care of installing a drainage layer and insulation under the base of a columnar foundation. Otherwise, holes are dug below the freezing level. Non-heaving soil eliminates additional effort and time.
The size of the pit is slightly larger than the size of the blocks or bricks so that they can be adjusted. At the bottom of the prepared recesses, a drainage layer of crushed stone 0.1 m high is formed, followed by compaction.
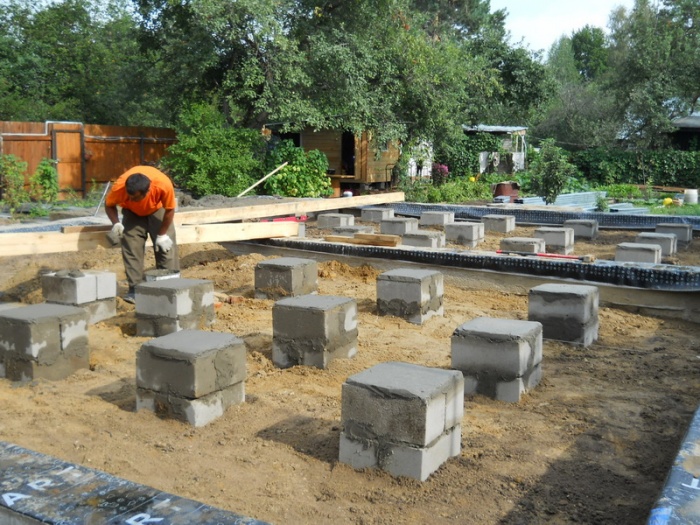
Installation of blocks is carried out according to the level, its height is adjusted using crushed stone, pouring it under the bottom or removing excess. A significant advantage of a block-based foundation is the speed of construction. Problem-free soil allows you to prepare a columnar foundation for a barn in one or two days on your own without the involvement of helpers. If brick is used as pillars, it can be laid in such a way that a cavity is formed inside, which is subsequently filled with concrete mixture to increase the strength of the columnar foundation.

A preliminary study of the relief features and soil characteristics will help you choose the best foundation option for the barn.