How to install insulation in a steam room. Proper insulation of the walls of the bath from the inside with your own hands
In every Russian bath (and not only Russian), the steam room is considered the main room. Modern large buildings have an additional washing room, a rest room, a separate dressing room, during the construction of these premises it is also necessary to pay great attention to their comfort, but still the steam room always comes first. In addition, the operating conditions of the steam room are the most severe in terms of building materials, this must be taken into account when choosing methods and methods of insulation.
The article considers several options for insulation, let's talk about the criteria for choosing materials and their physical characteristics. Professional builders will share their knowledge and practical experience in the production of works. First, you need to give a brief description of the thermal insulation materials, based on this knowledge, you can make informed decisions when choosing a method for thermal insulation of the steam room.

To insulate a steam room, you can use various materials, from the most modern mineral wool to traditional, but inefficient straw or expanded clay insulation. The table gives comparisons of various heaters and building materials in terms of thermal conductivity based on the recommendations of SNiP 23-02-2003. Calculations are made for the Moscow region.

SET OF RULES. THERMAL PROTECTION OF BUILDINGS. SP 50.13330.2012. Download file
Specifically for pairs, the thickness of the insulation is not regulated, we recommend using these data as the minimum values. You can increase the thickness of the insulation, but you should not reduce it.
As can be seen from the table, expanded polystyrene and mineral wool are confidently leading in terms of heat saving qualities; these materials are most often used for thermal insulation of baths. What can be said about these heaters?
It has one rather unpleasant property - it releases unsafe substances into the air. Advantages - the cost of the material is much lower than that of mineral wool. In addition, he is not afraid of moisture, which greatly reduces the cost and simplifies the waterproofing of the insulation, and for baths this is a very important issue.

What do practitioners advise on the use of expanded polystyrene? It can be used for indoors as well, a short stay in the steam room can hardly affect your well-being. In addition, there are modern brands that are approved by the sanitary authorities for indoor use. By the way, various decorative elements for interior decoration are made from them: ceiling plinths, baguettes, art products, etc. True, the cost of such safe polystyrene foam is much higher.

In the case of a bath, the use of expanded polystyrene has another problem - rodents “love” it very much. In just one year, the plates can turn into separate balls, the insulation efficiency will decrease significantly. This should also be kept in mind when choosing a heater.

The material can be used to insulate walls and ceilings, and expanded polystyrene with increased physical strength is also used during the arrangement of warm floors with ceramic tiles.


Styrofoam prices
polystyrene foam
Mineral wool
In terms of heat-saving indicators, it almost does not differ from polystyrene foam. There are two drawbacks - high price and extremely high sensitivity to increasing relative humidity. Wet cotton wool worsens the initial characteristics by an order of magnitude and causes rotting of all wooden structures.

Mineral wool - photos and characteristics
During the warming of the steam room, it is necessary to carefully and carefully carry out construction measures for steam and hydro protection, this is quite expensive and time consuming. During the construction of the bath, mineral wool is used to insulate all surfaces of the steam room, except for the floor.


Mineral wool prices
mineral wool
In terms of efficiency, it is significantly inferior to the above materials, but it has two advantages: low cost and high versatility of use. It can be used as an embankment on the ceiling, and as an additive to concrete for flooring bases.

Bulk insulation also includes loose polystyrene foam. It can also be added to concrete, such a material is somewhat inferior in terms of heat saving characteristics to foam concrete, but surpasses it in strength. In the bath, these materials can be used to insulate ceilings or make warm floors.

Expanded clay prices
expanded clay
Ecowool
Quite a new material, universal application. The price quite suits consumers, the application technology is not difficult. It is made from recycled cellulose (waste paper) with the addition of antiseptics and fire retardants. Diluted with water before mechanical application, any surface can be insulated. The use of ecowool is sometimes the only possible way to insulate surfaces of a complex profile, the technology of use allows additional processing of sheathed surfaces without dismantling them.

Ecowool - packaging

In terms of heat-conducting characteristics, ecowool is not inferior to mineral wool, is not afraid of high humidity, is slightly combustible, and is not damaged by rodents.

Suitable for insulation of ceilings in bulk without dilution with water. The disadvantage is that after applying the wet material in a mechanized way, the wooden structures must dry well, and this is quite difficult for all bath rooms.

traditional materials
This refers to the use of straw and sawdust for insulation of ceilings. The materials are mixed with clay, diluted to the consistency of thick sour cream. You can only insulate the ceilings of the steam room. Advantages - the lowest price. Disadvantages - unsatisfactory indicators of heat saving, a large amount of heavy manual work. Today, such heaters are used extremely rarely.


In this brief review of insulation materials, we tried to give objective characteristics, not to indicate only the positive aspects, but also not to forget about the shortcomings. And each of them has them. We hope that this will help you make informed decisions when choosing technology and materials for insulating your bath, taking into account the maximum number of individual factors.
How to insulate a steam room
Effective warming of a steam room is a complex set of construction works. How to start warming a steam room? Most will answer without a hitch: of course, from the walls, ceiling and floor. But this is not at all the case, these measures should be carried out already at the second stage of warming, and you need to start from a completely different point. Why?
Windows and doors
If there is a large window in the steam room, and even with single glass, then heat losses largely level out all work on the insulation of walls and ceilings. In the steam room, the window should be at least single-chamber (ideally two-chamber) and small in size. Professional builders advise making a steam room without a window at all. Heat loss through a large window can be over 20%.


Small window in the steam room - photo
Slots in the doors are the second reason for significant losses; be sure to nail rubber seals around the perimeter. Doors must be wooden, dense, the thickness of the boards is not less than 35 mm.

Another very important factor to pay attention to is ventilation. No matter how you insulate the steam room, the effect will be minimal if the air exchange rate in the room is too high. Ventilation is needed, no one argues, but it should only be made adjustable. You should always be able to close it completely or increase the air change rate as needed.

Having solved these questions, start thinking about the methods and materials for insulating the floor, walls and ceiling of the steam room.
Now, in turn, consider the methods of warming the steam room.
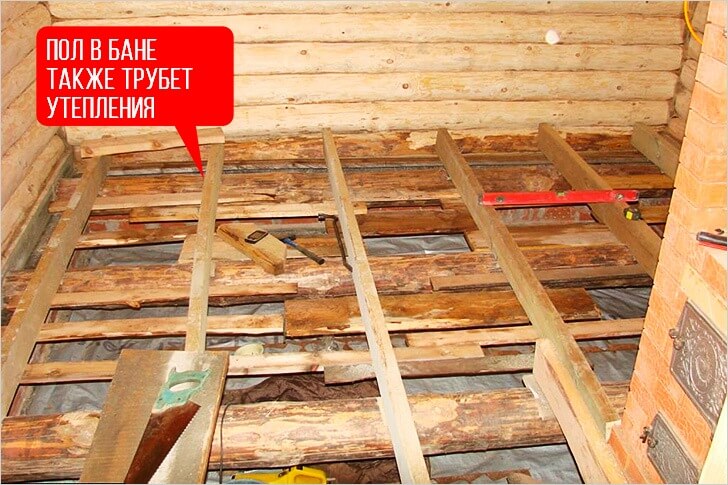
Steam room floor insulation
Wooden floors do not require insulation. Even with a very strong desire, heaters will do much more harm than good. It is worth insulating floors made of ceramic tiles. How it's done?
Step 1. Prepare the base. The ground under the steam room needs to be leveled, a sand cushion about ten centimeters thick should be poured on top.

Important. Before starting work, beat off the zero mark. Construction zero is the level of location of the finishing flooring. Knowing this point, you can calculate the thickness of the pillow and the concrete base.
Step 2 Tamp the sand cushion, install plastic pipes for water drainage, lay a layer of waterproofing. For these purposes, you can use roofing material or ordinary plastic wrap. Waterproofing will reduce the relative humidity of concrete, which increases its heat-saving performance.


waterproofing prices
waterproofing
Step 3 Prepare concrete. We strongly recommend using foam concrete for the base or adding expanded clay or loose foam plastic to the cement-sand mixture. To prepare a solution for one part of cement, add two parts of sand and three parts of expanded clay.


Step 4 Install beacons. Water drainage can be done in the middle or in the corner of the steam room. We do not recommend the first option - it is rather difficult to perform a screed with a slope towards the center. It is enough to have a slope within 2 ÷ 3 mm per linear meter of the room. Make a slope towards the location of the shelf or doors. Take a specific decision, taking into account the location of the bath and the possibility of withdrawing water beyond its perimeter.

Step 5 If there is a desire and opportunity, then it is possible to concrete the wires for electric floor heating. No desire - wait a few days until the screed dries, and start laying ceramic tiles.

The cost of an insulated ceramic floor in a steam room is much higher than a wooden one. As for the comfort of taking water procedures, there is no significant difference. The only advantage is that the life of floors under ceramic tiles is much longer than wood floors.

Steam room wall insulation
It can be made with pressed or rolled mineral wool, polystyrene foam or ecowool. It is quite difficult to give unambiguous advice, there are too many different factors. Most often, mineral wool is used for these purposes, in order to facilitate the waterproofing process, it is better to immediately purchase foil. True, it costs more than usual. But, if we take into account the additional costs of waterproofing, including the loss of time, then the money invested pays off.

As for the thickness of the thermal insulation. Comparison of the data available in the tables gives nothing to many developers. We recommend using two criteria: the climatic zone of residence and the time of using the steam room. If the bath is located in areas with very low temperatures, then the thickness of the wool should be at least 10 cm. For a milder climate, it is enough to insulate with wool 5 cm thick.

If the steam room will be used for a short period of time, then the heat will be retained by a thinner layer of insulation. When people are in the steam room for several hours, then put a heater at least 10 cm thick. But these are general recommendations, choose the specific values yourself.
Consider the algorithm for performing work on wall insulation with rolled foil mineral wool 10 cm thick.
Step 1. Check the walls of the room, mark the installation of vertical mounting rails. The width of the laths should be equal to the thickness of the mineral wool. Nail the two extreme rails, check their verticality with a level. If necessary, use various linings under the rails to give them a vertical position.
Council of professionals. If the thickness of the mineral wool should be 10 cm, then difficulties arise with the fastening of rails of such dimensions. We advise you to use metal corners, with their help you can not only quickly fix the supporting frame, but also adjust the vertical position. In addition, narrow material can be used. For one rail, 3 ÷ 4 corners are enough.


It is allowed to replace wooden slats with metal slats made of galvanized sheet steel, but they will cost much more.


Metal crate - mounting option for suspensions
Step 2 Pull the ropes between the extreme slats and pin the remaining slats along them. Constantly check their position. The distance between them should be 1÷2 cm less than the width of the roll or sheets of pressed mineral wool. Do the same work around the entire perimeter of the steam room.
Step 3 Prepare the lining, bring it into the room and let it stand for several days. For a steam room, we strongly recommend using European profile lining.

- Firstly, it has increased the dimensions of the spike / groove, which eliminates the appearance of cracks during the swelling / drying of the material.
- Secondly, the rear plane of the eurolining has a recess - the drying conditions are much improved.
You can nail the lining both into the groove and into the front plane. The first method is more beautiful, but requires some skill, the second method is simpler, but the hardware caps will be visible. It is better to use galvanized or copper nails.
Step 4 Start laying the insulation between the slats, make sure that there are no gaps and gaps. Mineral wool is fixed with special hardware with large caps. If you don’t have them, make your own hats from sheet steel.

Council of professionals. We recommend using foil-clad mineral wool for insulation. It costs more than usual, but this difference pays off. There is no need to buy additional materials for waterproofing and the terms of work are significantly reduced.
Step 5 Seal the seams between the joints. To do this, you can use special self-adhesive aluminum foil or ordinary tape. What material you choose - there is no difference. The main thing is to completely exclude the possibility of penetration of moist air into the thickness of mineral wool.
Step 6 Fasten the rails for fastening the lining, the thickness of the rails is approximately two centimeters. Due to these rails, it will be possible to naturally ventilate the skin. Leave gaps of 1÷2 cm between the floor and ceiling for ventilation. The gaps will then be closed with a ceiling and floor plinth and become invisible.

Crate for lining


If all the requirements of the insulation technology are met, then the thermal insulation of the walls will be effective and durable.
Steam room ceiling insulation
Ceilings can be insulated with polystyrene foam, mineral wool, ecowool, expanded clay or straw with clay. The best option is mineral wool. The algorithm for insulating ceilings with mineral wool is no different from the work on arranging walls, it makes no sense to repeat. Let's talk about another method using expanded clay. Insulation is carried out after the finishing sheathing of the steam room ceiling. The thickness of expanded clay is not less than twenty centimeters.

Important. Expanded clay has hygroscopicity, during saturation with moisture it can increase its weight several times. This has a very negative effect on the bearing surfaces, there are cases of deformation of the ceiling sheathing. To avoid such an unpleasant phenomenon, carefully make hydro- and vapor barrier.
Step 1. Lay vapor barrier material on the ceiling. For these purposes, you can use both ordinary cheap polyethylene film and expensive modern non-woven materials.


Step 2 Gently evenly pour a layer of expanded clay on the film with a thickness of at least 20 cm. Cover with a film on top.


It is necessary to say a few words about how expanded clay works. Among its shortcomings, none of the manufacturers mentions one rather significant one. Air passes through it almost without resistance, the large diameters of individual balls create significant free spaces between them. Since the air passes almost freely, the heat loss due to convection increases significantly and, accordingly, the effectiveness of thermal insulation deteriorates. After covering the expanded clay from above, efficiency improves - warm air does not have the opportunity to leave the insulator.

It's good that the expanded clay is covered, the ceilings retain heat better, but another danger appears. The material can absorb a large amount of moisture, wet insulation not only worsens the initial thermal conductivity, but also becomes much heavier. And this threatens to increase the load on all structural elements of the ceiling, there are risks of their deformation or complete violation of stability. Experienced builders recommend at least once a year to open the top film for several days to ventilate and dry expanded clay.

Work on insulation with straw and sawdust is almost no different from those described with expanded clay. But there are a few additional downsides. The first - the weight of the insulation layer increases significantly. The second is liquid clay, it takes time and conditions for the water to dry. Third - the thickness of the ceiling boards must be at least 35 mm. Fourth - the low efficiency of this method of insulation.
It is very difficult to find premises in any buildings, building structures and materials in which would be operated in such difficult conditions: high humidity and temperature, direct contact with water, the presence of multidirectional splashes, large temperature differences in certain sections of the walls and ceiling. In this regard, we strongly recommend that during the production of work do not rush and do not try to skip some technological operations in order to save time and money.
This is a virtual savings, theoretical expectations to reduce the cost of construction in most cases cause very real losses. And reducing the comfort of taking water procedures is not the biggest nuisance.

Perform all insulation work in the complex, pay equal attention to ceilings, walls and floors. Do not forget that thermal insulation includes reducing losses through windows and doors, do it right and use ventilation. The choice of methods, materials and methods of thermal insulation of the steam room should be made consciously and taking into account both all the architectural features of the bath and the modes of use of the steam room.
All the advantages of a bath may be unattainable if, at the stage of its finishing, the issue of internal insulation was not worked out carefully enough. Even with proper construction according to a time-tested project, the walls of the bath without additional thermal insulation will not be able to retain heat acceptably. And this means a decrease in comfort during bath procedures, and an increase in the cost of kindling. Meanwhile, there are many options how to avoid unacceptable heat losses.
The better to insulate the bath from the inside
What materials to use for internal insulation of the bath? The longest in the practice of building baths are used natural materials, which have been available throughout the history of the existence of such structures. Our ancestors often insulated the inner surfaces of the bath walls with improvised materials: hemp hemp, linen tow, moss, etc. All of the above is used today, because. natural materials have a very significant advantage over other thermal insulation: they are absolutely environmentally friendly.
However, natural insulation has some features that significantly reduce their attractiveness. Firstly, the process of finishing the bath with natural thermal insulation is a very, very laborious process. Even with all the simplicity of the technology, caulking a bath with moss or tow will take an excessive amount of time.
Secondly, natural materials are attractive not only to the owner of the bath. Birds and small rodents love to take them away for their own needs, and insects can easily start in the moss layer, which also do not contribute to the durability of the material. Therefore, the insulation of a bath from natural materials requires regular updating.
More modern synthetic materials completely devoid of these shortcomings. With no less environmental friendliness, they have a much longer service life, and in terms of thermal insulation parameters they even surpass natural alternatives.
In addition, synthetic materials are not at all afraid of exposure to moisture and high temperatures characteristic of a bath, they are distinguished by their low weight and simple technology for working with them.
Among the synthetic heat-insulating materials suitable for interior decoration of the bath, most widespread expanded polystyrene, basalt fiber, mineral wool and glass wool. When deciding how and what is better to insulate the bath inside, it is necessary to understand that for the same purpose, each of these materials also has some differences.
- Styrofoam. Its main feature is a successful combination of excellent thermal insulation, low cost and low weight. However, in relation to the bath, this material can only be used to insulate the outer walls of the dressing room. In the washing room, due to the high temperature, polystyrene foam can lose its shape, thereby violating the thermal insulation. It is generally unacceptable to use this material for warming the steam room, since it is a fire hazard.
- Basalt fiber insulation they cannot boast of a pleasant price tag, however, in relation to a bath, they can be an ideal solution. Since basalt fiber is produced from molten rocks, it has some important features:
- absolute incombustibility;
- resistance to mechanical deformation and moisture;
- excellent level of sound absorption;
- excellent thermal insulation.
Basalt insulation is quite convenient for finishing, as it is perfectly cut into pieces of the required shape. Their service life, which can reach several decades, is also noteworthy.
Other benefits of mineral wool include:
- low thermal conductivity (guarantee of the reliability of thermal insulation);
- hydrophobicity, allowing the use of mineral wool in conditions of high humidity;
- ability to absorb sound.
Meanwhile, mineral wool, due to the characteristics of the raw materials for its manufacture, does not differ in mechanical strength. Therefore, when working with such material, it is desirable to exercise some caution.
Video on how to properly insulate the bath from the inside.
One of the significant advantages of glass wool over analogues is the relatively low cost. In this case, it is always possible to choose a heater of the required thickness. Both rolls of glass wool of different widths, as well as industrially cut mats and slabs are on sale.
And in this photo one of the schemes for warming the bath from the inside.

Warming the bath from the inside
 A feature of the insulation of internal walls in the bath is a high level of humidity. Therefore, even in the case when thermal insulation insensitive to moisture is chosen, insulation will be required. securely cover with a layer of vapor barrier. If this is not done, then moisture will begin to condense inside the insulation material, which is fraught with a decrease in the ability to retain heat and the likelihood of rotting of the wall material.
As a vapor barrier for baths, aluminum foil can be used, which not only protects the insulation from condensation, but also reflects heat to a large extent. To ensure the integrity of the vapor barrier, all seams between sheets of foil should be glued with metallized tape.
Since the conditions in the bath in different rooms are significantly different, the insulation technology will vary significantly.
- Wall insulation in the steam room.
Here the sequence of actions will be as follows:
- a crate of dry wooden beams or slats is hung on the surface of the walls;
- the cells formed by the laths of the crate are covered with a fiberglass cloth;
- heat-insulating material is laid (basalt is best);
- a layer of vapor barrier is laid on top of everything.
The final stage of wall insulation in the steam room will be the installation of decorative trim. As such, it is best to use a wooden lining.
Another video about warming the bath from the inside and how to sheathe the steam room inside.
 This operation is in many ways similar to improving the thermal insulation of walls. The differences will be that when insulating the ceiling in the washing room and in the dressing room, you can refuse to use aluminum foil as a vapor barrier. Instead, it is quite possible to use cheaper polyethylene or kraft paper.
In addition, it is worth leaving a gap of 1-2 cm between the vapor barrier layer and the decorative ceiling cladding. This distance will improve the ventilation of the cladding material to speed up its drying. This moment is quite important, because during the bath procedures, the ceiling lining is exposed to the damaging effects of moisture at very high temperatures. The presence of a gap will allow the tree not to rot, but to dry out without compromising its operational and aesthetic qualities.
Heat loss in the bath can occur not only through the walls or ceiling, but also through the floor, which is especially important in winter. Therefore, the floors must also be carefully insulated. The sequence of actions for floor insulation will be as follows:
- a concrete screed is poured on a leveled and compacted base of the earthen floor;
- after the screed has hardened, a waterproofing layer of dense polyethylene or roofing felt is lined;
- sheets or sheets of insulation are laid;
- another layer of waterproofing is lined;
- poured another layer of concrete screed.
Since the floors in the bath are constantly in contact with water, when they are insulated, the thoroughness of laying the waterproofing should be given the greatest possible attention.
It is very important that water, even with minor damage to the top layer of the concrete screed, cannot penetrate into the insulation layer and thereby deprive it of its heat-insulating qualities.
Having solved the problem of how to properly insulate the bath from the inside, you can get a guarantee that it will be possible to quickly warm up all the rooms even in severe frosts. The sauna event itself will become much more comfortable, as the temperature will be consistently high.
This is especially important for lovers of a strong steam bath, because with insufficient thermal insulation of the steam room, the procedure will lose its attractiveness. Using the same modern insulating materials, you can permanently get rid of such problems.
The vast majority of owners of country houses do not imagine their site without a real Russian bath or sauna. But in order for it to function properly, and really bring only strength and health to the owners, it is very important to insulate it well, methods of insulation are considered at the stage of drawing up a bath project, but this can also be done with a ready construction
To know how to properly insulate a bath from the inside, you need to study the technology of this process and choose the right materials.
Work materials
Before proceeding with the consideration of insulation technology, it is necessary to figure out what materials need to be prepared for work.
1. Thermal insulation material - is the most important component in the process of insulating the walls, ceiling and floor of the bath. To date, there are a large number of heaters, but not all of them are suitable for bath conditions. Which of them are most adapted to high temperatures and humidity? It makes sense to look at the most popular - expanded polystyrene, plain and extruded (XPS plates), mineral wool, polyurethane foam and expanded clay:
| Styrofoam | Mineral wool | XPS slabs | ||
|---|---|---|---|---|
 |  |  |  |  |
| Has an open cell structure | Since the installation of the material occurs by spraying, it can have an open and closed cellular structure. | It has a fibrous structure, the fibers are arranged randomly in the vertical and horizontal direction | Closed (sealed) cell structure | Natural bulk material consisting of granules with a porous structure |
| Poor moisture permeability | Poor moisture permeability | Almost does not absorb moisture | Doesn't let moisture through | Doesn't let moisture through |
| Light in weight | Light in weight | Medium-light in weight | Medium-light in weight | Light |
| Has medium strength | Has low strength | Has medium strength | Has high strength | Granules have high strength |
| Average compressive strength | Low compressive strength | May vary in low to medium compressive strength | High resistance to compression | Granules are resistant to compression |
| Over time, it begins to release toxic substances | When heated, it becomes toxic, emits carbon dioxide and carbon monoxide | Non toxic | Non toxic | Non toxic |
| Not suitable for heavy duty applications | Not suitable for load applications | Mineral wool has different types, there are resistant and not resistant to high loads. | Suitable for use under high load | |
| prone to decay | Durable, not subject to decay | durable | durable | durable |
| Affected by ultraviolet rays (it should not be left open for a long time) | Almost unaffected by ultraviolet radiation, but it is recommended to close it with a finishing material | UV resistant | Unaffected by ultraviolet light |
Acquaintance with characteristics leads to the conclusion that mineral wool for walls and wooden floors is most suitable for warming the bath from the inside, and XPS slabs for concrete. Expanded clay can be called a universal material that is perfect for any of the floors, but for walls it cannot be used for internal insulation.
If you buy it, then it's perfect for a bath material with a foil layer, which contributes to the long-term retention of heat indoors according to the principle of a thermos. For example, some characteristics of foil mineral wool insulation of the Izorok company are shown in the table:
| Isolight-L | Isolight | Isovent | Isocor -C | Isophor | Isoruf | |
|---|---|---|---|---|---|---|
| Density, kg/m³ | 40 | 50 | 90 | 105 | 110 | 150 |
| Compressive strength at 10% deformation, kPa, not less than | 20 | 25 | 50 | |||
| Ultimate tensile strength of layers, kPa, not less than | 4 | 4 | 12 | |||
| Declared coefficient of thermal conductivity, W/m×°K | 0,035 | 0,034 | 0,034 | 0,036 | 0,034 | 0,036 |
| Thermal conductivity coefficient under operating conditions, W/m×°K | 0,043 | 0,038 | 0,039 | 0,041 | 0.040 | 0,042 |
| Water absorption by volume, %, no more | 1.5 | 1.5 | 1.5 | 1.5 | 1.5 | 1 |
| Humidity by weight, %, no more | 0.5 | 0.5 | 0.5 | 0.5 | 0.5 | 0.5 |
| Content of organic substances by mass, %, no more | 2.5 | 2.5 | 4 | 4 | 4 | 4 |
Mineral wool is suitable for heat and sound insulation works for the walls, ceiling and floor of the bath. But on the floors it is still recommended to organize several layers of thermal insulation, the first of which should be expanded clay. The important thing is that rodents bypass it, which means that all other materials will be safe.
2. To fasten mats of mineral wool or other foil insulation, and create an integral hermetic coating of surfaces, it will be necessary to purchase a special foil tape.

3. The insulation is placed between the batten guides, which means that wooden bars will be required with a section that depends on the thickness of the insulation mats. If, as an example, we take the recommended insulation thickness of 100 mm, then the bars should have the same size on one of the sides, or a double crate with a perpendicular arrangement of guides and a two-layer arrangement of mats will be used.
4. The bars are attached to the walls using self-tapping screws, dowels or anchors (depending on the type of wall material), therefore, it is necessary to purchase these elements of the required length, corresponding to both the dimensions of the guides and the required penetration into the walls - for wood - 20 ÷ 25 mm, for capital walls - at least 40 mm.
5. If a heater without a foil layer is chosen, then a vapor barrier film is required to close it.
6. If the floor in the bath will be poured with a concrete screed, then in addition to the insulation you will need:
- cement and sand or ready mix;
- roofing material;
- reinforcing mesh;
— guides for beacons;
- polyethylene film ;
- damper tape.
The amount of materials will depend on the area of the floor, ceiling and walls of the insulated room.
Having prepared everything you need, you can proceed to the insulation of the surfaces of the bath rooms.
Prices for popular types of heaters
insulation
Bath floor insulation
As you know, a bath can be built of wood or brick, which is why not only wood, but also concrete is arranged. The latter is most often poured in a brick bath, but sometimes they do it in a wooden one. In any case, the concrete floor always requires enhanced insulation.
Thermal insulation of floors in any bath should be given special attention, since they must withstand high humidity and temperature changes between the rooms and the ground. Therefore, before proceeding with the installation of a multi-layer "pie" of a wooden floor or a concrete device, it is recommended to cover the entire surface under the structure of a middle fraction bath or slag.
The expanded clay layer will depend on the thickness of the walls of the building. It should be at least twice as thick as they are. It should be noted that if it is possible and allows space to make the expanded clay embankment thicker, then this will only increase the effectiveness of thermal insulation. If the bath is built of brick and installed on a concrete foundation, then it is recommended to fill it with expanded clay almost to the entire height of the foundation tape.
 Floor covered with expanded clay "cushion"
 Concrete floor
In order for the concrete floor of the bath to be warm, you need to do a series of operations that are carried out after laying the drain pipe (it must be raised in advance to the height of the future screed). The work consists of the following stages:
- The soil inside is well compacted, and the walls are covered with a waterproofing compound.
- Further, a layer of sand 80 ÷ 100 mm thick is poured onto the soil, moistened and compacted.
- A ruberoid is laid on top of the sand with a 150 ÷ 200 mm approach to the walls. The canvases are overlapped by 120 ÷ 150 mm, it is advisable to fasten them with waterproof adhesive tape or glue them together thermally using tar mastic.
- Further, expanded clay is poured onto the roofing material in such a way that the future floor screed is approximately 50 mm lower than the height of the foundation.

- Further, expanded clay is distributed over the entire surface in an even layer. Additionally, XPS slabs 50 mm thick can be laid on it - they have sufficient rigidity and can easily withstand all loads, do not forget that before laying expanded clay should be covered with dense polyethylene.

- A reinforcing mesh with cells from 50 to 100 mm is laid on the surface prepared in this way.
- Beacons are placed on top of the reinforcing belt, along which it will be aligned.
- If the sewer hole is located in the center of the insulated room, then the beacons are laid at a slight angle to it, so that when the concrete is leveled, a slight slope is formed from all sides of the room to the drain.
- Further, along the perimeter of the room, a damper tape is glued or otherwise attached to the lower part of the walls. This measure will keep the screed from deformation during temperature changes, since compensates thermal expansion of the material.

- Prepared concrete, mixed from sand and cement in a ratio of 3: 1, is laid out on the reinforcing mesh, and leveled using the building rule. It is advisable to introduce special plasticizers that are commercially available into the composition - this will improve the quality of the coating. Often, ready-made screed mortars with an already optimized composition for rooms with high humidity or for external works .
- After hardening and screeding and gaining strength, it is impregnated with a waterproofing compound () of deep penetration.

- When the soil dries, ceramic tiles are laid. Another option is to install logs with wooden flooring on the concrete floor. Well processed boards on it should be fixed at a distance of 20 ÷ 30 mm from each other.
Wooden floor
For wooden baths, wooden floors are traditional. To arrange them correctly, in addition to insulation operations, it is necessary to provide for high-quality waterproofing. Do not forget about the ventilation of the floor - for this, special channels must be left in the foundation.

Works on the device and floor insulation are carried out in such a sequence:
- First of all, a drain pipe is connected to the bath. The drain is usually located in the middle of the room, and all the insulation materials and the ceiling are arranged around it.

- A roofing material is laid on the compacted soil, which must rise to the walls by 150 ÷ 200 mm.
- Expanded clay is laid on top of the waterproofing. The greater its thickness, the better, but between its surface and the floor beams there must be a ventilation distance of at least 200 ÷ 250 mm.
- Next, on waterproofed with layers of roofing material, the protruding part of the foundation is laid with floor beams. All wooden floor elements must be processed in advance.

- The cranial bars are nailed or screwed onto the lower parts of the floor beams, on which the subfloor boards will be mounted.

- The subfloor is covered with a vapor barrier film, which covers both the floor beams and the boards laid between them.
- Further, a heater is laid on the subfloor between the floor beams - it can be mineral wool or the same expanded clay.

- From above, the insulation material is closed with another layer of vapor barrier film.
 Above - another layer of waterproofing
 - Logs are fixed perpendicular to the floor beams, on which a wooden flooring is arranged. A hole is made in the middle - a drain pipe will go into it.

- On the style, slats are nailed, cut at an angle of 5 ÷ 7 degrees towards the drain - they will become a crate for mounting a waterproof wooden floor.
- Between the bars of the crate, the insulation is laid with a foil layer up and fastened together with foil tape. The thermal insulator must completely cover the bars of the crate.

- A non-leaking, well-fitted, fine wood flooring is laid on top at an angle.
Another option for insulation for wooden and concrete floors
In addition to those presented above, there are still a very large number of different options for warming the floor of the bath. You can briefly talk about another possible way to equip the floor using polystyrene foam. The method is more time consuming, but suitable for both concrete and wood flooring.

1 - soil;
2- layer of sand;
3 - foam plates;
4 - cement mortar with foam chips;
5 - waterproofing layer;
6 - cement mortar with vermiculite;
7 - concrete screed;
9 - boardwalk.
- In this option, the space under the future floor will have to be deepened by 500 ÷ 600 mm, and the soil at its bottom will be well tamped.
- Then, a layer of sand 50 ÷ 70 mm thick is poured to the bottom, which is wetted and compacted with a manual rammer.
- A dense waterproofing film is laid on top of this layer, which should completely cover the bottom and be on the walls by 200-300 mm. On its walls must be securely fixed.
- Instead of expanded clay, which was used in the first versions, a layer of expanded polystyrene boards is laid on the film. Its total thickness should be at least 150 ÷ 200 mm.
- Further, a screed made of cement mortar and foam plastic in proportions of 2: 1 is laid on the foam plastic slabs. The thickness of this layer should be 50 ÷ 70 mm. This layer will be not only insulating, but also reinforcing for the slab material laid below.
- Then a layer of waterproofing is laid again - for it you can use a dense plastic film or roofing felt. Cloths must be fastened together with waterproof tape.
- The next layer in this "pie" is a layer of concrete with vermiculite, mixed in proportions of 3: 1. Its thickness should be 50 ÷ 100 mm. is a natural material that has high thermal insulation properties. Insects and rodents never settle in it, it is not subject to rotting and decomposition. The vermiculite layer will significantly increase the thermal insulation of the floor.
 It looks like a natural material - vermiculite
 The table shows the proportions cement-vermiculite solutions and their performance characteristics:
| Characteristics of solutions with vermiculite | |||||||
|---|---|---|---|---|---|---|---|
| Cement (kg) | 40 | 30 | 250 | 200 | 150 | 120 | 100 |
| Vermiculite (liter) | 130 | 130 | 130 | 130 | 130 | 130 | 130 |
| Water (liter) | 42.5 | 41 | 40 | 39.5 | 39 | 38.5 | 38 |
| Bulk weight (kg/m³) dry | 60 | 50 | 43 | 39 | 34 | 31 | 29 |
| Compressive strength (kg/cm²) | 20 | 13 | 10 | 7 | 5 | 2 | 1 |
| Dry Thermal Conductivity (W/m×°K) | 0.13 | 0.11 | 0.1 | 0,092 | 0,083 | 0,075 | 0,07 |
| Thermal conductivity at 5% humidity (W/m×°K) | 0.17 | 0,145 | 0.13 | 0.12 | 0.105 | 0.09 | 0.08 |
| Sound absorption coefficient at a frequency of 1000 Hz | 0.37 | 0.51 | 0.54 | 0,56 | 0.6 | 0.64 | 0.73 |
- The hardened screed is reinforced with a reinforcing mesh with cells up to 100 mm, and beacons for the upper concrete screed are set on it. Beacons are fixed on a concrete or gypsum mortar, at an angle of 5-7 degrees towards the drain.
- Further, concrete is laid out on this structure, in the same proportions and combinations with modifying additives, as described above. The thickness of the screed near the drain must be at least 50mm.
- After hardening the screed, ceramic tiles are laid on it or removable wooden floorings of wetted floors are arranged.

Boards in such semi pinned at a distance of 15 ÷ 20 mm from each other - this will allow not only to quickly leave the water from the flooring, but also to dry the wood. In addition, removable ones can be periodically put outside for airing and drying, so you need to foresee their size in advance so that they can freely pass through the bath door.
Bath wall insulation
It is equally important, in addition to the floor, to reliably insulate the walls and ceiling of the bath rooms. The walls and ceiling of a brick or wooden bath are insulated according to the same principle, the only difference between them will be the thickness of the thermal insulation layer. Since wood has a lower thermal conductivity than brick, the latter will require a thicker layer of insulation to be fixed.
 Particular attention to the insulation of the walls of the bath
 The process of wall insulation is carried out as follows:
- The walls are treated with an antiseptic composition - it will protect them from the appearance and spread of mold and fungus.
- Next, it is necessary to fix the hydrovapor barrier film on the wall.
- The crate is mounted.
- Insulation is placed between the guides of the crate.
- The vapor barrier is attached.
- The slats of the counter-lattice are nailed - this will create the necessary ventilation gap.
- The facing material is installed.
The sequence of work is common, but walls made of different materials have their own characteristics.
brick walls

- Lathing bars are fixed to the brick wall in increments of 600 mm. The size of the beam section should be equal to the thickness of the selected insulation. Usually, for a brick wall, it is taken to insulate slag wool in mats, 100 mm thick, which means that the thickness of the batten guides should be 100 mm.

- Insulation is placed between the bars in the spacer. You can help fix it with a stretched zigzag nylon cord.
- The next layer is a hydro-vapor barrier film, which is fixed to the bars of the crate. The overlaps between the canvases (at least 150 mm) are glued with waterproof tape.
- Further, the rails of the counter-lattice are nailed to the bars.
- Then a foil insulation is stretched over the entire surface, 8 ÷ 10 mm thick, which is attached to the rails. Joints are sealed with foil tape.

- From above, the entire "pie" is sheathed with wooden clapboard, which is fixed to the same rails of the counter-lattice.
It should be noted that if a foil insulation is used in the insulation process, then an additional layer of vapor barrier can be excluded, since this type of insulation material perfectly holds back steam.
Log wall insulation

1 - log wall;
2 - basalt insulation with a foil surface;
3 - crate bars;
4 - lining;
5 - ventilation gap between the insulation and lining.
The walls of a log bath in themselves have low thermal conductivity and retain heat well inside the room, provided that the joints of the logs at the corners and between themselves are well sealed. Therefore, insulation is carried out as follows:
- Basalt mineral wool with a foil layer is fixed to the wall, which should be facing the room. The thickness of the insulation is selected from 50 to 80 mm. You can fix it with special fasteners with wide caps - "fungi", which are recessed into the insulation.
- On top of the insulation, wooden bars of the crate are nailed vertically or horizontally.
- Further, the wall is sheathed, having a thickness of 10 mm - it is attached to the bars of the crate.
Timber wall insulation
A wall made of timber should be, just like a log wall, well insulated in itself, that is, all cracks and gaps are caulked with tow. It is easier to attach all the components of the insulation “pie” to it, since it has a flat surface into which fasteners are easily screwed or clogged. Warming it occurs in the following sequence:

- A crate made of a bar is attached to the wall, at a distance of 600 mm between the guides.
- Further, insulation material is laid between the bars - it is better if it is mineral wool.
- Then the whole structure is closed with a rolled foil insulation, which is fixed to the bars of the crate, and the joints of the individual sheets are glued together with foil tape.
- Counter rails are nailed on top of the bars, which will create a ventilation gap between the insulation and the lining.
- At the end of the process, the warming "pie" is sheathed with clapboard.
It must be said that there are other options for laying layers of insulation, but the above are considered the most popular and frequently used, as they are quite simple and have long been tested in practice.
Ceiling insulation
The ceiling can be mounted and insulated in three ways - you can choose any of them if it is suitable for the existing structure of the bath.
panel ceiling
This ceiling is mounted from panels, which already consist of all the layers necessary for vapor barrier, insulation and inner cladding, fixed on the support bars. As a heater in the panel, mineral wool is most often laid, having a thickness of at least 100 mm.

Shields are mounted at the bottom and rise up already in finished form. A feature of such insulation is that insulation gaskets must also be laid between the finished panels - this process is carried out after the panels are fixed on the bath floor.
Lifting the panels to the top can be complicated by the fact that they are quite heavy when assembled, so very often they are lifted in parts and assembled at a height.
false ceiling
A false ceiling is fundamentally different in its design from a panel one, since its installation takes place according to a different principle, somewhat similar to wall insulation.

- The frame for such a ceiling is the beams of the attic floor, laid in increments of 600 mm.
- From the side of the attic room, waterproofing is laid on the floor beams, which should cover the entire area of \u200b\u200bthe ceiling.
- On the waterproofing, also from the side of the attic, a wooden flooring is fixed.
- Insulation is laid between the floor beams by surprise.

- Then the insulation is closed with a vapor barrier or foil material, which is fixed to the floor beams.
- The last step is the lining of the ceiling with a wooden clapboard.
There is another option for insulating a false ceiling, using other insulating materials, for example, expanded clay. In this case, almost all work is carried out from the side of the attic, except for the finishing lining of the ceiling surface with clapboard.
Decking ceiling
The deck ceiling also differs from the two already mentioned in its design, in particular the fact that it is laid directly on the walls of the room, that is, in principle, it does not rely on floor beams. For such a ceiling, boards with a thickness of at least 30 mm are used.

From the side of the attic, a vapor barrier and insulation are laid on the style of the boards, which are covered from above with a waterproofing film and plywood or plank flooring.
The advantages of this design include the speed and ease of installation, but this version of the ceiling can only be used when insulating a small bath room, with distances between walls no more than 2.5 ÷ 2.7 m.
A detailed publication on the description of all the materials necessary for this and step-by-step instructions can be found on the pages of our portal by clicking on the recommended link.
If the installation of thermal insulation and auxiliary materials is carried out correctly, then the heat in the bath rooms will remain for a very long time, which will help to significantly save on fuel.
In conclusion - a detailed video tutorial on warming a bathhouse built using frame technology.
Video: warming and finishing a frame bath
When building a traditional Russian or Finnish bath, you need to take care of high-quality insulation of the building in order to prevent large heat losses through walls, ceilings and floors in winter. Otherwise, it will be difficult to heat the steam room properly, and fuel consumption will turn out to be unreasonably high. Not to mention the comfortable conditions for people washing there. It is not difficult to insulate a bath, but you need to have an idea of \u200b\u200bhow to do it correctly and what materials you can use. You can learn about all the nuances of the process from this article.
What heater to choose?
If you study the issue more deeply, it turns out that the main difficulty lies in choosing the right insulation for proper thermal insulation of the bath building in general and the steam room in particular. The reason is simple - none of the many modern materials on the market are suitable for insulating a steam room inside. Moreover, it is simply unacceptable to use foam plastic, foam plastic and other polymers for this purpose, as well as mineral wool.
The bath is designed to improve the health of a person - this is an axiom. Inside the steam room, and other adjacent rooms, high temperature and humidity are provided - this is one of the conditions for the healing procedure. Accordingly, the internal insulation for a bath should not emit any harmful substances when heated, which cannot be said about the vast majority of modern materials.
When heated above 60 ° C (and in the steam room it can also be 110 ° C), all foamed polymers begin to release harmful substances and even emit a specific smell. Therefore, with their help, it is possible to insulate the bath building only from the outside, but by no means inside. The same applies to various types of basalt and mineral wool, which include a phenol-based binder. There is nothing to say about roll insulation based on glass wool.

For reference. Polymeric heaters that are not suitable for interior decoration include polystyrene foam, extruded polystyrene foam, foam plastic, foamed polyethylene insulators (Izolon, Penofol) and other similar materials.

What is the best way to sheathe the walls from the inside in order to insulate the bath correctly and without harm to health? The answer lies on the surface - natural environmentally friendly materials that were used by our ancestors. These include:
- sawdust with clay;
- wood;
- felt;
- linen, jute;
- reeds tied into mats;
Advice. There is an old folk method used by people in villages for a long time. When the owners kept several cows, they prepared a lot of hay and straw for the winter. And they kept them, leaning against the walls of a wooden house or a bathhouse, thereby at the same time warming it for the winter.
Good modern heaters for baths and saunas are expanded clay and vermiculite, all others are suitable only for external insulation, done by hand or with the help of specialists. Now that we have figured out the best way to finish the interior of the steam room, we can proceed to the very process of thermal insulation of the walls.
The scheme of warming the bath from the inside
The method of carrying out the work depends on what the building is built from. For example, a well-built log house does not need insulation at all, the thickness of the logs is quite enough. In an old chopped bathhouse, it may be necessary to seal and caulk the cracks between the logs. This is done using felt or other interventional heaters listed above. The same warming procedure is done by hand in structures made of profiled or glued timber, if cracks appear.

In order to protect the walls of a wooden bath from exposure to high humidity, you can protect them with a foil vapor barrier layer. This is not a foil insulation made of polyethylene foam, but a pure foil that is laid between the inner surface of the wall and the wooden trim of the steam room. A simple technology is used here: the foil is nailed to a wooden surface with the help of battens, as shown in the diagram:

The joints of the material are made with an overlap of at least 10 cm and are glued with aluminum tape for tightness. Later, interior trim elements are attached to the lathing slats. According to the same scheme, it is proposed to insulate baths built of brick, gas silicate and foam blocks, since these building materials are best protected from moisture. That is, from the inside, lay a foil vapor barrier, and perform the main "pie" of insulation from the outside.

The most correct decision would be to abandon the idea of insulating the bath from the inside, it is enough to lay a vapor barrier layer between the walls and the interior. At the same time, when installing external thermal insulation, it is possible to use any kind of heaters for baths or saunas without risking the health of your loved ones. In this case, it is worth starting with the insulation of the foundation of the building.
Foundation thermal insulation
This procedure is more convenient to perform during construction, otherwise you will have to destroy the blind area and dig a hole around the structure at least 1 m wide and 30 cm deep. First, a layer of waterproofing is applied to the foundation surface, and then insulation boards are glued. This is where foamed polymers will come in handy - polystyrene, or better, polystyrene foam and foam plastic. The thickness of the heat-insulating layer in this case will be 50 mm.
Advice. To insulate the base and base of the bath, you should not use various foil heaters, they are too thin and will not give the desired effect. Mineral wool is also not suitable, since it is hygroscopic and, after absorbing moisture, is not able to retain heat.
Insulation plates are also laid under the blind area, thus protecting the soil near the building from freezing. Then the concrete blind area is poured and the basement is finished, as shown in the example of sauna insulation from foam blocks:

How to properly insulate the floor and ceiling
As mentioned above, it is possible to produce thermal insulation inside the bath, including floors, only with the help of natural heaters. However, there is a technology in accordance with which it is possible to insulate the floor with foam plastic and similar materials. To do this, you just need to isolate them from the inner space of the steam room and this is done by means of a concrete screed. With this option, the “pie” of the design looks like this:

First, an inclined surface with a footing is arranged, on which a waterproofing film is placed, and on top - a layer of foam. The insulation is covered with another layer of vapor barrier film, after which it is poured with a concrete screed. In the middle of the structure, a ladder with a drainage pipe for draining and discharging water is provided.
It is possible to simplify the process if you simply use concrete mixed with foam balls or vermiculite for screeding. Then it will simultaneously serve as an insulating layer, and there is no need to put whole plates under the screed. Another option is to take expanded clay for floor insulation, and it will not need to be isolated from the interior of the bath. The method will fit when the wooden floors on the logs are supported by brick posts and you do not plan to arrange a ladder and drainage.

Expanded clay is poured between the lags into the cavity between the finishing and subfloor, or around the brick columns. Remember that to ensure the required degree of insulation, a layer of expanded clay is needed 3-4 times thicker than foam. Otherwise, there will be no sense from it. This material is loose and porous, so after getting wet it can dry out quickly enough, the main thing is that ventilation works.

Also, with the help of expanded clay, the ceiling is insulated in a bath with a cold roof. The only condition is that the ceiling lining must be strong enough to withstand the weight of the insulation. From above, from the side of the attic space, the material does not need to be covered with anything. If you want to insulate the attic over the steam room with sawdust, then they should first be mixed with clay and the resulting solution should be laid between the logs.

The fact is that water vapor will gradually penetrate from the steam room through the wooden floor and impregnate the layer of sawdust. As a result, their thermal insulation properties will decrease, in addition, a fungus can start from moisture. Clay, on the other hand, does not allow moisture to pass through and after drying, a good thermal insulation of the ceiling will be obtained. Sometimes a mixture of sawdust and cement is also used, but this option is not suitable for baths and saunas, cement can absorb a lot of moisture and the ceiling will lose heat.

For reference. If any basalt insulation is considered for internal insulation of a bath, then it is not suitable not only because of the release of phenol. Mineral wool also absorbs moisture well, no matter how hard you try to wrap it up, except to hermetically seal the plate material in polyethylene.
We should not forget about reed mats. In the bath, they can be used everywhere and insulate any structures, but it is important to ensure good ventilation and airing of the steam room to dry this natural material after washing procedures.
About door insulation
Due to the large temperature difference between the street and the room inside the sauna, a large amount of heat can escape through the front door if it has loose porches or is poorly insulated. The first problem is solved in the old-fashioned way - by stuffing felt strips onto the elements of the door frame. As for insulation, there are several ways.

The simplest is the installation of a thermal curtain just outside the door. A string is attached to the wall above the entrance, on which a piece of dense fabric is suspended to the floor. In order to be able to move it away, the suspension must be provided on clips or make rings of wire with your own hands. Another way is to insulate a wooden door from the inside by upholstering it with foam rubber or the same felt. From above, the material is covered with dermantine on carnations, and a sealing roller is nailed along the perimeter of the box, as shown in the diagram:

Conclusion
As it turned out, the process of warming the enclosing structures of the bath is not as simple as it might seem. There are a lot of recommendations on the Internet on how to carry out thermal insulation with various heaters, but their environmental friendliness and harmlessness to health are not mentioned. Meanwhile, this is the main factor influencing the choice of material, because from this point of view, the bath should be built flawlessly.
Warming the bath from the inside with your own hands is one of the most important stages in the alteration or repair of this structure. Without paying special attention to the issue of high-quality thermal insulation, the owner of the bath should be prepared for the fact that his heating costs for the same steam room will be much higher, and after a very short time he will again have to think about how to insulate the walls in the bath.
As for the environment itself: in order for it to be truly pleasant and comfortable, well-mounted thermal insulation is necessary. This is the main requirement in order to insulate the bath inside.
The thermal insulation of the bath from the inside and the outside in the old days differed from the modern one in that then the question of how to insulate the walls in the bath from the inside was solved by using such heaters as, for example, felt, linen or red moss. Yes, these are all natural materials of plant origin. However, their disadvantages are that they either rot or dry very quickly. And their use was explained only by the lack of more suitable and reliable heaters in those days. And, nevertheless, a bath and thermal insulation are inseparable concepts. That is why for lovers of a good steam bath, the eternal question was how to insulate the bath from the inside.
How does the insulation of a bath differ from a similar process, for example, in a house, and what is the best way to insulate this room? A bathhouse is a room in which a sufficiently high temperature (heat) should remain as long as possible. And this, in turn, requires better insulation from, so to speak, the outside world.

Carrying out the insulation of the bath with your own hands, it is possible to use a variety of insulation materials. The best option, for example, could be foil stone wool or extruded polystyrene foam(thermoplex). This modern thermal insulation for a bath is able to withstand a temperature of 750 degrees, that is, it is completely fireproof, perfectly stores heat, does not rot, and neither insects nor rodents are interested in this material.

In order for the bath to be truly hot, it is necessary, first of all, to correctly select the most appropriate heat-insulating materials for this. In addition, depending on what the building is built from, it may be necessary to insulate such bath walls from the inside with your own hands to a greater or lesser extent. Based on this information, it will be possible to answer the most important questions with confidence: how to insulate the walls in the bath? What wall insulation to choose? Is it better to insulate this room?
So, what is the building made of?
- brick,
- concrete,
- a rock.
Concrete or brick walls
If the basis of the bath is concrete, stone or brickwork, warming the bath will be a mandatory procedure. Moreover, the preservation of heat is not the only reason for this. The sauna interior is a humid room. And wet walls subject to large temperature changes (and in baths and saunas it is exactly like that) tend to collapse quite quickly.
The selection of the thickness of the insulating material for a bath with stone, concrete or brick walls is influenced by two main factors: the thickness of the walls themselves; climatic zone in which the bath or sauna building is located. A good specialist in this matter in most cases will recommend warming the bath with a ten-centimeter layer of insulation.
Wooden walls
How to insulate a wooden bath and is it necessary to do it at all? The question is highly controversial. On the one hand, the walls made of logs or timber are quite warm in themselves, they perfectly keep the temperature in the steam room and dressing room. On the other hand, from additional insulation, definitely, it will not get worse. On the contrary, it will give additional protection to the walls from the aggressive effects of high temperatures and moisture, which bath rooms abound in.
Usually baths made of timber or logs are recommended to be insulated only in case when the thickness of the walls does not exceed 15 centimeters. In this case, in order to insulate the bath from the inside, it is simply necessary to put an insulating layer. A log house is insulated only if the diameter of the log is less than 20 centimeters. Walls and walls, which are thicker, are either not insulated at all, or only waterproofing and lining are used as protection. The crate is performed only if there are noticeable blockages in the walls.
Vapor barrier for a bath consists in laying the appropriate material in strips.

These strips are sewn together with a stapler and overlaps of 5 centimeters are maintained.

First, the canvases located below are hemmed. Overlaps are made to prevent water and steam from getting under the material.
Attention! Since the bath is a room with an elevated temperature, it is strictly forbidden for the steam insulation for the bath to include polyethylene.
Thermal insulation materials
In order to understand how to properly insulate a bath, you must first understand the materials that are most suitable for these purposes. The optimal insulation in this case is, as mentioned above, foil stone wool. It is the best suited for these purposes in the vast majority of cases.
The thickness of this material should be within 10 centimeters. Ceiling ceilings are insulated with foil stone wool 15-20 cm thickness, since the lion's share of the heat from the steam room disappears through the ceiling and roof.
Additional requirements
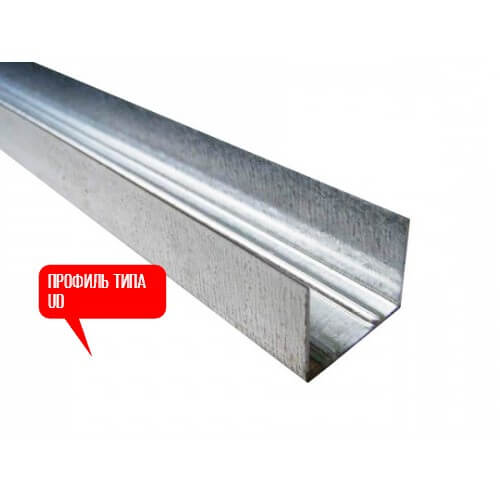
Lathing. The profile frame is the most durable option for a brick or stone bath. The most commonly used ceiling-type CD profile; the perimeter of the ceiling is edging with a guide profile of the UD type; with a step of 0.6-0.8 meters, direct suspensions are attached; steps between profiles are made 1-2 centimeters less than the width of the insulation material plates.
As for wooden baths: warming the steam room of a log cabin allows you to save a little. Since the cost per linear meter of timber is an order of magnitude lower than that of profiles; at the same time, the durability of such insulation remains at the same level and is limited solely by the durability of the materials of the walls themselves.
Foil waterproofing bath. To implement this task, not only water and vapor impermeable, but also heat-resistant material is required. I am glad that the modern market is replete with materials of this kind and it will not be difficult to decide how to insulate the walls of the bath: an example of such a material is the foamed foam type Penotherm NPP LF, designed for a temperature load of up to 150 degrees Celsius. This material is not only excellent protection of walls and ceilings from moisture. It is also an excellent reflector of so-called radiant heat and, being a foam material, further reduces heat loss. As the manufacturers assure, Penotherm with a thickness of 3 millimeters is quite capable of providing thermal insulation at the same level as a bar with a thickness of 150 millimeters.
Clean finish. Any thermal insulation for saunas and baths should always be hidden with a layer of finishing material. To date, the role of such material is traditionally played by wooden lining made of aspen or linden.
These types of wood, even in very, very hot rooms, do not burn themselves. They are also resistant to decay and practically not subject to corrosion, which makes it possible to use such lining in baths and sheathe even steam rooms with it.
Weakness
When deciding how to insulate a sauna from the inside, one should also not forget about cold floors and drafts, which take away a very considerable amount of heat. How to solve these problems?
The door to the steam room, or rather, the perimeter of this door should be framed with thick felt. It will reliably clog the cracks through which such precious heat escapes.
Wooden windows of the washing department, steam room and dressing room should be insulated with cotton wool. If plastic windows are installed in these rooms, which, by the way, is not recommended, then here the problem is solved by gluing with self-adhesive foam rubber strips.
Floor
When warming a sauna or a bath, the floor requires special attention. And here the course of work depends on the type of this very floor.
The wooden leaking floor is covered with expanded clay. Carefully filled and leveled expanded clay backfill is covered with wooden flooring.
Insulation of a leaking concrete floor begins by digging a foundation pit half a meter deep. Then, from bottom to top, the following “sandwich” is applied: 5 cm layer of sand; 20 cm layer of foam; 5 cm layer of a mixture of foam chips and concrete (proportion 1: 1); waterproofing from roofing felt or polyethylene; 5 cm layer of vermiculite with concrete (proportion 1: 1); 5 cm reinforced screed.
Then the screed is poured (at the same stage, it is necessary to form a slope for unimpeded water flow. The screed is covered with wooden flooring on the logs.
The solid floor, which has a rough screed, is covered with a 10-20 cm insulating layer of mineral wool or polystyrene. Waterproofing is laid on top of it (always with small overlaps on the walls). The next 5-10 cm layer is a reinforced screed, on which a tiled floor is most often laid.
Ceiling and walls
When steam and thermal insulation of the bath room is performed from the inside, very interesting questions arise: in what order is the walls in the bath insulated from the inside with your own hands? Does this process have any special nuances that differ from the insulation of some other premises? To tell the truth, no, it doesn't. Thermal insulation for baths and saunas, or rather for their ceiling (ceiling) and walls, is carried out in the same manner as for any other room.

The main differences are only in the increased attention to the reliability of the vapor barrier, and in the fact that it is necessary to use non-combustible materials for a bath or sauna.
The question is also quite frequent: is it possible to insulate the bath with foam plastic? It is categorically not recommended to make foam insulation, since this material is quite afraid of high temperatures, and when melted, it also begins to release toxic substances, which is fraught with poisoning. Especially this can not be done in the immediate vicinity of the sauna stove. The use of this material is only permissible if this room is insulated with foam from the outside.
crate
Before installing the crate, all cracks (both inside and outside) are filled with mounting foam. The distance between the surface of the crate and the draft wall or ceiling should be slightly more than the thickness of the insulation. When galvanized profiles are used, this distance can be adjusted with hangers. Wooden beams through the gasket, for example, from pieces of the same beam.
Working with drywall
When we carry out the insulation of the walls of the bath from the inside with our own hands, one of the final stages of this process is the laying of the rough sheathing. An excellent material for these purposes is drywall. When working with this material, it is necessary to take into account several rules:
- The guide profile type UD is fixed along the perimeter of the ceiling or wall. The step of such fastening should not exceed 600 millimeters. Such a profile is fixed to a beam or logs with self-tapping screws, and to a concrete or brick wall - with screws and plastic dowels.
- The axes of the CD-profile are marked and then suspensions are attached along these axes at a distance of 600-800 millimeters one from one..
- Installation and fastening of CD-profiles is carried out with self-tapping screws for metal, the length of which is 9 millimeters. Then the protruding edges of the suspensions are bent.
- On the entire resulting structure, under which the insulation is located, and we fix our drywall.
As you can see, warming the bath inside and out is not a daunting process, and the thermal insulation of the sauna does not require a builder's diploma. All this is within the power of almost anyone. If you need a clear example of how and how to insulate a bath from the inside with your own hands, on the pages of our site you can find a video of a thematic focus.