How to alter a dress if it is too small. How to sew a dress according to your figure
When purchasing ready-made clothes, many women quite often encounter the fact that they seem to like the product, but at the same time the fit on their figure is far from ideal. It is not possible to put on such a new thing right away, since it first needs to be “fitted” onto the figure. If the cut of the clothing is not too complicated, it is possible to sew the dress to fit your figure on your own.
First of all, you need to put on the purchased item and pay attention to how it fits your figure. Perhaps somewhere it will seem free or even large. You may want to change something about the product altogether. So, for example, the elegant women's dress in question turned out to be too wide at the hips, too big in the chest, I wanted to remove the finishing flounce completely, and change the shape of the neck from round to V-shaped.
At the first fitting, the places where it was necessary to “remove” the volume were pinned with pins, and a new line for the neckline of the front was outlined.


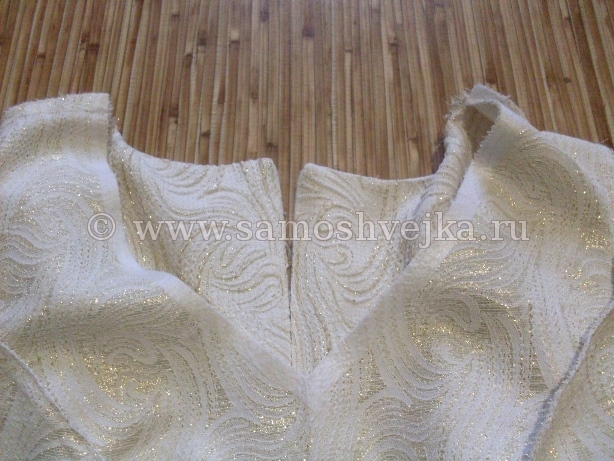
If the product has a lining, you should pay attention to whether it is lining or not. If the lining is detachable (that is, not sewn on the bottom of the product), as in the photo, then getting to the wrong side and the seams of interest to the product will not be difficult. If the lining is stitched, you will have to rip a small hole in one of its seams so that you can turn the product inside out.

On the wrong side of the product, along the laid needles, you need to put marks with chalk or soap, along which you should take away the excess width.

This applies to the area in the hips area (the shelf and back will be lifted evenly), as well as in the chest area (in in this case Only part of the side part of the shelf will be removed, but the central part will remain unchanged).


You need to lay basting lines along the chalked lines. Excess volume in the product must be removed simultaneously on both sides, that is, on the right and left hips, on both parts of the shelf in the chest area.


For the second fitting, in addition to the seams, you also need to prepare the neckline. To do this, the product must be pinned together, that is, folded in half with the wrong side inward, matching the shoulder and side seams, as well as the cuts of the neck, bottom, and armholes.

Along the laid needles, you should first use chalk and then use a basting thread to lay a new neckline.
After these preparatory operations, you should try on the dress again, paying attention to its fit and new uniform neck.
If the corrected product fits perfectly after 2 fittings, and you like and are satisfied with everything in its appearance, then you can proceed to the final stage of fitting it to the figure - processing all the nodes that have undergone adjustment.
The neck of the shelf should be straightened, departing from the intended line of the finished look by 5-7 mm (allowance for turning the lining).
To prevent the neck from stretching out, it must be duplicated with an adhesive gasket. It will be enough to glue strips of adhesive 1 cm wide along the cut of the neck.
After adjusting the top of the dress, you need to adjust the lining. The product must be put on a mannequin or figure and the lining must be pinned along the customized neckline.

At this stage, it is important to pay attention to ensure that the lining lies naturally and does not tighten anywhere.

The excess lining should be trimmed flush with the neckline of the top.

On the sides and raised seams The product needs to be machine stitched, seam allowances overcast and ironed.

The lining of the dress must be folded with its top face to face, aligning the neck cuts. For convenience, the layers of the dress can be pinned or basted. After this, you need to stitch the neckline with a seam of 5-7 mm.

The pins or basting stitch must be removed, and the corner at the ledge of the neckline must be notched.

Then the dress must be turned inside out front side. The seam allowance for turning the neckline must be secured by stitching it onto the lining (the so-called seam fluffing).
When finished, the neckline of the dress should be ironed from the wrong side.

The purchased dress now fits your figure perfectly, which means it’s time to think about where you can wear it.
Many women, when buying another knitted dress in a store or at a flea market, are primarily guided not by common sense, but by a spontaneous impulse, a great desire to buy the item they like at any cost. In such cases, the brain completely switches off, and such purchases, as a rule, then disappoint us when we come home and it turns out that the dress is very narrow, or long, that the item is too short, small, narrow in the shoulders or there is nowhere to put it on. Fortunately, not all representatives of the fair sex commit such desperate acts - more often the purchased items simply have to be slightly corrected, adjusted and updated in order to achieve the ideal style and size. In this article we will answer the most important question that worries many ladies: how to remake a dress if it is too small, if you took a smaller size and need to change it to a larger one yourself. In principle, there is nothing difficult in this work if you have the desire and time to work for your own benefit.
The dress is too small – are we losing weight or altering it?
Naturally, the first thing that comes to mind is to lose weight. But not everyone is able to lose enough kilograms in a short period of time to fit into a new dress.
You can try to change it. But first, imagine visually what result you want to achieve. Here, a lot depends on the design of the outfit itself, because perhaps it cannot be altered at all. And if it has a lot of reliefs, seams and yokes, then it will be even easier to do.
Anyway:
- First you have to embroider it.
- After this, all seams are carefully smoothed with an iron and all threads are removed.
- Then you need to choose a material that will play the role of an insert, and it is better if its texture resembles the main one, and in color you can choose, on the contrary, a contrasting shade.
- Mesh and guipure are excellent for this purpose. With the help of these materials you can significantly enhance the outfit, giving it sexuality and femininity.
Important! If you are not a fan of open things, then use double fabric, for example, now silk and satin are in fashion, which are covered with mesh fabric on top. The flesh-colored material with black guipure inserts looks simply gorgeous. You can use these same tips to follow our master classes.
Now we will look at the most popular options for solving problems that arise with things bought “by eye,” that is, small in size. So, next we will get acquainted with the most useful and proven advice from professionals on how to make a big dress out of a small dress:
- If you have just bought a completely new dress or an outfit that has hardly been worn, then you can simply carefully open the seams and reduce the allowances on them by the required distance. Believe me, this seemingly simple option will significantly increase the size of the dress.
- If you need to lengthen the dress, you can sew a beautiful and stylish frill at the bottom or cut it at the waist and insert a strip of original fabric in this place.
Important! You can take any material, and so that the changes made are in harmony with the outfit itself, you can trim the bodice or sleeves with the same fabric.
- We must not forget that before stitching it is necessary to wash and iron the new material so that after finishing it does not shrink and further ruin your new outfit.
- Before you start working, you need to carefully calculate the patterns, not forgetting to take into account all seam allowances and the ability to move freely.
- If the clothes are small in a particular place, then you can try to do something with it. For example:
- The bodice area can be increased by deepening the neckline or inserting a beautiful ribbon directly into the seam.
- Wedges will help widen the dress in the hip area.
Important! The most problems arise when the item is small in the waist, because then you have to alter it completely.
What to do if the dress is too small in the chest, hips or waist?
In such a situation, you need to look for information on how to expand the dress on the sides with your own hands. So that you can fit into it and not feel discomfort in the hip area, you need to sew a piece of fabric on the sides. To do this, you just need to rip it apart at the darts, add the prepared material to the right place and sew everything back together. There is nothing complicated or supernatural about this.
Important! When it comes to the hips, it is better to choose a fabric for inserts that is not too bright in color so that it slightly hides the volume.
What to do if your new outfit is too short?
Now let’s look at the situation from a different perspective - when the purchased dress does not cover the required areas of the body in length. The issue of lengthening the outfit can be solved in several ways:
- Sew a wide ribbon of openwork or lace fabric along the bottom perimeter, which will add playfulness and style to the image.
- Look for a fabric that is similar in all respects to the main one, cut out the missing piece from it, and sew it in the right place.
- If you are a fan of non-standard solutions, you can lengthen things using a completely different alternative fabric, for example, with some kind of bright print or geometric pattern.
- To make your new dress more formal and elegant, you can sew on fabric in the form of frills.
Choosing a material when altering a dress
It may seem to some that it doesn’t matter what material to choose for altering a new outfit. But this is a big misconception and a mistake that many needlewomen make. The fact is that if it differs too much from the main fabric, the dress will look sloppy. Therefore, do not save your time, go to a couple of ateliers or fabric stores to choose a material that is suitable in texture and structure.
You also need to take care of making a small pattern. To expand an outfit or increase its length, you need to take all measurements taking into account the rigor of calculations and register.
Important! Remember that a dress is a very complex wardrobe item, because it covers almost the entire figure, except for the legs. Therefore, not everyone can remake them correctly - you need to use insight and dexterity, courage and have excellent taste.
Sometimes it’s easier to look through interesting ideas from practicing craftswomen and sew them easily for an upcoming event.
We alter a small dress ourselves
Next, we will take a step-by-step and detailed look at how to arrange a dress, if it is small, on your own. In fact, this idea is quite simple to implement and is suitable for altering a dress of almost any style:
- With the help of a strip only 5 cm wide, we can increase the volume of the product by 1 cm.
- If you use a strip 6 cm wide, then by 2 cm. And so on - everything will depend on how much you need to increase it in each specific case.
- If you plan to enlarge too large, it is better to use two strips at once.
Important! Another important point that must be taken into account. Many people gain weight forward, that is, things become small in the front. Therefore, to increase the size of a new product, in most cases it is enough to simply increase the shelf.
It is also possible to simultaneously and uniformly increase the back and shelf. But in such cases, the width of the neck must necessarily increase by one fourth of the total number increasing the shelf.
In addition to the product itself for reworking, you will need companion material.
Important! Before you begin the cutting and sewing process, read about the different options. It is likely that you will want to use some of them on your product.

The step-by-step alteration looks like this:
- Preparing the dress. First you need to rip off the facing of the collar or neckline, rip off the lower part. Then steam the product.
- Before cutting the dress, you need to fold it, while combining the shoulder and side seams, reliefs and darts, halves of the neck and bottom. Using pins, you need to pin all the combined seams and mark the half-skid.
- If you use one strip to enlarge the dress, then you need to cut the front along the half-skid line. But in the case of two stripes, you will need to attach a line to the half-skid, make a marking, step back a few centimeters from it and cut off both shelves.
- Now we proportionally reduce the neck. This requires chest level. To avoid mistakes, you can use your chest height measurement. The neck dart solution is the width of the insert in its finished form minus the third part of the insert in its finished form. But this formula is considered approximate, so we only mark the stitching, taking into account that its top must be at least 2 cm above the chest line.
- After fitting, we cut off all excess.
- The insert can be made using stitched wedges, because their production requires much less fabric than one-piece parts.
- Then we make inserts, smooth out the seams and process the bottom and neck.
The situation when a beautiful and comfortable piece of clothing becomes too tight is familiar to everyone. This may be due to weight gain, pregnancy, or incorrect choice of washing or drying mode. However, your favorite item can be remade so that it not only fits well, but also takes on a new original look. Below are several options for increasing the width of clothing by sewing in simple cut details. All of them are simple and require minimal sewing skills.
Basic rules
In order for remade items to look good, the work must be done very carefully. All expansions are carried out along the structural seams of the products, and the joints should not have holes or abrasions. The material for insert parts can be very diverse:
- fabric in tone or vice versa, contrasting;
- decorative braid;
- lace;
- satin ribbon, etc.
At the same time, you need to remember that fabrics of different densities and textures, firstly, can become distorted when sewing, and secondly, behave differently after washing. The easiest way to achieve a good fit is to use elastic materials, the choice of which is now very large.
Arranging the belt
Typically, the first sign of weight gain is a belt that is difficult to fasten. In this case, the easiest way is to alter the button. If the size of the belt does not allow this, then you can make a fastened strap, the design of which is shown in the photo. Material: grosgrain ribbon.
If the skirt or trousers have a beltless cut, then an effective solution is triangular inserts made of dense elastic material in the side seams. If there is a belt, then you can rip it off and then stitch the top, as shown in the figure.
 Expanding elastic inserts
A comfortable and easy-to-implement solution is to replace a fabric belt with a strip of thick knitwear. It can be straight or with a scent.

Expectant mothers can thus remake any trousers that suit them. To do this, you need dense but elastic knitwear with a width of at least 20 cm, which is stitched just below the hip line.

Increasing skirt and trouser sizes
With a uniform increase in the volume of the body, inserts on the skirt or trousers are made along their entire length in the places of longitudinal seams, most often side ones. The main problem with this is the fit of the belt. The simplest solution is to cut the belt and extend the expansion piece to the very top

If the belt is long enough, it is torn off, inserts are made, and then sewn back on. The photo shows a redesign of a low-slung denim skirt, in which the belt has moved higher on the figure. The resulting reduction in the length of the skirt is compensated by the protruding corners of the bias-cut side inserts.

A simple but very original solution is to widen a skirt or trousers using an elastic band, shown in the photo.

Redesigning a blouse and dress
The pattern of a blouse and dress is built according to certain rules, which must be taken into account when altering the product. However, in some cases, you can get a good result using the simplest methods, using simple-shaped details sewn on the sides, as well as in the center of the front or back. The easiest way to remake clothes is sleeveless. If the blouse has become tight in the chest and armholes, it is ripped out at the side seams and triangular inserts are sewn in.

For a rounded tummy, side parts that widen downward are inserted.

What to do if the dress has become too big (small), its model is tired or outdated, or the length is no longer suitable? Is it worth buying designer items on sale that are not your size or a slightly outdated style? Any dress can be altered, giving it new life and a beautiful fit.
Dress fitting
When sewing, most clothing manufacturers are guided by a standard line of volumes accepted for size. If a woman does not have a figure from this “standard set,” then problems with the fit of clothes may arise. Which, however, is easy to fix.
To fit a dress of a simple cut to your figure, you just need to perform three steps:
- taper the side seams
- make deeper darts in problem areas
- thoroughly steam the darts.
A dress with a complex cut, which is distinguished by the presence of figured details, stitched fronts, peplums, is more difficult to alter. The action algorithm here has four positions:
- rip the dress
- iron and steam the parts
- reduce every detail according to the pattern
- stitch the seams again.
Attention! Silk, thin T-shirt knitwear, and linen do not react well to repeated stitching in the same places: holes may appear on the seams or loops may come down.
How to alter an old dress
If the fabric of the item is still strong, then the principle of altering an old item is the same as when adjusting new clothes.
If the dress is damaged or has been washed several times, then more difficult work will have to be done. The main rules here are:
- the item must be washed and ironed
- areas with damaged or thinned tissue are not altered
- threads and needles are used that match the type of fabric.
The options “assembled” from several old or new dresses look interesting. Combinations of fabrics of different textures are especially interesting. However, in order to correctly select and sew materials of different textures, you will need the talent of a fashion designer and certain technological knowledge. It will be easier to use the services of a professional tailor.
How to increase your dress size
The easiest way is to unravel the side seams and darts. You need to rip it very carefully so as not to damage the fabric. It is best to use a special tailoring tool. Then the threads are selected from the seams and the fabric is thoroughly steamed with an iron. This is required to completely remove all traces of the old stitching. Afterwards, stepping back from the edge by at least 0.5-1 cm, the product is re-sewn. These centimeters will give an “increase” of 1-2 sizes.
And if you add new decorative details to the embroidered dress: side stripes, a transparent cover made of lace or mesh, trimmed shelves, you can get a completely new thing.
Do not rush to throw away or give away old dresses. Current fashion is cyclical. By adding just a couple of modern details, you will get a stylish designer item.
If you are not confident in your abilities or do not have sufficient skills in altering or adjusting a dress, you are welcome to the Mobile Tailor atelier. Thanks to our “service”, many fashionable new items will appear in your wardrobe every season. And the cost of updating your wardrobe will be much less than if you just go shopping.