Drainage system from scrap materials. How to make a reliable drainage system on the site with your own hands
Not all owners of suburban plots are “lucky” with ideal hydrogeological conditions. Often it is only during the cultivation of the land or construction that they understand that the groundwater is high, that during the flood period there are puddles for a long time. Do not worry, drainage will eliminate this problem. Agree, building it is much easier than looking for a perfect site.
The drainage system will remove excess moisture from the soil-vegetation layer, which will ensure the normal growth of cultivated green spaces. It will divert underground water from the foundation in case of contact, protect the basement and the inspection pit of the garage from flooding.
Those who wish to arrange drainage of the garden plot with their own hands or with the efforts of a team of landscape workers will find detailed answers to all kinds of questions. Our material describes in detail the options for groundwater drainage systems and methods of their construction.
A drainage system that collects and removes excess groundwater is necessary in the following cases:
- The plot is flat, i.e. there are no conditions for the spontaneous movement of water downhill.
- Groundwater is marked at a level close to the surface of the earth.
- The site is located in a lowland, a river valley or in a marsh drained area.
- The soil-vegetation layer develops on clayey soils with low filtration properties.
- The dacha was built on a slope, not far from its foot, which is why, when precipitation falls on the site and around it, water accumulates and stagnates.
Installation of drainage is almost always necessary in areas with underlying clayey soils: sandy loam, loam. During the period of abundant precipitation, snow melting, this type of rock passes water through its thickness too slowly or does not allow it to pass at all.
Water stagnation at the level of soil development is associated with waterlogging. In a humid environment, the fungus actively multiplies, infections, pests (slugs, snails, etc.) appear, which leads to diseases of vegetable crops, rotting of the roots of bushes, perennial flowers and trees.
Due to stagnation of water, the soil and vegetation layer becomes overwetted, as a result of which plants die in a water-saturated environment, the appearance of the site deteriorates. The drainage system allows you to remove moisture instantly, preventing its long-term exposure to the ground
If the problem of waterlogging of the soil is not solved, then over time, soil erosion may occur. In frosty times, the soil layers containing water will swell, which may damage the foundation, paved paths and other site improvement objects.
To check if drainage is necessary, you need to know the throughput of the soil layers on the site. To do this, dig a small hole 60 cm deep and pour water into it to the limit.
If water is absorbed in a day, then the underlying soil has acceptable filtration properties. In this case, there is no need for drainage. If after two days the water does not leave, it means that clayey rocks lie under the soil-vegetation layer, and there is a risk of waterlogging.

Due to the heaving of water-saturated rocks, the walls of residential structures can crack, as a result of which the building may become unsuitable for permanent residence
Image gallery
Landowners in a low-lying area or on a steep slope are faced with the problem of water stagnation at the lowest point, when the receiving water can be located higher. In this case, a storage well must be built in the lower part of the territory, into which a drainage pump must be installed. With its help, water is pumped upward with a discharge into a ditch, ravine or other water receiver.
If for the disposal of the collected water it is planned to build an absorption well at the site, then the work on its construction is performed in the following sequence:
Image gallery
When you constantly encounter the problem of the appearance of excess water on the site, it is imperative to take measures to drain it. Otherwise, you will not only get in trouble in the cultivation of the site, but also endanger the foundation of the house or nearby household buildings. The manufacture of drainage, or rather a drainage structure in this situation is the only acceptable way out.
In this article, we will look at an easy and economical way to create drainage in your home garden. 
Preparatory actions
Before you begin the process of assembling and installing the drainage structure, you need to decide what result you would like to achieve. Based on your decision, you need, at least at a primitive level, to create for yourself a project of a future system: determine its location, possible consequences of contact between the system and surrounding objects, dimensions, dimensions. Based on the generalization of all these data, it is already possible to calculate the material costs for the purchase of the entire volume of consumables. It is useful, by the way, to understand that the depth of drainage directly depends on the height of the well intended for drainage. It is customary to place the well a little higher than the elements of the entire structure. 
Now about the structure itself: traditional (or "French") drainage is a trench filled with gravel, separated from the ground by geotextiles (geotextile is used to prevent mixing of soil and gravel, it also allows water to flow through itself and prevents weeds from growing). Gravel, together with geotextile, help water to quickly be absorbed into the soil, evenly distributing moisture along its location, thus preventing the collection and stagnation of water in any one particular place.
When creating drainage of this type, corrugated pipes are usually used, equipped with longitudinal holes on one side, as a rule, made of PVC. At the end of the entire system, a drainage tank should be located, the task of which is to evenly distribute the accumulated water into the ground around itself. To create this well, a two-hundred-liter plastic barrel in the form of a drum is well suited (a rounded shape of the container is more preferable in this case) with multiple holes in the bottom and walls. This well should be placed on a special gravel "cushion" (about 10 cm), the space between the walls of the pit and the tank is also filled with gravel (layer thickness 15 cm). Holes are made in the upper part of the barrel to receive incoming water, and one of the holes is for the installation of a special drainage grid. It is not necessary to make many holes, two or three are enough, 5 cm each. One large hole is made in the upper part of the wall of the well, intended for the entry of the drainage system pipe.
The second major element of such a system is a drainage tank, the width of which should be about 30x30 cm. The tank must be equipped with a drain grate. This is mandatory if drainage is provided with a drain pipe, which, when connected to the tank, provides an inflow of clean water into the system. a personal plot is not a very expensive operation. Affordable materials are used in the manufacture of the system and only a few are needed. The most expensive part you will need may be the catchment tank. A PVC pipe will be much cheaper. Gravel will need about two cubic meters. It will also be necessary to purchase a special fabric - geotextile.
Digging a drainage trench
Next, you need to dig a trench from the catchment point to the drainage point and a hole to install a well on one side and a reservoir on the other. In the place for the drainage well, the pit will need to be deepened by 15 cm compared to the depth of the rest of the trench, the depth of which, in turn, you will need to calculate yourself based on the size of the drainage tank. 


Manufacturing of a drainage well
Using a drill with a diameter of 2-3 cm, you can easily turn the walls of the tank into a sieve. Through these holes, if possible made at equal intervals, the waste water entering the barrel should flow evenly into the surrounding soil. On the wall of the barrel, at the top, make a hole in the diameter of the drain pipe and prepare a fastener for the pipe. 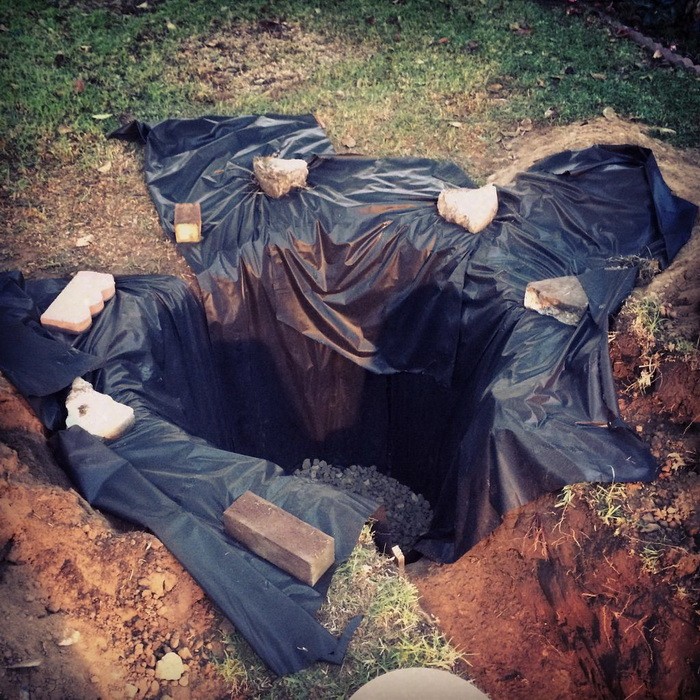


Filling the trench
Then the dug trench must be covered with geotextile. This will prevent silt and dirt particles from mixing with the gravel. Also, geotextiles will provide better moisture absorption by the earth. Next, place an already prepared 200-liter barrel on the 8-10 cm gravel bed. Place a small amount of gravel around the barrel and make sure that the tank does not "move" from side to side. The same should be done with the sump, which must be made so that its top edge is at the edge of the earth's surface. The height of the sump can also be adjusted with a gravel bed. 


Make sure that the water collector is also immobilized and then connect both tanks to the drain pipe. It is important to know that the holes in the drainage pipe should be located on its lower side, while the pipe itself is laid down a slope. Fill the trench with gravel. Make it so that the surface of the ground and the gravel remains 15 cm. Next, mount the drain grate on the tank. Then it is necessary to tuck the geotextile, making sure that the edges of the textiles on both sides of the trench overlap, while covering each other. 


Backfilling with earth
At the final stage of the drainage installation, it is necessary to fill the trench well with earth, avoiding soil subsidence and unevenness. If you dig the trench with high quality, then literally in a year you can guess that there is a drainage system under this place, it will be possible only by "looking out" gratings. The installation site of the system can be sown with lawn grass. 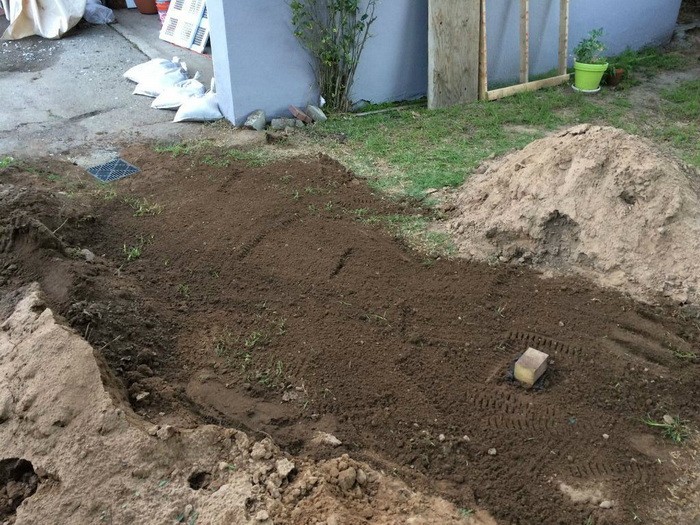

Now you know how you can build a drain on your own in just a couple of days without significant costs. The main thing in this business, as well as in all others, is thorough preparation.
Video How to make drainage on a site with your own hands
How can you replace drainage or drainage with your own hands, since the current cost of building materials makes you think more than once. There are quite old ways to get rid of excess water on the site, but they are undeservedly neglected. To implement such options requires more patience and labor, relative to more modern methods of constructing drainage systems. The advantage of this method is the minimum cost. We should never forget about practical and inexpensive, new and more technologically advanced materials. What can be used for dehumidification in the article below.
Content
The basic principles for the invention of a drainage system, which will be individual in terms of design, are the ability of the structure to be able to forgive the required amounts of water that can enter this system and the correct selection of the configuration as a whole on the land plot.
A variety of items are useful for organizing the drain and highways for water drainage. In skillful hands, they will be presented with the next life, and in everyday life, they will be perceived as rubbish. These items can include plastic bottles, bricks, stones, pieces of old mortar, and worn-out car tires.
Is it possible to make drainage from plastic bottles? There are a lot of polyethylene containers, which lie derelict or create, littered with the impression of a summer cottage and its environs.
Preparation for work will be as follows:
- It is necessary to study the soil relief, this is a fundamental factor in the organization of the drainage system.
- Based on the studied relief, it is necessary to construct a water flow pattern so that it is similar to the principle of a river (channel with tributaries).
- Having outlined a plan on paper and terrain, it becomes possible to start working with the land. It is necessary to observe the depth of the ditch - approximately two lengths of the shovel bayonet.
Do not forget that the fertile, top layer is recommended to be preserved, removed and temporarily set aside in another place.
Plastic drainage, work is performed in the following sequence:
- Having wrapped the corks, we put the bottles on the bottom more tightly.
- The filling of the bottles is done so that the ditch is filled up to half the depth.
- The sod layer is laid on top of the soil layer.
- Tamp down.
- Next, you need to fill in a layer of earth and cover with a layer of turf.
This design is durable and comfortable. The advantages are that polyethylene is not subject to decay, which makes the system practically eternal, and also thanks to the ability to make a flower garden or a path over it, allowing you to save precious land area.
Stone and fascinated drainage

Plastic containers are not the only material from which drainage can be made. For the production of fascines, you can use brushwood, which is excellent for this. In everyday life, there is a sufficient amount of materials that can be used to replace crushed stone during installation. Replacement options proven more than once:
- Fascines. Relatively long stems and brushwood, which are tied in bunches, the diameter is about 30 cm. It is better to knit every 50 cm, with a nylon cord or wire. Longer stems fit in the center, and those that are shorter at the edges. After laying, moss is laid out on top. The entrance to the trench is made with a socket made of boards.
- Stone drainage is made in a similar way. Fashiny is replaced with rubble, which must first be sorted (large to the bottom, small ditch walls). On top of the crushed stone is laid out with moss, then everything is covered with a layer of inverted sod.

Dehumidification without gravel
Making drainage without rubble is possible:
- Using a pottery pipe with a diameter of 5 cm or more. When using pottery pipes, the joints must be overlaid with moss or fibrous material, which will serve as a filtering role. The pottery drain is covered with inverted sod and covered with earth.
- Pole system. Uses wooden gutters to replace the pottery pipe. The rest of the process is the same.
It is imperative, it is necessary to remember that laying must be carried out to the beginning of the drainage system from the mouth, that is, in the opposite direction to the flow of water.
- Low tide made on the basis of poles. It is called a wooden system, for execution, coniferous trees are needed, the diameter of which is 7 - 10 cm. They must be cleaned of bark and sanded, after which they are located in a ditch.

Therefore, we considered three methods of constructing drainage without rubble.
Dehumidification with modern textile materials
Manufacturing of soft drainage from technologically advanced fabric materials. The modern design of tecton is based on membrane properties, the essence is that moisture is passed in only one direction, moisture does not pass in the opposite direction. 
Geotextiles will be needed to complete. It forms a filtration layer that prevents debris, soil and silt from entering the drainage system. Such a drainage system is performed as follows:
- A ditch is dug, the slope of which coincides with the direction of water drainage.
- It is necessary to lay the tecton on the bottom, so that a U-shape is formed when viewed from across.
- Next is a layer of geotextile with a gap of 40 cm on both edges.
- The matter is filled with small stones or rubble.
- The edges of the geotextile are wrapped.
- The entire structure of soft drainage is covered with sand.
The article discusses various do-it-yourself drainage methods, you are left to choose the appropriate drainage system yourself.
If the site requires the arrangement of a drainage system, and there is no money for the purchase of materials, you can try an alternative option - to equip the drainage of the site with improvised means.
The problem of flooding the territory during snowmelt or heavy precipitation is familiar to many. If it is not resolved in a timely manner, there is a risk of facing very unpleasant consequences. The fact is that moisture washes away the foundation of a house and outbuildings, adversely affects the root systems of plants and urban cultures.
Drainage from polyethylene film
If you are wondering what kind of material can be used for drainage, the answer is unequivocal - one that ensures the passage of water. Most often, the following materials are used to create a drainage system:
- plastic bottles;
- Styrofoam;
- branches;
- fascines;
- car wheel;
- construction garbage;
- stones;
- old things.
Note! Before choosing materials at hand for installing the drainage system in your area, you should make sure that during operation they will not rot, decompose, creating an unpleasant odor problem.
Plastic bottles for drainage
Have a lot of plastic bottles accumulated and you don't know what to do with them? Do not rush to throw it away, as they can be useful for arranging the drainage system on the site. For the manufacture of bottles, high-quality, environmentally friendly polyethylene is used, which has a long service life.

Drainage from plastic bottles
The main advantages of using bottles for arranging drainage on the territory:
- Long period of operation. Tara can lie in the ground for more than 50 years without decomposing or deforming.
- Availability. Sometimes the owners simply do not throw out the used bottles, but collect them somewhere in the basement or in the attic. Alternatively, you can buy containers on the market at a very reasonable price.
- Environmental Safety. In the ditches where plastic bottles are laid, an unpleasant odor will not occur, since there are no conditions for the development and reproduction of microorganisms (unlike drainage from wood, textiles).
- Ease of installation. The main complex of works consists of carrying out land works. Then the entire installation can be done by yourself in a few hours.
Important! Drainage using plastic bottles should only be closed. When heated, polyethylene is capable of emitting harmful substances, which can affect the health of the inhabitants of the house, therefore, it is necessary to ensure that there is no direct sunlight on the material and the effects of heating elements.
There are two options for arranging the drainage system using plastic bottles: mesh, "natural" drain. In the first case, the bottom of the bottle is cut off, the neck of the next one is inserted into it. After completing the earthworks, such a plastic mesh is simply placed in the trenches and sprinkled with a sand pillow, then with soil. This method can be used only in areas where the area is small and the amount of precipitation is insignificant.
"Natural" drainage is used much more often, it is considered more efficient and convenient. There is no need to pre-prepare the bottles. They are simply crusted tightly before being laid in ditches.
When arranging the drainage of the site from scrap materials, in particular from plastic bottles, you should take care of high-quality insulation. If the system freezes during the cold season, it will not be able to perform its functions in the spring during the snow melting, therefore, all work may in this case be considered in vain.
Styrofoam drainage
If you plan to equip drainage from scrap materials, use foam. It can be collected, or you can buy it at a hardware store at an affordable price. The material has long been known for its versatility. It is used to protect equipment from damage, to create a drainage layer for indoor plants. Sometimes foam is used to equip drainage systems in small areas.

Styrofoam drainage
The work should begin with the implementation of earthworks. Trenches are dug at a slope towards the location of the collection well, collector or artificial reservoir. A cushion of sand and gravel is placed in the dug trenches, then a layer of pre-crushed foam. The last step is laying the soil. To increase the efficiency of the drainage system, geotextiles can be laid in the ditches.
If the site is abundantly flooded, groundwater is located high, which from time to time accumulate in basements, it is rather difficult to solve the problem using scrap materials. In small areas with a slightly high level of humidity, the materials at hand cope with their functions efficiently.
A low-lying area can create many problems for its owners. In waterlogged soil, the foundation of the house is destroyed faster, the roots of plants rot from lack of air. Fertile soil in a short time turns into clay unsuitable for agriculture, because the lighter one is washed out into water bodies. Similar problems are solved by a site drainage device.
The installation of such a reclamation system is not difficult, but all the work is quite laborious, so first you should make sure that the problem lies precisely in the high level of groundwater flow, and not in other errors of agricultural technology.
How to determine the level of groundwater
 A drainage system device will be needed in the following cases:
- The plot is located on a slope. Thawed or storm water will erode the soil, carrying with it a layer of humus. The problem is solved by digging transverse drainage ditches.
- The site is located in a low-lying area. In this case, moisture accumulates directly on it. With prolonged rains or amicable melting of snow, the soil will swamp and acidify, and the structures will collapse from mold. In this case, it is necessary to install drainage channels around the entire perimeter of the site and around the foundation.
- There is no obvious difference in elevation on the site, but in floods and rainy weather, there is still water on it. It has nowhere to drain, so moisture is slowly absorbed and at times appears on the surface in the form of long-lasting puddles.
The latter option is typical for lowland lowlands with an extensive network of large and small rivers. It is well known to the owners of land plots in the floodplains of rivers.
If there are no obvious signs listed above, but plantings and buildings still suffer from high humidity, you should pay attention to the condition of the lawn and trees. If the lawn periodically looses, and mature trees die for no apparent reason, the problem most likely lies in high-standing waters.
Dig a hole 0.5–0.7 m deep and after a while check if there is water in it. If you saw the water, then the level of its occurrence is less than 1 meter, and drainage of the summer cottage will definitely be needed.
Drainage types
 Drainage is a system of shallow ditches used to drain groundwater. A drainage system installed in accordance with all the rules can significantly reduce their level. After its installation, the problems of root decay in trees, the appearance of mold in the underground and water in the cellar disappear.
There are two types of drainage systems - surface and deep.
The first option is the easiest way to drain precipitation. It is a complex of interconnecting trenches dug along the perimeter of the land plot at a slope. With their help, you can relatively quickly, with minimal costs and effectively divert melt and rainwater into a special catchment, which is arranged in the lowest part of the site. Runoff from the catchment is discharged into the storm drain, or used for irrigation. Small volumes of liquid evaporate quickly on their own.
 Installation of a deep system is more difficult, but it is superior to a surface system in the following cases:
- groundwater rises above half a meter from the surface;
- the site is located on a slope;
- the soil is dominated by clay.
Deep drainage differs from surface drainage by the presence of drains - pipes with frequent holes through which water is collected, as well as sand traps and other technological elements.
Deep drainage of the site is completely hidden underground and does not spoil the landscape.
Installation of a deep drainage system
 It is not difficult to make a water drainage system from the site yourself, but you need to plan its installation before the stage of building the foundation and laying the garden. First, preparatory work is carried out. They prepare a project and note in it:
- elevation differences on the site;
- the location of the lowest point;
- drainage grooves;
- places for wells;
- pipe laying depth.
For effective drainage to work, the minimum slope should be at least one centimeter per linear meter of the pipe.
Upon completion of the preparatory work, all the necessary tools, materials should be prepared and their number should be calculated. The standard set includes:
- perforated pipes of a suitable size;
- drainage wells;
- drain connection accessories - various couplings and fittings;
- geotextile;
- sand and crushed stone.
On sale there are pipes for laying drainage on the site with your own hands. Suitable asbestos-cement, PVC, ceramic. Popular made of modern porous materials - plastoconcrete, expanded clay glass. Water seeps through the pores, and small solid particles do not pass, that is, they do not clog the system.
Also prepare tools in advance: bayonet and shovels, wheelbarrows for soil, for cutting pipes, building level.
Next, mark the location of all elements on the ground. Then, in the marked places, trenches are dug with a depth of at least 0.7 m and about half a meter wide. When all the channels have been dug, make sure they have the correct slope throughout. The places where the wells will be located are deepened more.
 When all the trenches are ready, the bottom of the grooves and wells is rammed, covered with a layer of sand and compacted again. Then geotextiles are laid in them in such a way as to wrap it around the pipe with a margin.
 Crushed stone is poured onto the geotextile and pipes are laid so that the holes are at the bottom. The whole system is connected, the slope is checked again and finally covered with rubble. It must cover the pipes completely. Then the free edges of the fabric are wrapped inward. The result should be a kind of roll with a pipe in the center.
Layers of fabric, sand and gravel prevent siltation of the system, significantly extending its service life.
Drainage (revision) wells are installed at the joints of the pipes. They are designed for condition monitoring and cleaning. They are mounted just below the pipe level. The upper part has a removable cover for easy maintenance.
After assembling pipes and wells into a single complex, a collector well is installed at the lowest part of the site. It is the main reservoir for waste water. Most often, collectors are made of reinforced concrete rings, but if desired, they purchase and install ready-made plastic ones. From the collector, it is necessary to provide for a drain into the storm sewer or reservoir.
How to hide drainage underground and decorate the site at the same time
 On this, the installation work for the device in the country with their own hands can be considered complete. Now the entire system should be filled up in order to hide it completely underground. The backfilled trenches are covered with turf. In the future, flowers or any garden crops with a shallow root system are planted in this place. The grooves filled with large marble chips look interesting. Such elements of landscape design will decorate the site and will not let you forget the location of the pipes in case of repair work.
The drainage system of waters is usually combined with gutters. To do this, a gutter is mounted that connects the drain with the nearest well, or a storm water inlet is installed.
 A closed drainage device at a summer cottage is not the easiest, but the most effective way to lower the groundwater level. Some of the steps may seem like too much time consuming or painstaking, but the result in the form of a dry foundation and a healthy garden will delight for many years.
Do-it-yourself drainage of the site - video